> ## Documentation Index
> Fetch the complete documentation index at: https://support.dripos.com/llms.txt
> Use this file to discover all available pages before exploring further.
# Accounting Onboarding
Learn how to onboard onto Dripos Accounting in order to start linking bank accounts and categorizing transactions!
## Account Setup
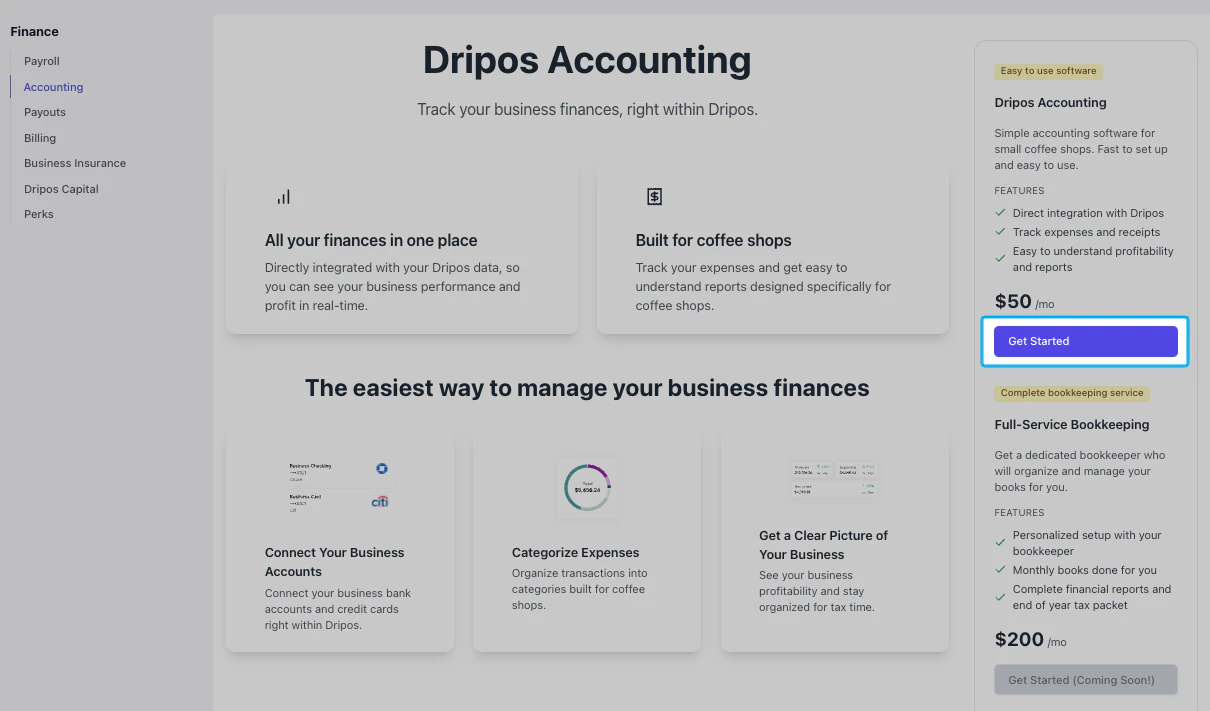
Navigate to your **Dashboard > Finance > Accounting** and click the **Get Started** button on the right-hand side.
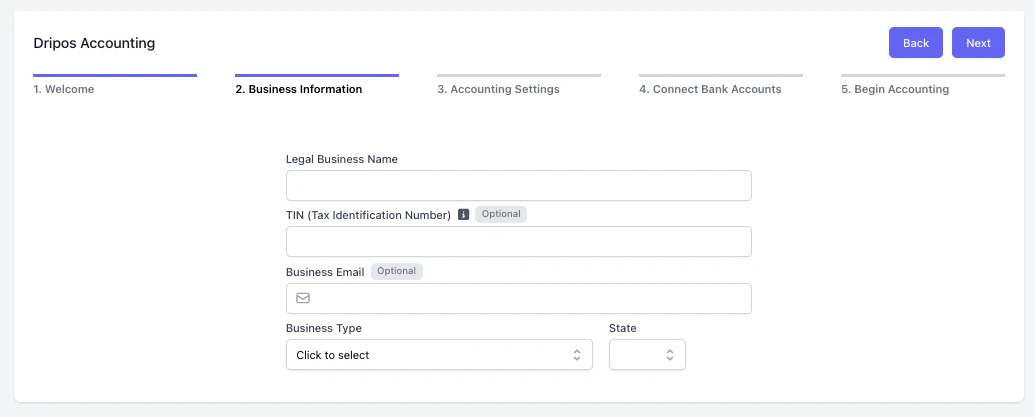
 * Legal Business Name
* Tax Identification Number (*Optional*)
* Business Email (*Optional*)
* Business Type (*If you are unsure of your classification, we recommend consulting your accountant)*
* State
* Legal Business Name
* Tax Identification Number (*Optional*)
* Business Email (*Optional*)
* Business Type (*If you are unsure of your classification, we recommend consulting your accountant)*
* State
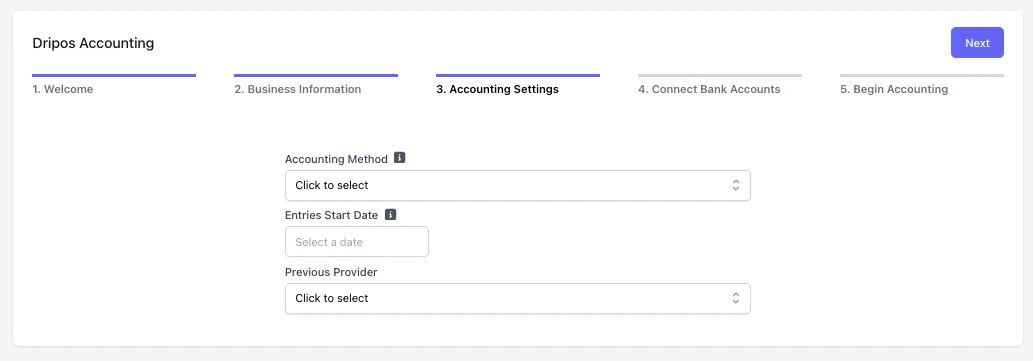
 * **Accounting Method** — Cash or Accrual
* **Cash:** Records transactions only when money actually changes hands (payment is received or paid).
* **Accrual:** Records income when it is earned and expenses when they are incurred, regardless of when the cash moves.
* **Entries Start Date** — Determines the date from which accounting entries will begin to be recorded and tracked.
* *Note: the earliest available start date is January 1, 2026.*
* **Previous Provider** — Switching from another platform? Reach out to support.dripos.com. Our team will assist you with the historical data transfer process.
* **Accounting Method** — Cash or Accrual
* **Cash:** Records transactions only when money actually changes hands (payment is received or paid).
* **Accrual:** Records income when it is earned and expenses when they are incurred, regardless of when the cash moves.
* **Entries Start Date** — Determines the date from which accounting entries will begin to be recorded and tracked.
* *Note: the earliest available start date is January 1, 2026.*
* **Previous Provider** — Switching from another platform? Reach out to support.dripos.com. Our team will assist you with the historical data transfer process.
 Link a bank account to enable automatic syncing. Once connected, your bank activity will flow directly into the Transactions page for easy categorization.
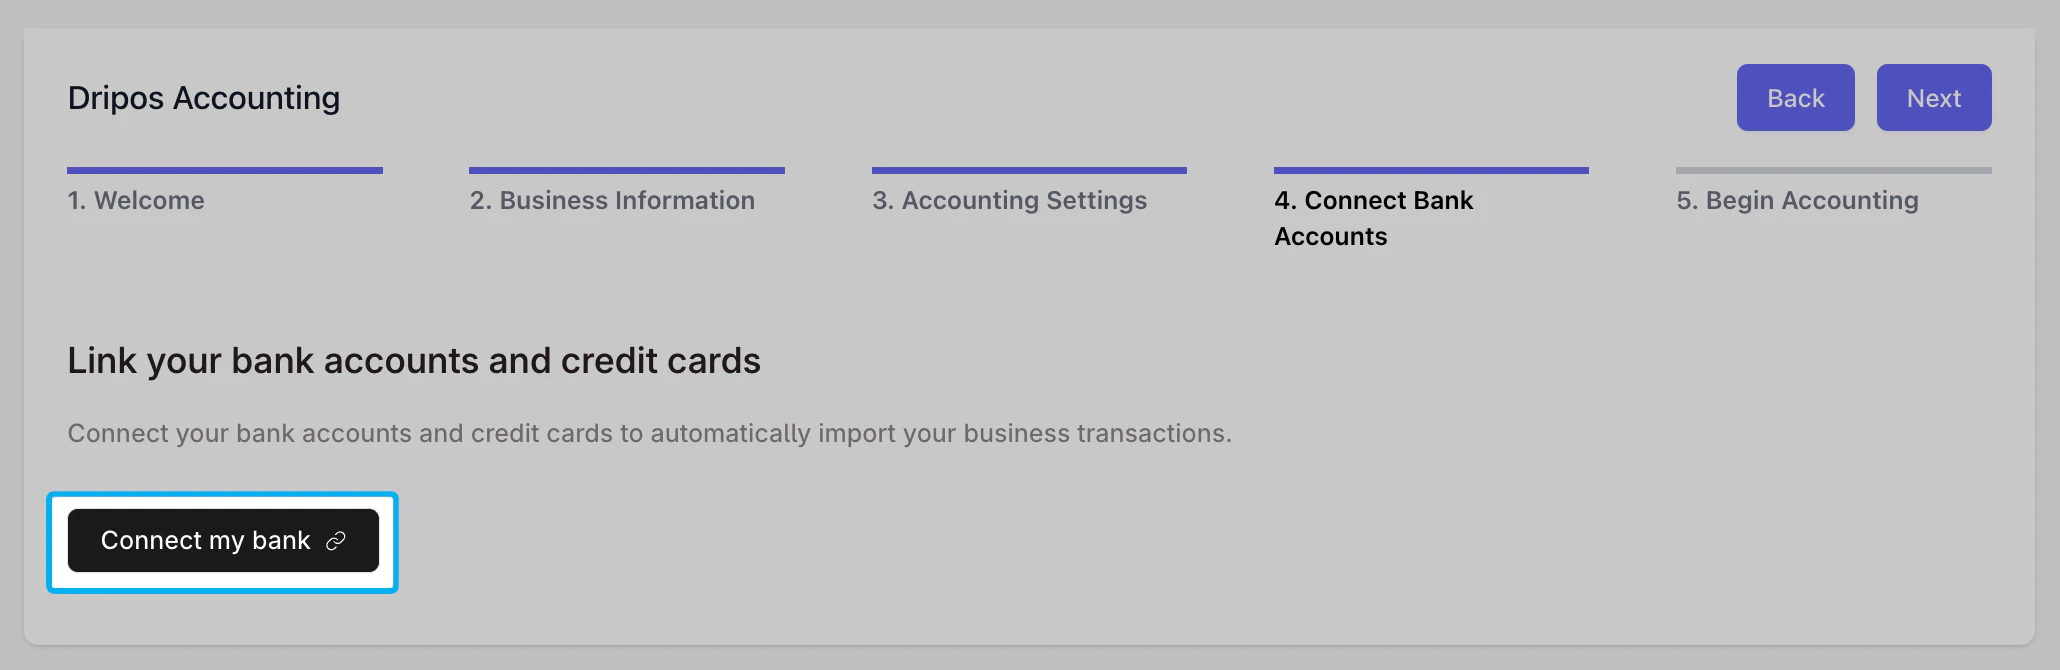 You are now ready to manage your finances directly within Dripos.
***
## Managing Linked Bank Accounts and Credit Cards
When you connect business bank accounts and credit cards, your business transactions are automatically uploaded into your Transactions page. You should connect all accounts tied to your business during onboarding, but you can add or remove accounts if anything changes with your business banking solutions.
You can manage your business bank account and credit card connections in on the Dashboard by going to **Finance > Accounting > Transactions**.
### Connect Additional Bank Accounts and Credit Cards
To connect your business finances, follow the steps below:
Navigate to **Finance > Accounting > Transactions** on the Dashboard
You are now ready to manage your finances directly within Dripos.
***
## Managing Linked Bank Accounts and Credit Cards
When you connect business bank accounts and credit cards, your business transactions are automatically uploaded into your Transactions page. You should connect all accounts tied to your business during onboarding, but you can add or remove accounts if anything changes with your business banking solutions.
You can manage your business bank account and credit card connections in on the Dashboard by going to **Finance > Accounting > Transactions**.
### Connect Additional Bank Accounts and Credit Cards
To connect your business finances, follow the steps below:
Navigate to **Finance > Accounting > Transactions** on the Dashboard
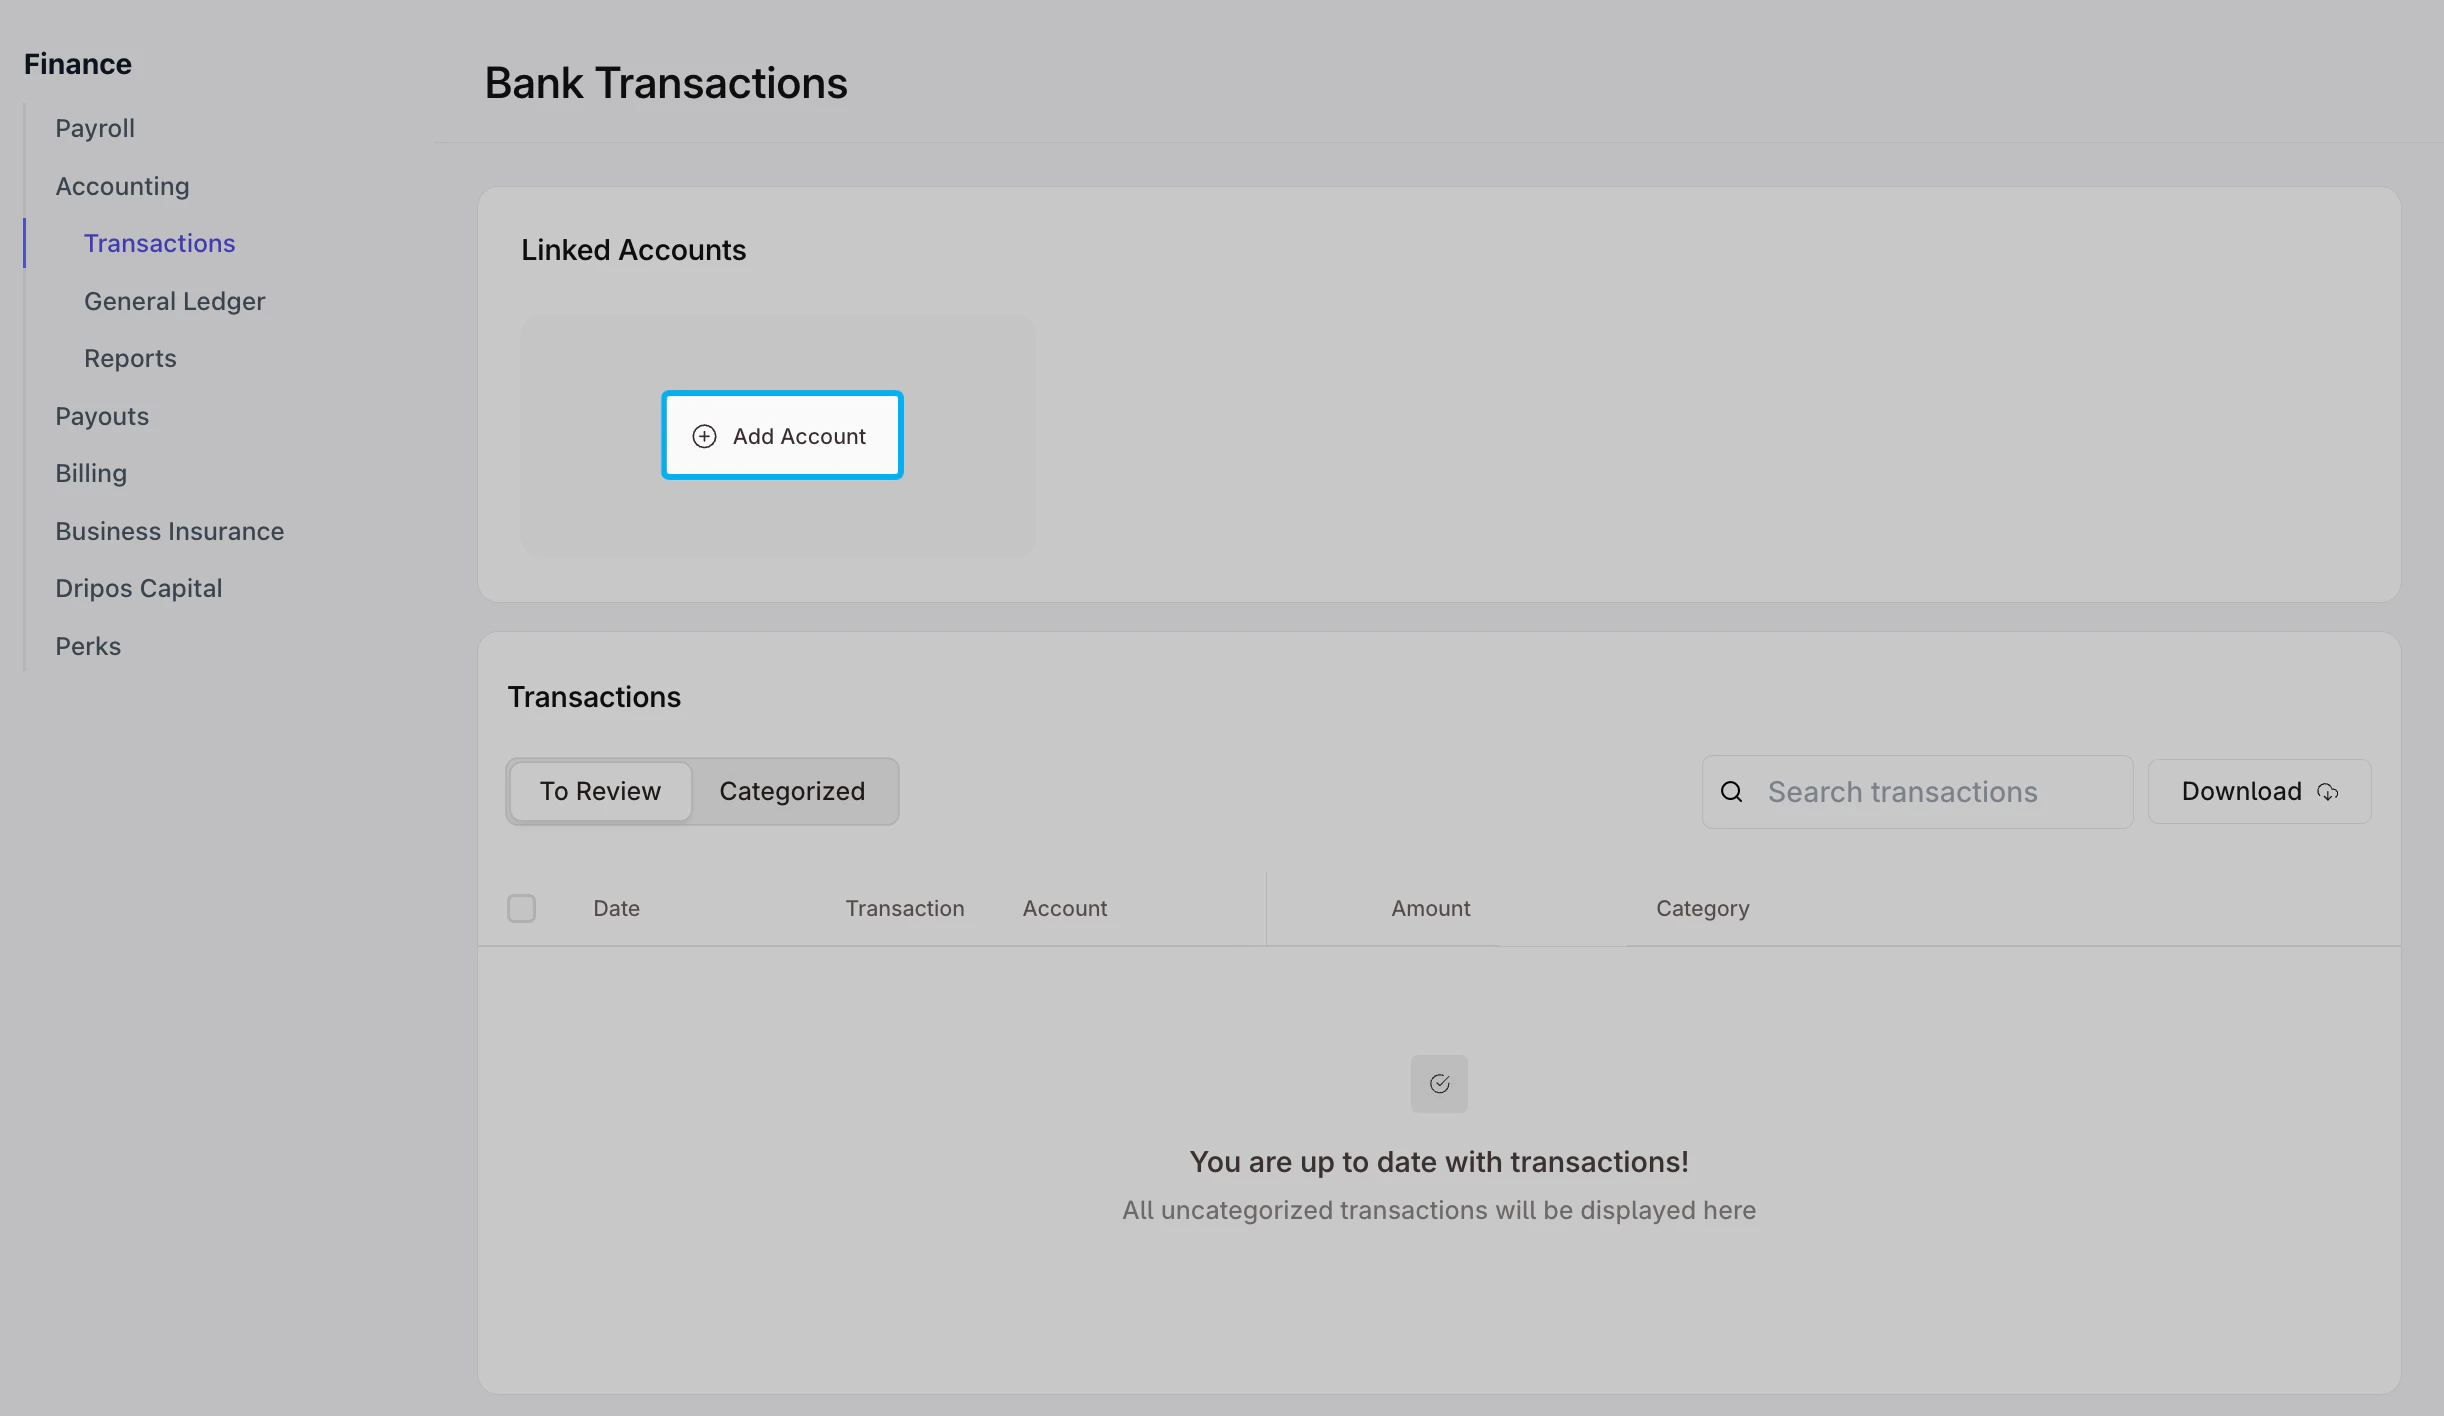
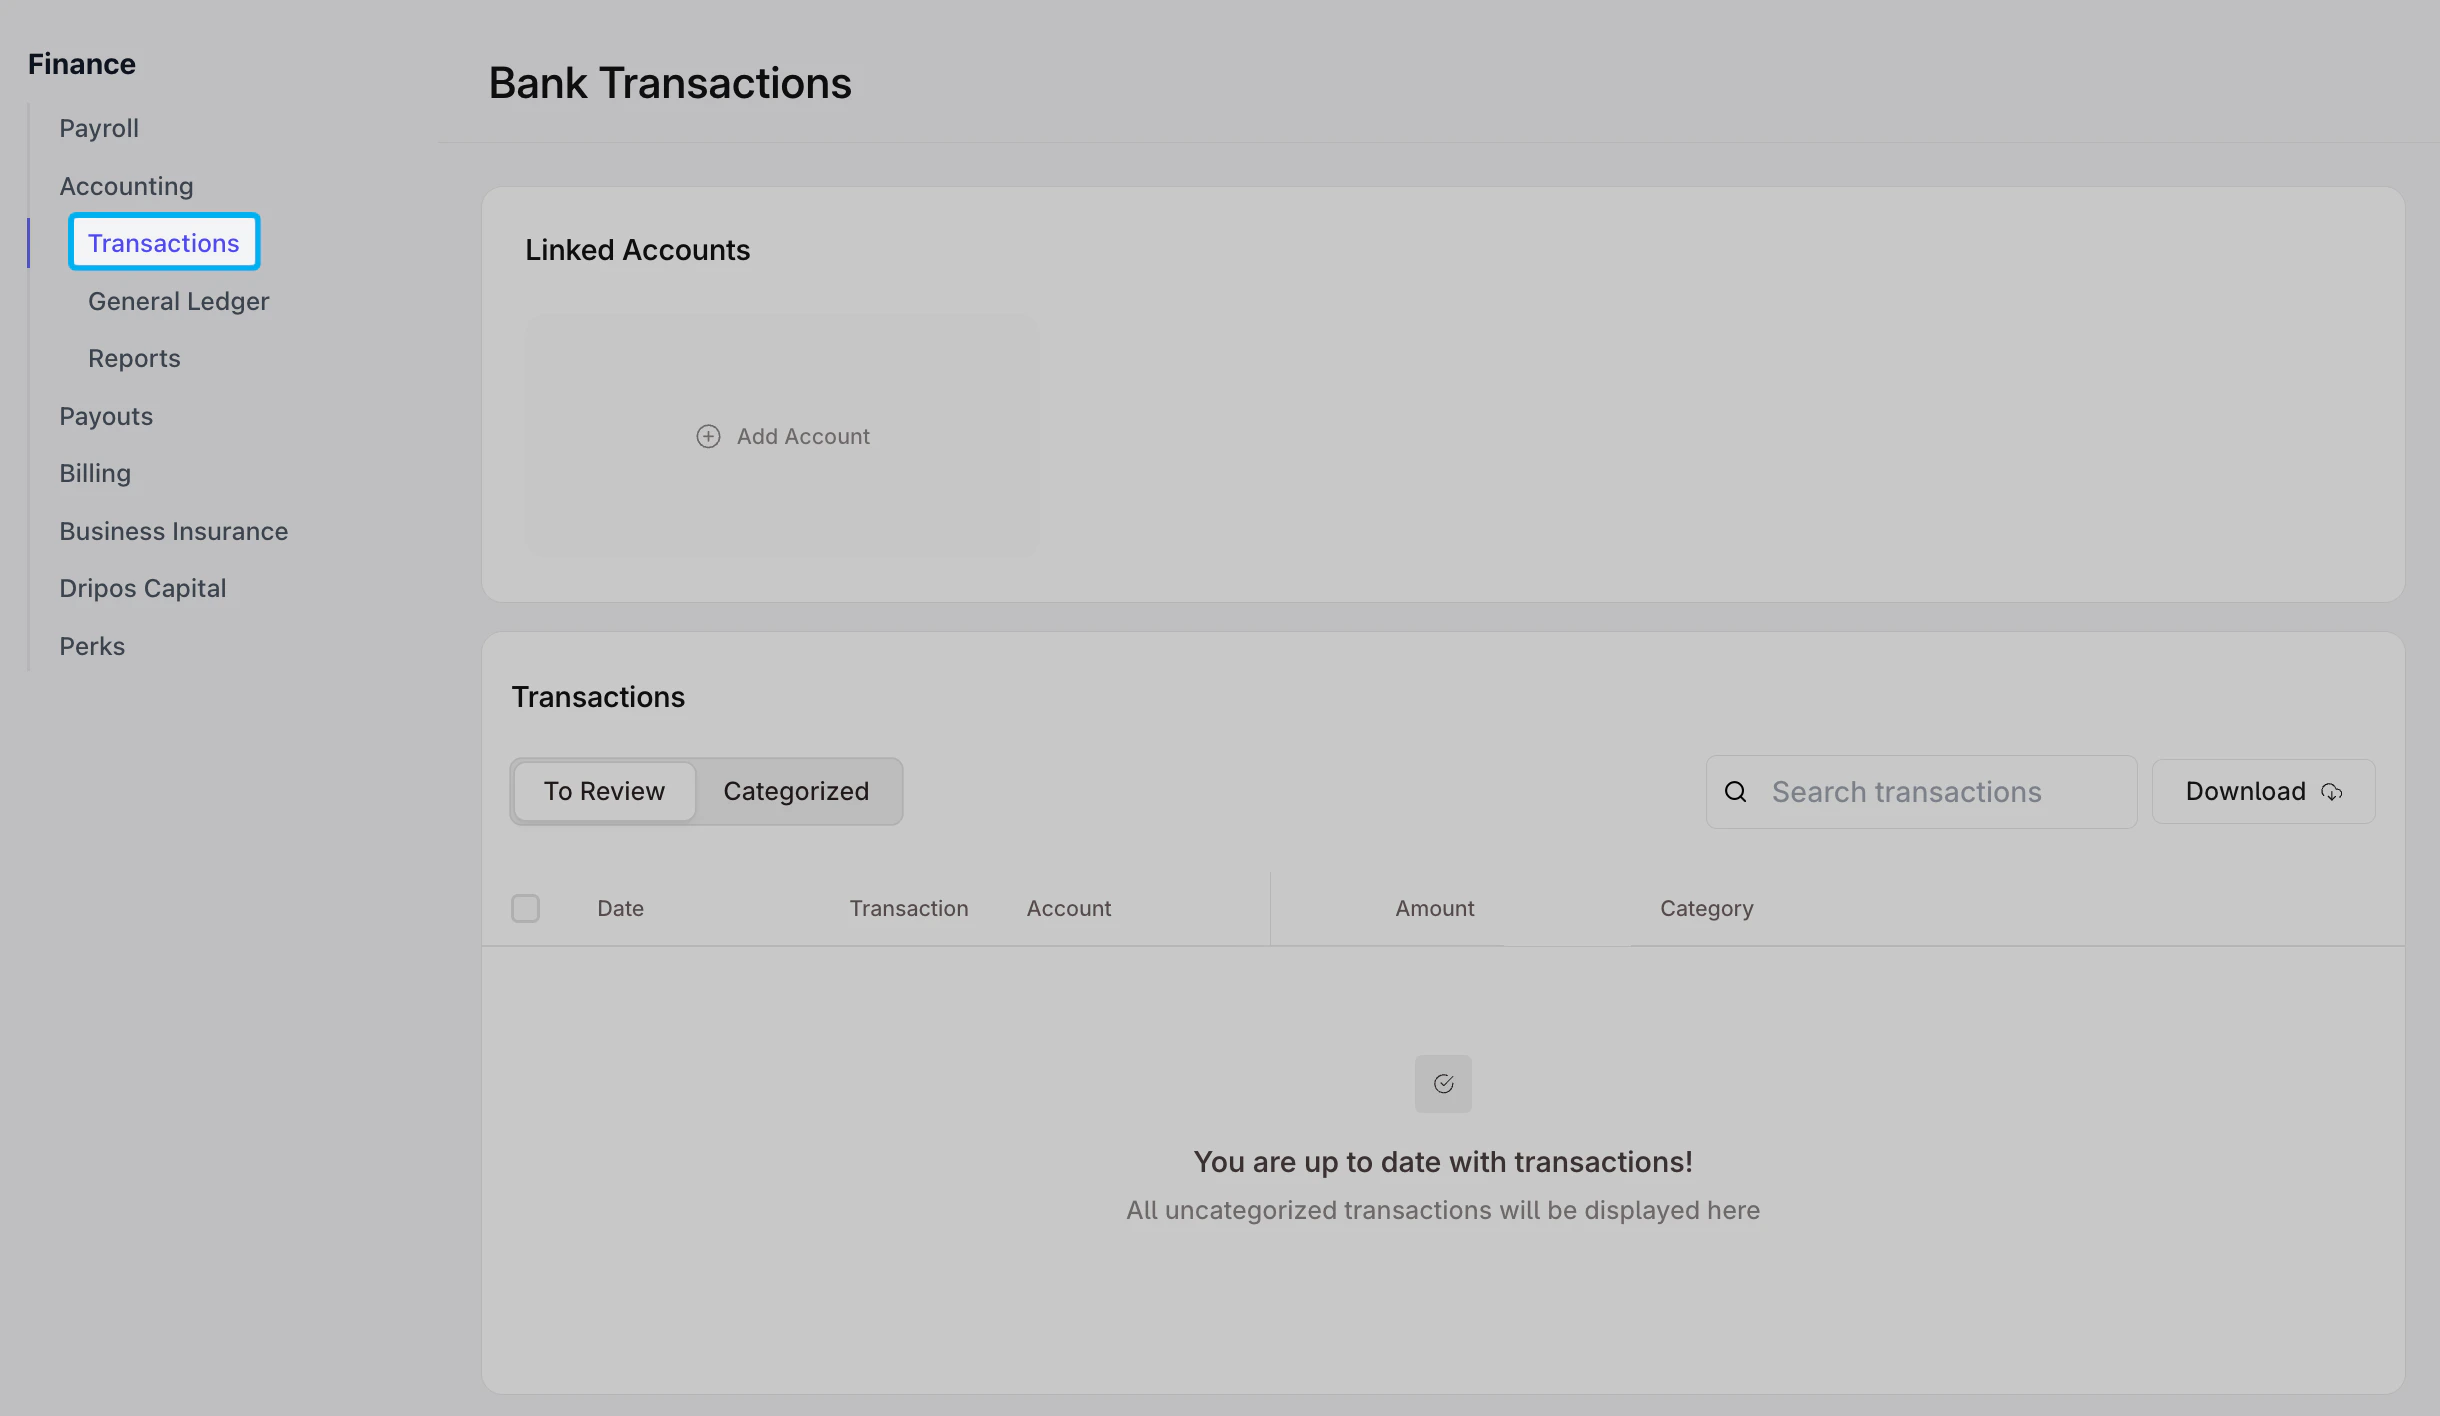 In the **Linked Accounts** section, select **(+) Add Account**.
 In the modal that pops up:
* **Continue without phone number** (inputting your phone number is an optional step)
* Select your bank in the list under **Select your institution**
* **Continue to login** to access your business bank account
* Follow the instructions on the screen to log into your bank account and **grant read-only access**
* If prompted, **select the accounts** that you would like to connect
* You may be asked to input your phone number again – select **Continue without saving**
### Unlink Bank Accounts and Credit Cards
To disconnect business bank accounts or credit cards, follow the steps below:
Navigate to **Finance > Accounting > Transactions** on the Dashboard
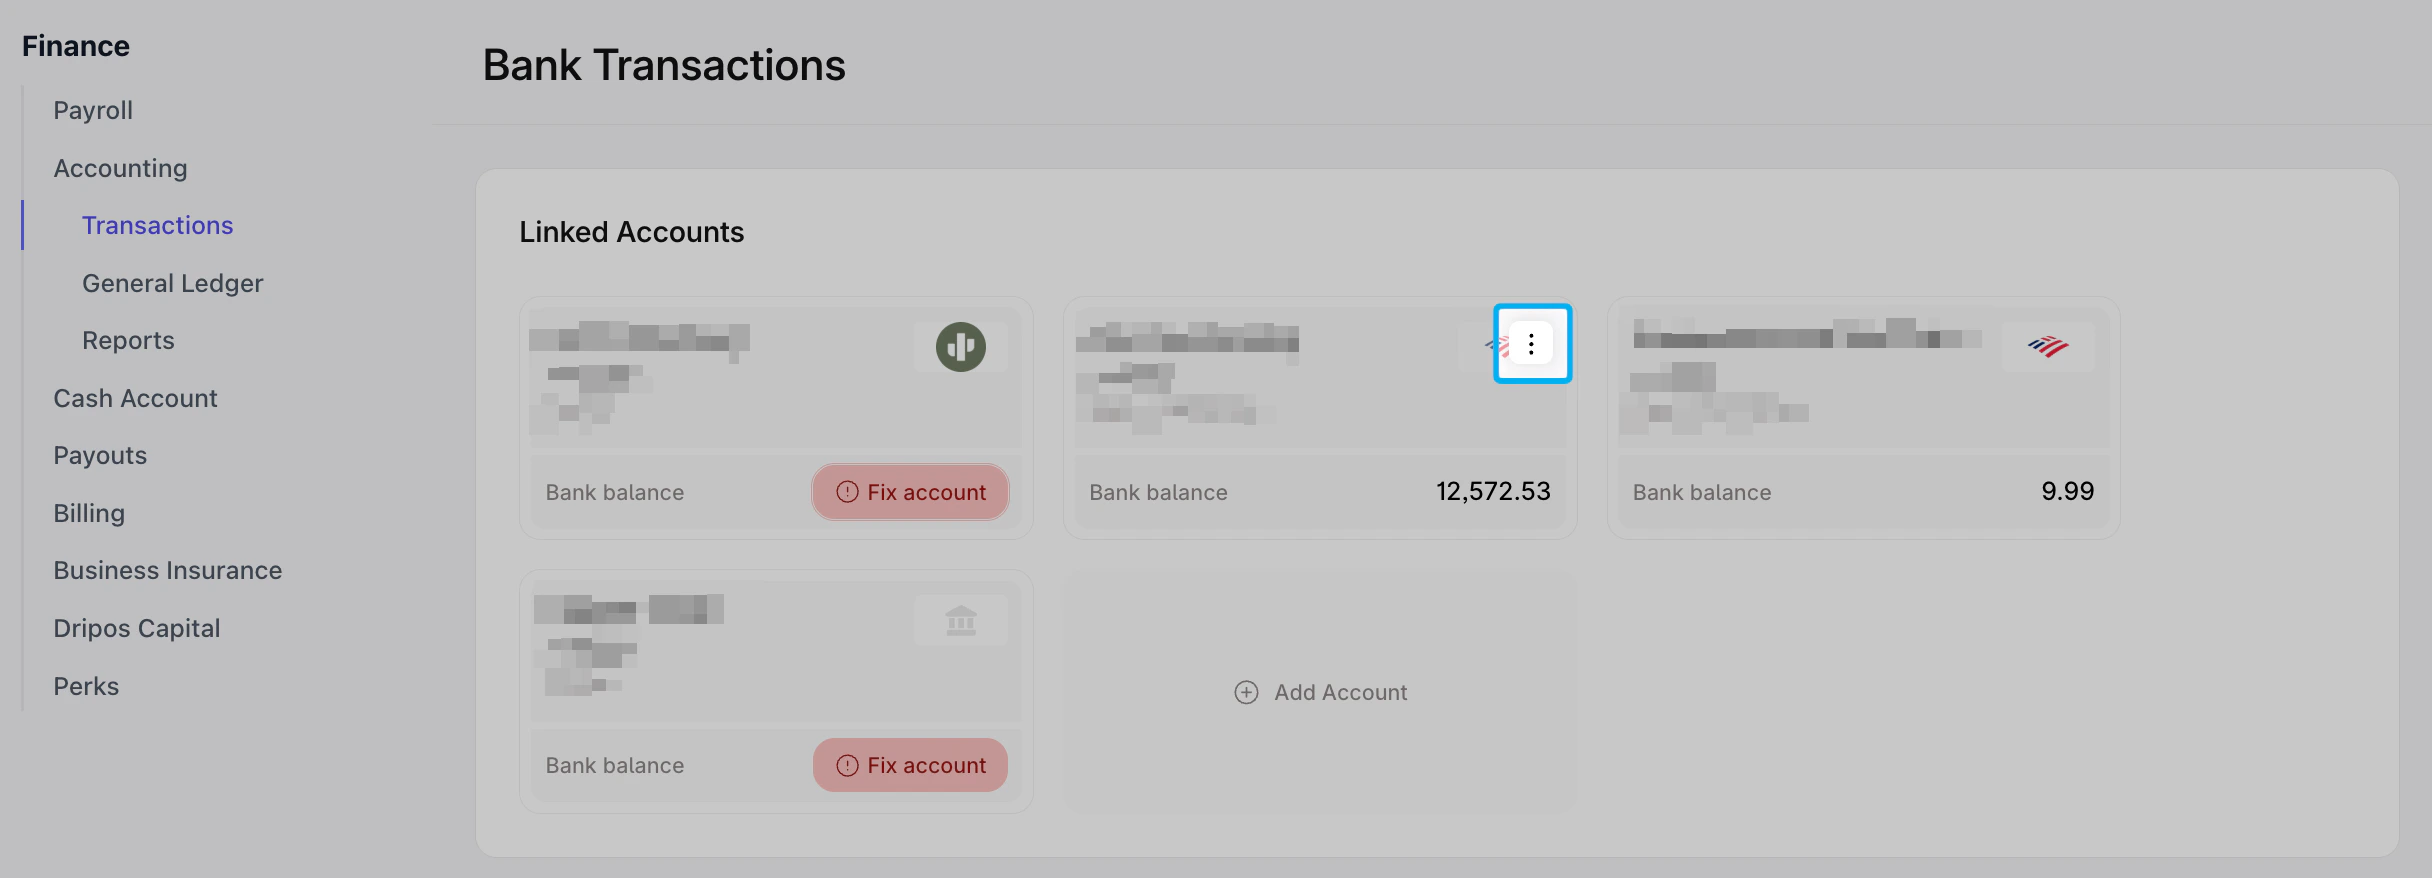
In the **Linked Accounts** section, hover over the bank account or credit card you would like to disconnect
In the modal that pops up:
* **Continue without phone number** (inputting your phone number is an optional step)
* Select your bank in the list under **Select your institution**
* **Continue to login** to access your business bank account
* Follow the instructions on the screen to log into your bank account and **grant read-only access**
* If prompted, **select the accounts** that you would like to connect
* You may be asked to input your phone number again – select **Continue without saving**
### Unlink Bank Accounts and Credit Cards
To disconnect business bank accounts or credit cards, follow the steps below:
Navigate to **Finance > Accounting > Transactions** on the Dashboard
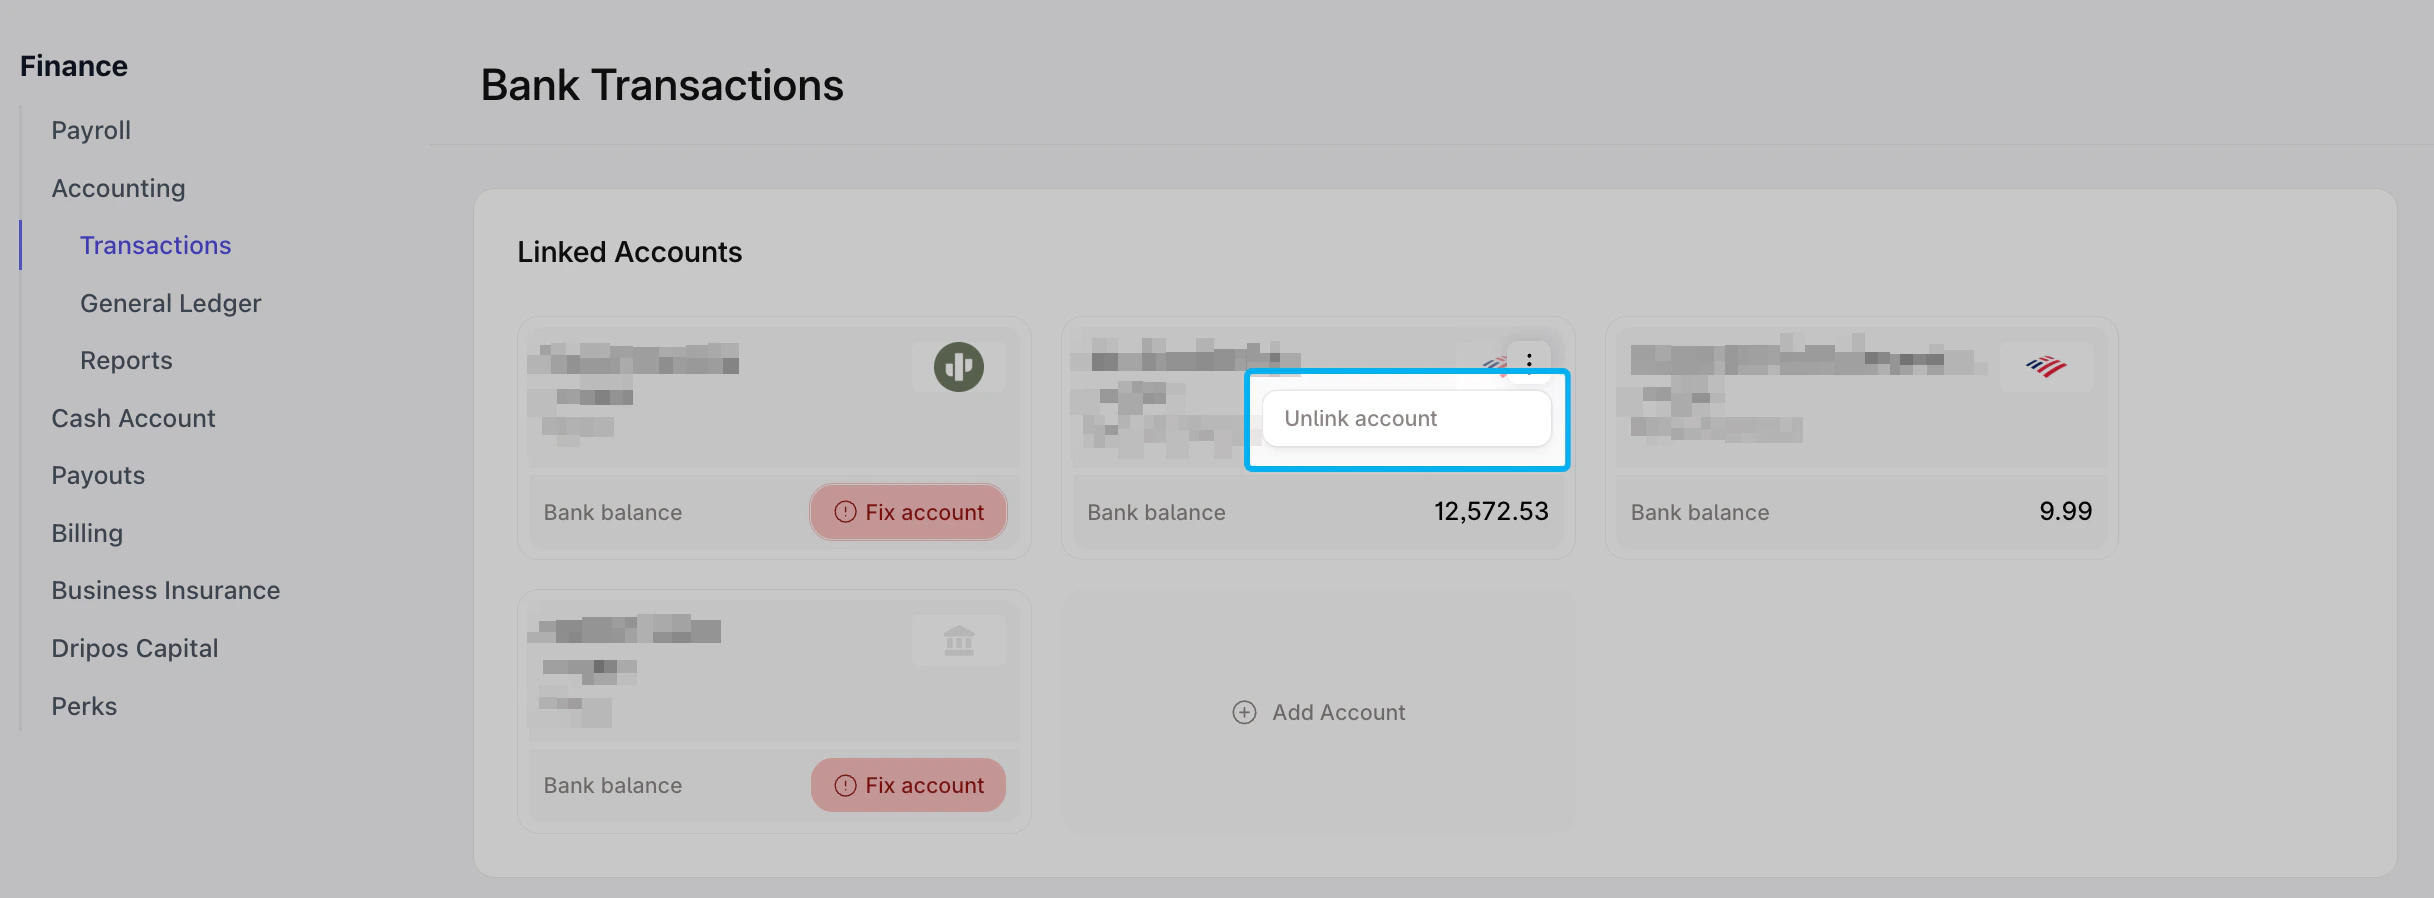
In the **Linked Accounts** section, hover over the bank account or credit card you would like to disconnect
 Select the icon that appears on the right side of the bank account or credit card
 Click **Unlink Account** and confirm that you would like to unlink your account
 ### Fix Connections with Linked Bank Accounts
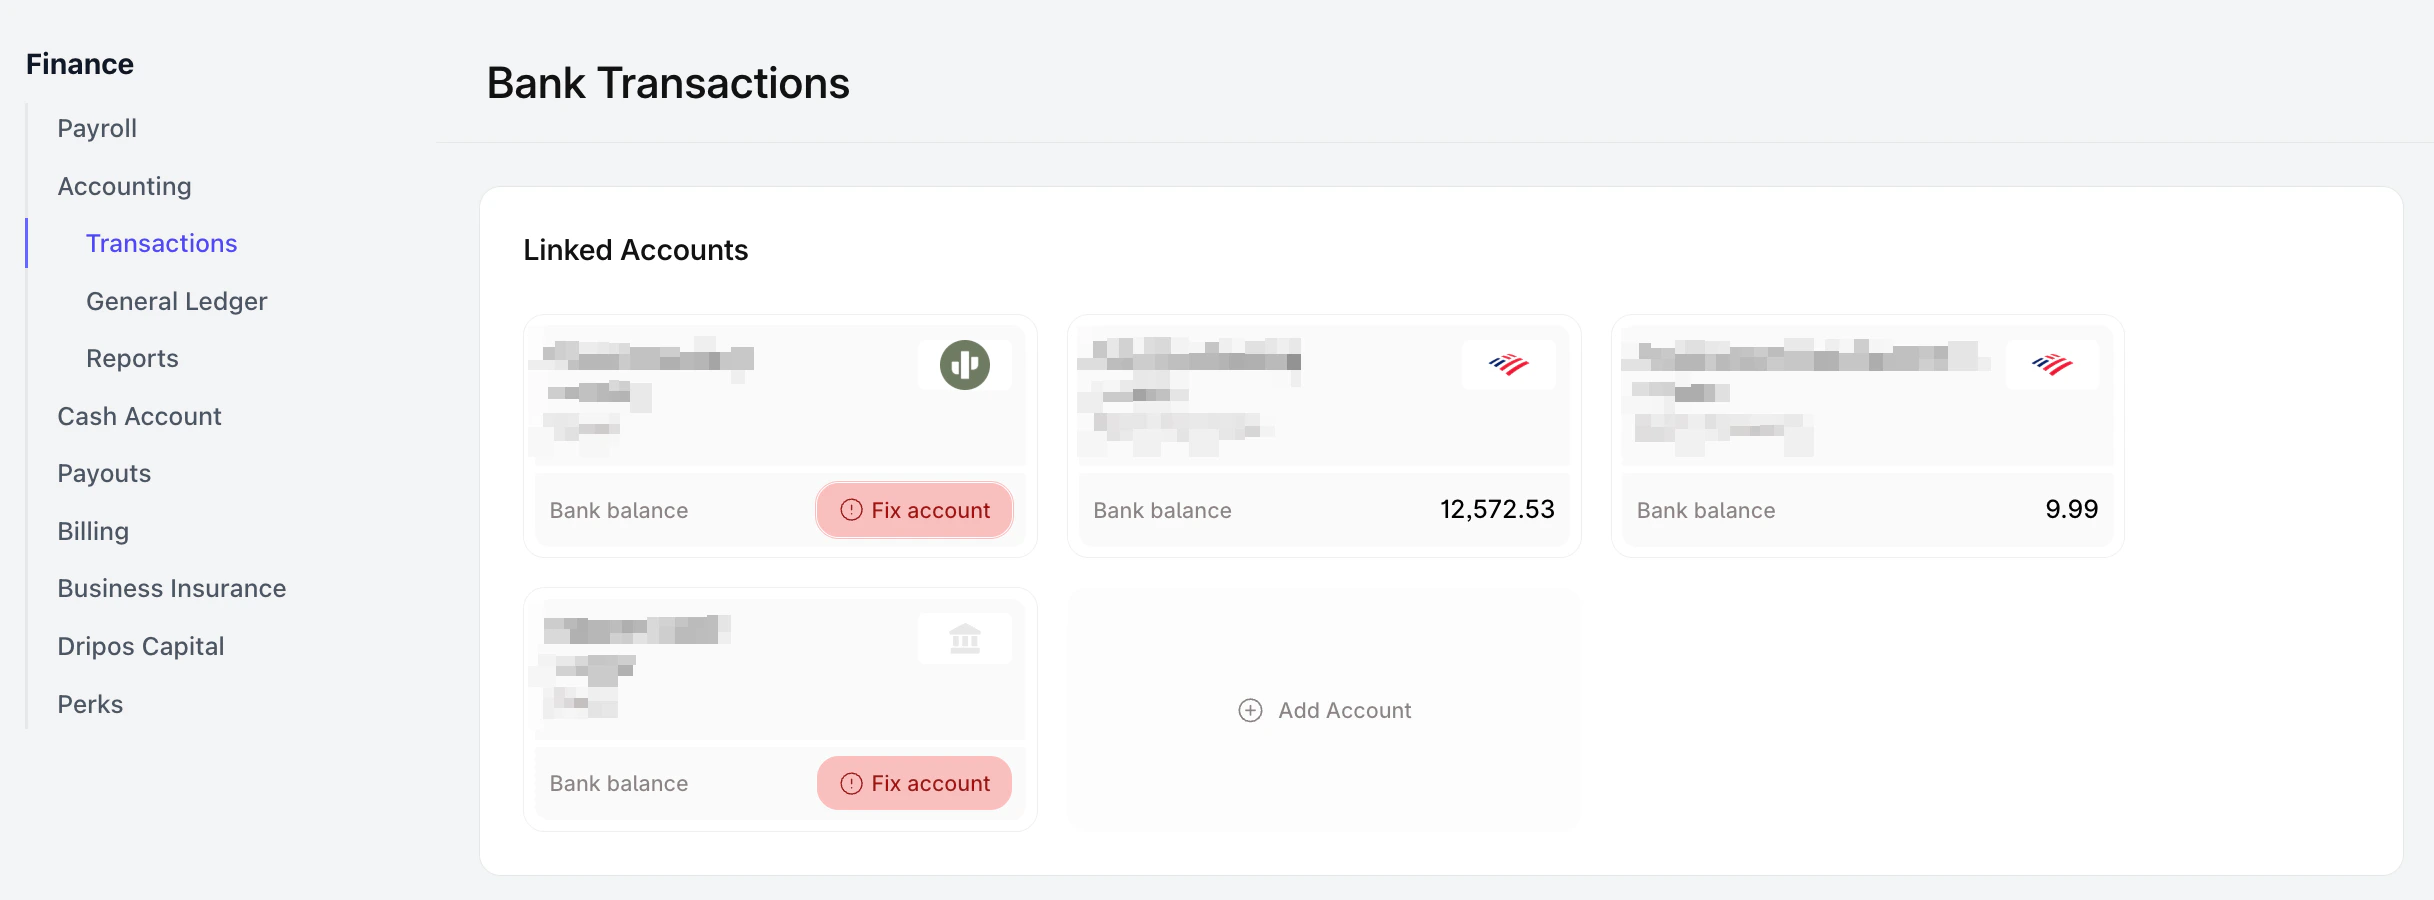
Bank accounts you have already linked can sometimes unlink when your bank password or security settings are changed. To fix the connections, follow the steps below:
In the **Linked accounts** section, click on the bank account or credit card you would like to disconnect
### Fix Connections with Linked Bank Accounts
Bank accounts you have already linked can sometimes unlink when your bank password or security settings are changed. To fix the connections, follow the steps below:
In the **Linked accounts** section, click on the bank account or credit card you would like to disconnect
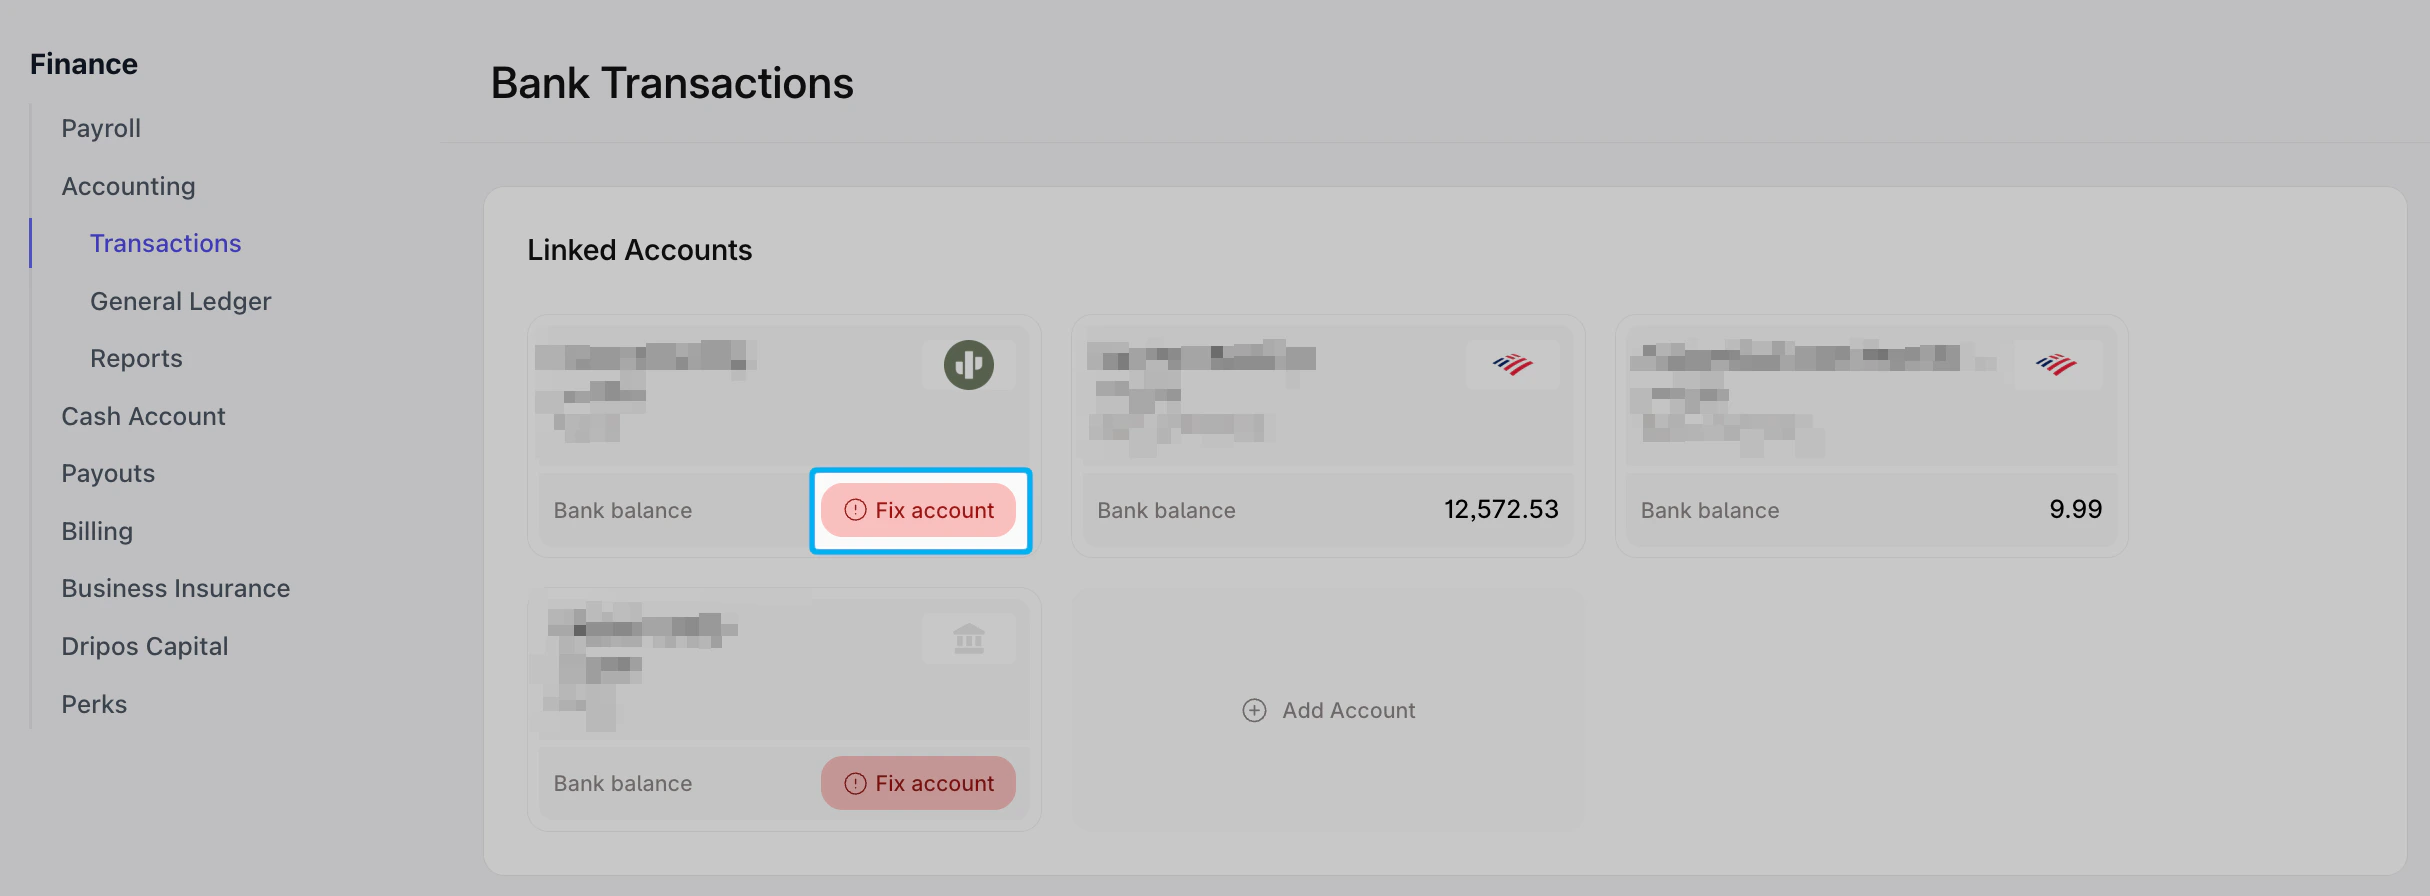 Click on **Fix Account** next to the accounts that have been disconnected and select **Repair Connection**
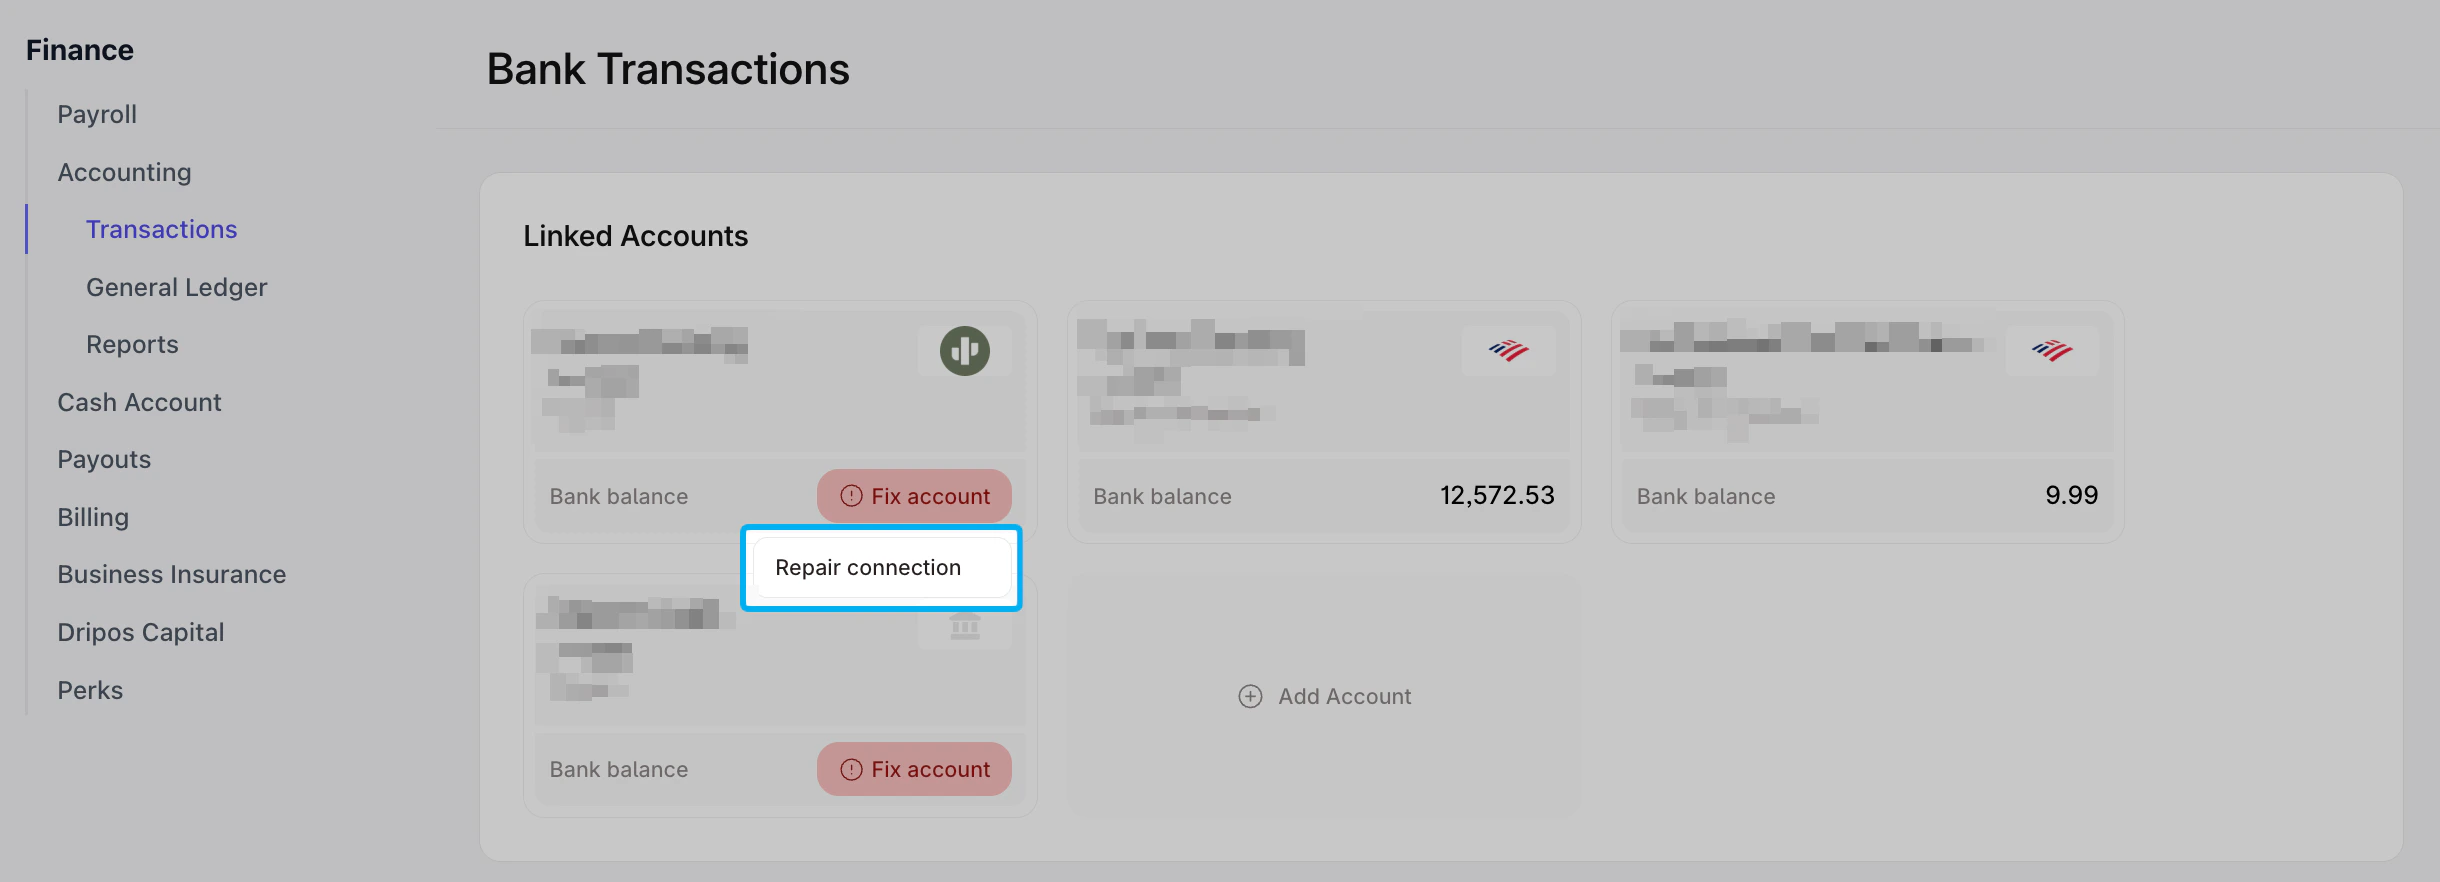 Enter your credentials to reconnect your account
***
## Categorizing Business Transactions
Categorizing transactions keeps your financial records clear and accurate—essential for tracking cash flow, understanding profitability, and prepping for taxes. Get started on the Dashboard by navigating to **Finance > Accounting > Transactions**
### Categorize New Transactions
Transactions from your business bank accounts and credit cards will automatically show up under **Transactions**. To categorize new transactions, follow the steps below:
Ensure the toggle under **Transactions** is set to **To Review**. This will display all transactions that require your attention.
Under the **Category** column, use the drop-down to select the relevant account.
Enter your credentials to reconnect your account
***
## Categorizing Business Transactions
Categorizing transactions keeps your financial records clear and accurate—essential for tracking cash flow, understanding profitability, and prepping for taxes. Get started on the Dashboard by navigating to **Finance > Accounting > Transactions**
### Categorize New Transactions
Transactions from your business bank accounts and credit cards will automatically show up under **Transactions**. To categorize new transactions, follow the steps below:
Ensure the toggle under **Transactions** is set to **To Review**. This will display all transactions that require your attention.
Under the **Category** column, use the drop-down to select the relevant account.
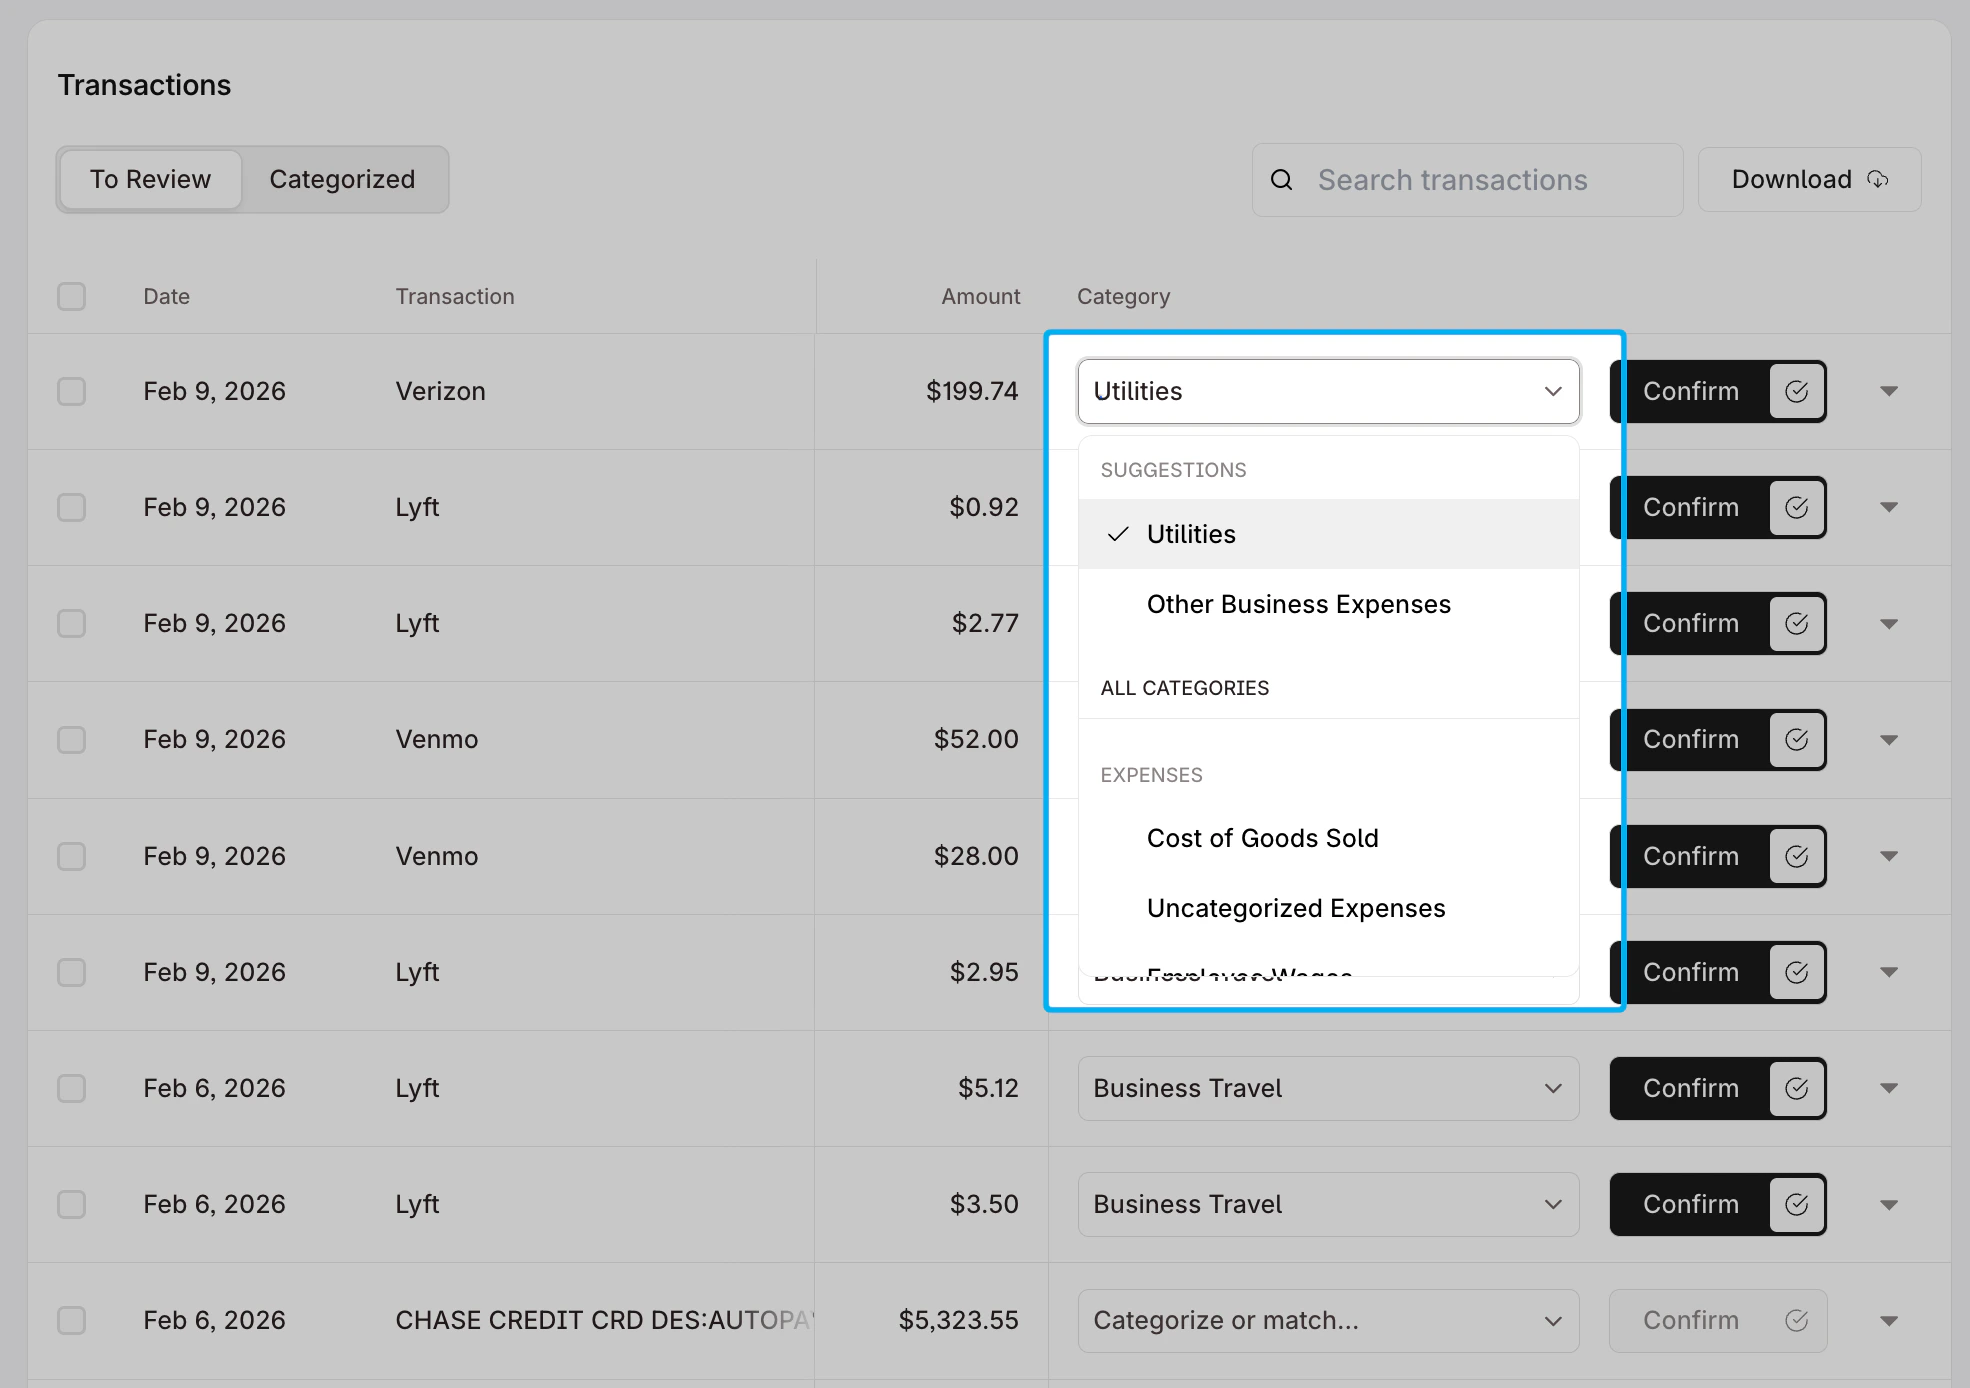 Once the account has been selected, **Confirm** the transaction to move the transaction to the list of **Categorized** transactions
### Make Changes to Categorized Transactions
You may want to make changes to transactions that you have already categorized. To edit those transactions, follow the steps below:
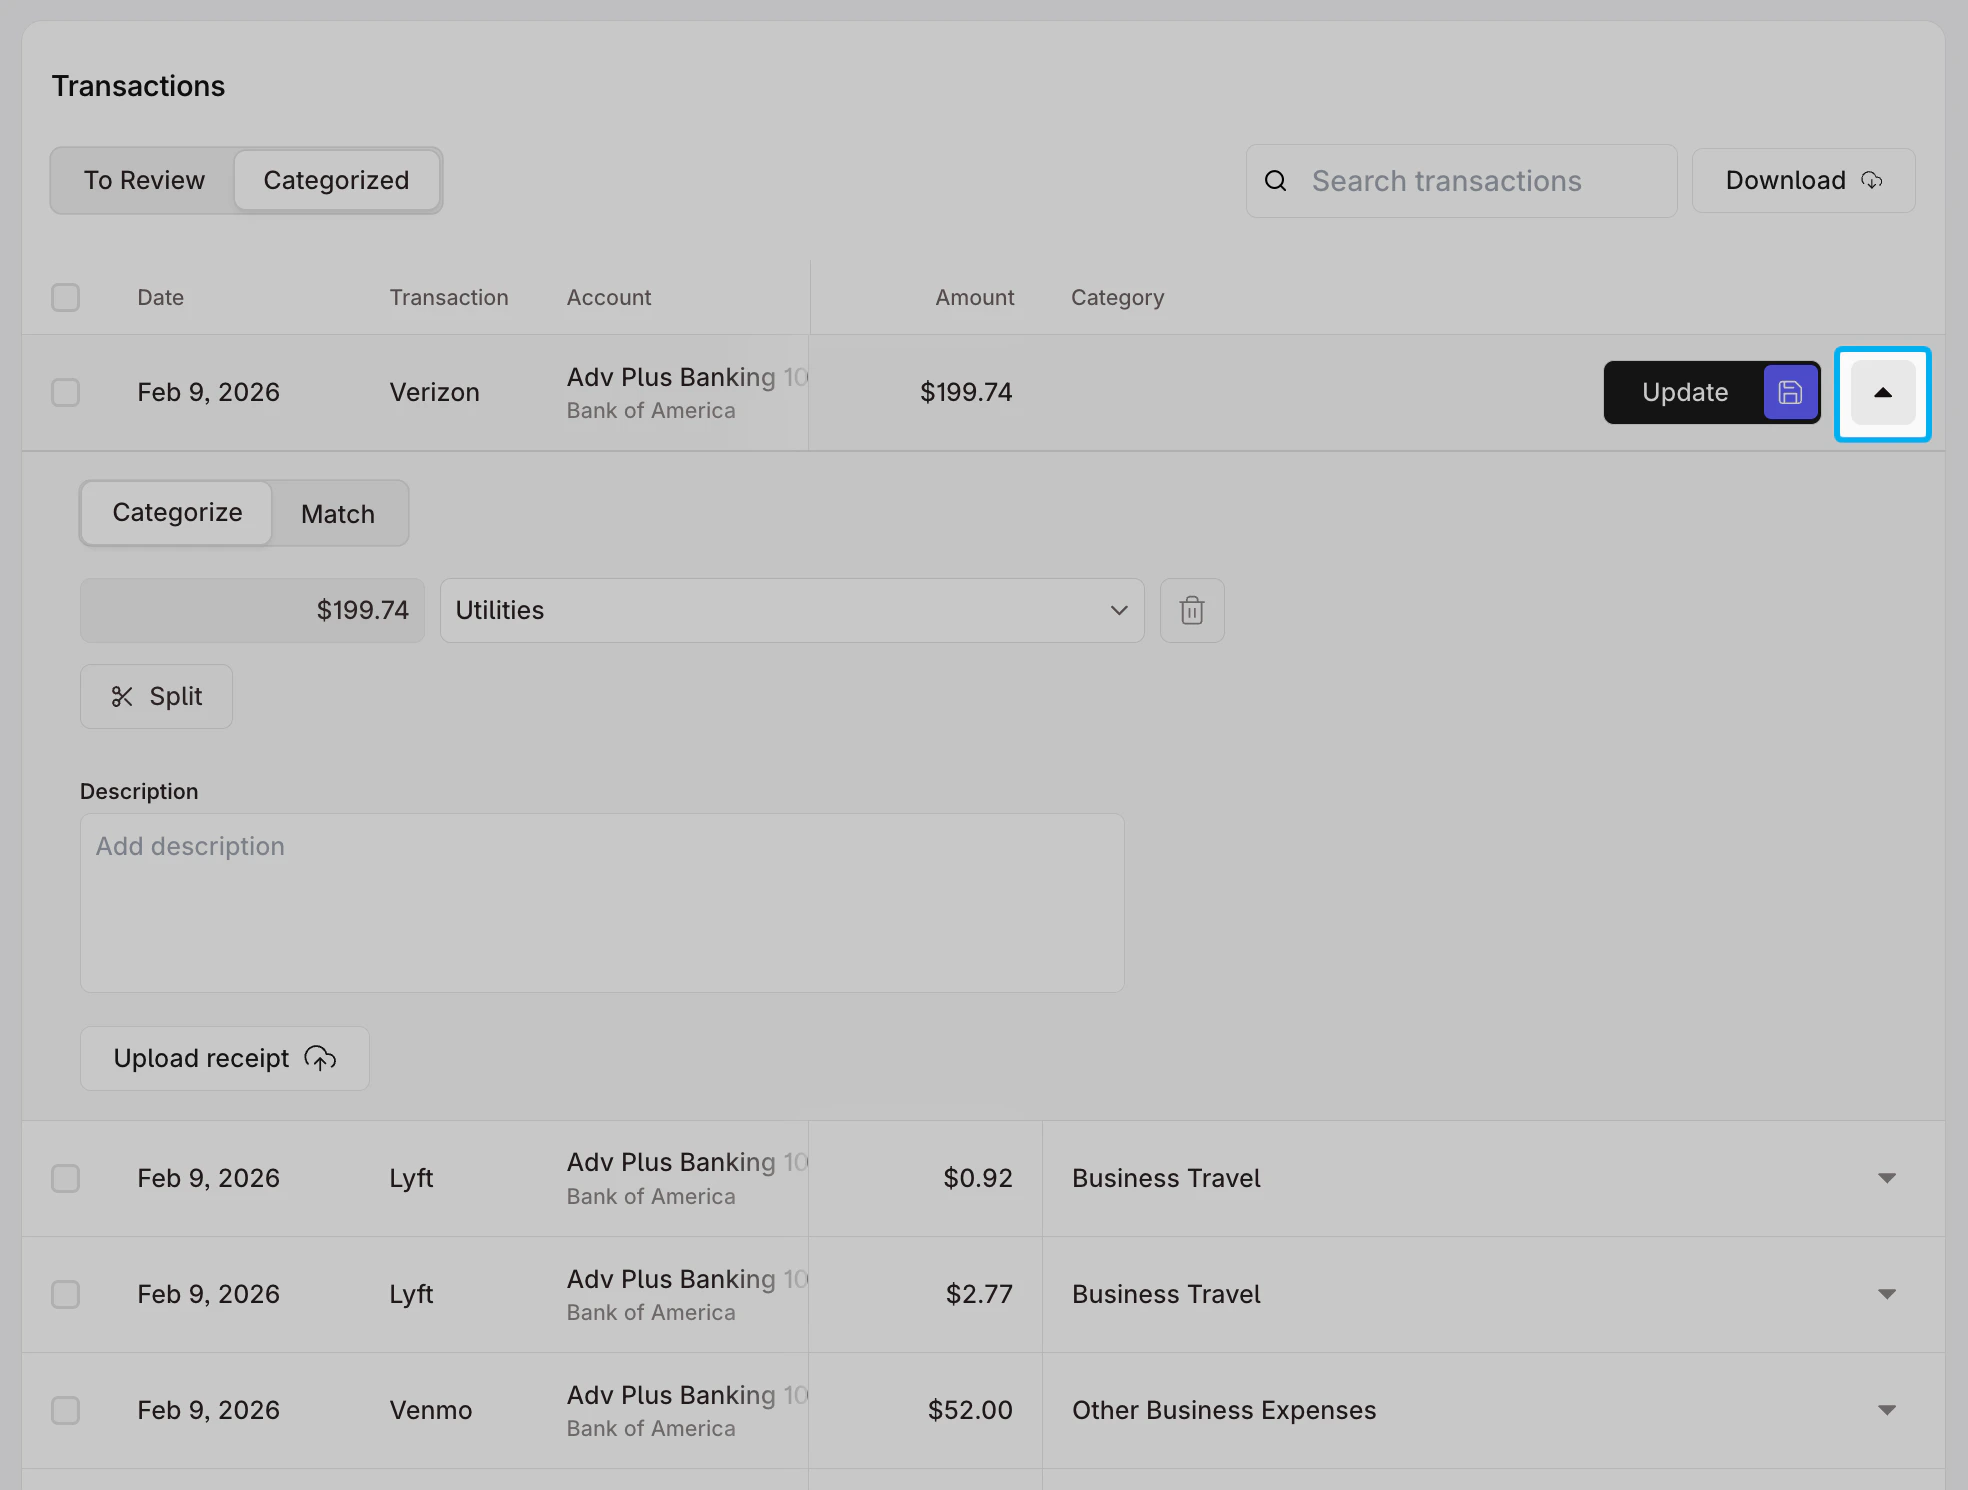
Ensure the toggle under **Transactions** is set to **Categorized**. This will display all transactions that have already been categorized.
Click the drop-down to the right of the transaction you would like to edit to view an expanded view of transaction details.
Once the account has been selected, **Confirm** the transaction to move the transaction to the list of **Categorized** transactions
### Make Changes to Categorized Transactions
You may want to make changes to transactions that you have already categorized. To edit those transactions, follow the steps below:
Ensure the toggle under **Transactions** is set to **Categorized**. This will display all transactions that have already been categorized.
Click the drop-down to the right of the transaction you would like to edit to view an expanded view of transaction details.
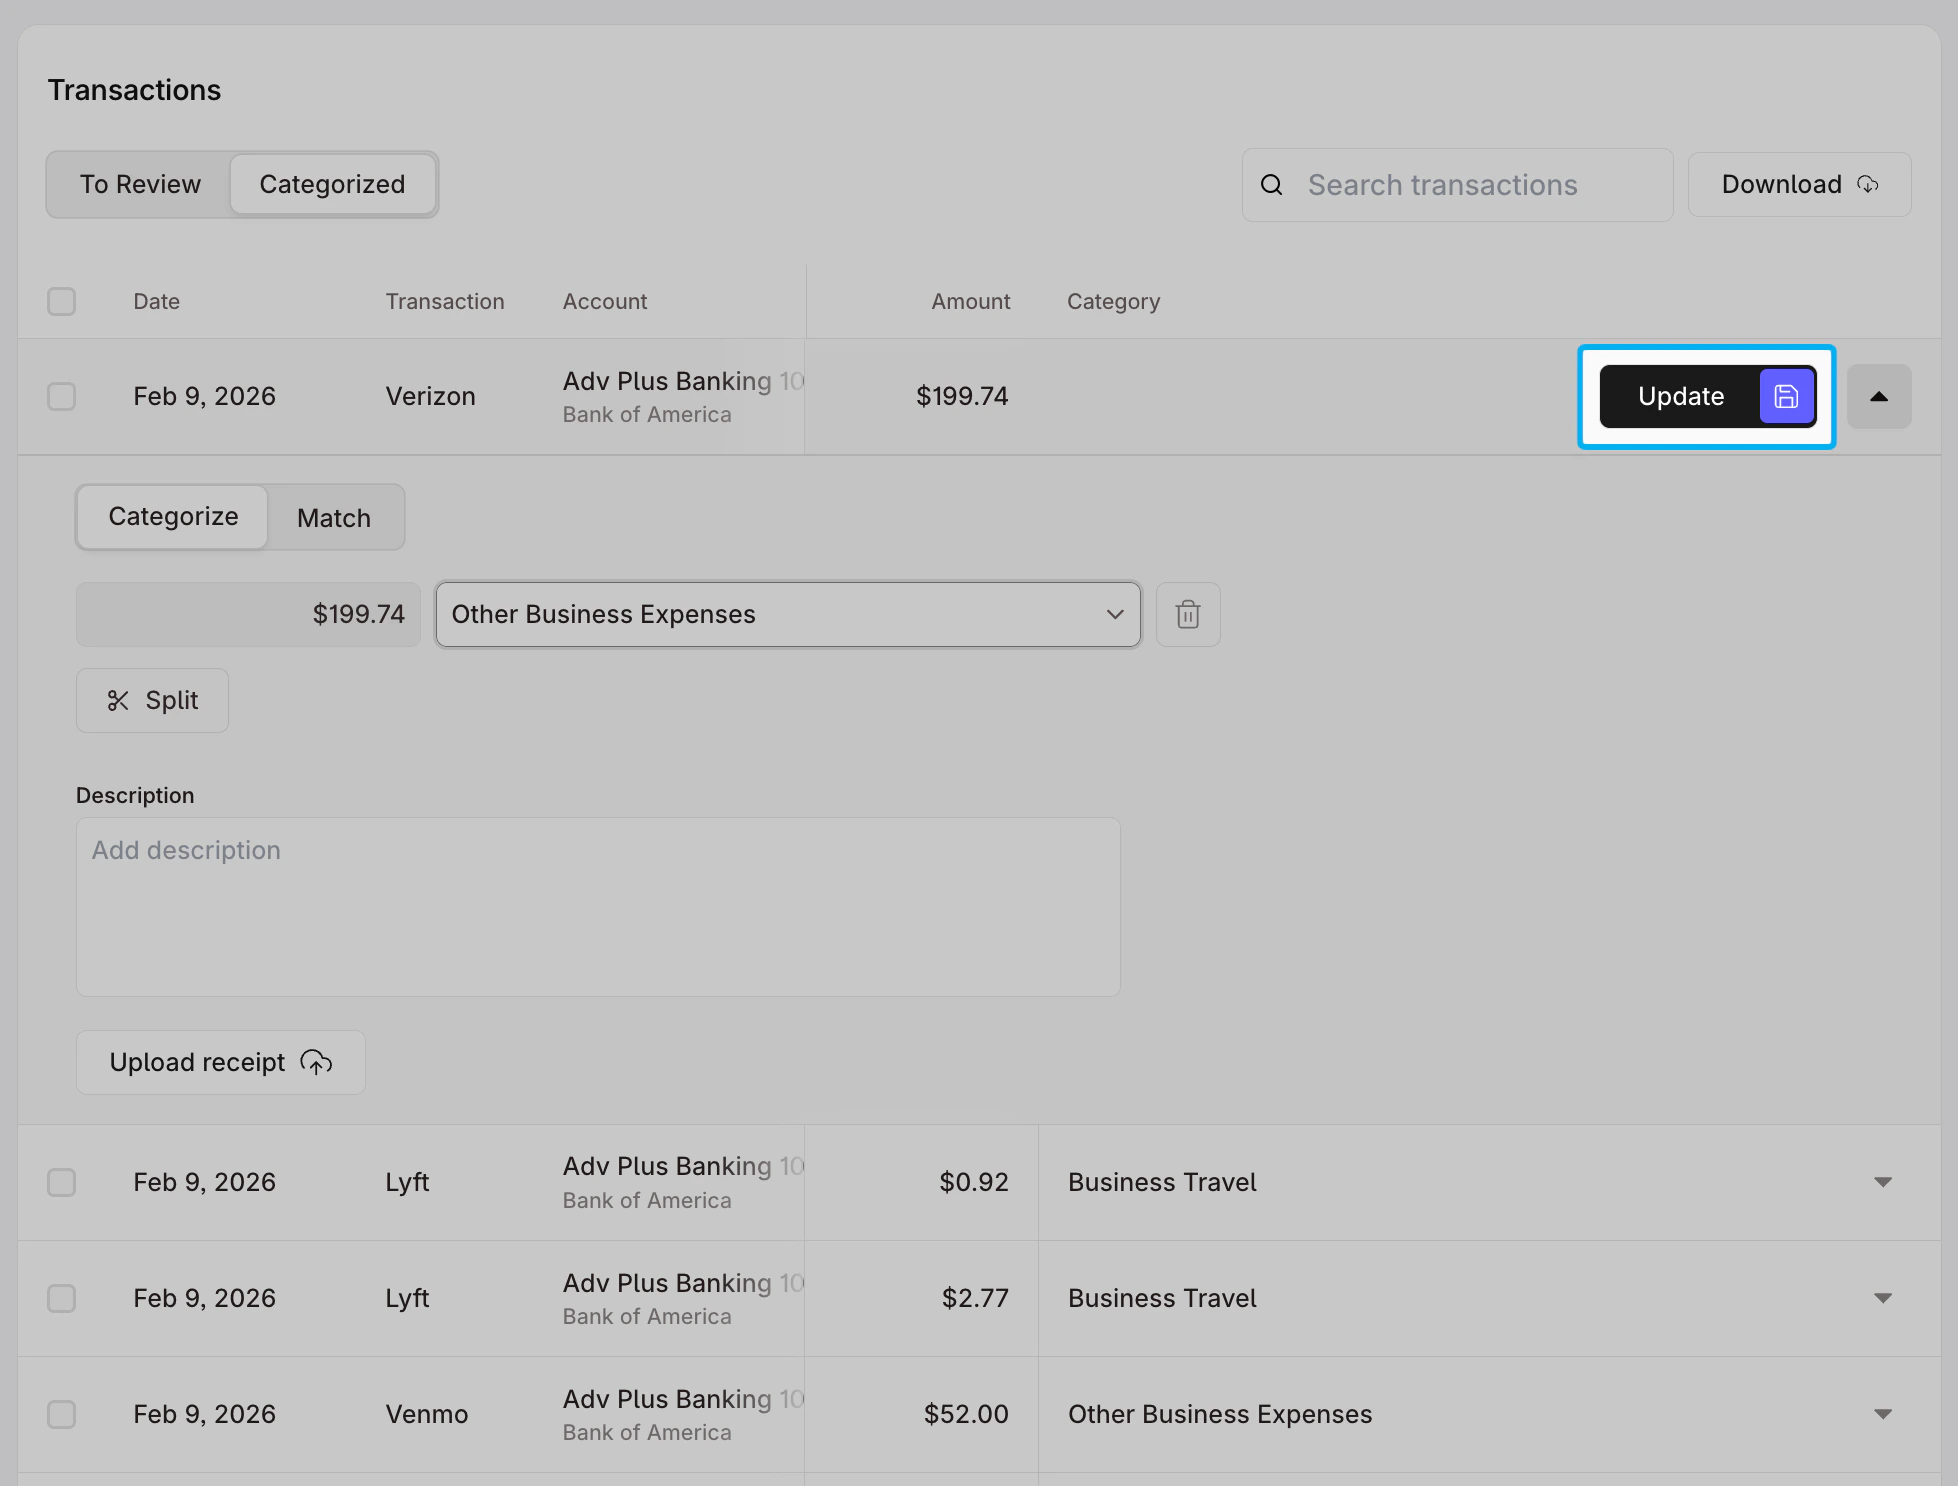
 Make the desired change(s) in the relevant field(s) and click **Update** to save the changes made to the transaction.
 ### Split Transactions
If you purchase multiple items from the same vendor, you can split the transaction and categorize individual items under different accounts.
Under **Transactions**, click on the drop-down to the right of the transaction that you want to split.
### Split Transactions
If you purchase multiple items from the same vendor, you can split the transaction and categorize individual items under different accounts.
Under **Transactions**, click on the drop-down to the right of the transaction that you want to split.
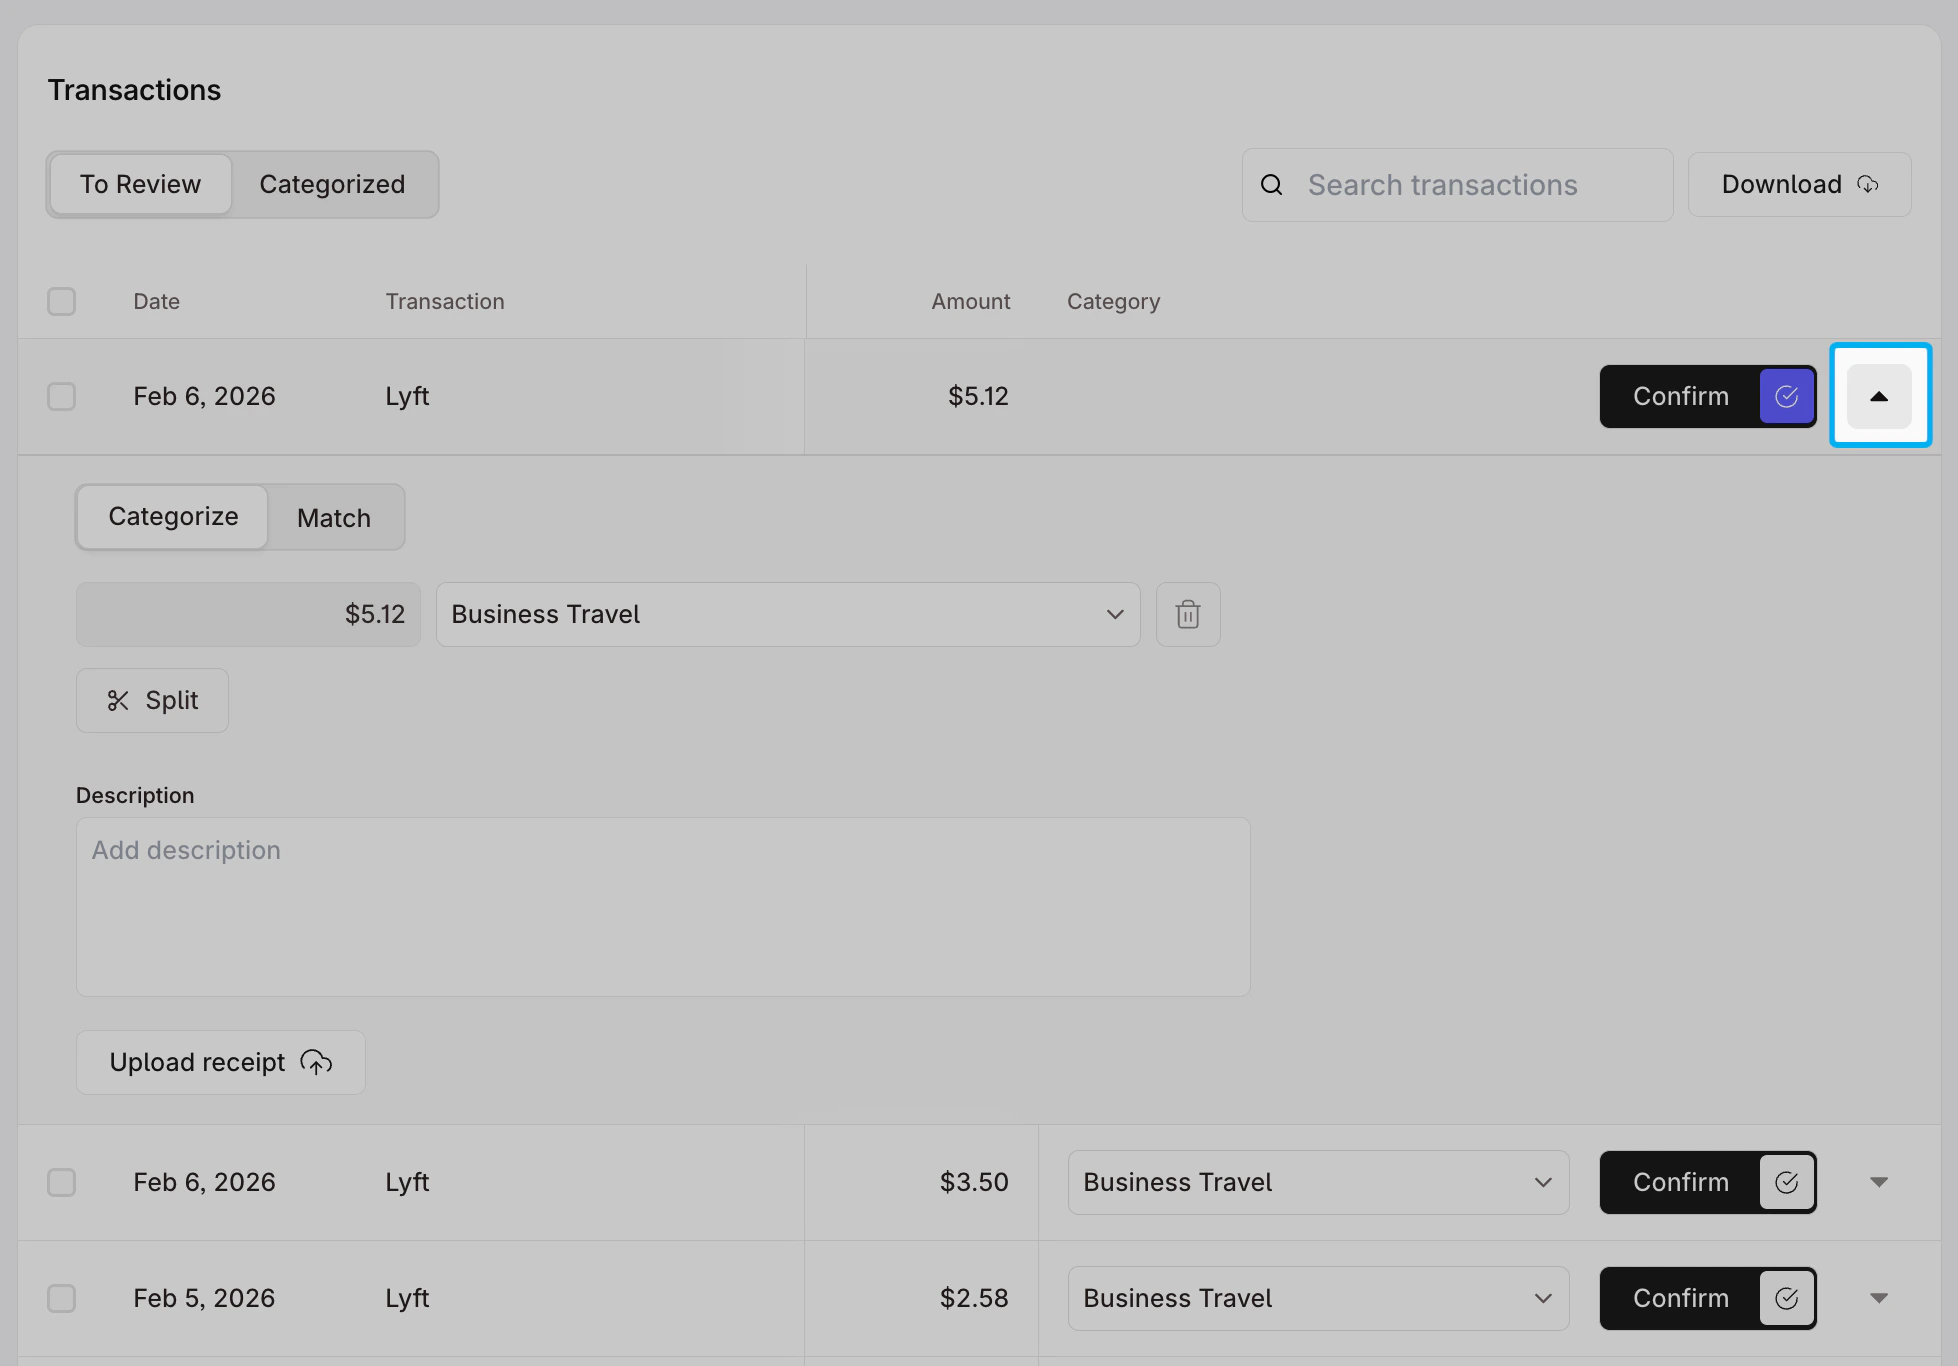 Ensure the toggle under the **Date** is set to **Categorize**.
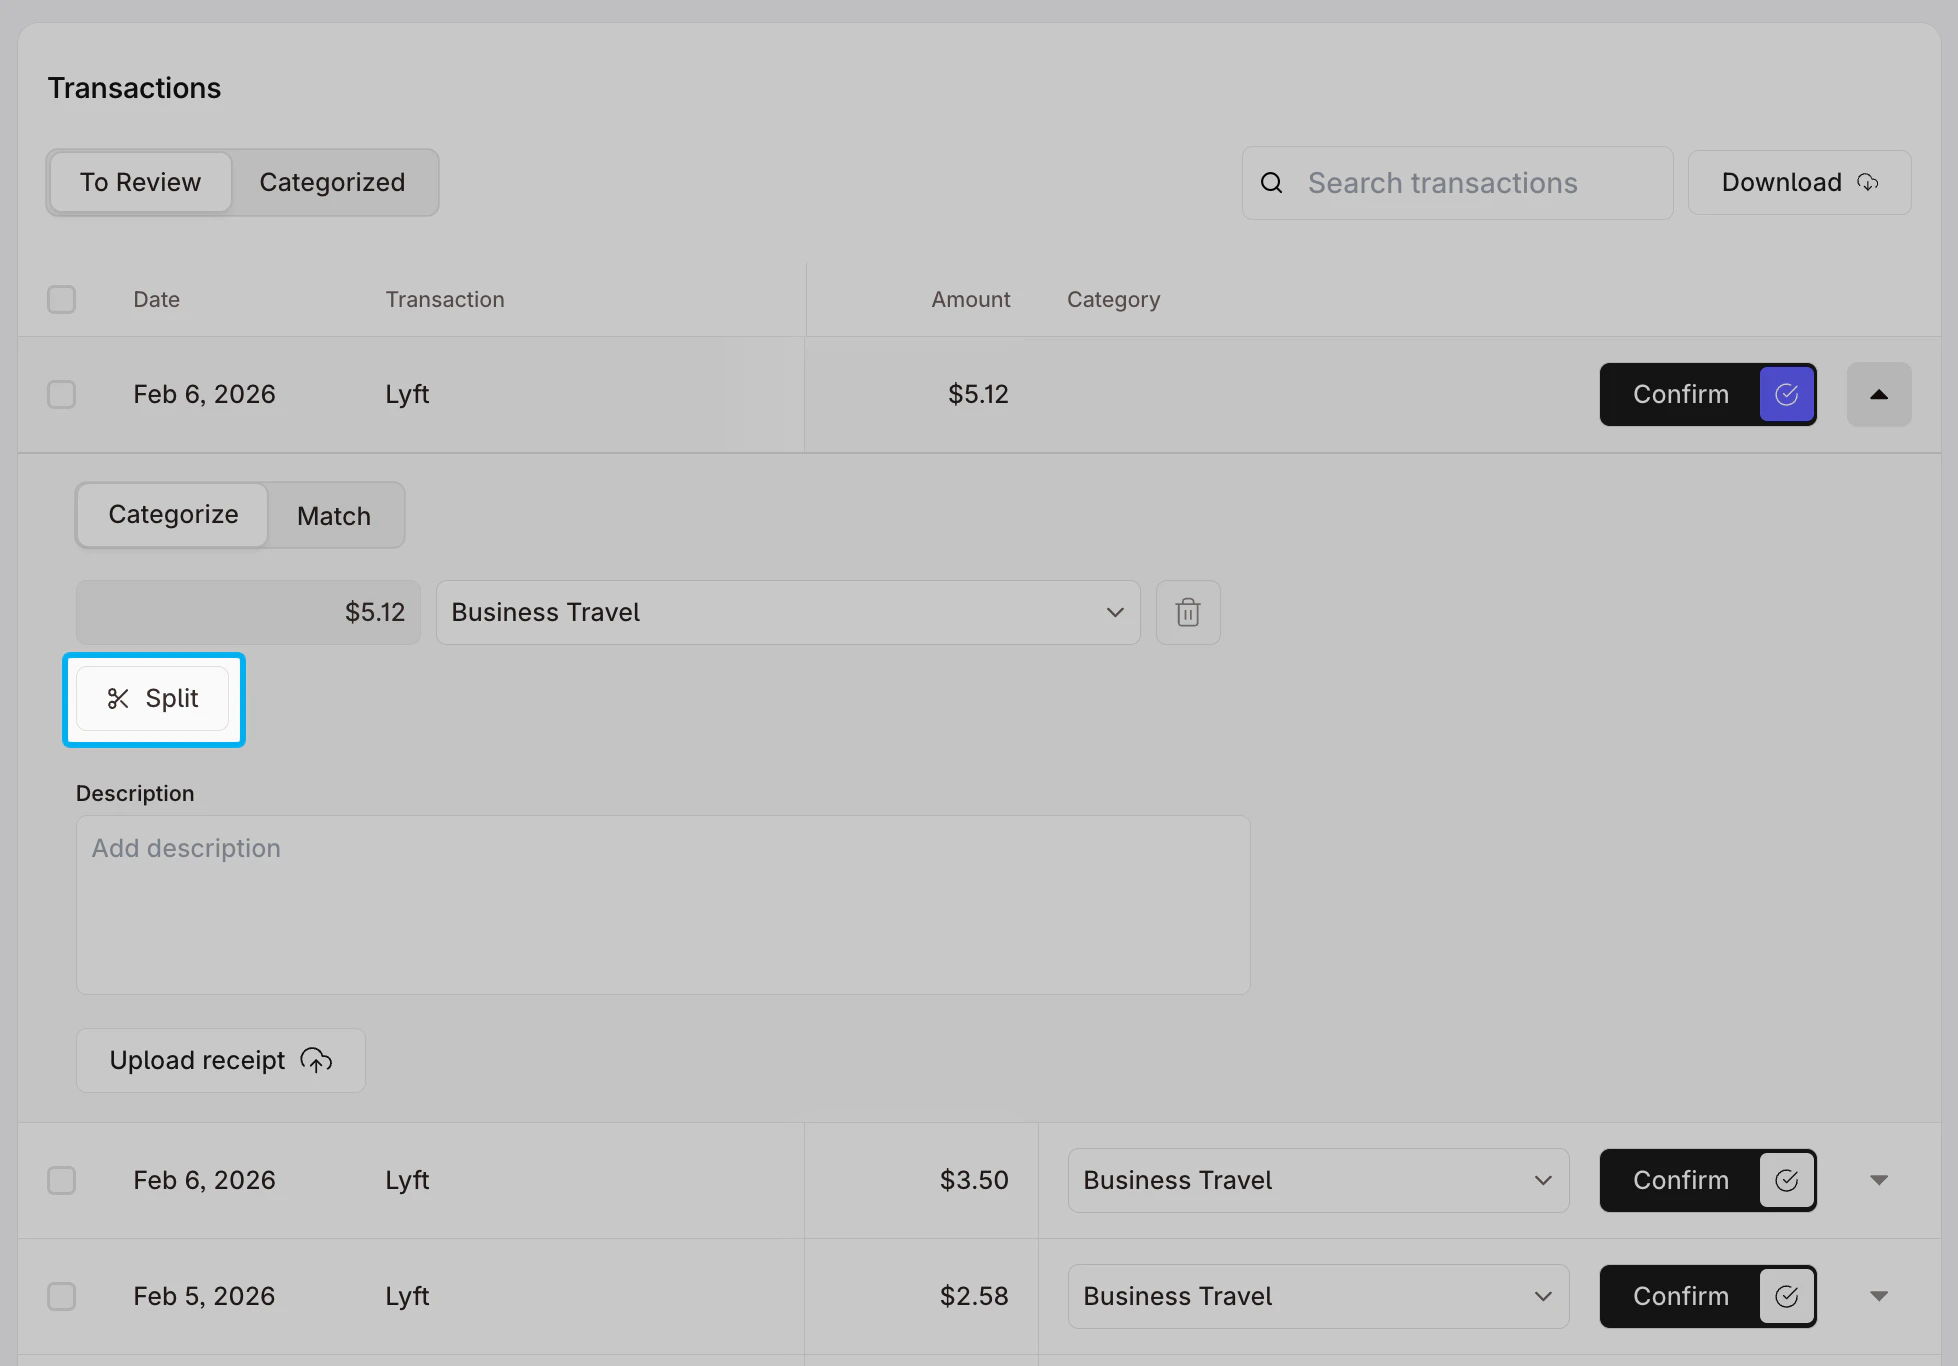
Under the transaction amount, click **Split** to create an additional line. Use the relevant fields to add the transaction amount and categorize the split transaction.
Ensure the toggle under the **Date** is set to **Categorize**.
Under the transaction amount, click **Split** to create an additional line. Use the relevant fields to add the transaction amount and categorize the split transaction.
 **Confirm** or **Update** the transaction.
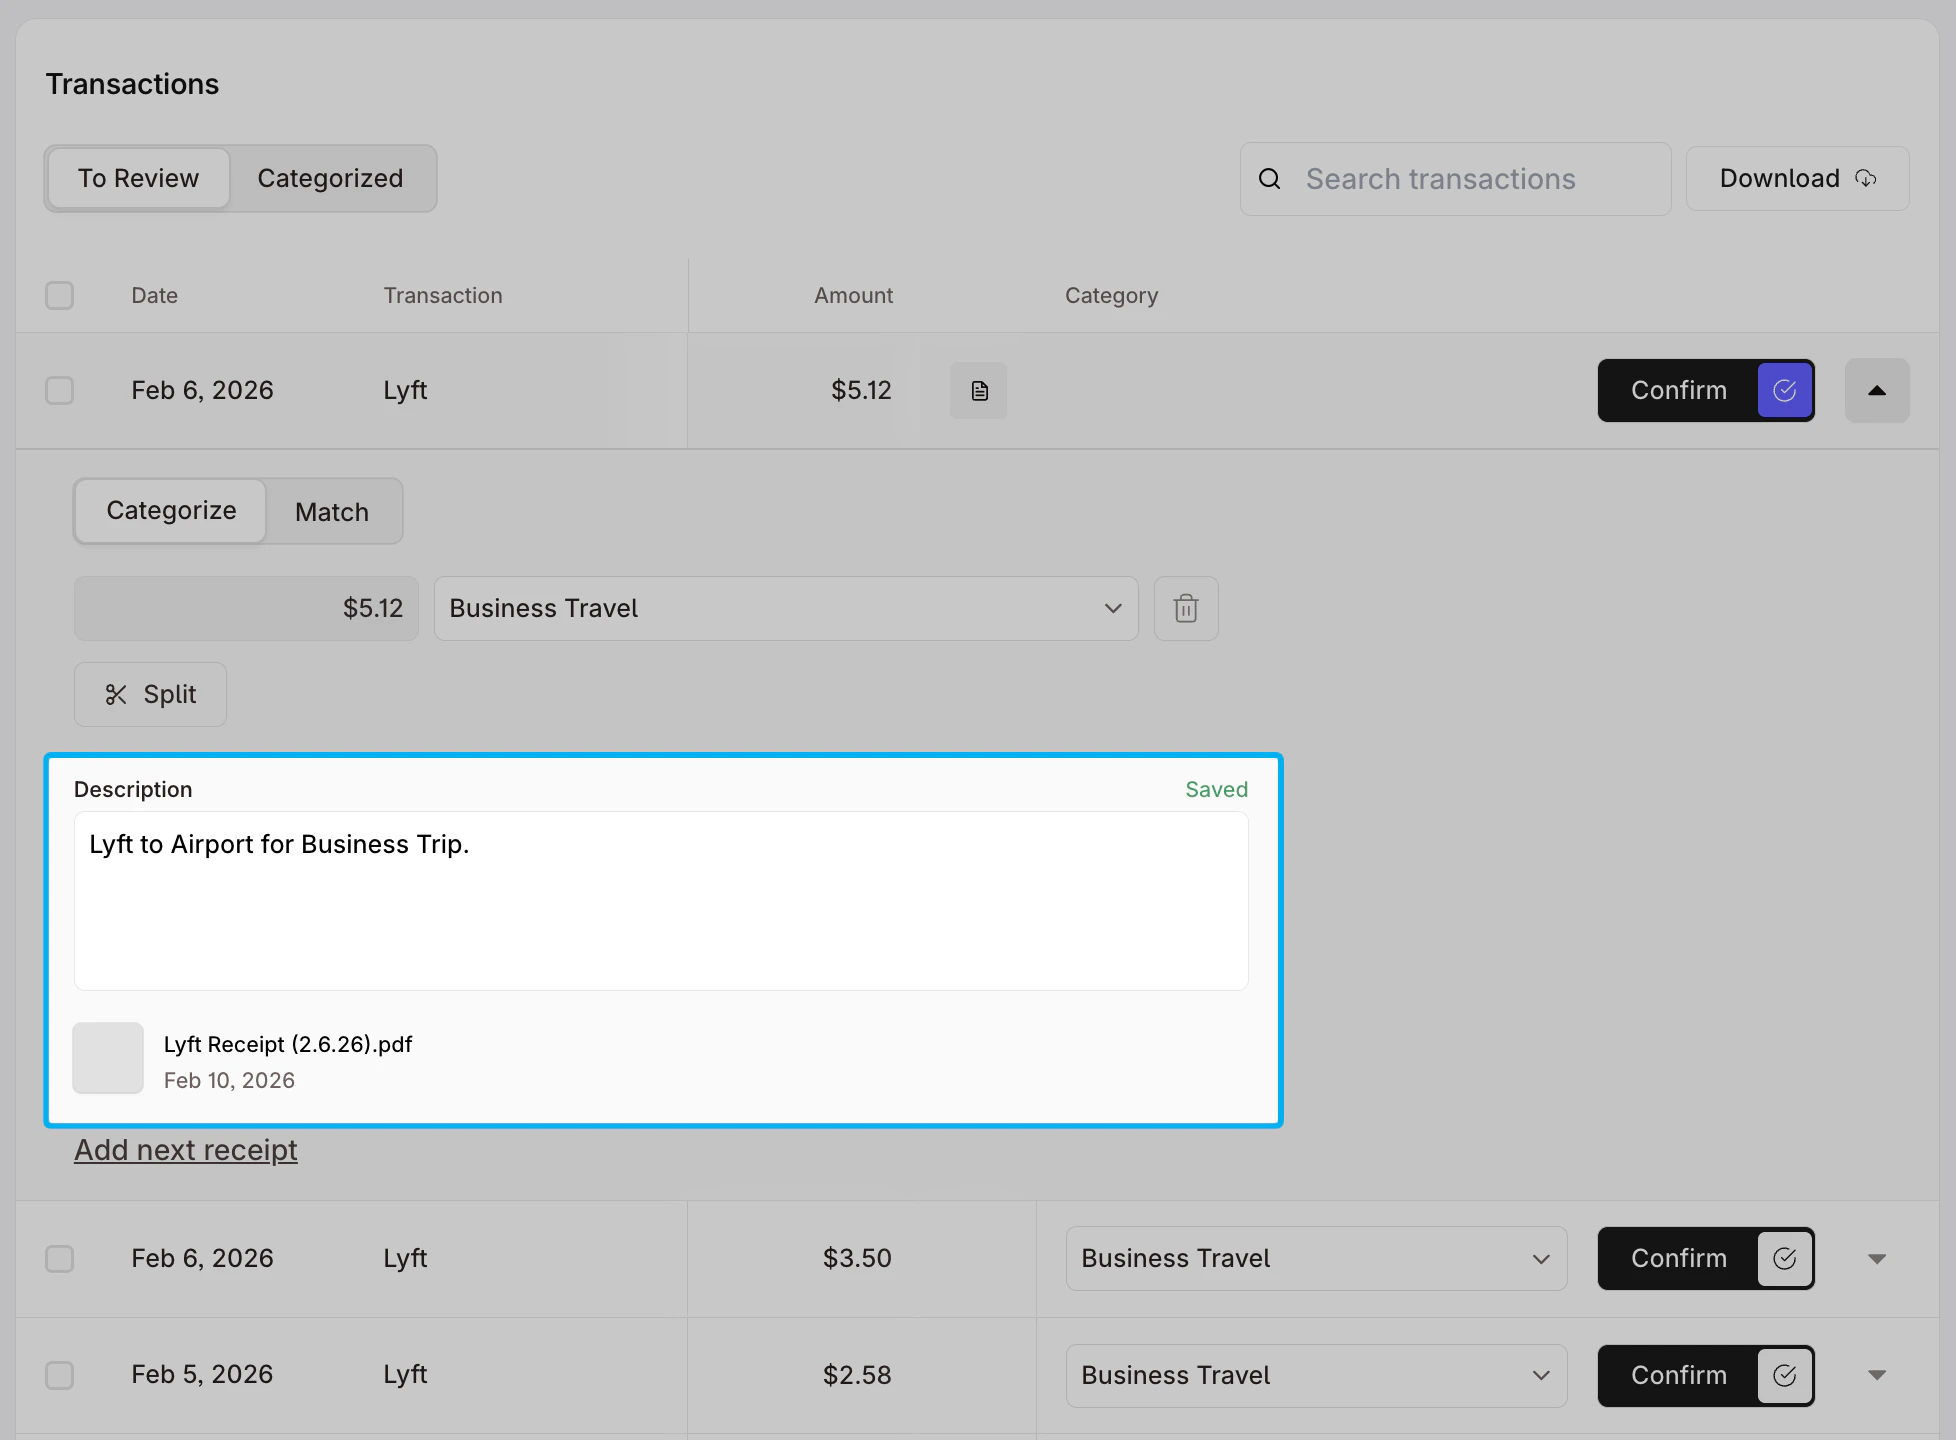
### Contextualize Transactions
If you want to track each transaction, you can also add descriptions or upload receipts.
Under **Transactions**, click on the drop-down to the right of the transaction that you want to document
Type any relevant context in the text box under **Description**. Click the **Upload receipt** button to upload any relevant document directly from your device. Click **Add next receipt** to upload additional documents.
**Confirm** or **Update** the transaction.
### Contextualize Transactions
If you want to track each transaction, you can also add descriptions or upload receipts.
Under **Transactions**, click on the drop-down to the right of the transaction that you want to document
Type any relevant context in the text box under **Description**. Click the **Upload receipt** button to upload any relevant document directly from your device. Click **Add next receipt** to upload additional documents.
 Hover over the receipt to **delete**, **download**, or **view** the uploaded receipt.
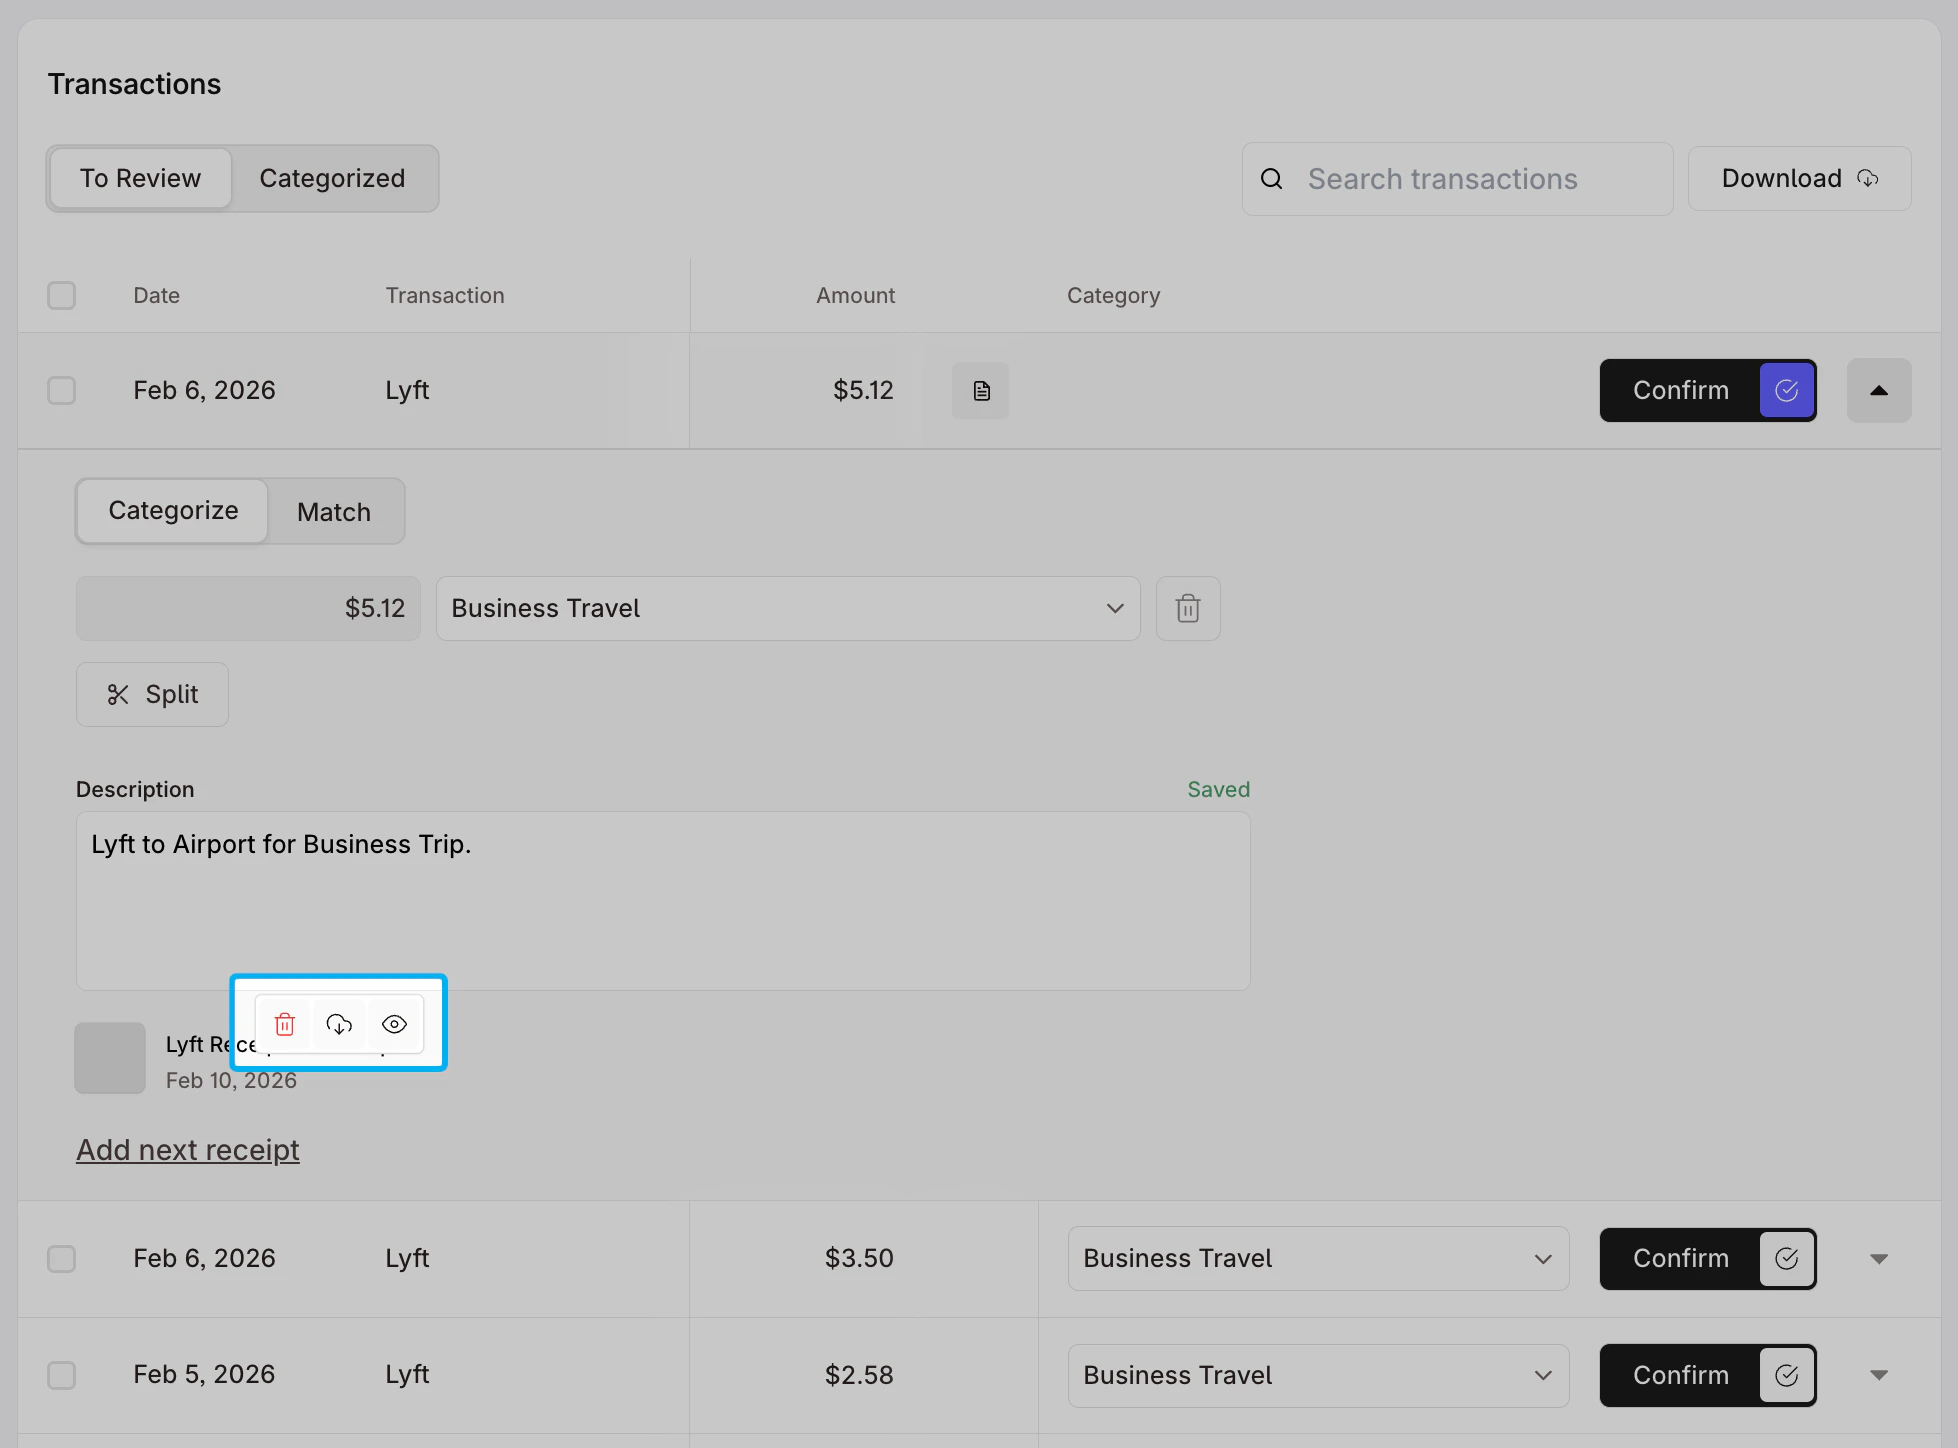 **Confirm** or **Update** the transaction.
***
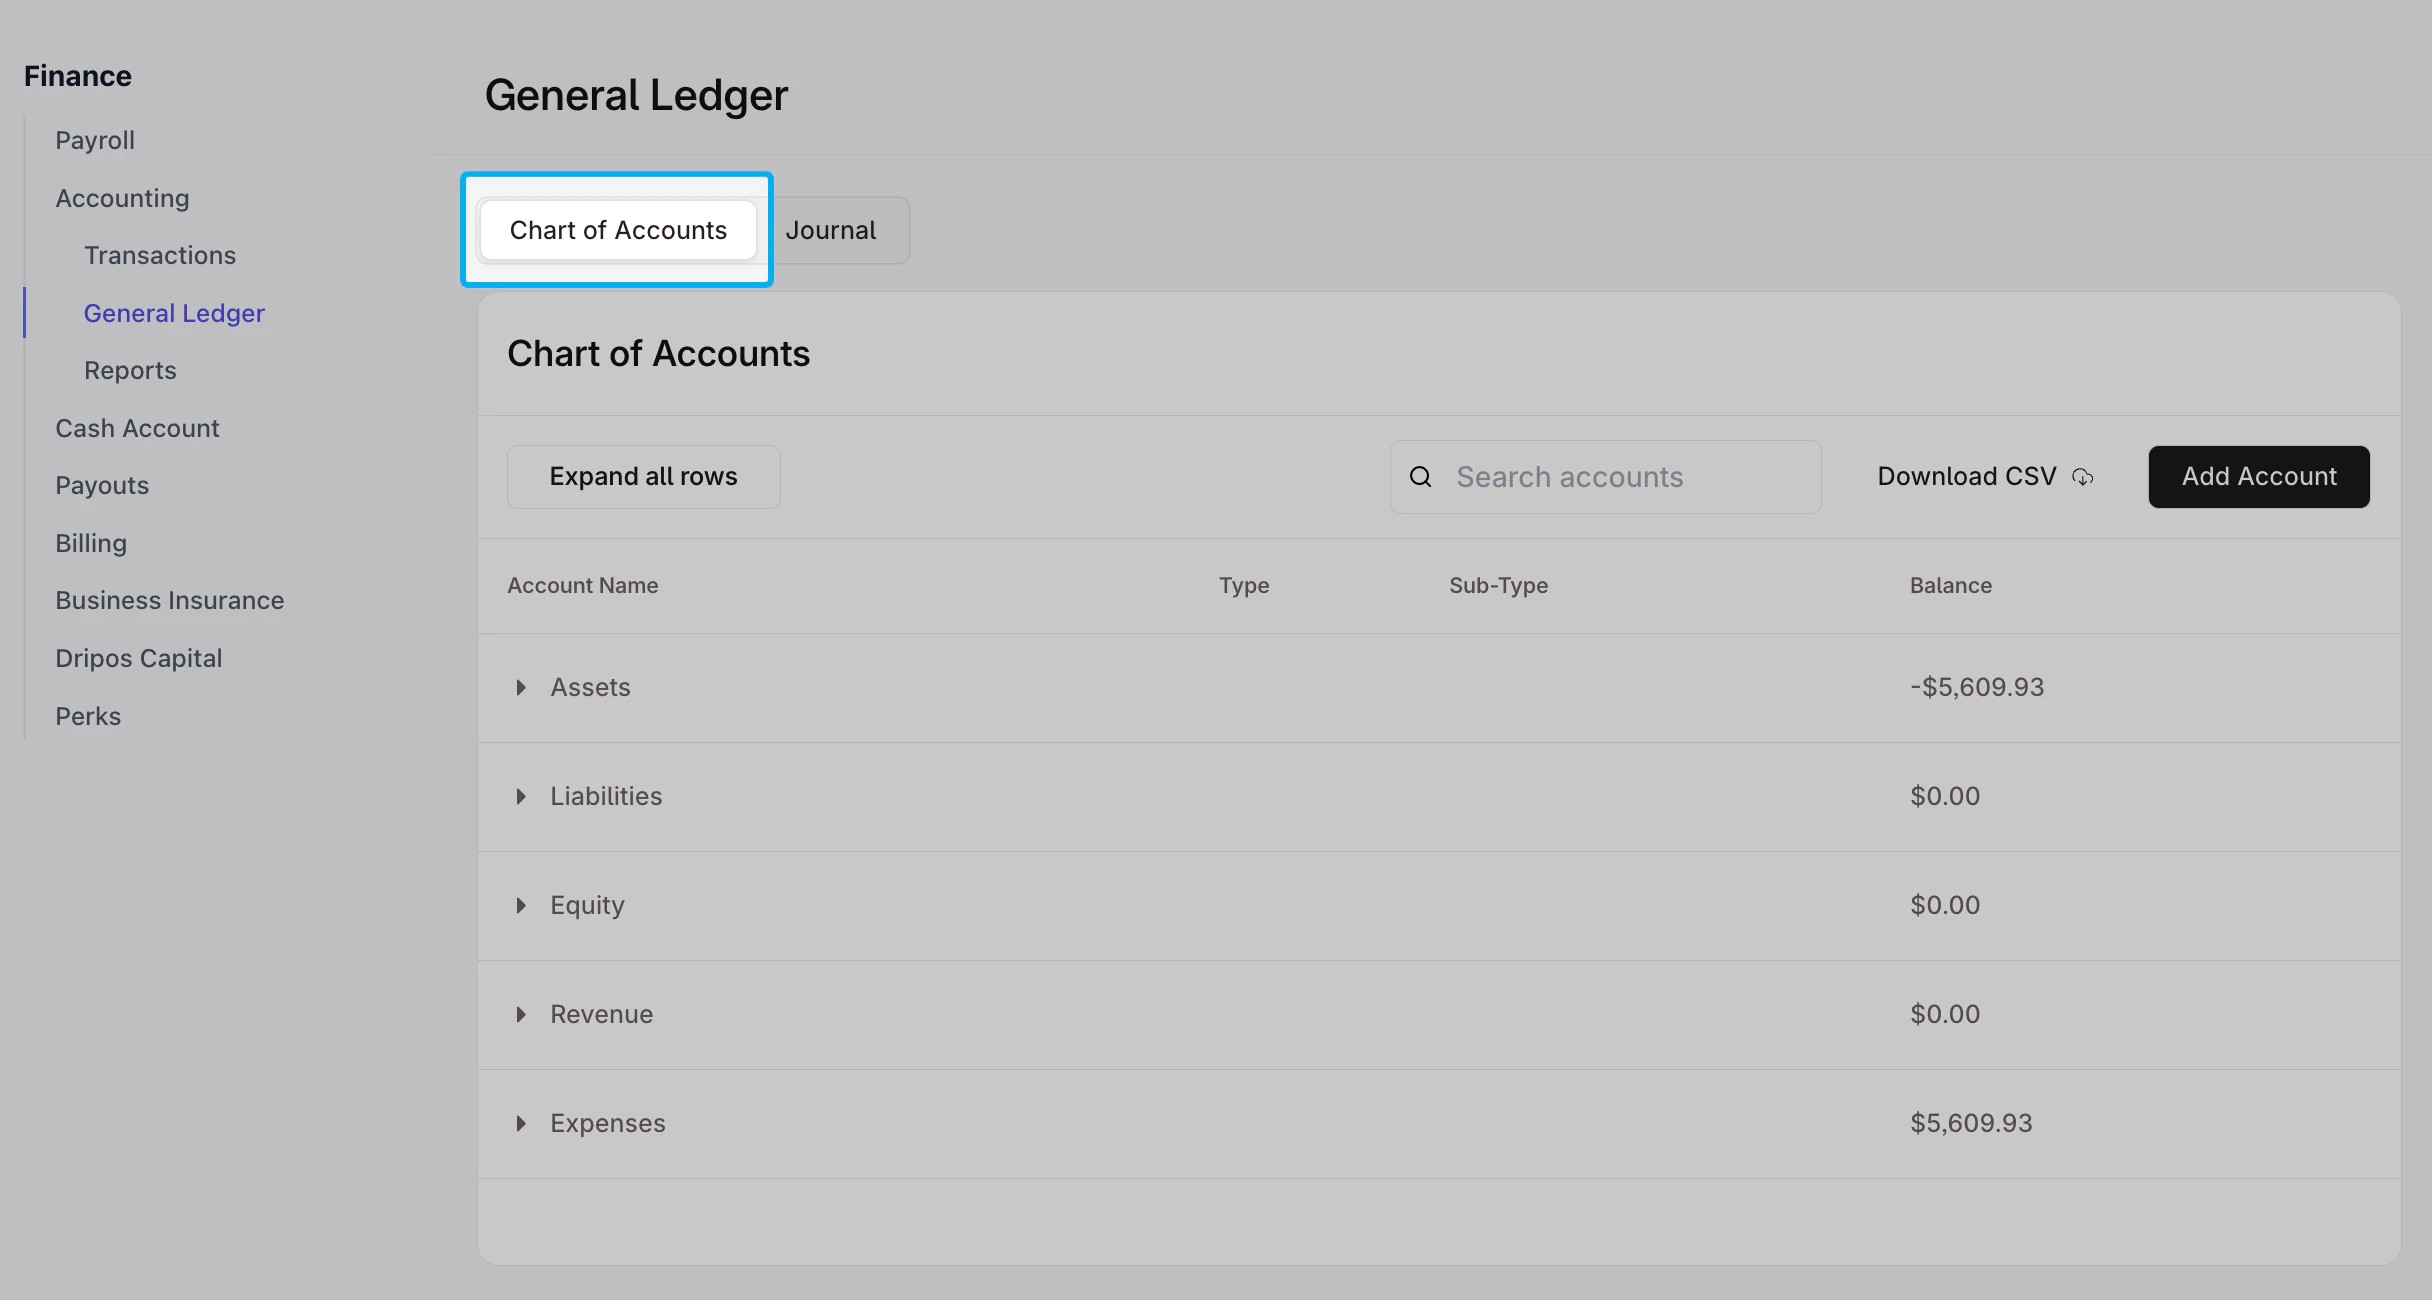
## Managing Your Chart of Accounts
The chart of accounts is a **list of all the categories you use to track your business finances** – including what you earn, spend, own, and owe.
You can manage your chart of accounts on the Dashboard by navigating to **Finance > Accounting > General Ledger > Chart of Accounts**
**Confirm** or **Update** the transaction.
***
## Managing Your Chart of Accounts
The chart of accounts is a **list of all the categories you use to track your business finances** – including what you earn, spend, own, and owe.
You can manage your chart of accounts on the Dashboard by navigating to **Finance > Accounting > General Ledger > Chart of Accounts**
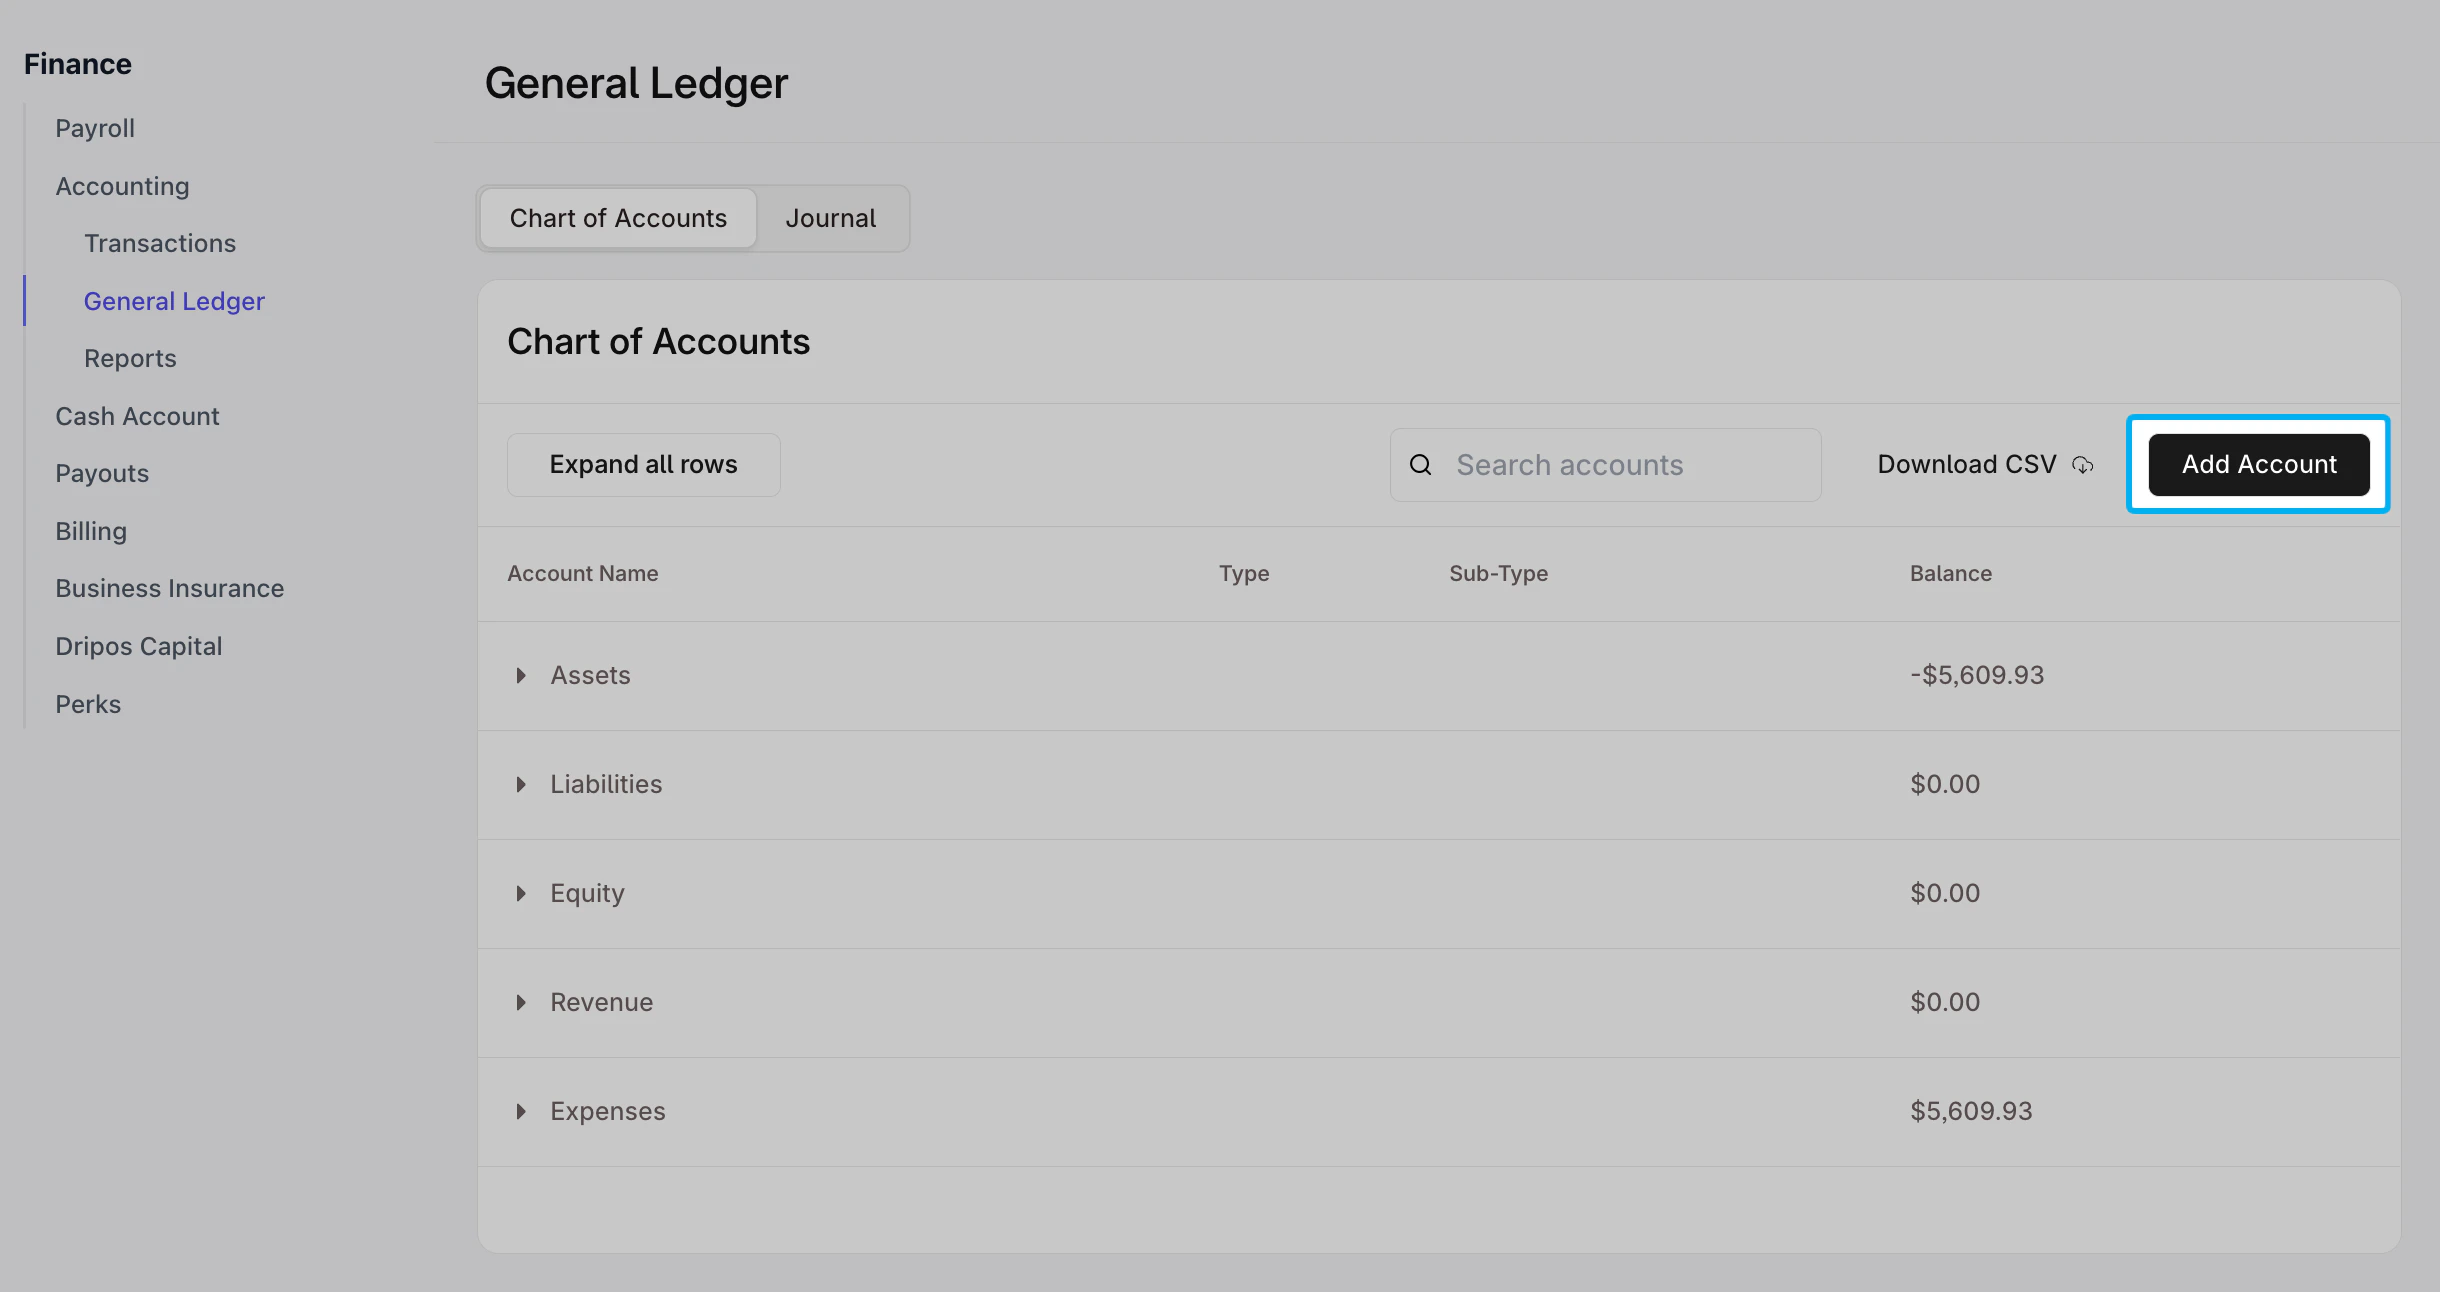
 ### Create New Accounts
Select **Add Account** and use the options on the pop-up screen to create additional accounts to reflect categories specific to your business.
### Create New Accounts
Select **Add Account** and use the options on the pop-up screen to create additional accounts to reflect categories specific to your business.
 Fill in the drop-downs and fields. You can set 6 attributes for your accounts:
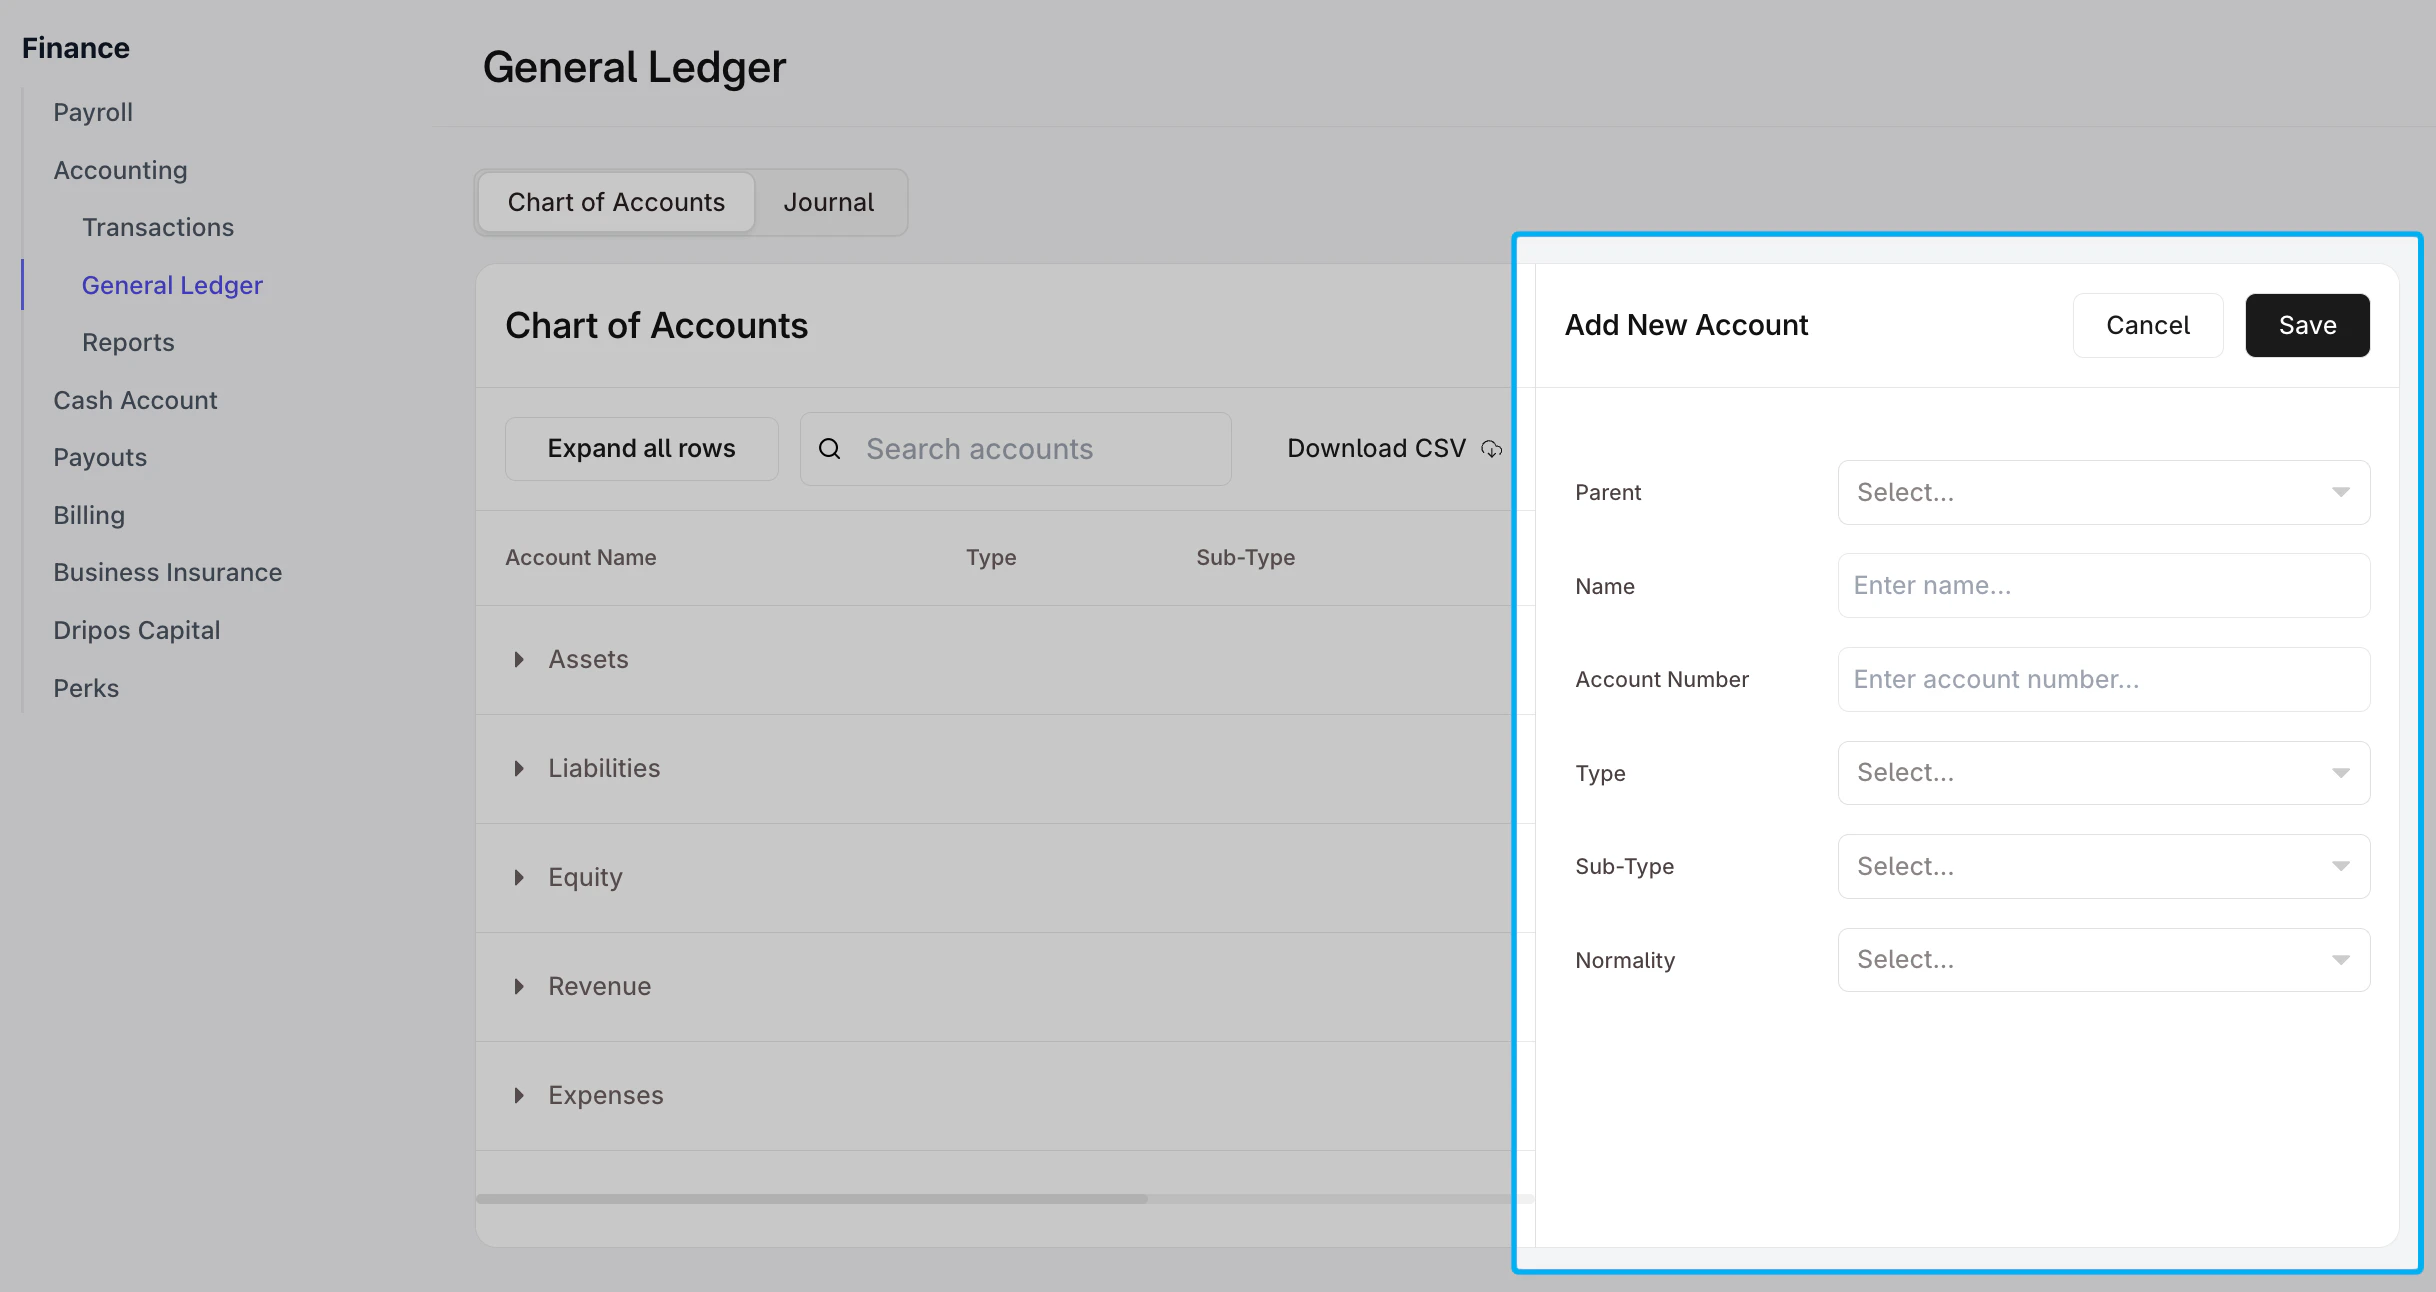 * **Parent:** Select the parent account or category to which your new account will belong.
* **Name:** Enter the name you’d like to give this new account. Note, this will appear on your reports and financial statements.
* **Account Number:** Enter an account number for the new account.
* **Type:** Choose the high-level category for the new account – **Assets**, **Liabilities**, **Equity**, **Revenues**, or **Expenses.**
* **Sub-type:** The **Sub-type** will automatically populate based on the Parent account selected. You can edit the **Sub-type** if desired.
* **Normality:** The **Normality** will automatically populate based on the Parent account selected and will determine how increases and decreases in the account’s balance are recorded. You can edit the **Normality** if desired.
Click **Save** at the top of the modal.
### Edit Existing Accounts
Hover over an existing account to view the pencil icon to the right side of the account.
* **Parent:** Select the parent account or category to which your new account will belong.
* **Name:** Enter the name you’d like to give this new account. Note, this will appear on your reports and financial statements.
* **Account Number:** Enter an account number for the new account.
* **Type:** Choose the high-level category for the new account – **Assets**, **Liabilities**, **Equity**, **Revenues**, or **Expenses.**
* **Sub-type:** The **Sub-type** will automatically populate based on the Parent account selected. You can edit the **Sub-type** if desired.
* **Normality:** The **Normality** will automatically populate based on the Parent account selected and will determine how increases and decreases in the account’s balance are recorded. You can edit the **Normality** if desired.
Click **Save** at the top of the modal.
### Edit Existing Accounts
Hover over an existing account to view the pencil icon to the right side of the account.
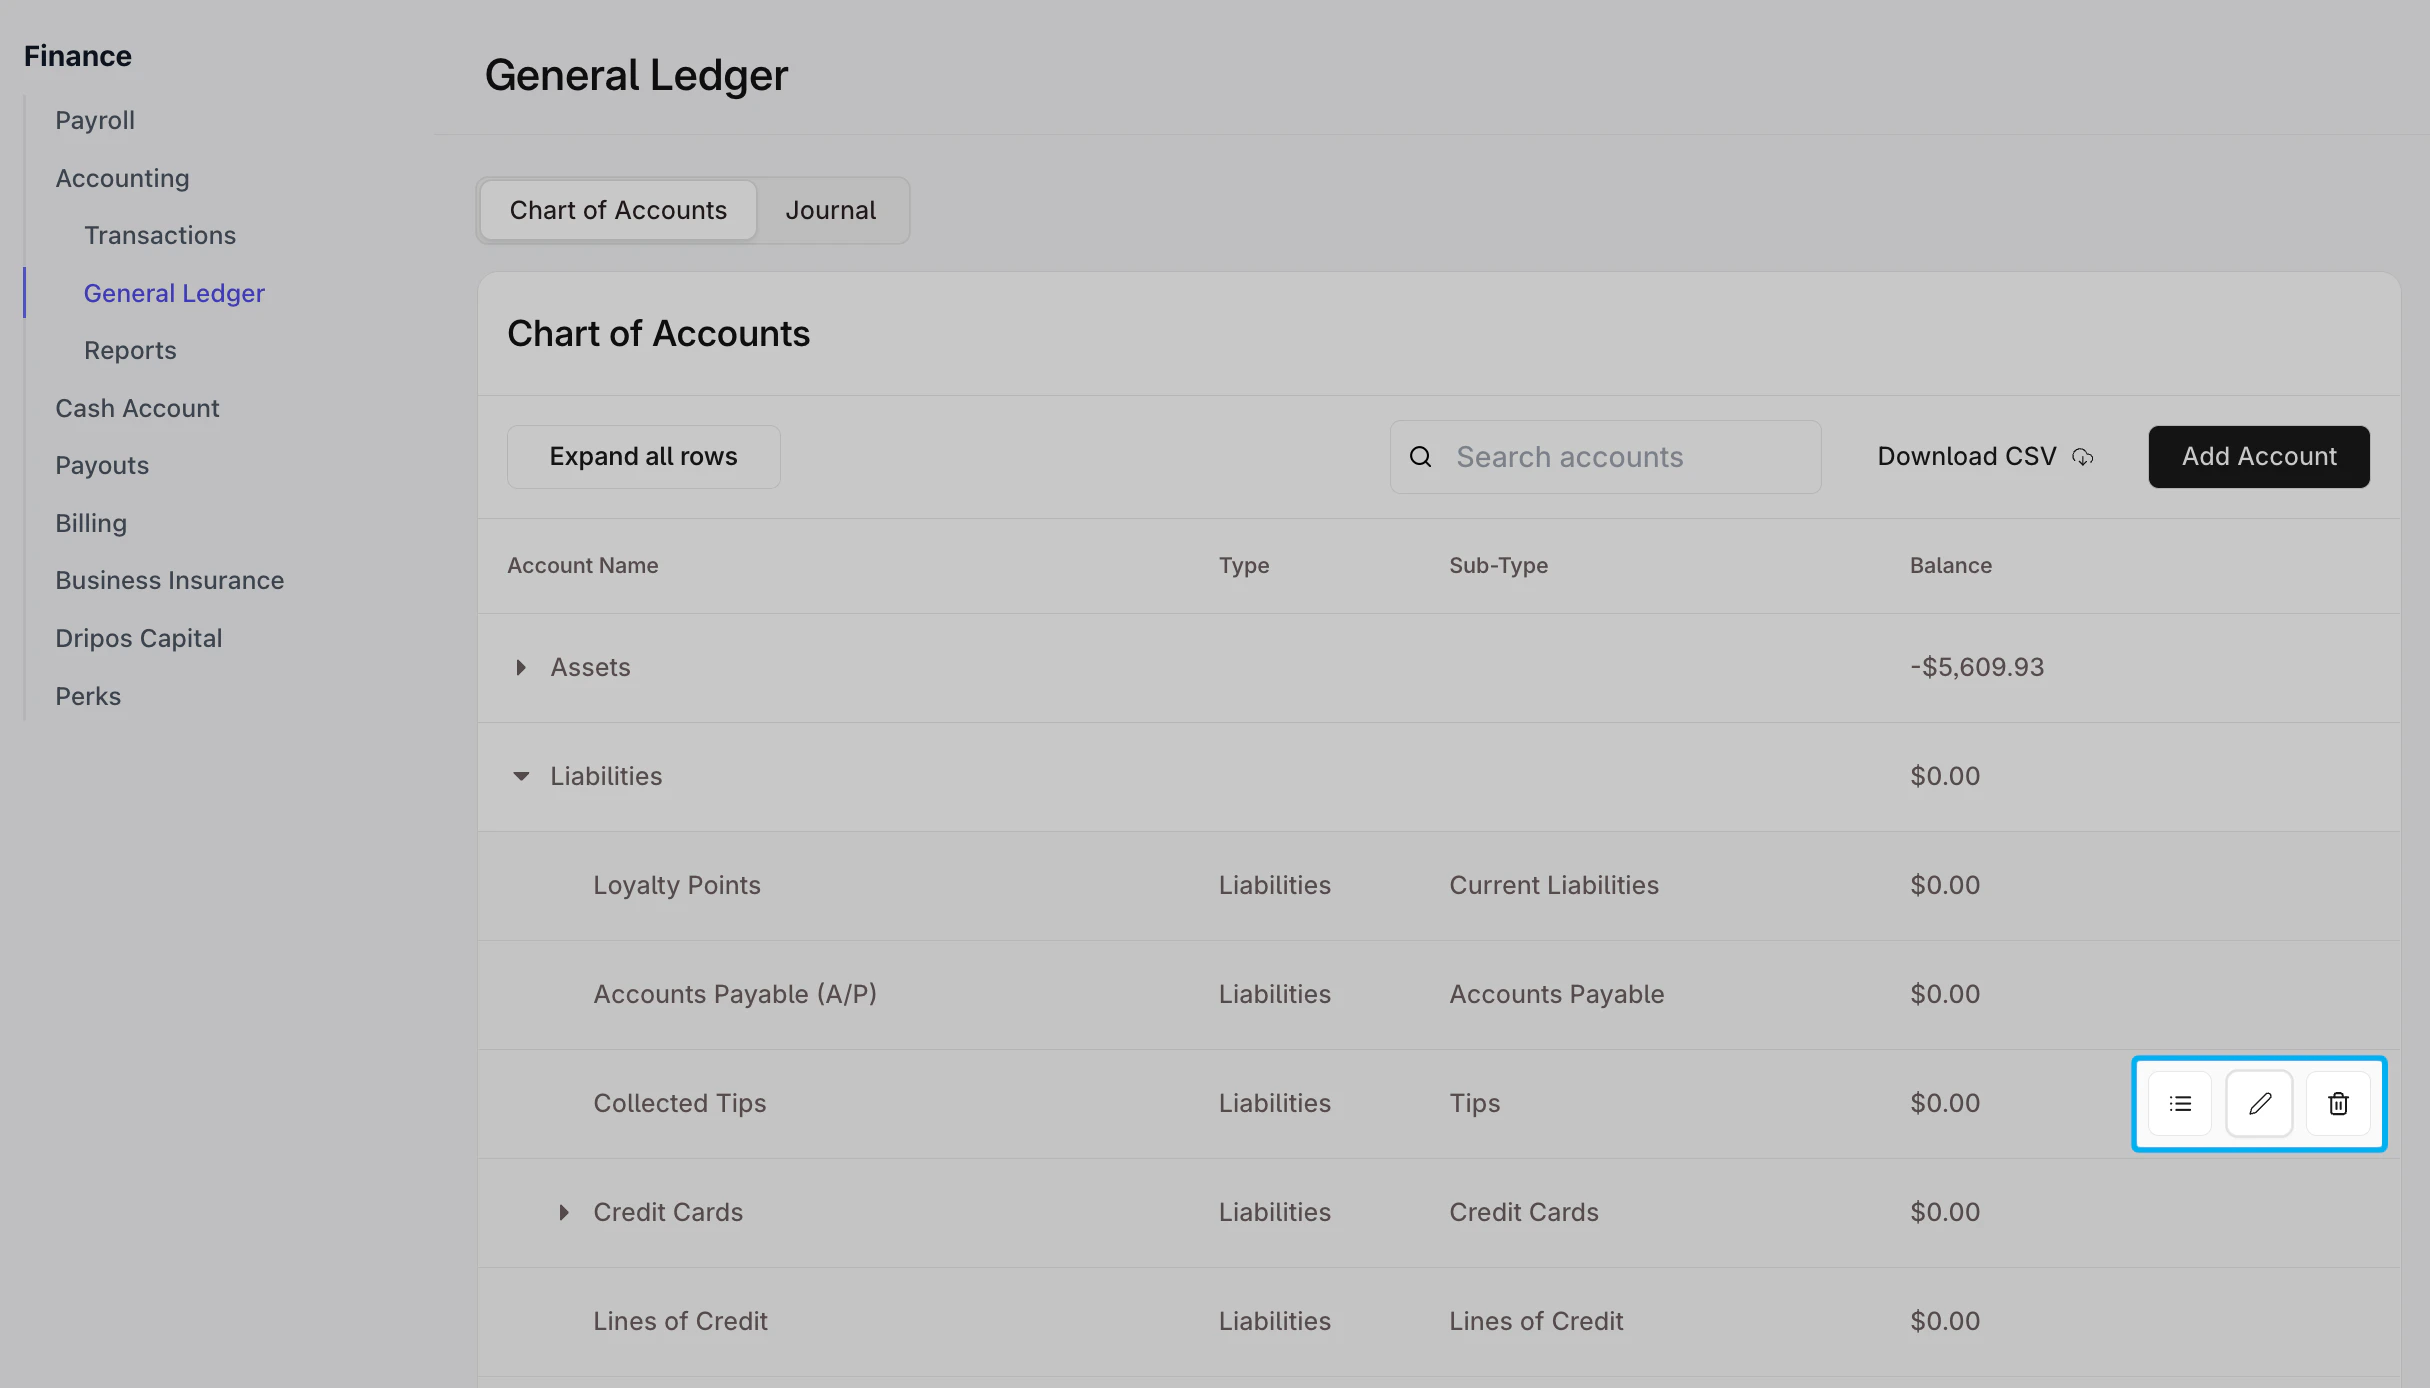 Select the pencil icon on the right side of each account to review and edit the account’s attributes. Note that the **Type** for each account is locked.
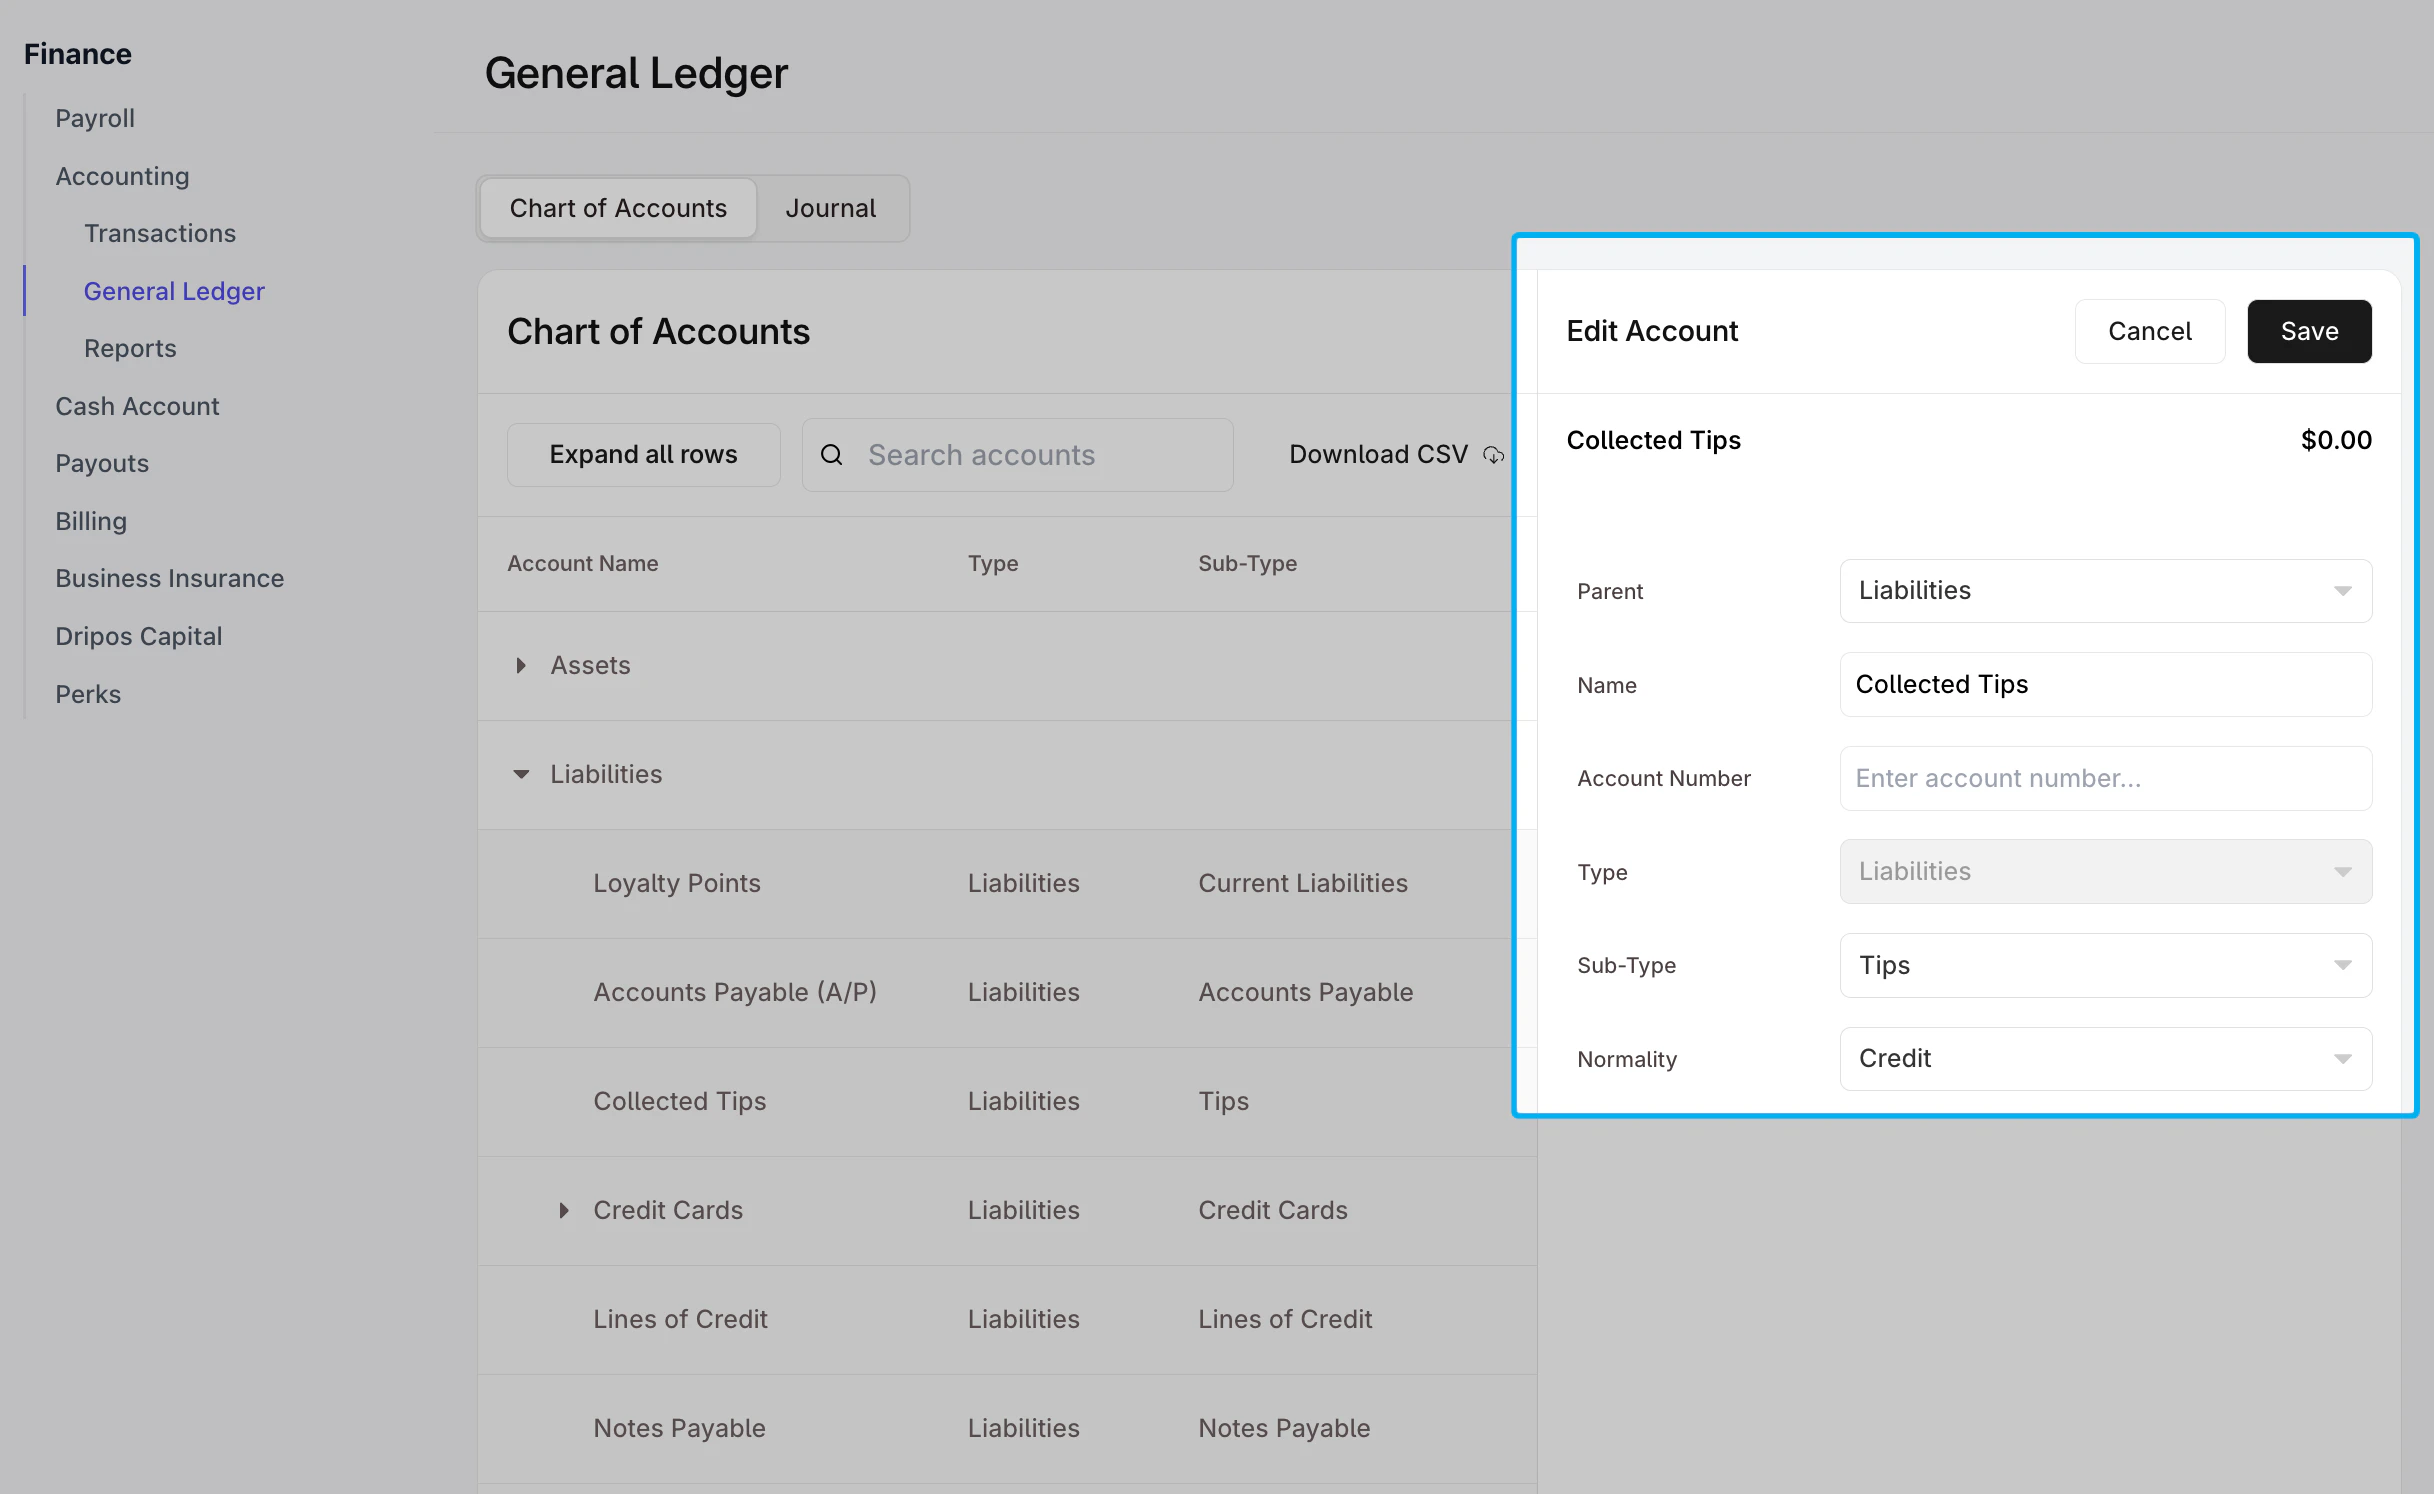 Click **Save** at the top of the modal.
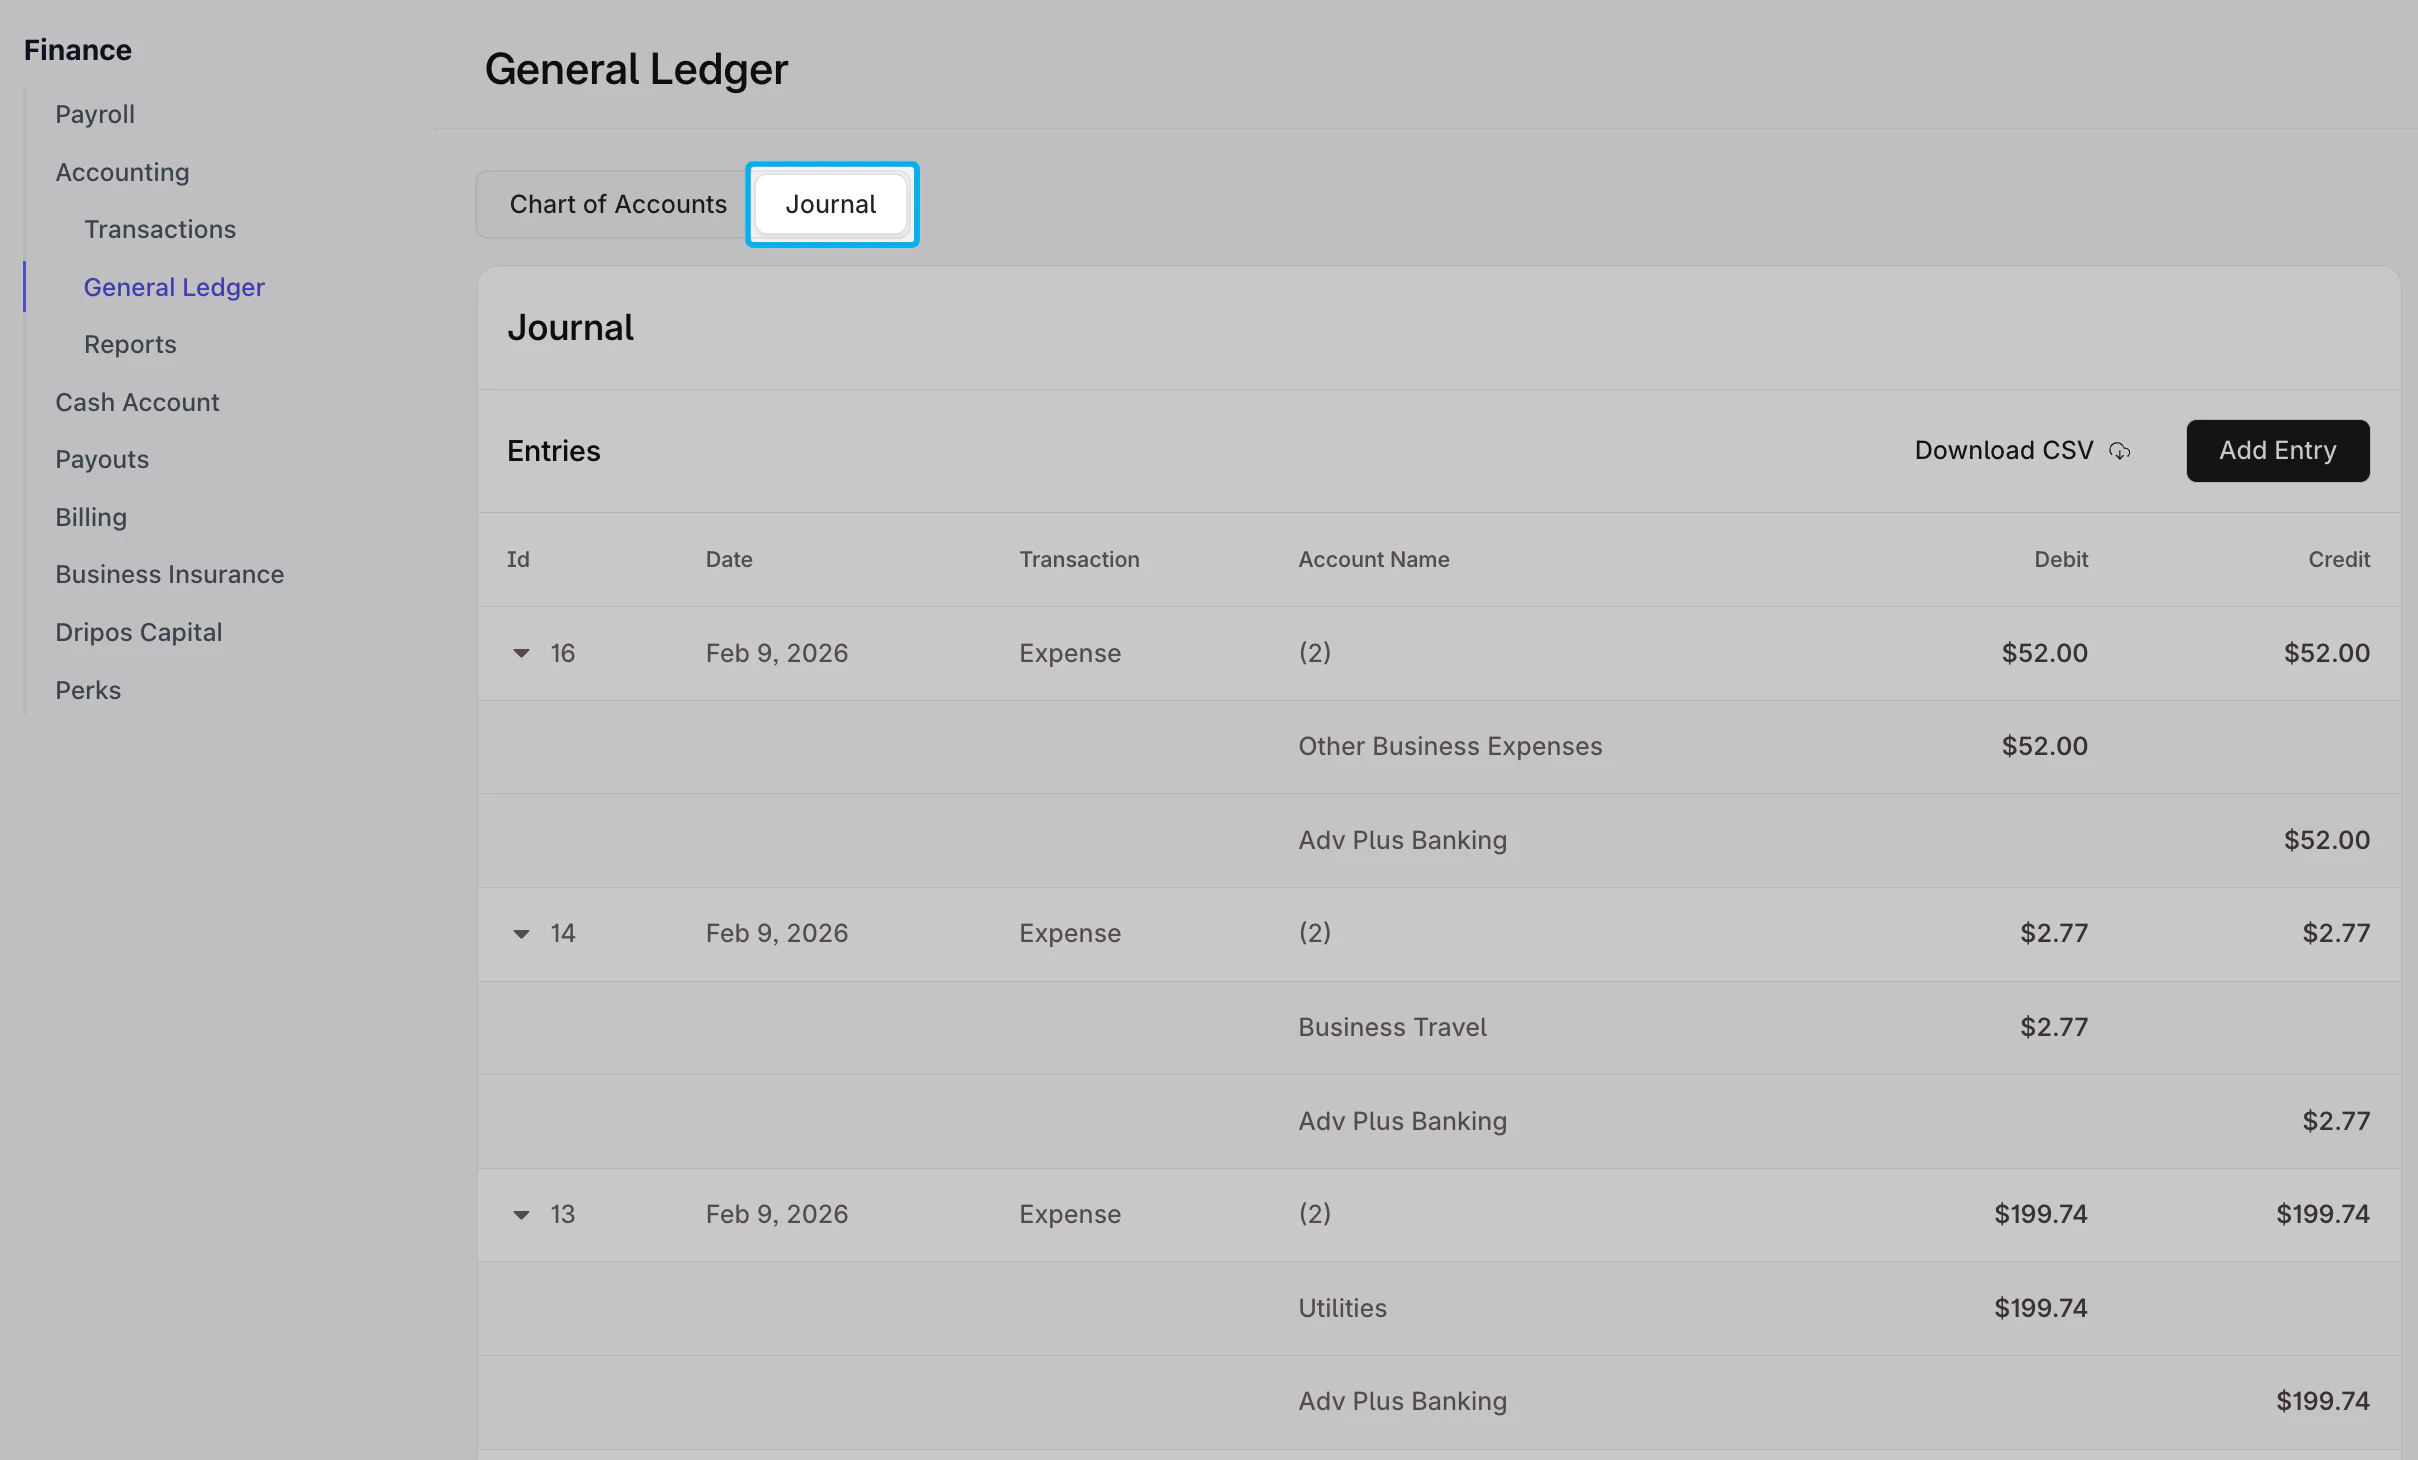
### View and Interpret Your Journal Entries
**Journal entries** are the building blocks of your accounting records. Each one logs a business transaction – like a sale, a bill payment, or a bank deposit – so your financial statements stay accurate and up-to-date.
To view your journal entries, navigate to **Finance > Accounting > General Ledger > Journal**
Click **Save** at the top of the modal.
### View and Interpret Your Journal Entries
**Journal entries** are the building blocks of your accounting records. Each one logs a business transaction – like a sale, a bill payment, or a bank deposit – so your financial statements stay accurate and up-to-date.
To view your journal entries, navigate to **Finance > Accounting > General Ledger > Journal**
 ***
## Reviewing Financial Reports
Financial statements give you a clear view of your business’s performance—profitability, assets and liabilities, and cash flow—so you can make informed decisions and plan for growth. Access your financial statements on the Dashboard by going to **Finance > Accounting > Reports**.
### Profit & Loss Statement
The **Profit & Loss Statement** (Income Statement) shows how much money your business made (revenues) and spent (expenses) over a certain time period
***
## Reviewing Financial Reports
Financial statements give you a clear view of your business’s performance—profitability, assets and liabilities, and cash flow—so you can make informed decisions and plan for growth. Access your financial statements on the Dashboard by going to **Finance > Accounting > Reports**.
### Profit & Loss Statement
The **Profit & Loss Statement** (Income Statement) shows how much money your business made (revenues) and spent (expenses) over a certain time period
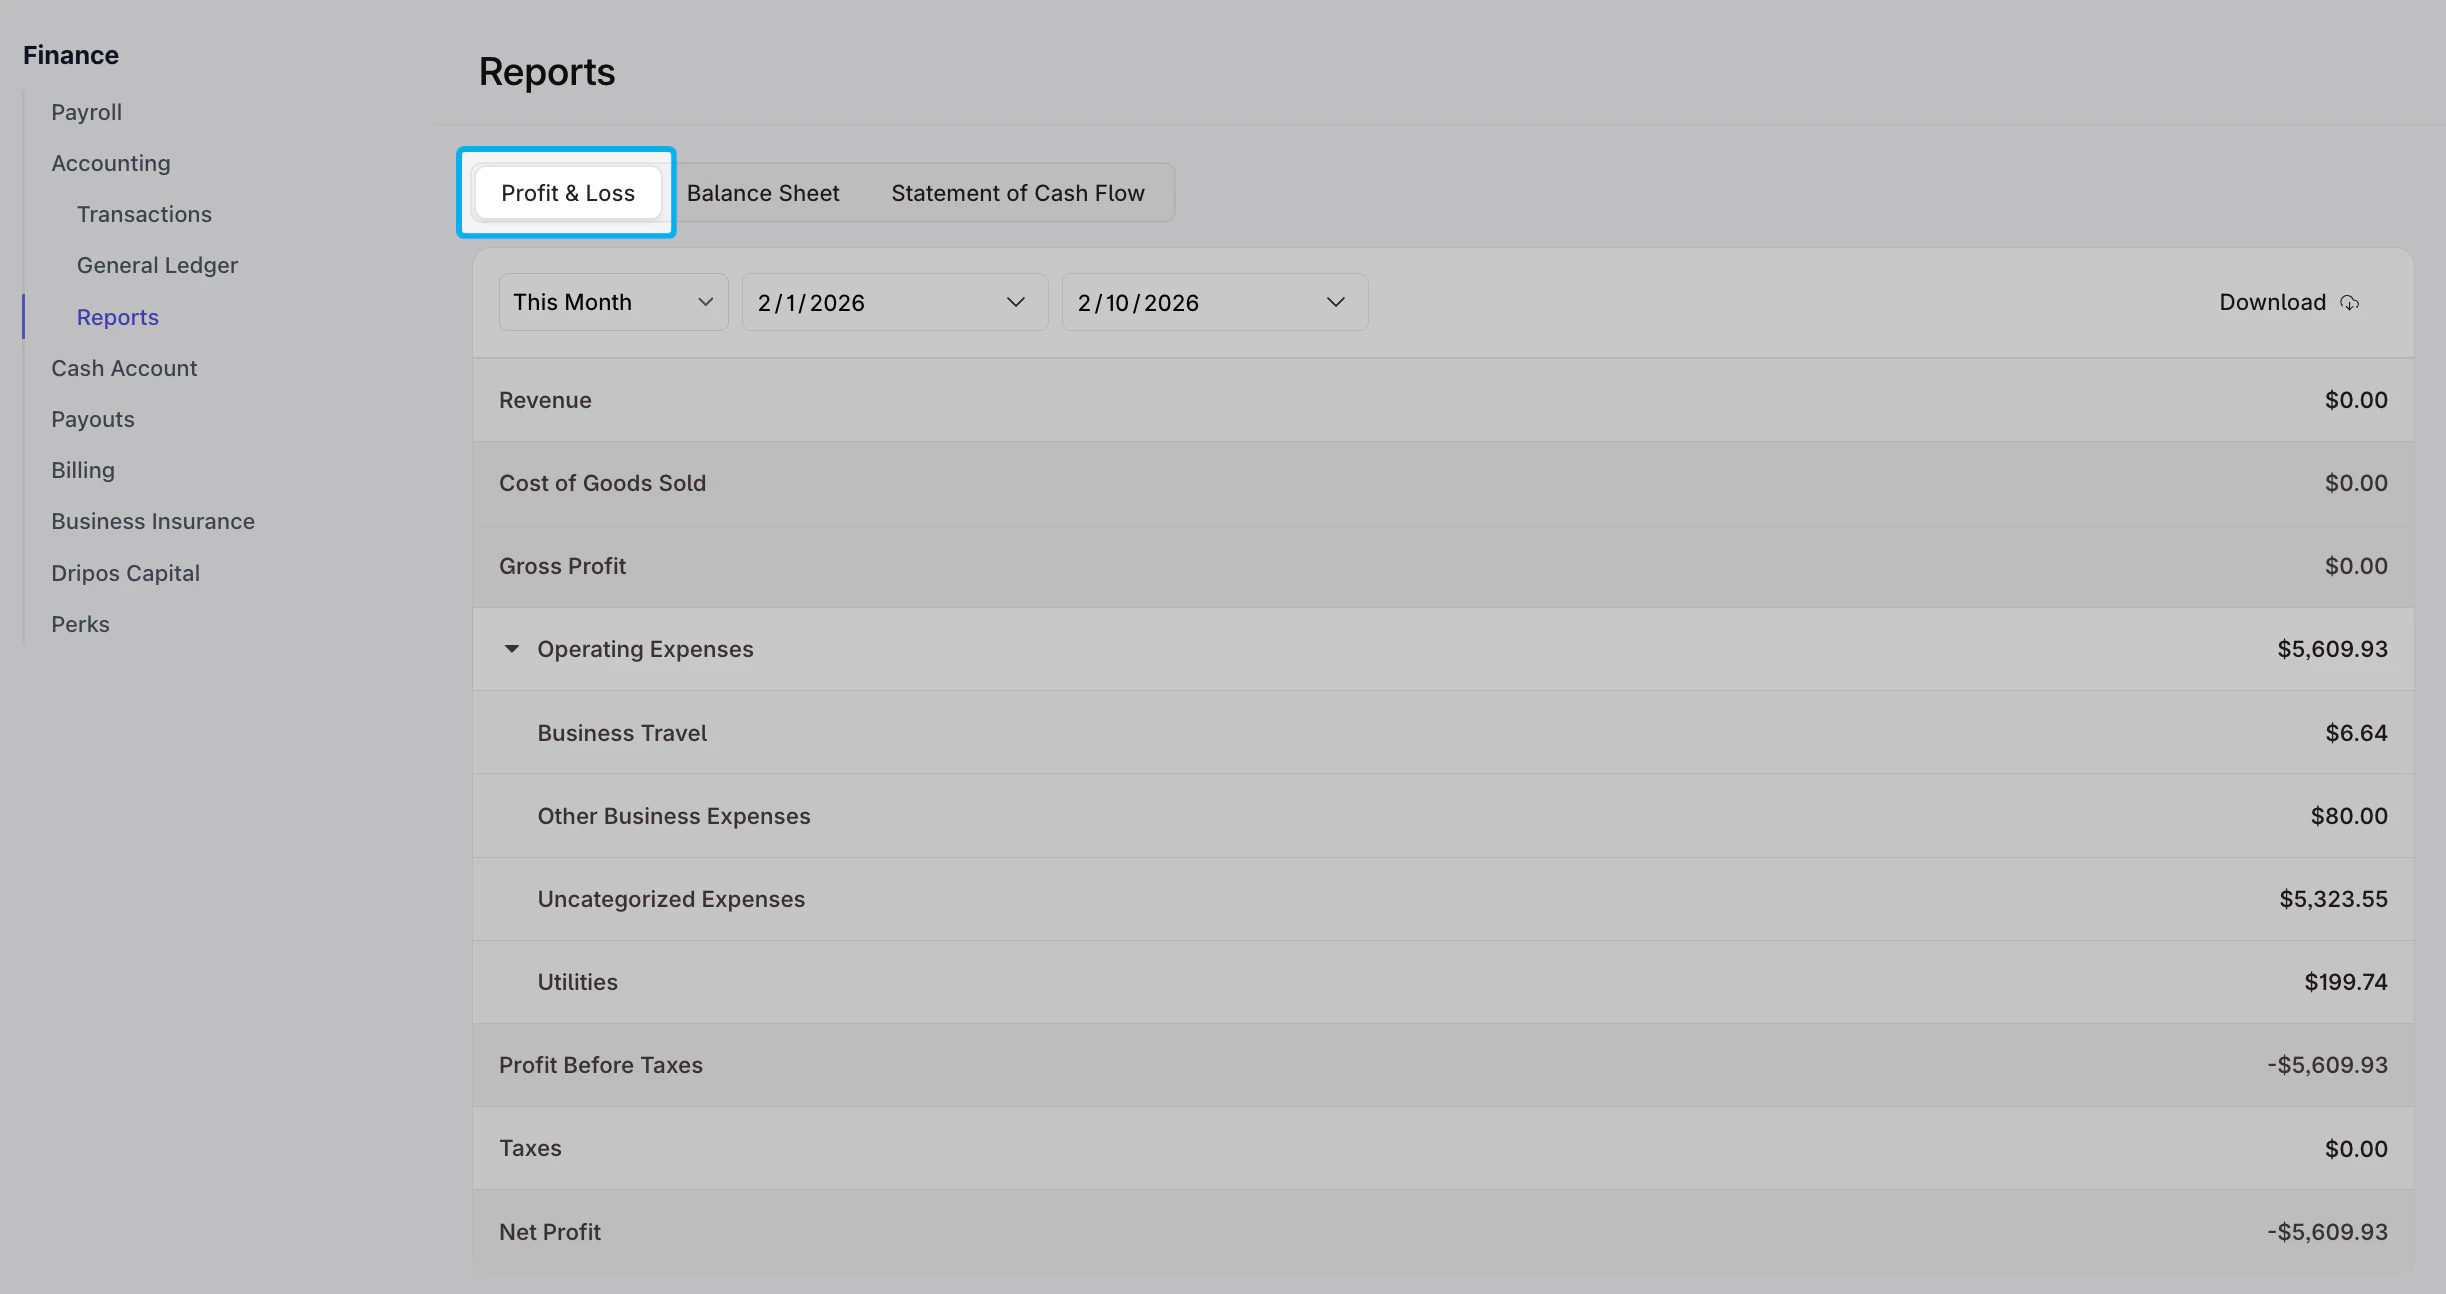 It breaks these into simple categories so you can see:
* Whether your business is making a profit or running at a loss
* Which activities or products generate the most revenue
* What categories are your biggest expenses
### Balance Sheet
The **Balance Sheet** gives you a snapshot of your business’s financial position at a point in time.
It breaks these into simple categories so you can see:
* Whether your business is making a profit or running at a loss
* Which activities or products generate the most revenue
* What categories are your biggest expenses
### Balance Sheet
The **Balance Sheet** gives you a snapshot of your business’s financial position at a point in time.
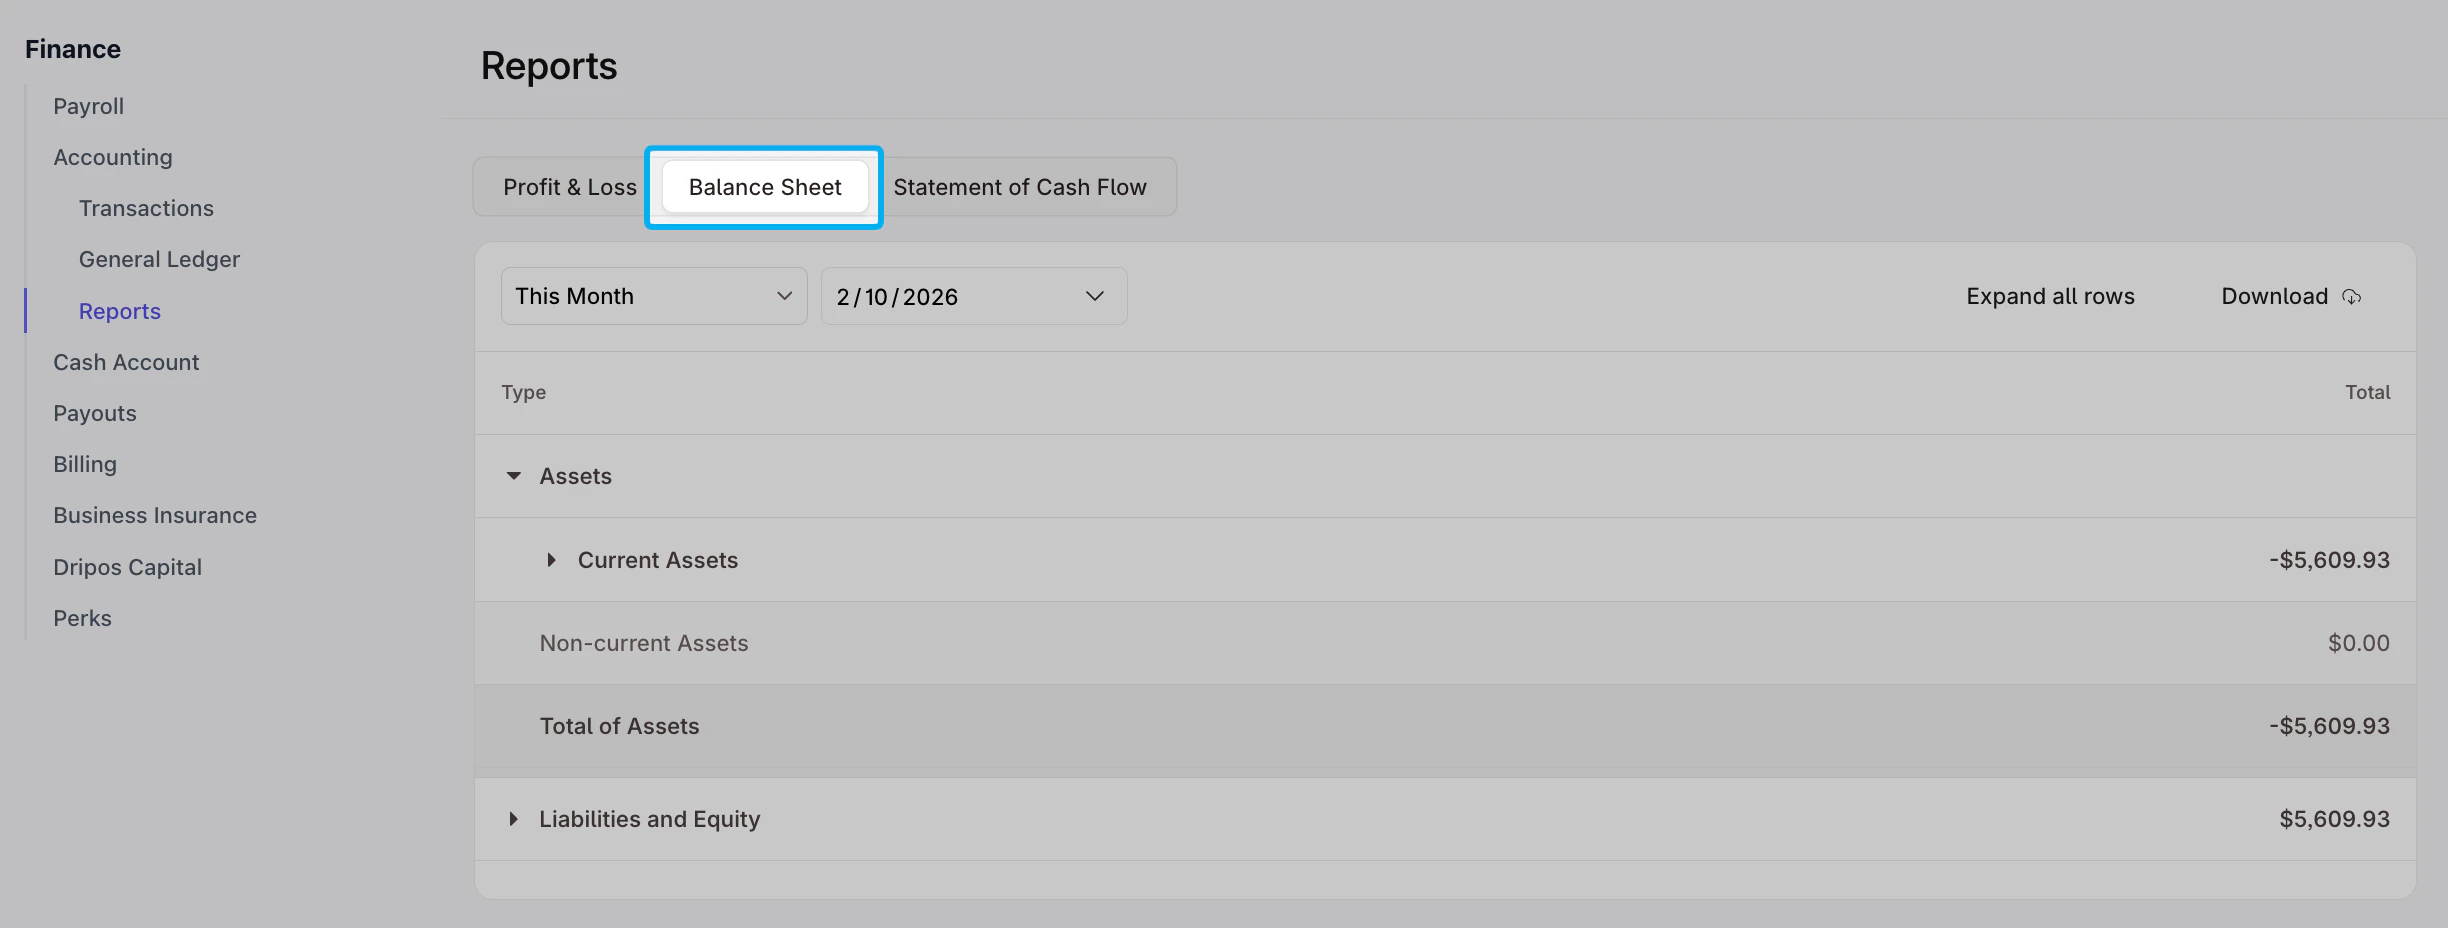 It breaks down your business finances into five standard categories:
* **What you earn** – such as sales (called **revenues**)
* **What you spend** – such as retail supplies or rent (called **expenses**)
* **What you own** – such as cash, inventory, or equipment (called **assets**)
* **What you owe** – such as loans or unpaid bills (called **liabilities**)
* **What’s left over** – the value of the business after paying debts (called **equity**)
### Statement of Cash Flow
The **Statement of Cash Flow** shows how cash moves in and out of your business. It tracks cash from day-to-day business operations, cash used for investments (like new equipment), and cash from financing (like loans or capital from owners)
It breaks down your business finances into five standard categories:
* **What you earn** – such as sales (called **revenues**)
* **What you spend** – such as retail supplies or rent (called **expenses**)
* **What you own** – such as cash, inventory, or equipment (called **assets**)
* **What you owe** – such as loans or unpaid bills (called **liabilities**)
* **What’s left over** – the value of the business after paying debts (called **equity**)
### Statement of Cash Flow
The **Statement of Cash Flow** shows how cash moves in and out of your business. It tracks cash from day-to-day business operations, cash used for investments (like new equipment), and cash from financing (like loans or capital from owners)