> ## Documentation Index
> Fetch the complete documentation index at: https://support.dripos.com/llms.txt
> Use this file to discover all available pages before exploring further.
# Checklist System Overview
> Keep track of your employee's tasks with checklists
Dripos Checklists helps to create a digitalized to-do list for employees to complete during their shifts whether they’re at the POS or on their Hub App.
Turn laminated paper checklists into digital time-stamped tasks for easier management and seamless updates.
## Create Checklists
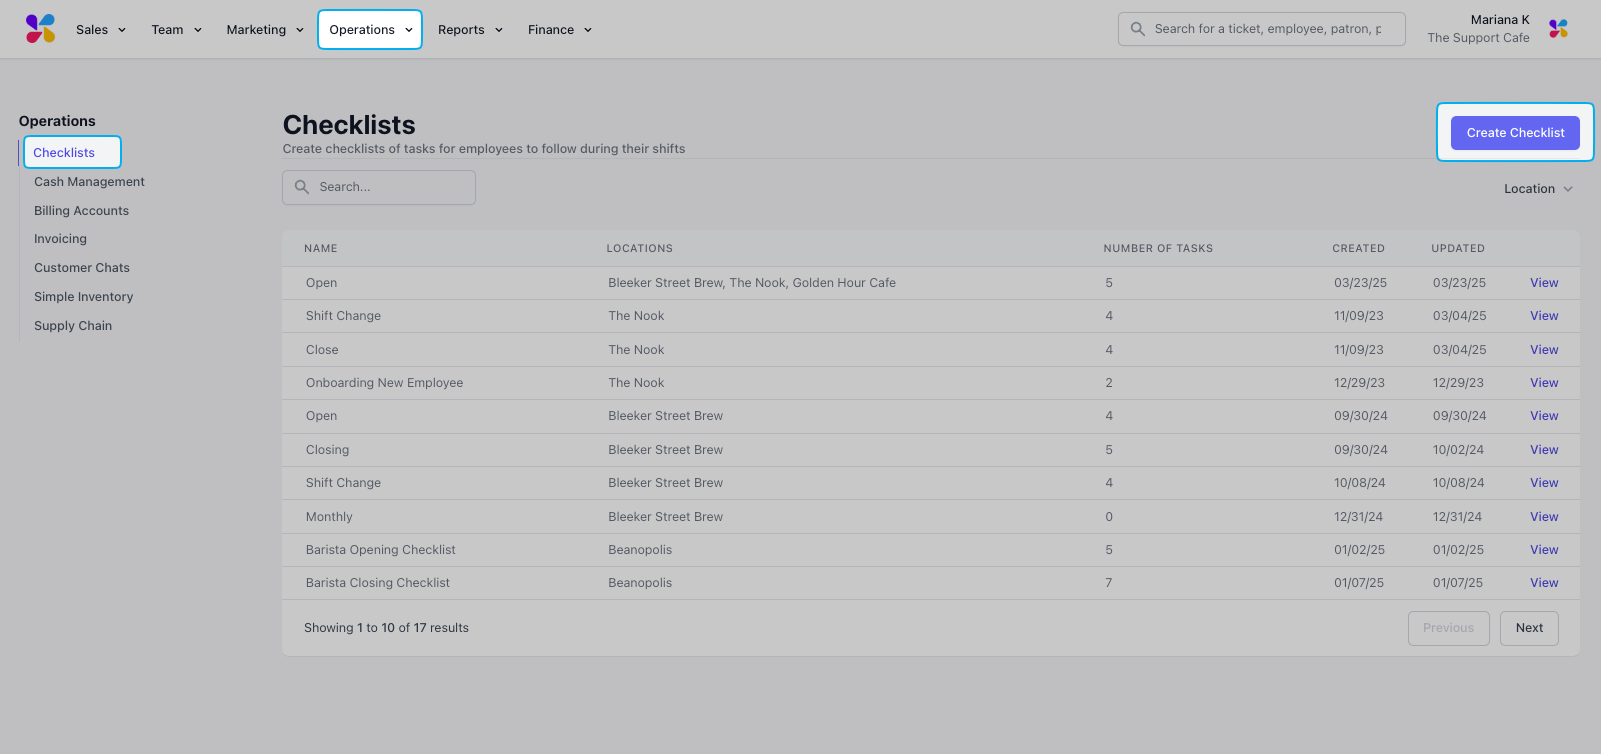
Create checklists from the dashboard to then be accessed via the POS and Hub App.
Click **Team** > **Checklists** > **Create Checklist**
 Complete the following fields to create a checklist:
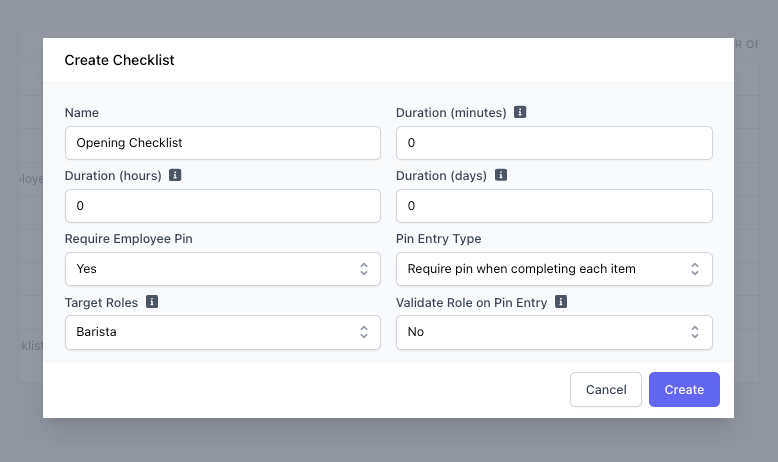 > **Duration (minutes):** Number of minutes employee(s) has to complete the checklist.
>
> **Duration (hours):** Number of hours employee(s) has to complete the checklist.
>
> **Duration (days):** Number of days employee(s) has to complete the checklist.
>
> **Require Employee Pin:** If **No**, the employee is not prompted to enter their Pin.
>
> **Pin Entry Type:** If require employee Pin is **Yes**, employee Pin is required when completing each task. Or toggle to only require employee Pin when closing the checklist.
>
> **Target Roles:** If selected, the employee attached to the role will be notified of a checklist requiring attention.
>
> **Validate Role on Pin Entry:** If **Yes**, only employees attached to the target role can complete the checklist. **Require Employee Pin** must be set to **Yes**.
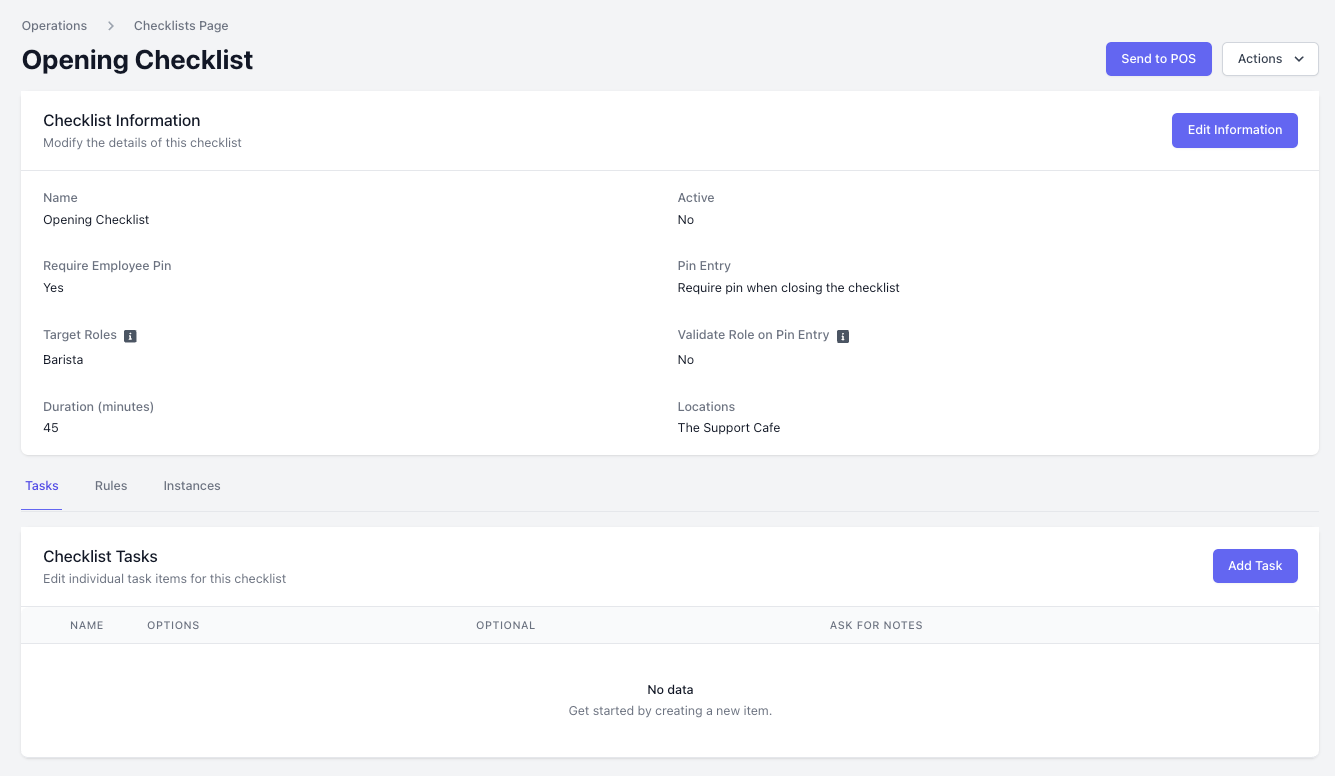
Click **Create**
> **Duration (minutes):** Number of minutes employee(s) has to complete the checklist.
>
> **Duration (hours):** Number of hours employee(s) has to complete the checklist.
>
> **Duration (days):** Number of days employee(s) has to complete the checklist.
>
> **Require Employee Pin:** If **No**, the employee is not prompted to enter their Pin.
>
> **Pin Entry Type:** If require employee Pin is **Yes**, employee Pin is required when completing each task. Or toggle to only require employee Pin when closing the checklist.
>
> **Target Roles:** If selected, the employee attached to the role will be notified of a checklist requiring attention.
>
> **Validate Role on Pin Entry:** If **Yes**, only employees attached to the target role can complete the checklist. **Require Employee Pin** must be set to **Yes**.
Click **Create**
 ***
## Create Tasks
Tasks are individual action items within the checklist to complete
Within a checklist, click **Add Task**
Complete the following fields:
***
## Create Tasks
Tasks are individual action items within the checklist to complete
Within a checklist, click **Add Task**
Complete the following fields:
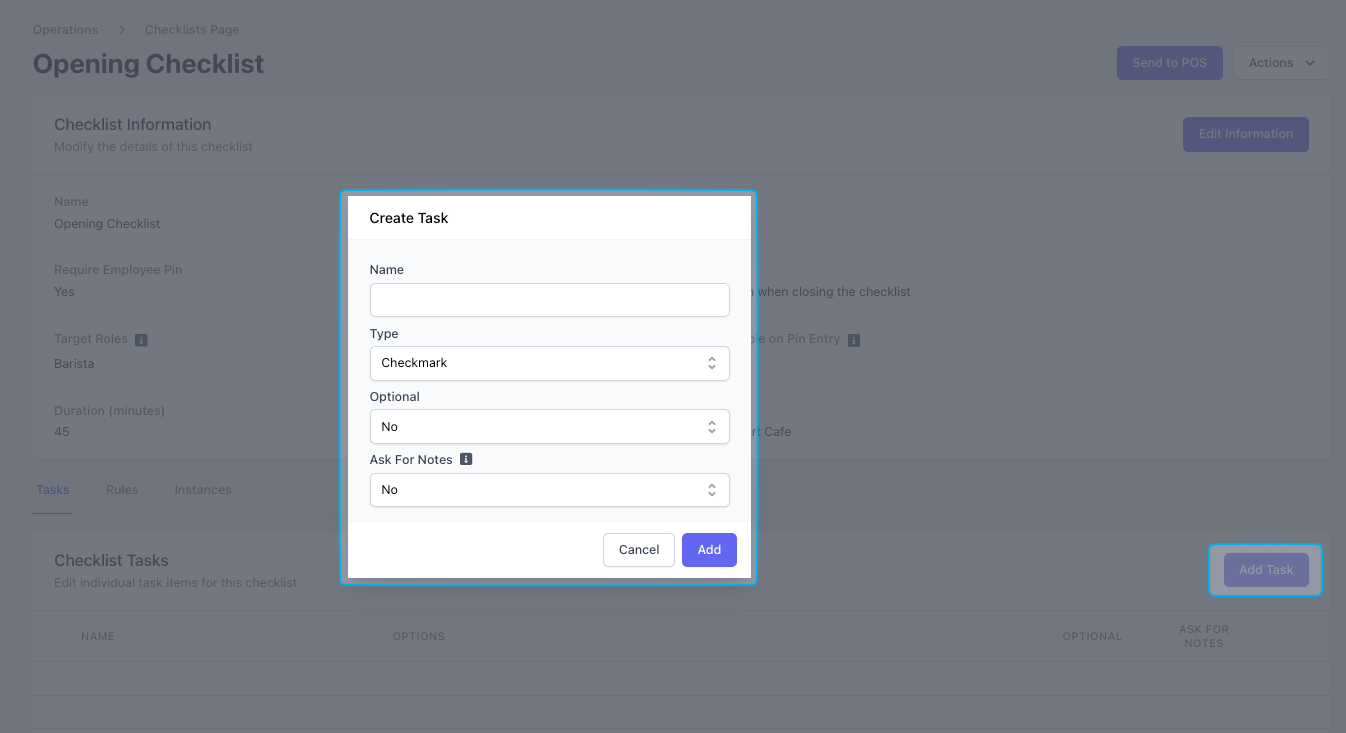 > **Name:** Title of the task
>
> **Type:** How the task can be completed
>
> **Optional:** If No, the task will be required in order to complete the checklist
>
> **Ask For Notes:** If Yes, the task will have a textbox to enter additional notes regarding the task
Depending on the necessary function of the task, there are different types of tasks that employees can complete.
* **Checkmark**
* **Yes or No**
* **Number**: displays a number to type in
* **Dropdown**: displays pre-determined options to choose from
* **Radio Select**: displays pre-determined options to choose from as a bubble-option
* **Short Answer**: displays a text box
* **Long Answer**: displays a text box
Click **Add**
***
## Create Rules
Rules are the frequencies at which the checklist should appear on the POS and Hub App.
At least one rule must be created in order for the checklist to appear on the POS and Hub App.
Within a checklist > click **Rules** > click **Add Rule**
Complete the following fields:
> **Name:** Title of the task
>
> **Type:** How the task can be completed
>
> **Optional:** If No, the task will be required in order to complete the checklist
>
> **Ask For Notes:** If Yes, the task will have a textbox to enter additional notes regarding the task
Depending on the necessary function of the task, there are different types of tasks that employees can complete.
* **Checkmark**
* **Yes or No**
* **Number**: displays a number to type in
* **Dropdown**: displays pre-determined options to choose from
* **Radio Select**: displays pre-determined options to choose from as a bubble-option
* **Short Answer**: displays a text box
* **Long Answer**: displays a text box
Click **Add**
***
## Create Rules
Rules are the frequencies at which the checklist should appear on the POS and Hub App.
At least one rule must be created in order for the checklist to appear on the POS and Hub App.
Within a checklist > click **Rules** > click **Add Rule**
Complete the following fields:
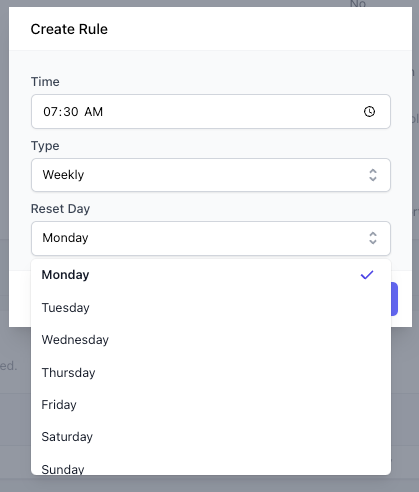 > **Time:** The specific time the checklist will appear on the POS and Hub App
>
> **Type:** The frequency at which this rule will prompt the checklist to appear on the POS and Hub App
>
> > **Checklist Rule Types:**
> >
> > **Daily**: Prompts the checklist to appear every day at a specified time
> >
> > **Weekly**: Prompts the checklist to appear once a week on a specified day at a specified time
> >
> > **Bi-Weekly**: Prompts the checklist to appear once every other week on a specified day at a specified time
> >
> > **Monthly**: Prompts the checklist to appear once a month on a specified day at a specified time
> >
> > **One Time**: Prompts the checklist to appear once on a specified day at a specified time
***
## Checklist Instances
Instances are the individual occurrences when a checklist is sent to the POS or Hub app either automatically through rules or manually via the “Send to POS” button.
For example, if an “Opening Checklist” checklist is scheduled to send every morning at 7:30 AM, each daily delivery counts as a separate instance.
Within a checklist > click **Instances**
> **Time:** The specific time the checklist will appear on the POS and Hub App
>
> **Type:** The frequency at which this rule will prompt the checklist to appear on the POS and Hub App
>
> > **Checklist Rule Types:**
> >
> > **Daily**: Prompts the checklist to appear every day at a specified time
> >
> > **Weekly**: Prompts the checklist to appear once a week on a specified day at a specified time
> >
> > **Bi-Weekly**: Prompts the checklist to appear once every other week on a specified day at a specified time
> >
> > **Monthly**: Prompts the checklist to appear once a month on a specified day at a specified time
> >
> > **One Time**: Prompts the checklist to appear once on a specified day at a specified time
***
## Checklist Instances
Instances are the individual occurrences when a checklist is sent to the POS or Hub app either automatically through rules or manually via the “Send to POS” button.
For example, if an “Opening Checklist” checklist is scheduled to send every morning at 7:30 AM, each daily delivery counts as a separate instance.
Within a checklist > click **Instances**
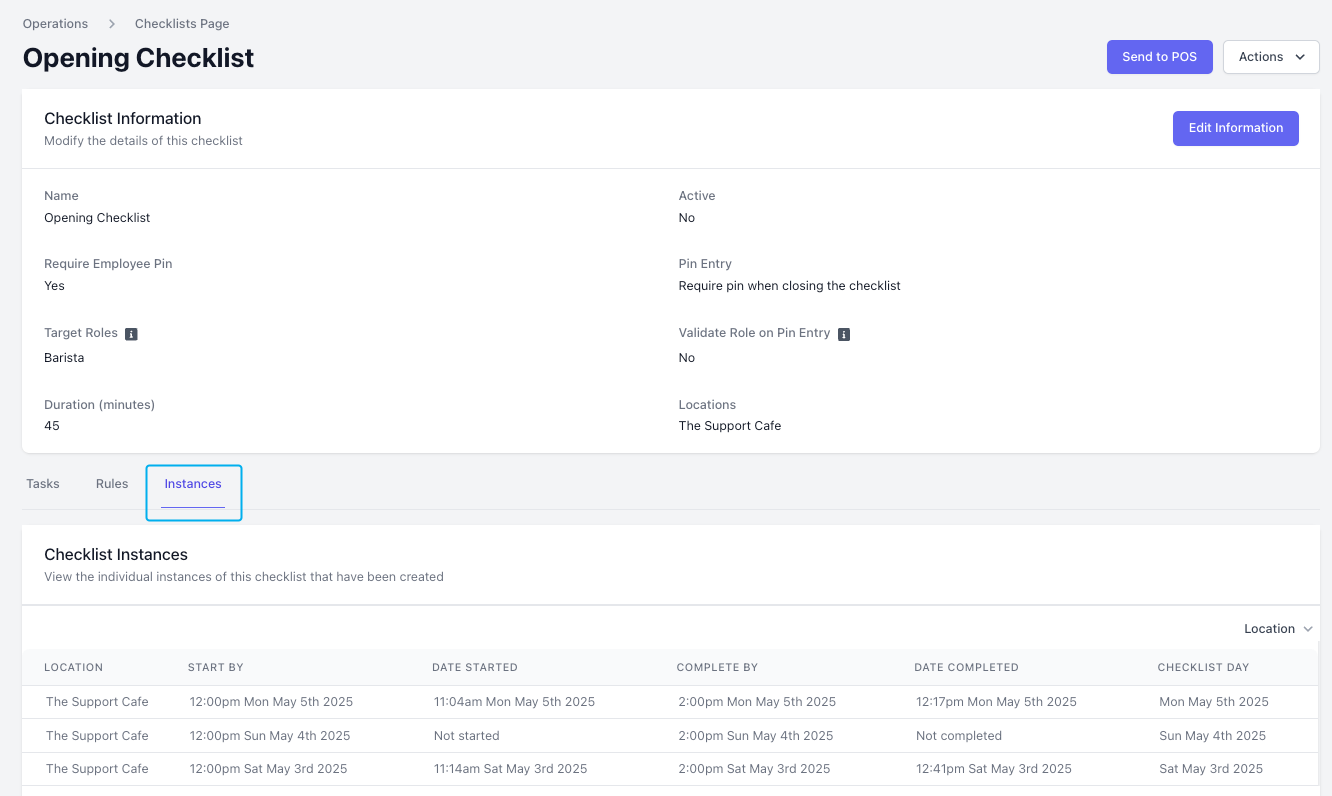 **Start By:** The day and time the checklist appears automatically based on the checklist rules
**Date Started:** The day and time the employee actually begins the checklist tasks
**Complete By:** The day and time the checklist should be completed by based on the duration set and checklist rules
**Date Completed:** The day and time the employee actually completes all checklist tasks
**Checklist Day:** The day the checklist instance corresponds to
***
## Complete a Checklist
Employees may complete checklists from the **Point of Sale** or the **Hub App**
Press the tribar in the left corner > **Checklists**
**Start By:** The day and time the checklist appears automatically based on the checklist rules
**Date Started:** The day and time the employee actually begins the checklist tasks
**Complete By:** The day and time the checklist should be completed by based on the duration set and checklist rules
**Date Completed:** The day and time the employee actually completes all checklist tasks
**Checklist Day:** The day the checklist instance corresponds to
***
## Complete a Checklist
Employees may complete checklists from the **Point of Sale** or the **Hub App**
Press the tribar in the left corner > **Checklists**
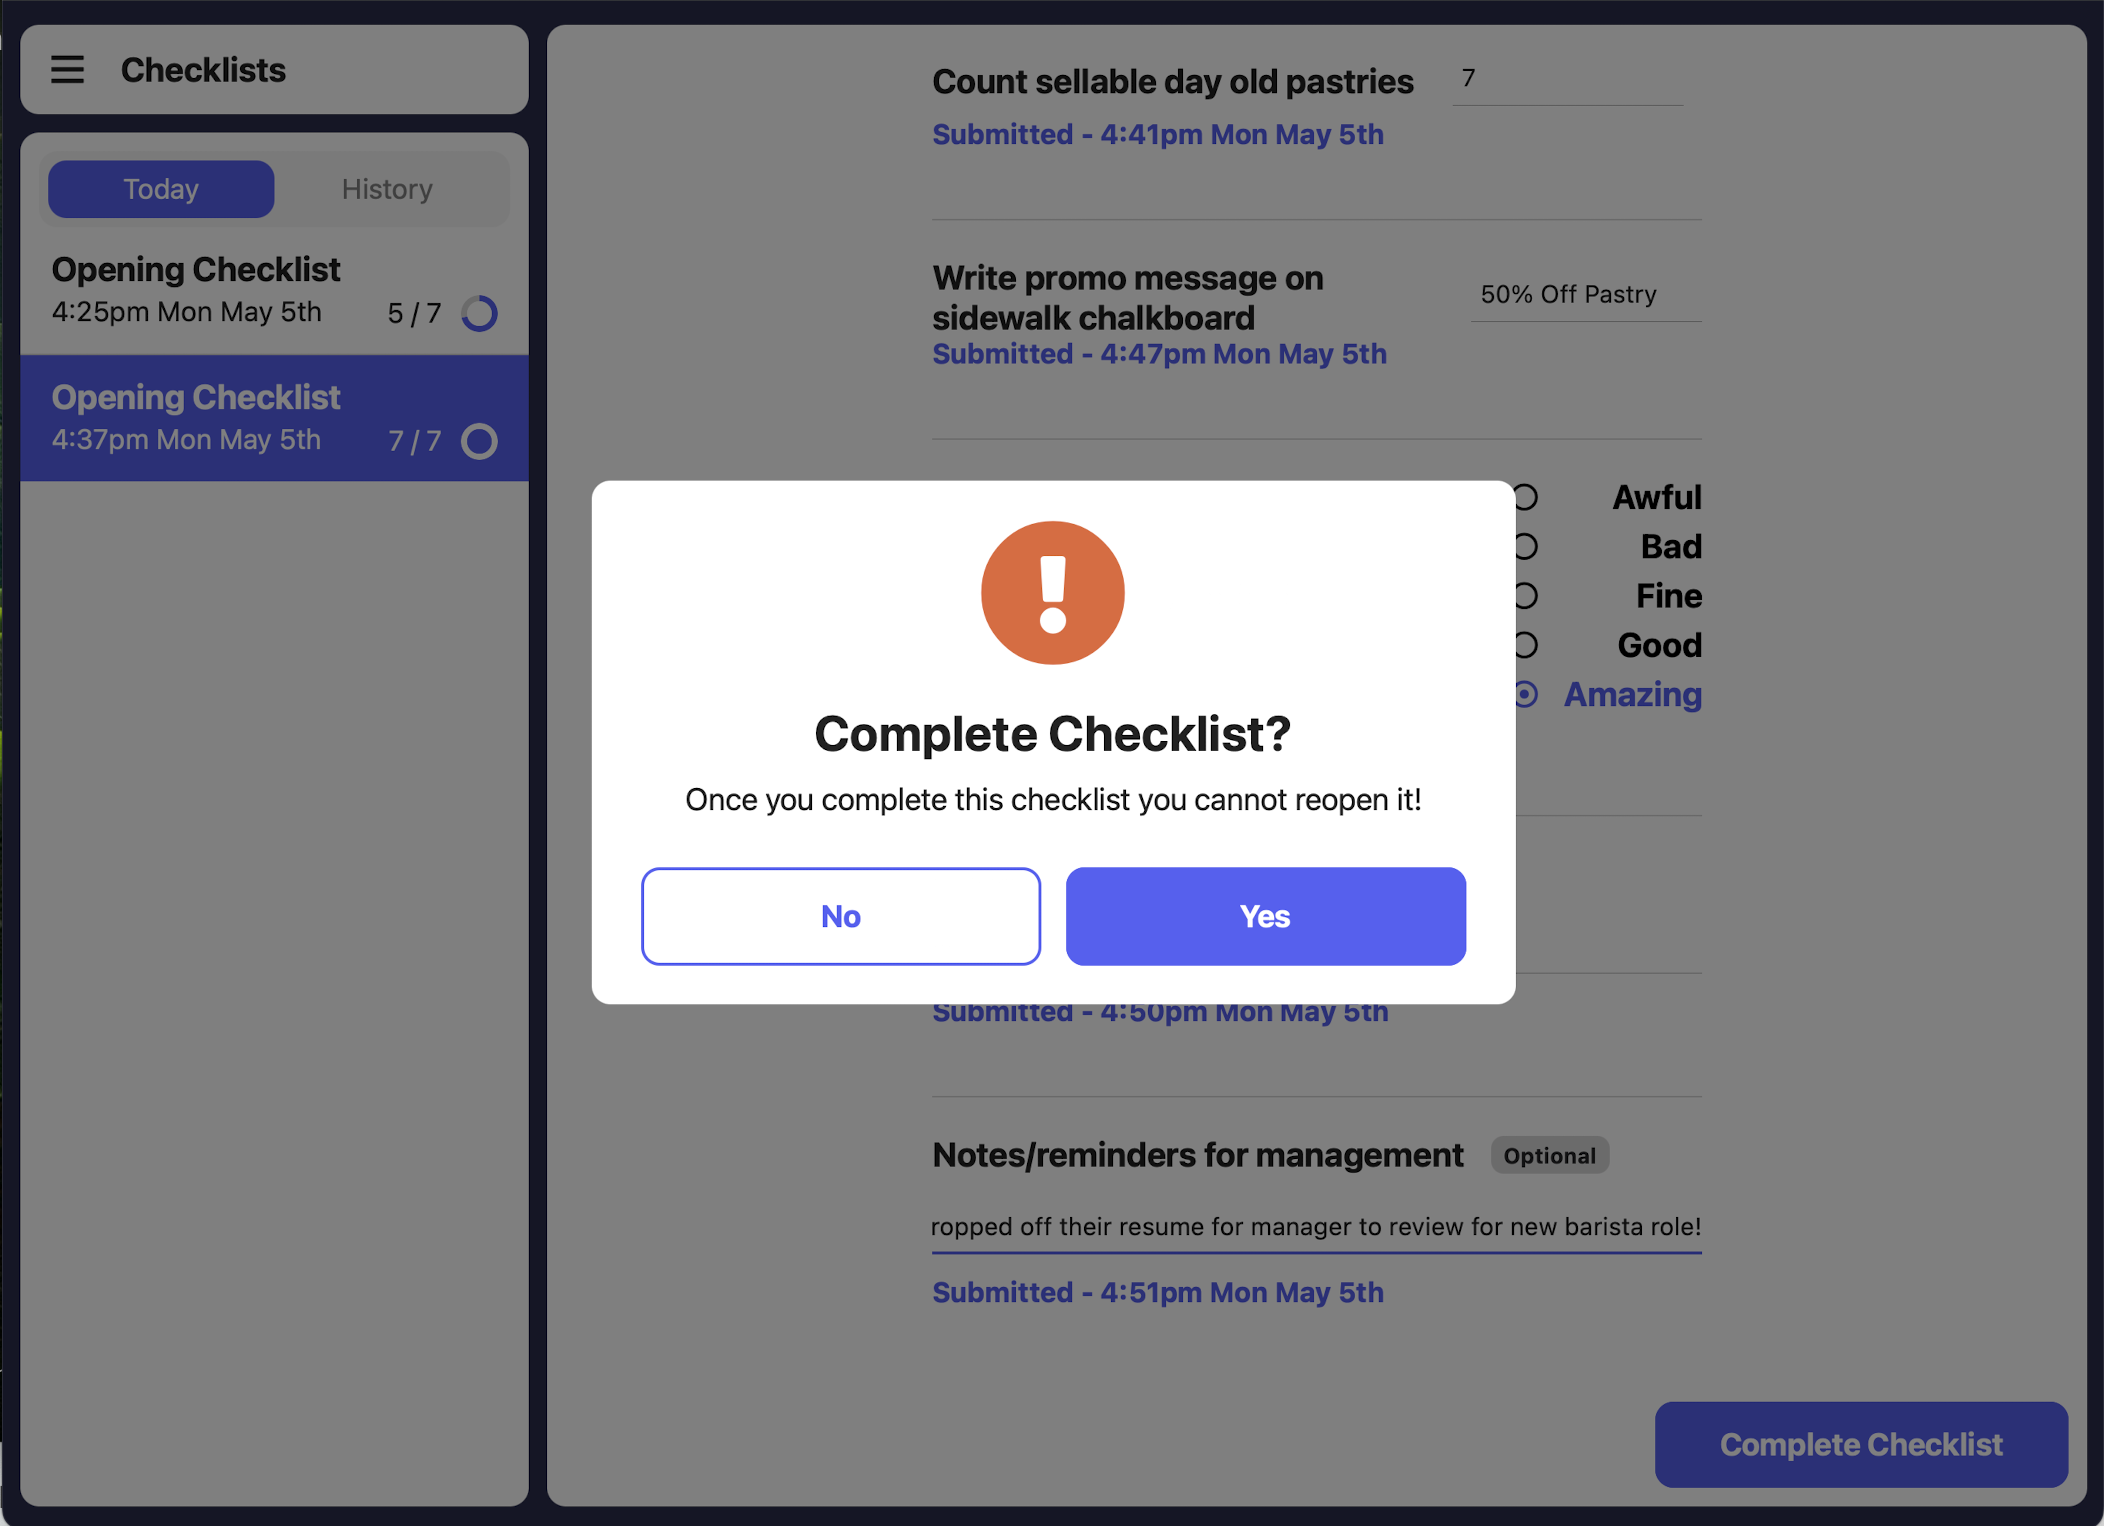
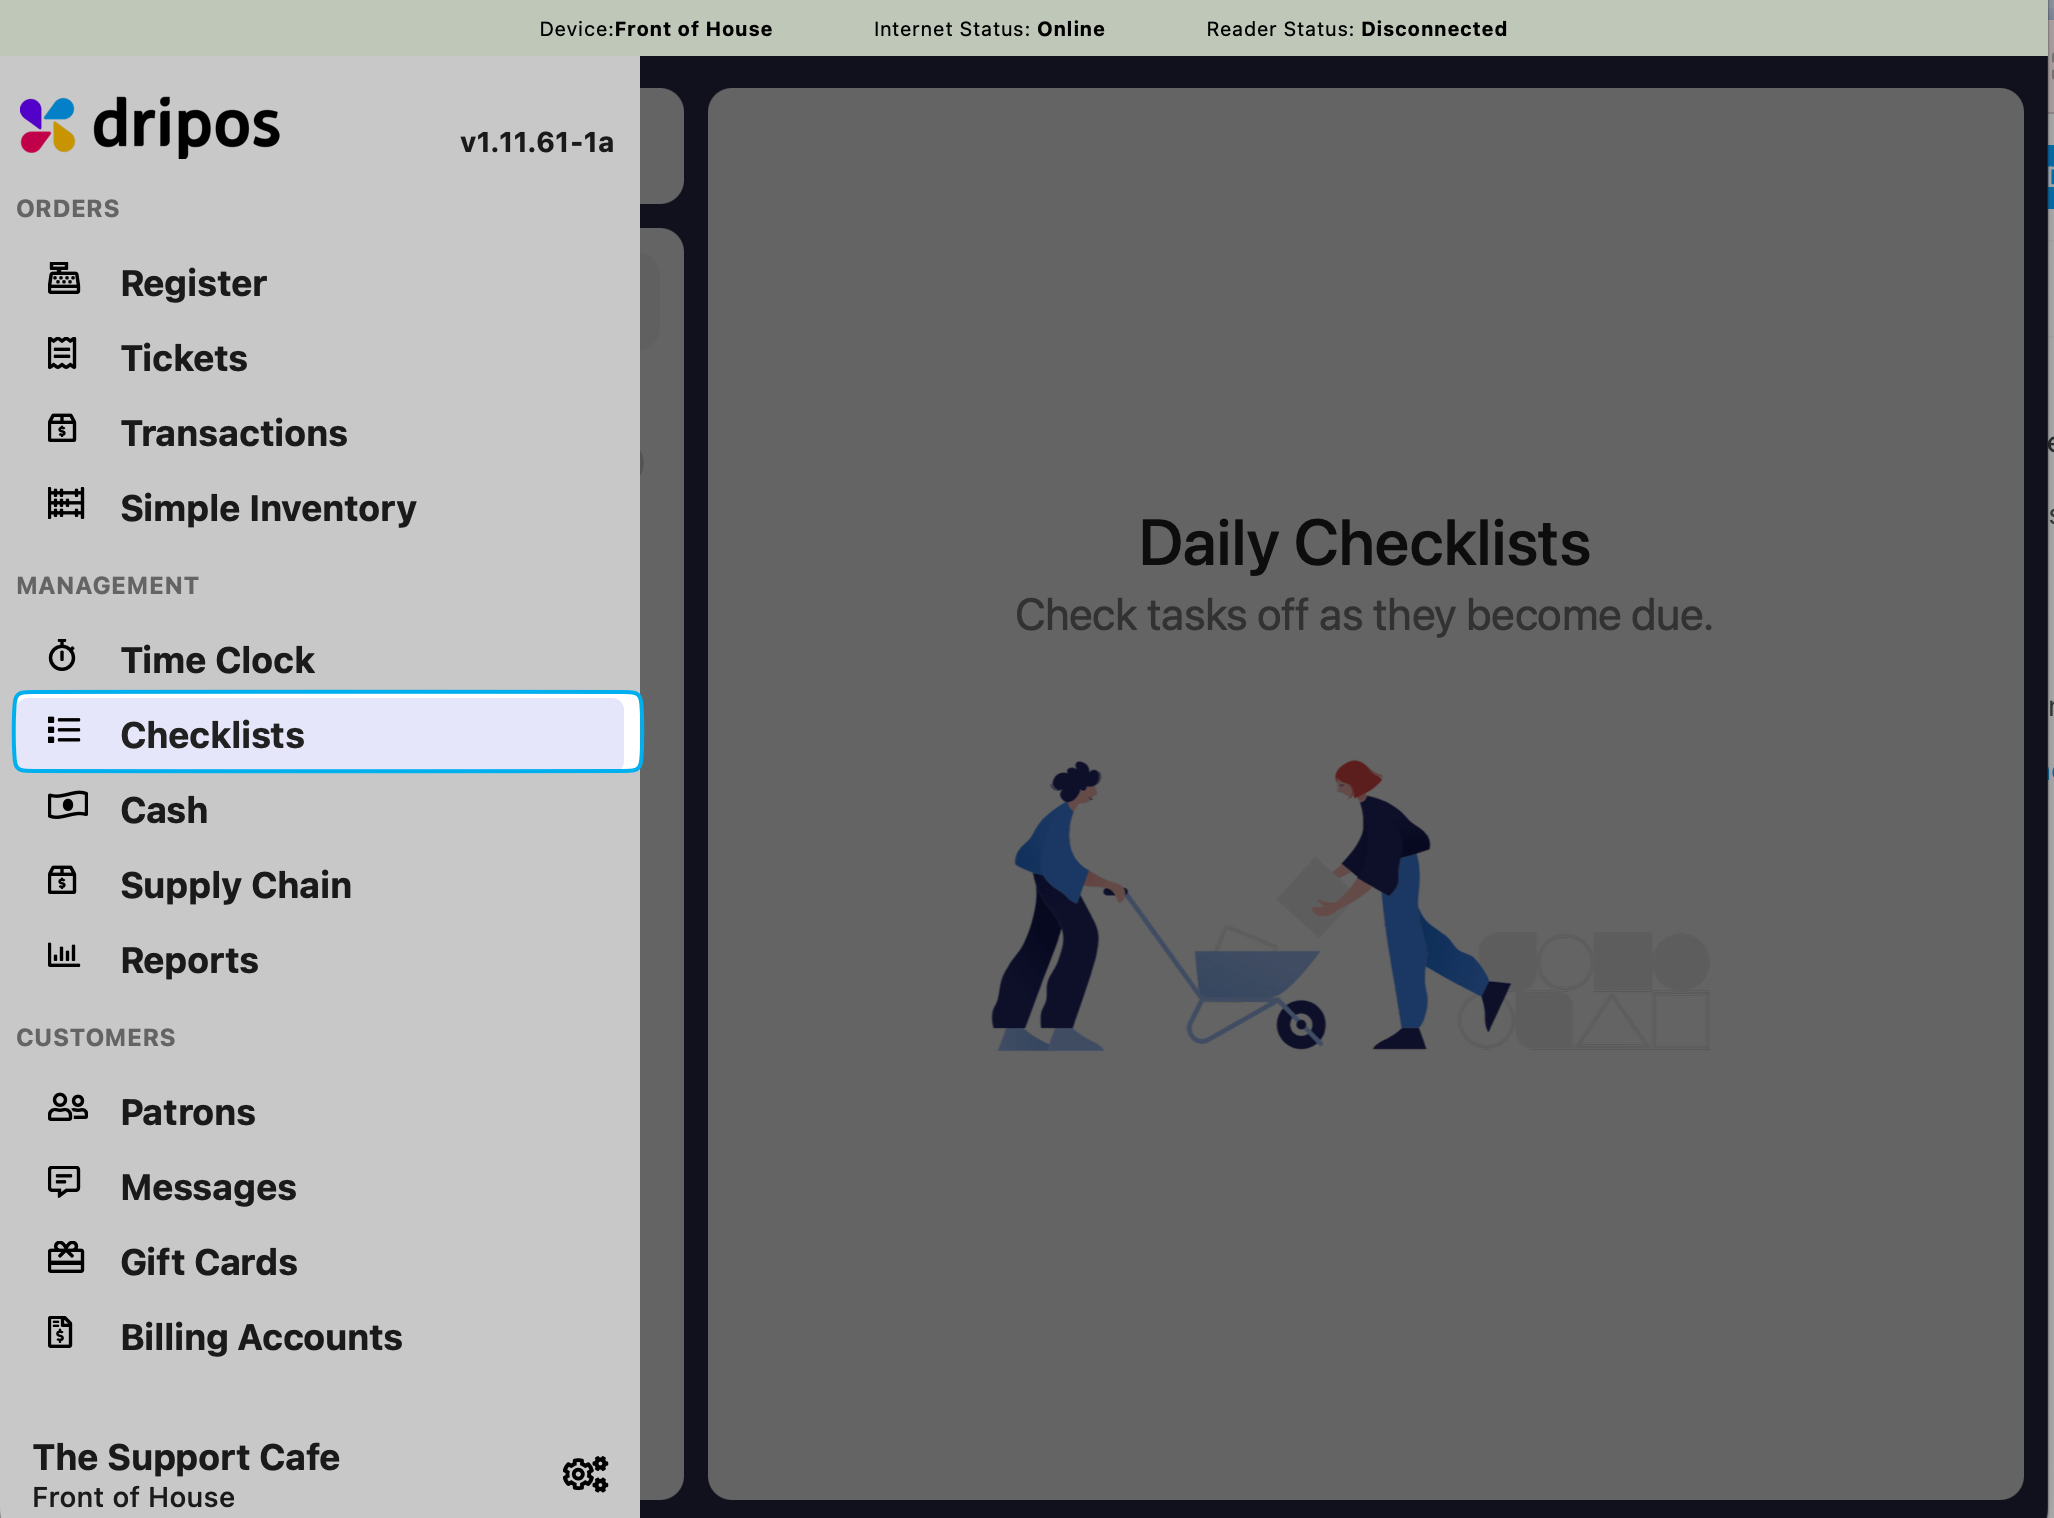 View the checklist to complete. Once all tasks are filled out, a prompt to mark the checklist as completed will appear.
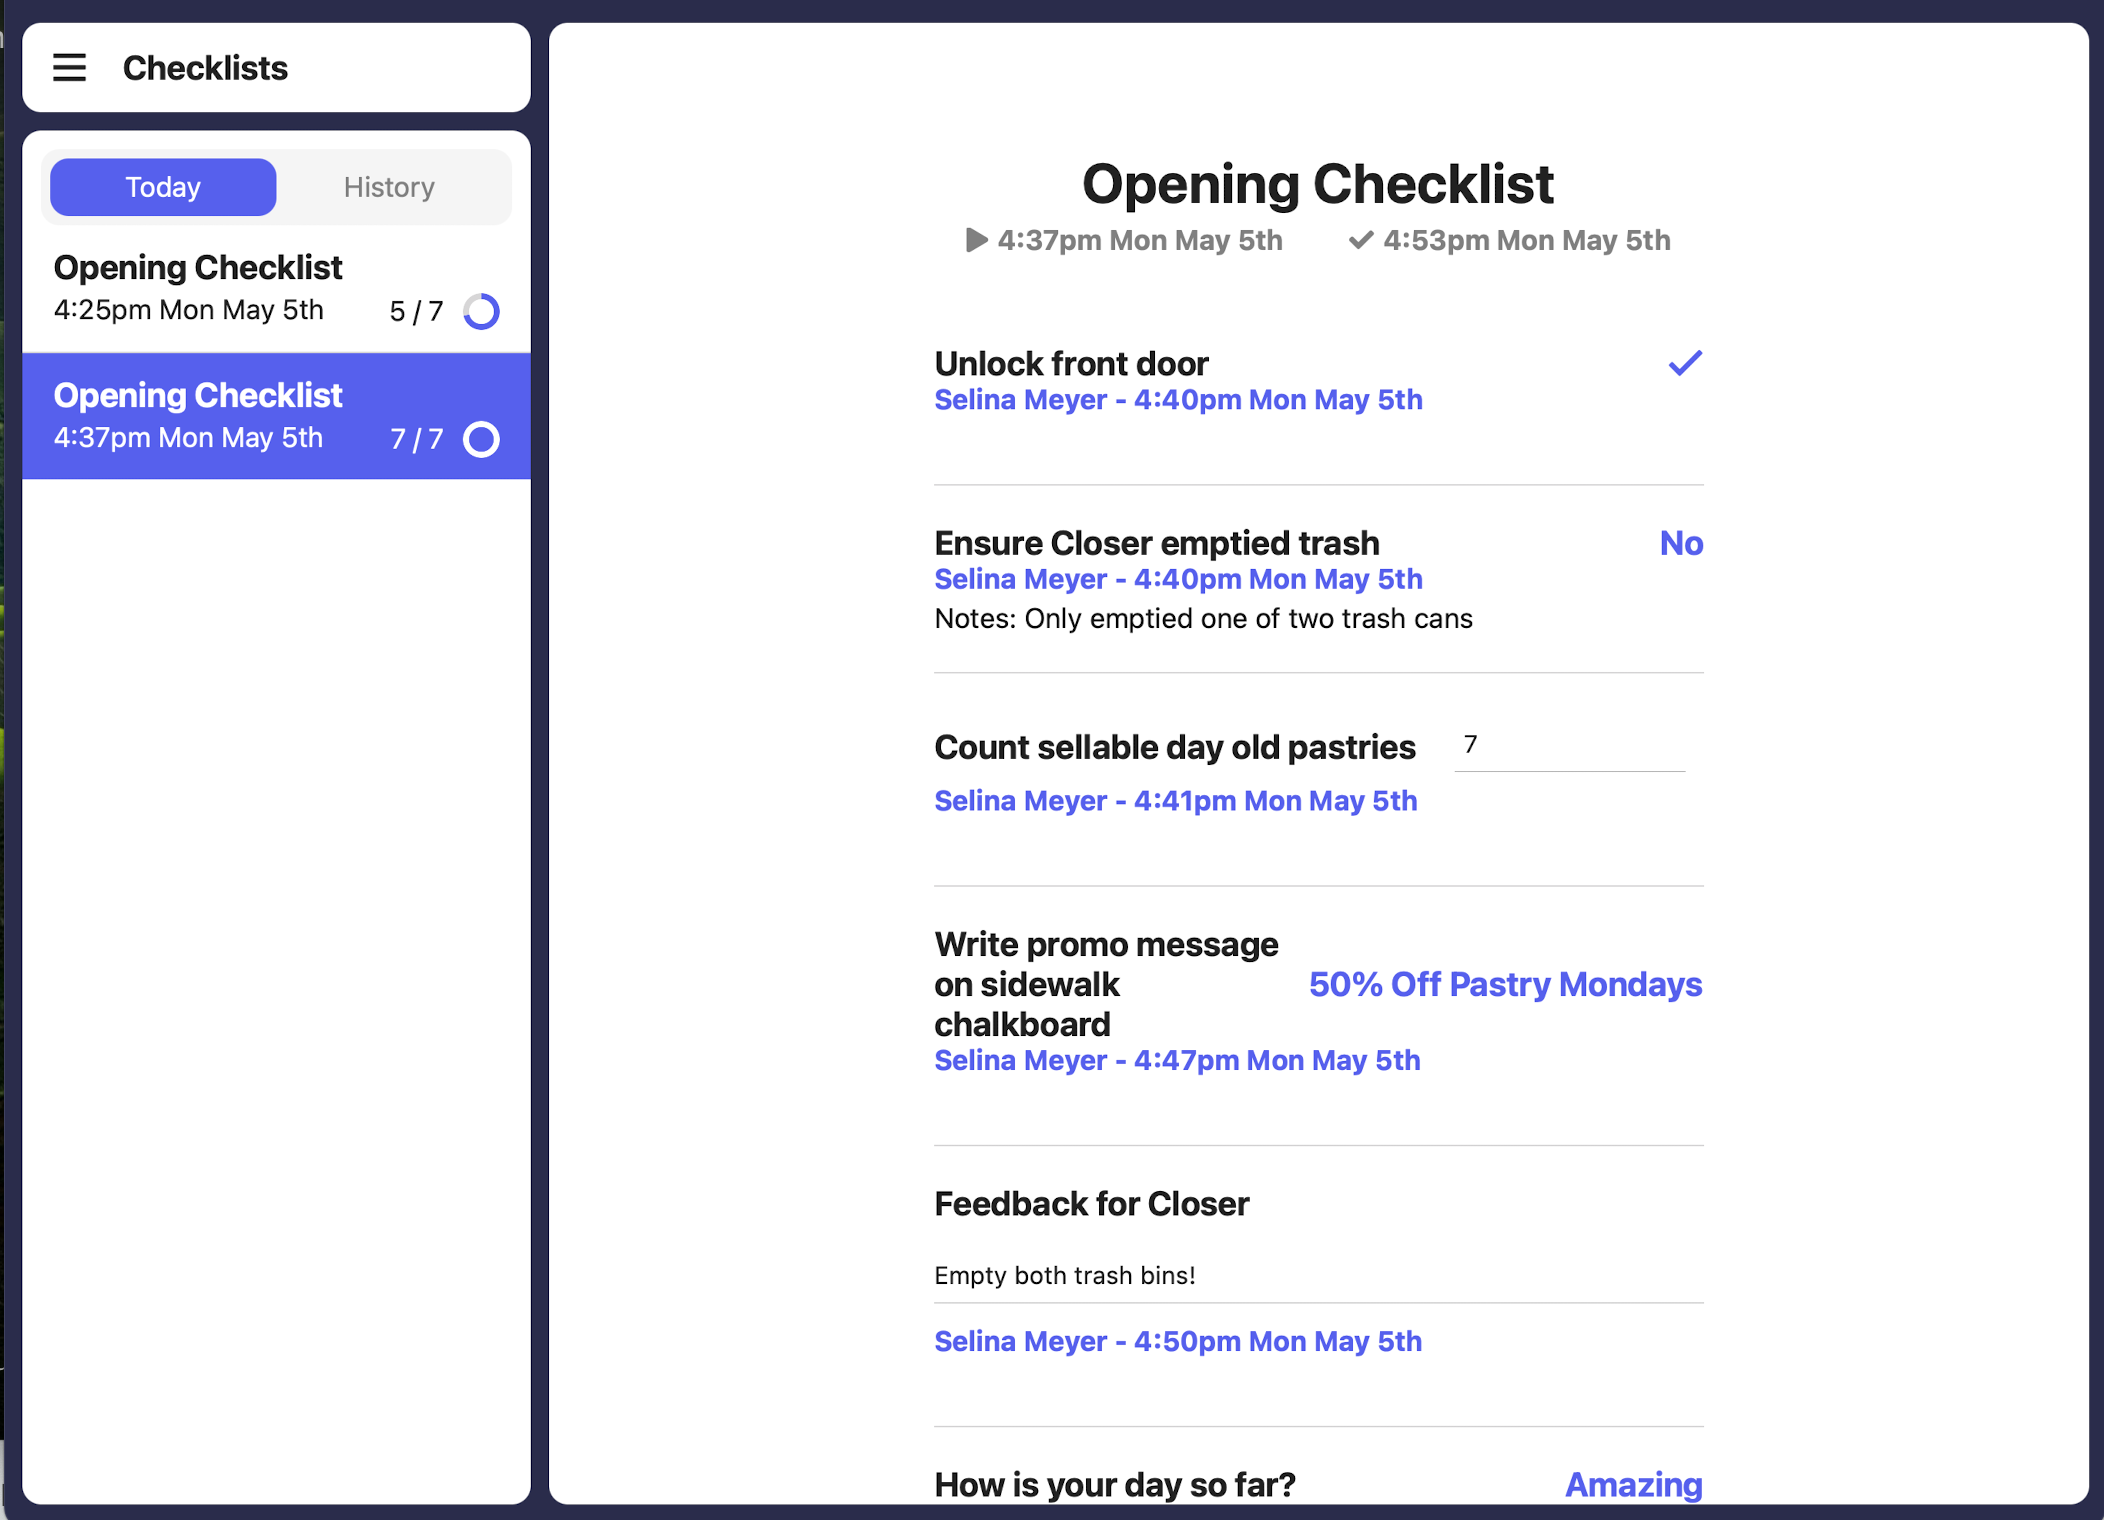
 Answers to tasks will appear in blue color with additional notes displaying as “Notes:”.
The time and employee name will appear in blue color next to each task.
Answers to tasks will appear in blue color with additional notes displaying as “Notes:”.
The time and employee name will appear in blue color next to each task.
 ***
## Checklists Report
To view a high-level report of what checklists have been completed or not completed, utilize the **Checklists Report** on the dashboard.
(**Reports** > click **Checklists Report** > click **Generate Report**)
***
## Checklists Report
To view a high-level report of what checklists have been completed or not completed, utilize the **Checklists Report** on the dashboard.
(**Reports** > click **Checklists Report** > click **Generate Report**)
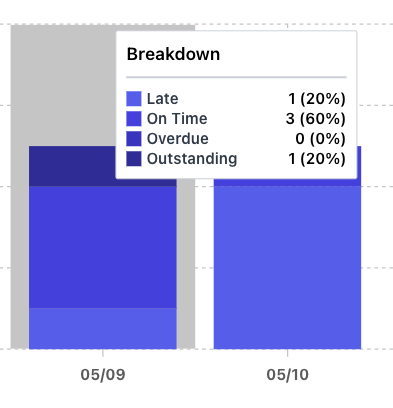
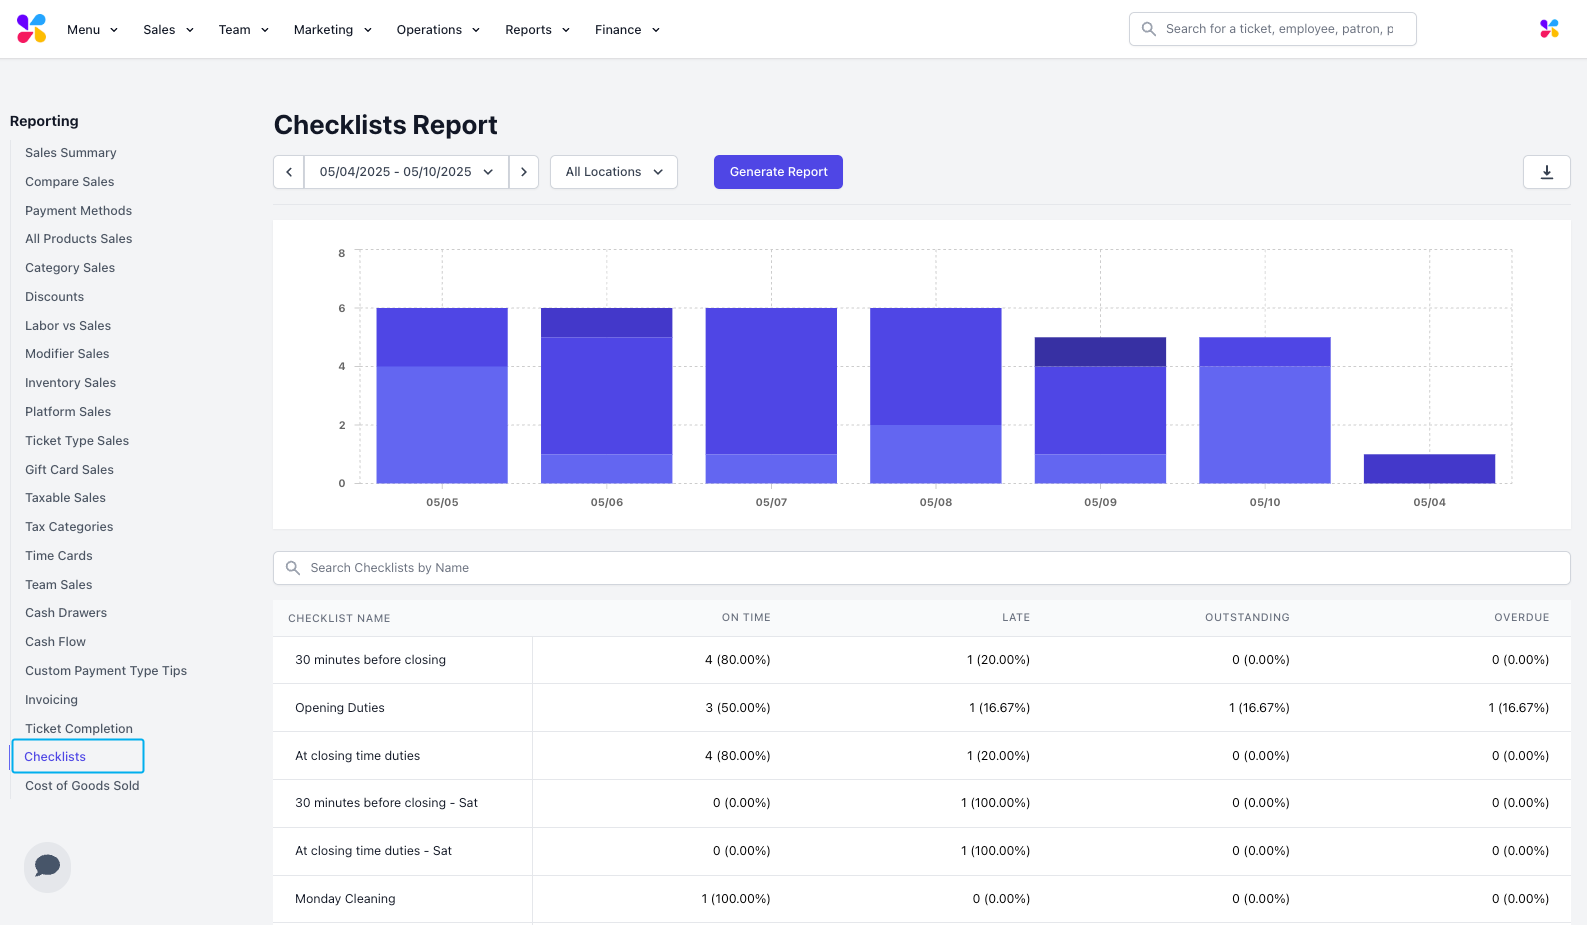 Hover over the bar graph to view additional details broken down: