> ## Documentation Index
> Fetch the complete documentation index at: https://support.dripos.com/llms.txt
> Use this file to discover all available pages before exploring further.
# Delivery Integrations
> Connecting Third-Party Ordering Platforms to Dripos
Dripos' third-party delivery integration simplifies operations and helps you serve more customers with less hassle.
Manage all your delivery platforms in one system for \$50 per month per location.
With every order flowing through Dripos, your team can focus more on serving great products and less on technical headaches.
## Why Upgrade?
* **Major Platform Support**: Seamlessly connect with UberEats, DoorDash, and GrubHub —fully integrated into your Dripos system
* **Menu Syncing Made Easy**: Automatically update your Dripos menu across all supported delivery platforms — no double entry required
* **Smart Inventory Tracking**: Third-party orders feed directly into Dripos’ inventory tools for accurate, real-time stock management
* **Unified Order Management**: See all orders—including those from delivery apps — directly through your POS and right into the Dripos ticket screen
* **Centralized Reporting**: Full visibility into third-party sales and orders in your reports
* **Streamlined Workflow**: Operate with ease using a single system — no need for extra hardware
Want to get started? Follow the guide below to connect your delivery platforms to Dripos.
***
## Getting Started
Create merchant accounts for each order platform (Uber, DoorDash, GrubHub) you would like to integrate with Dripos. Ensure that you are live and active on each platform.
When setting up your merchant account on each third-party platform, select the following options when prompted to select a POS partner:
**UberEats** — Select *Nothing*
**DoorDash** — Select *Email and phone number*
**GrubHub** — Select *Stream*
Complete in the following [Stream Integration Form](https://forms.gle/Jjd2WtKNchPjV8qh6) once for each platform to integrate with Dripos.
Once you've completed the integration form, reach out to the Dripos Support Team to begin the integration!
***
## Menu Synchronization
Once integrated, your Dripos menu will automatically sync with third-party platforms, including updates to hours, descriptions, images, and pricing.
**Enable your menu on third-party platforms:**
Enable and disable menu categories on third party platforms
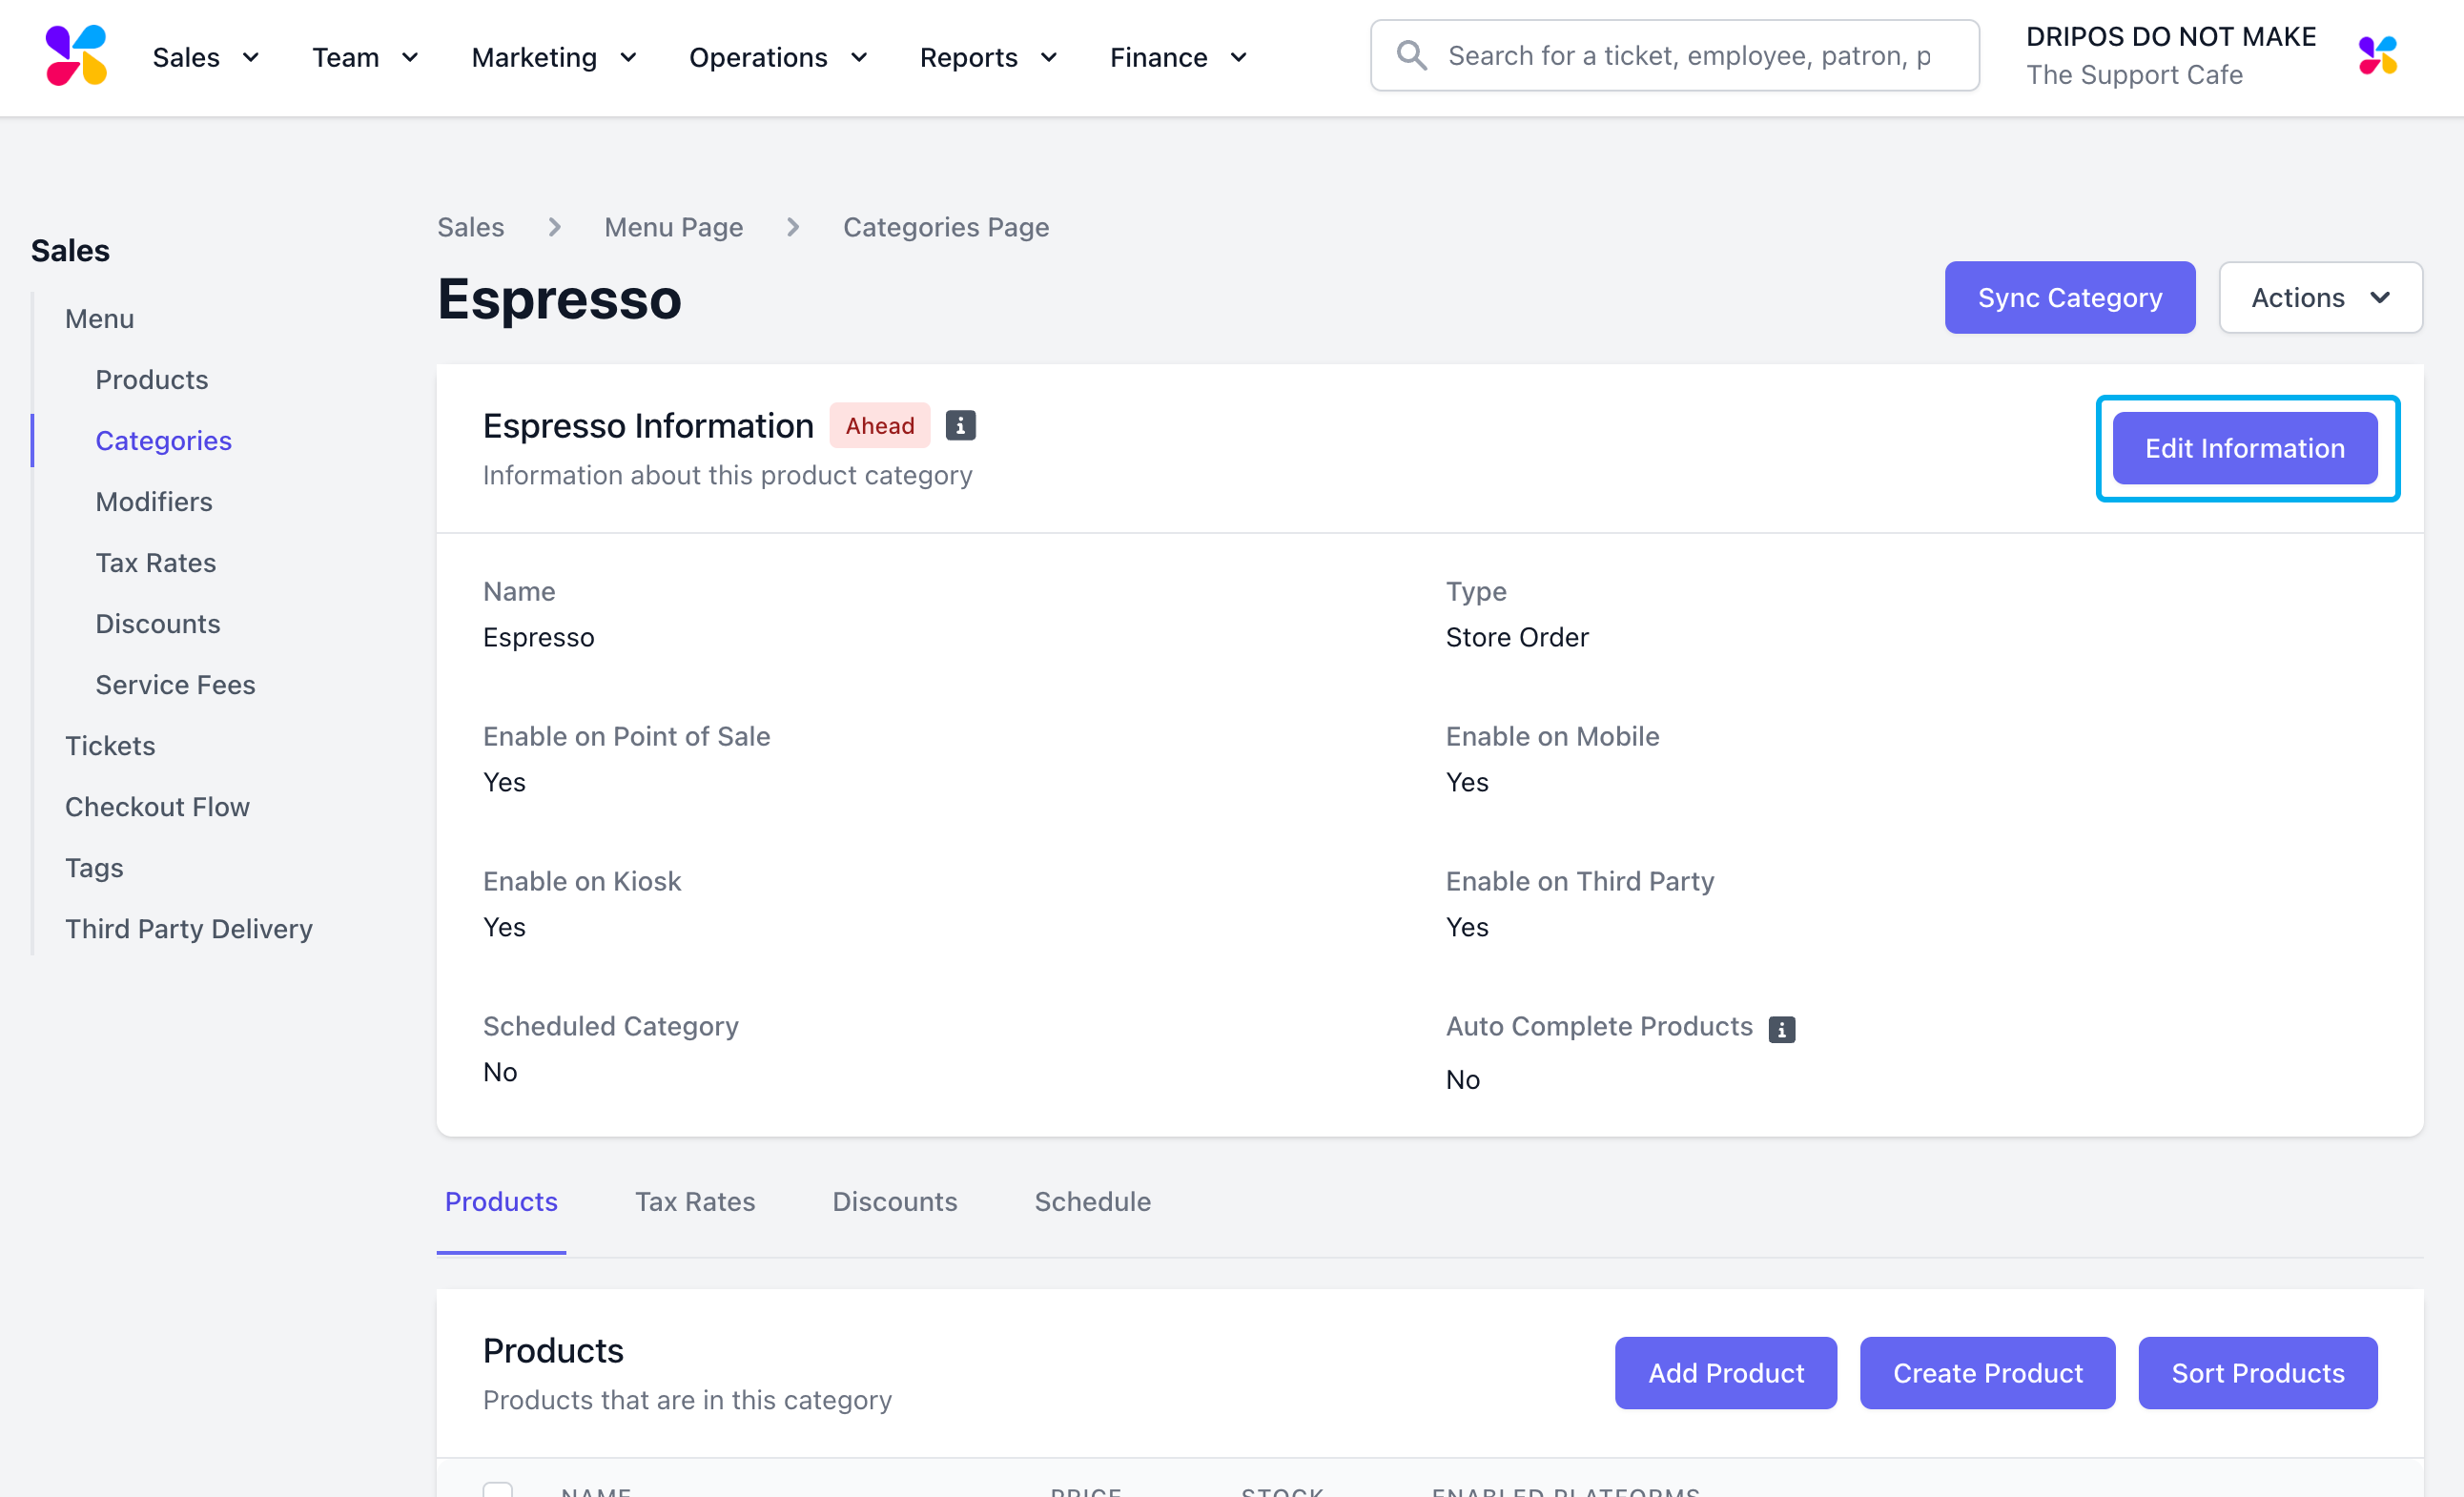
1. On the **Web Dashboard** click **Menu > Categories > View**
2. Click **Edit Information**
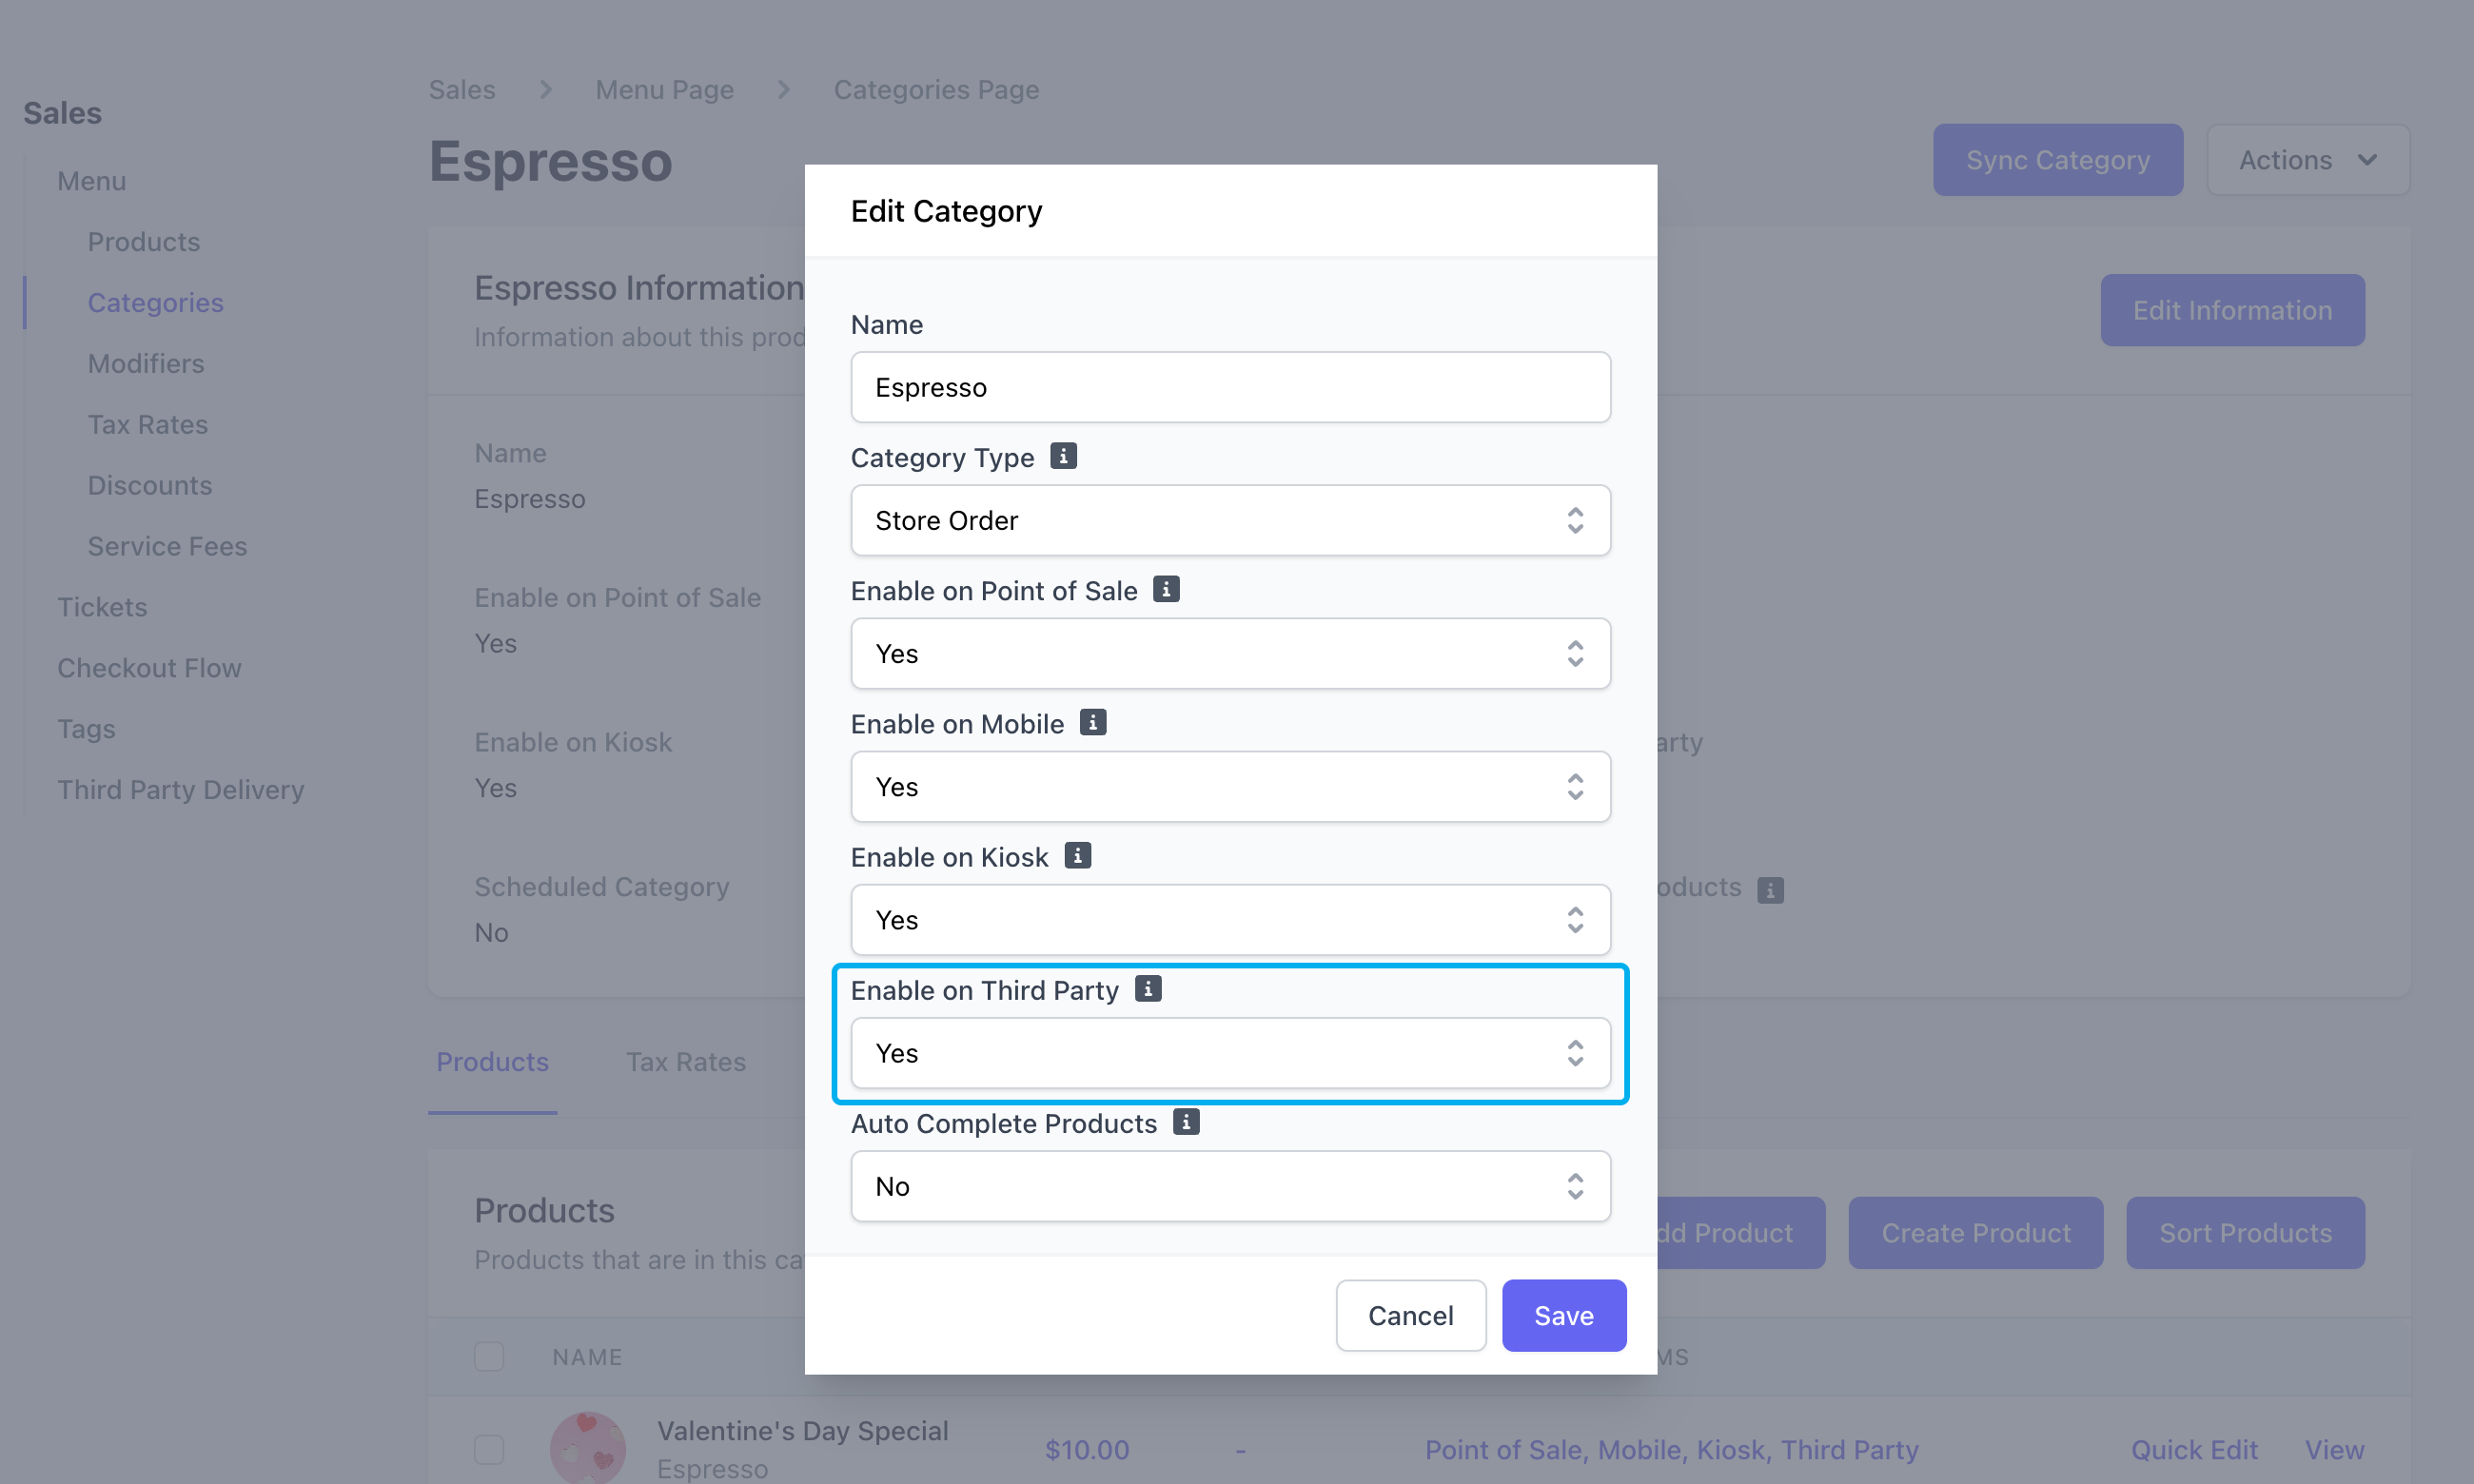
 3. Set **Enable on Third Party** to Yes
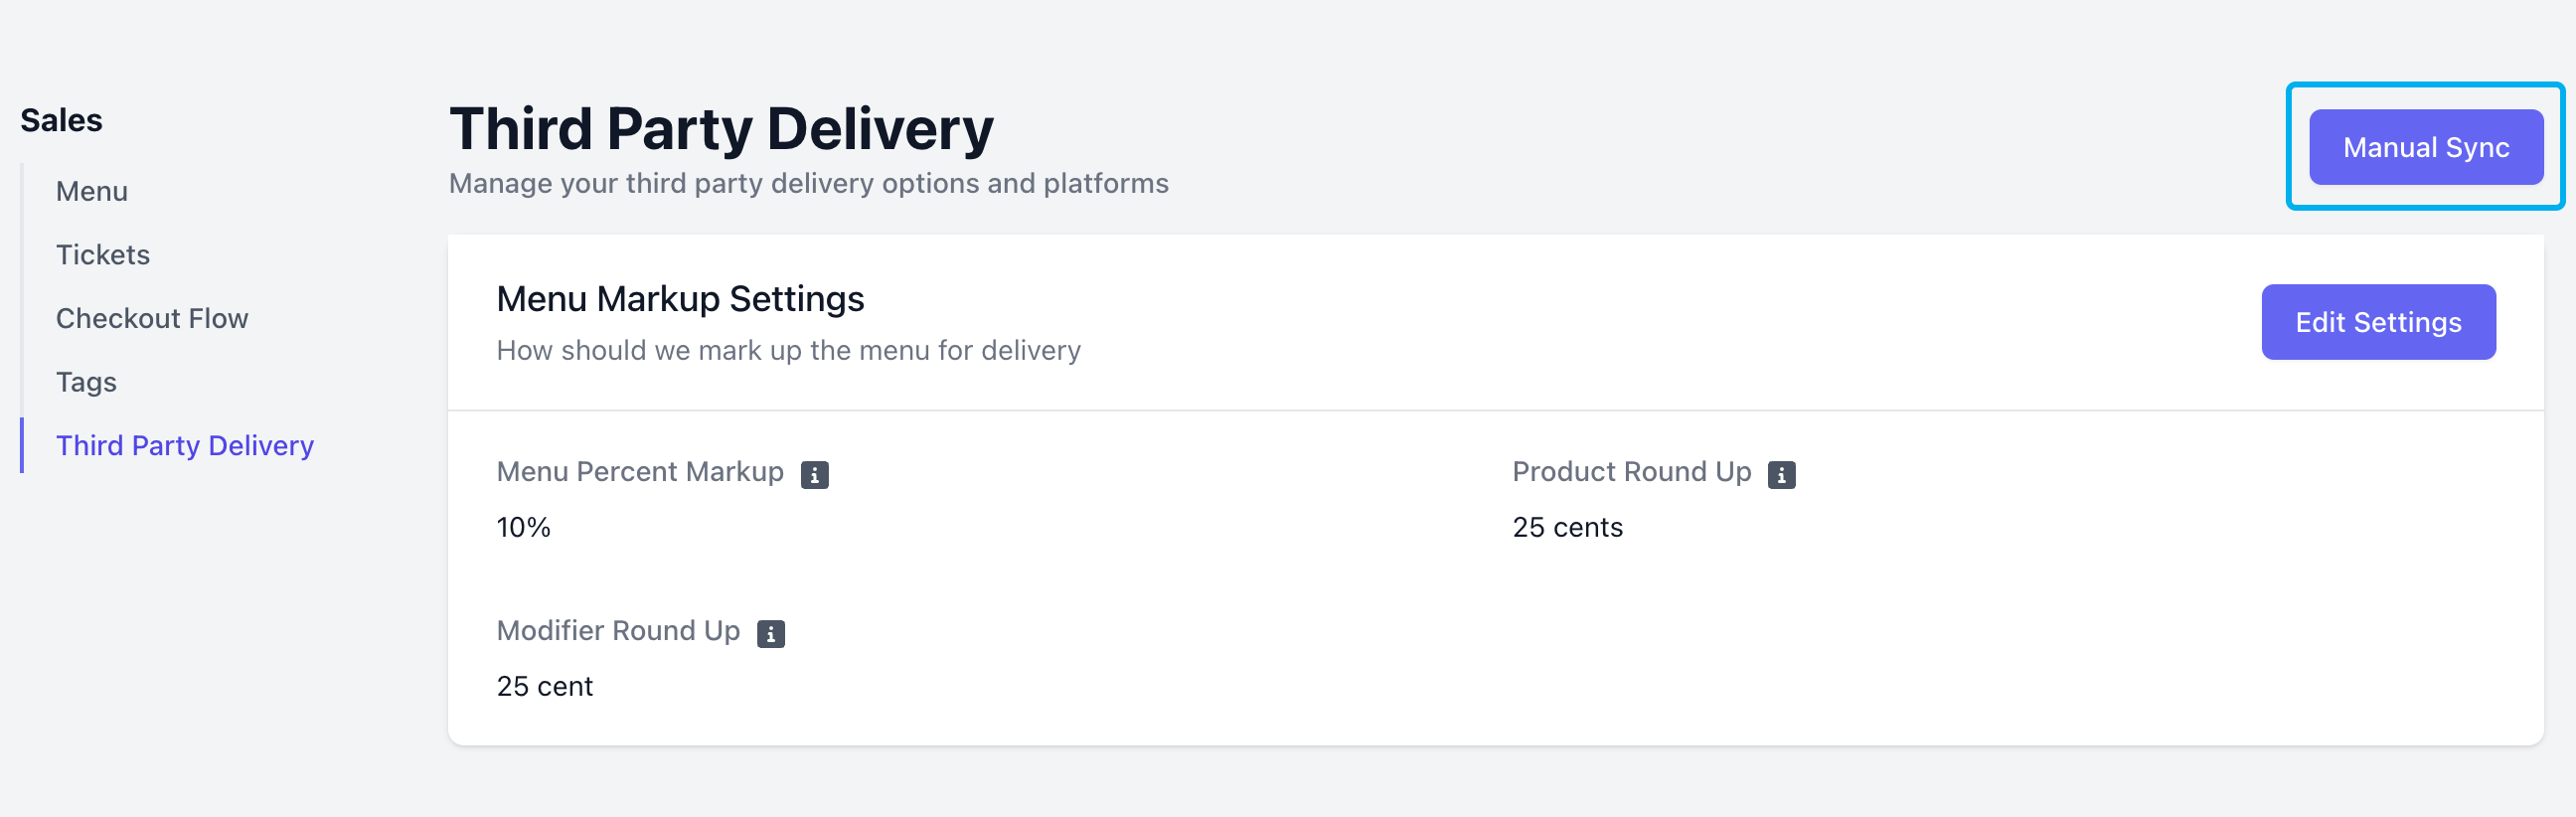
 If menu items aren’t syncing correctly, double-check your menu in Dripos and manually sync your menu on the Web Dashboard under **Menu > Delivery Integrations** and click **Manual Sync**
 Enable and disable menu products on third party platforms
1. On the **Web Dashboard** click \*\* Menu > Products > View\*\*
2. Click **Edit Information**
Enable and disable menu products on third party platforms
1. On the **Web Dashboard** click \*\* Menu > Products > View\*\*
2. Click **Edit Information**
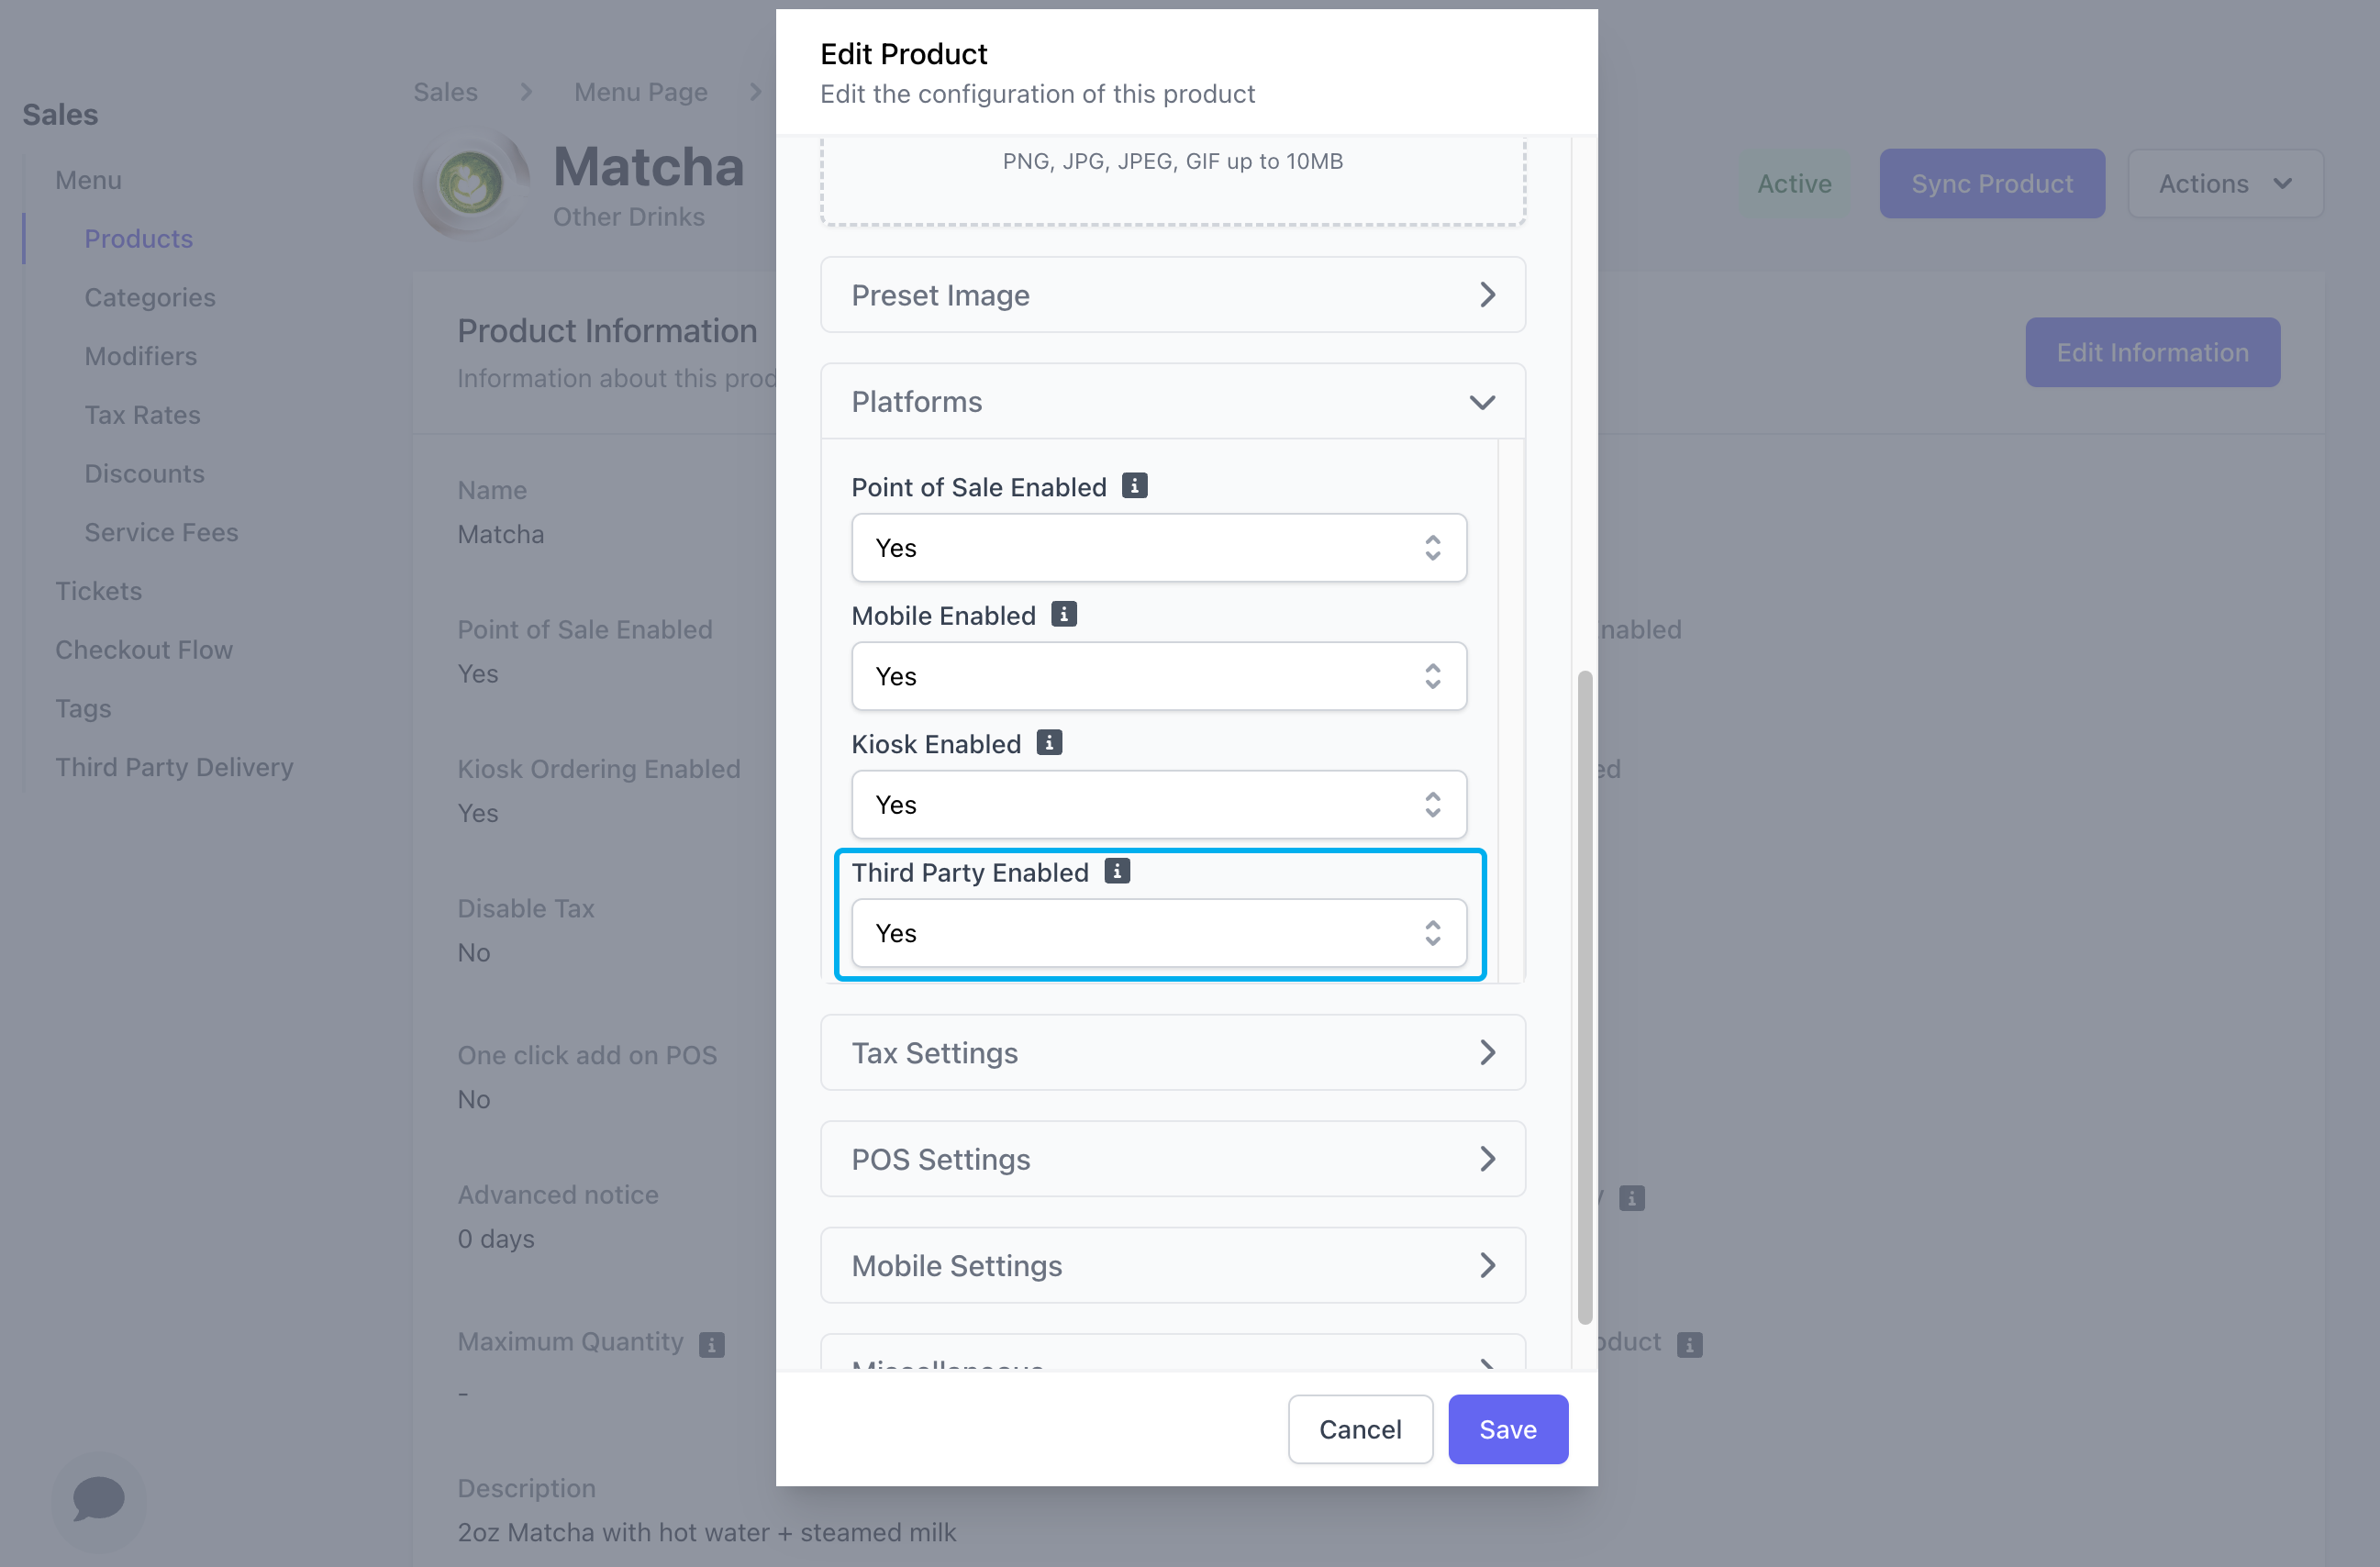
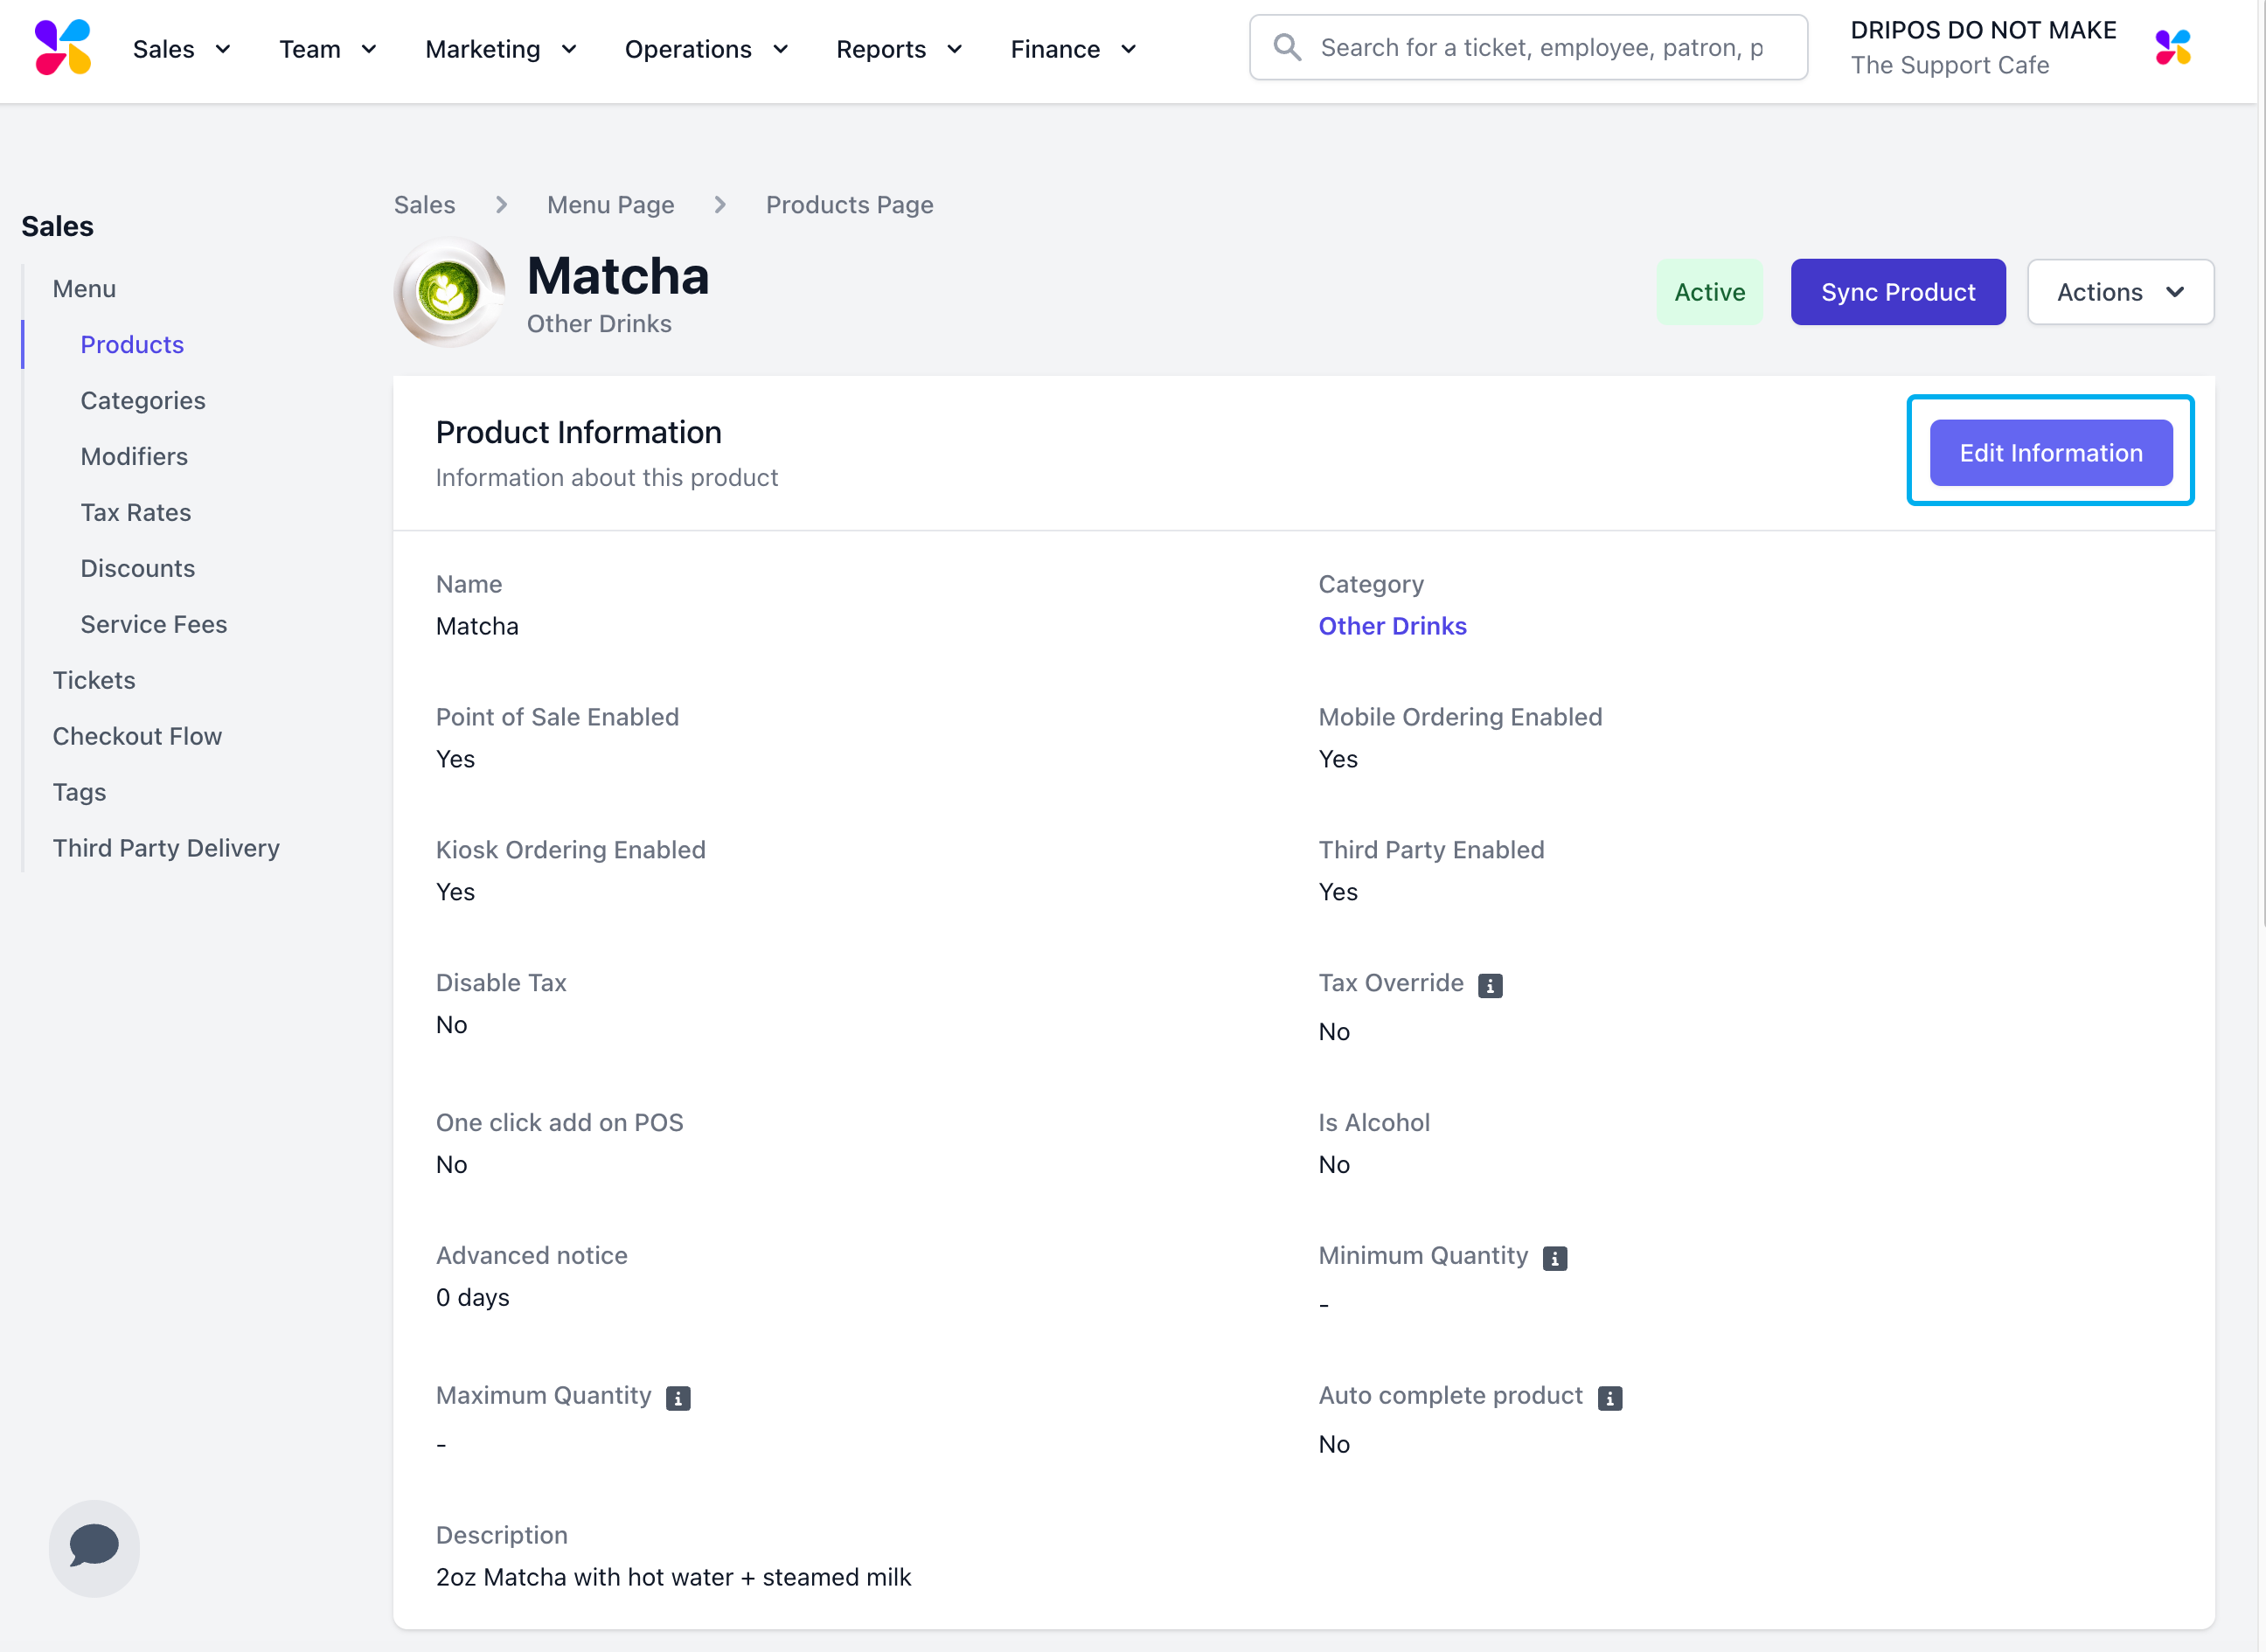 3. Navigate to **Platforms** > Set **Third Party Enabled** to Yes
 If menu items aren’t syncing correctly, double-check your menu in Dripos and manually sync your menu on the Web Dashboard under **Menu > Delivery Integrations** and click **Manual Sync**
***
## Menu Markup Settings
Dripos’ markup feature lets you adjust your menu prices on third-party order platforms to account for delivery platform commissions and fees.
1. On the **Web Dashboard** click **Menu > Delivery Integrations**
2. Click **Edit Settings** to input your menu mark-up settings:
If menu items aren’t syncing correctly, double-check your menu in Dripos and manually sync your menu on the Web Dashboard under **Menu > Delivery Integrations** and click **Manual Sync**
***
## Menu Markup Settings
Dripos’ markup feature lets you adjust your menu prices on third-party order platforms to account for delivery platform commissions and fees.
1. On the **Web Dashboard** click **Menu > Delivery Integrations**
2. Click **Edit Settings** to input your menu mark-up settings:
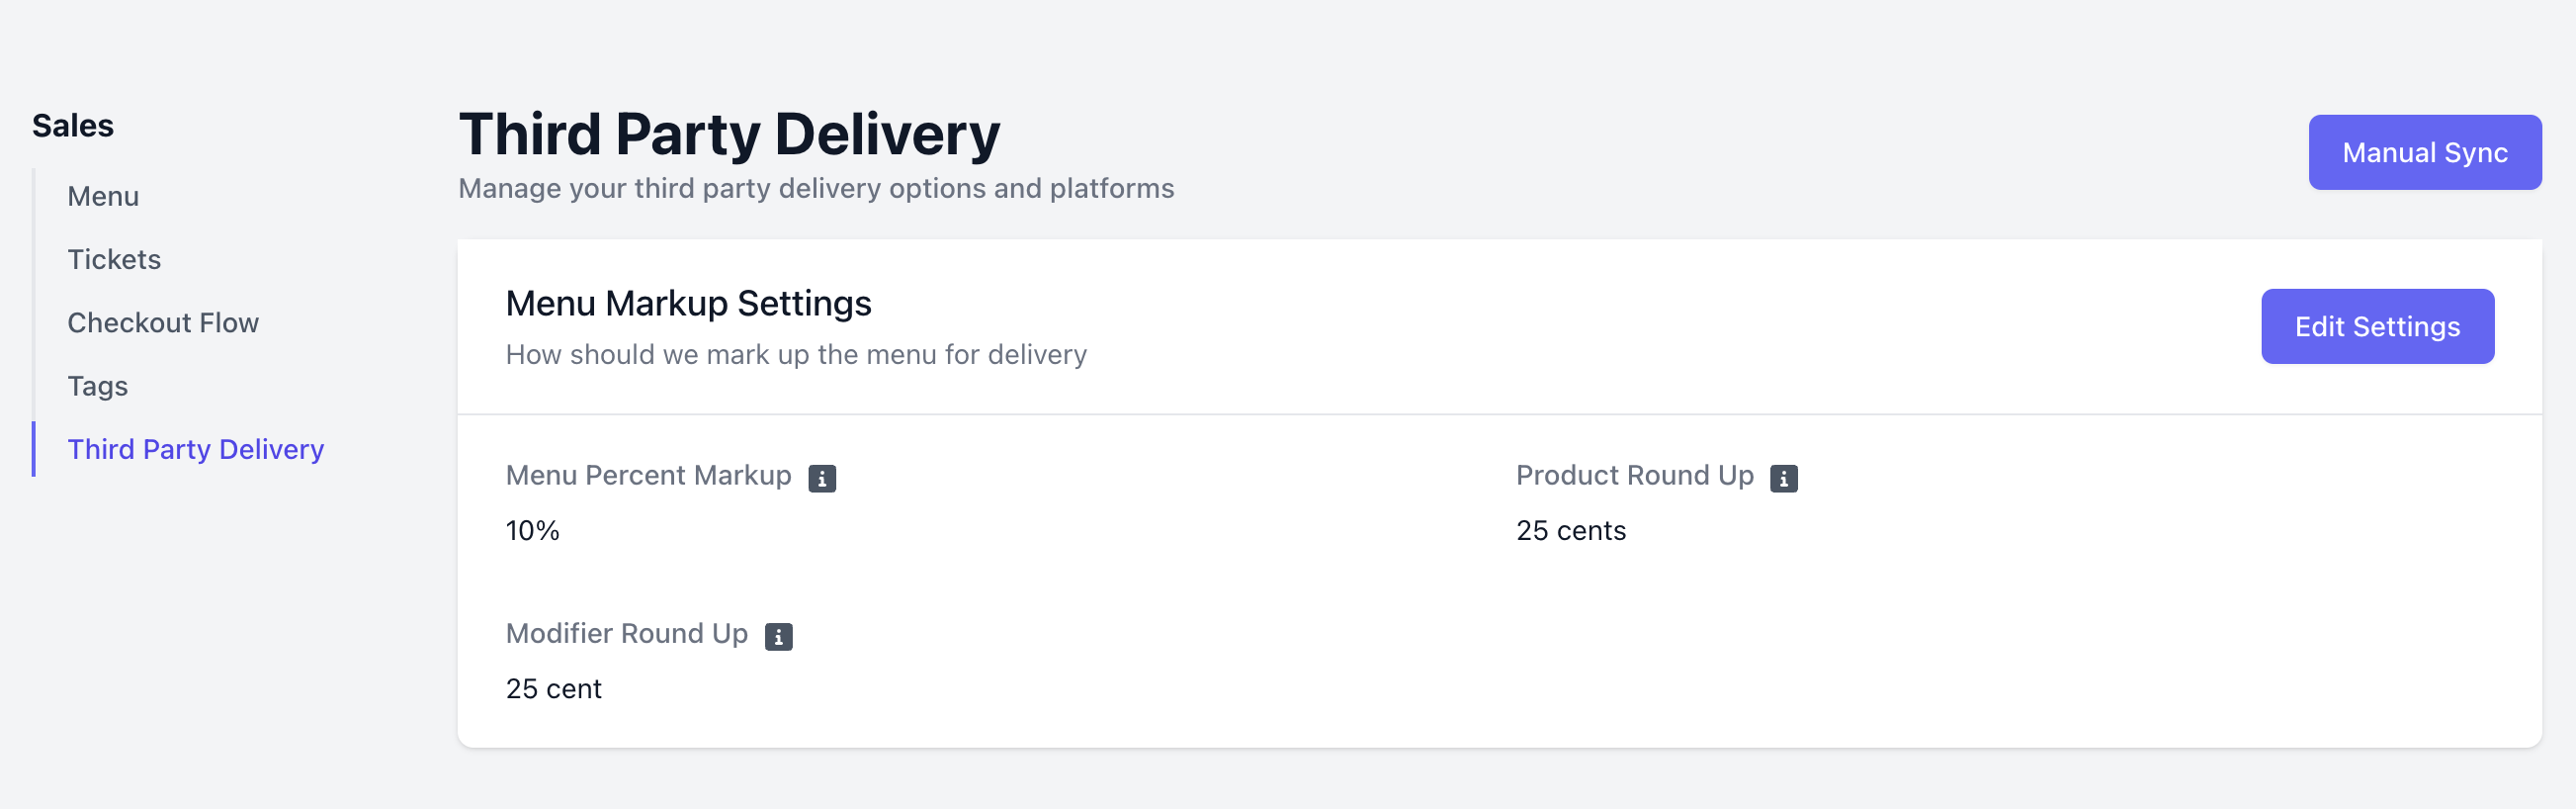 > **Menu Percent Markup:** Percent that you want the total menu prices to be marked up by. For example, if your product costs \$3.13 it will cost \$3.91 on your third party platforms.
> **Product Round Up:** Cent amount you want to round to for products. For example, if your product costs \$3.13 it will round up to \$3.25 on your third party platforms.
> **Modifier Round Up:** Cent amount you want to round to for products. For example, a modifier is \$0.63 it will round up to \$0.75 on your third party platforms.
***
## Set Third-Party Hours
Set daily hours for third-party platforms, so customers can only place orders when you’re ready to serve—keeping things smooth and on your schedule.
1. On the **Web Dashboard**, click the **Dripos logo** in the upper-right corner > [**Restaurants & Devices > Hours > Third Party**](https://dashboard.dripos.com/hours?tab=thirdParty)
2. Click **Edit Hours** to set daily third-party store hours:
> **Menu Percent Markup:** Percent that you want the total menu prices to be marked up by. For example, if your product costs \$3.13 it will cost \$3.91 on your third party platforms.
> **Product Round Up:** Cent amount you want to round to for products. For example, if your product costs \$3.13 it will round up to \$3.25 on your third party platforms.
> **Modifier Round Up:** Cent amount you want to round to for products. For example, a modifier is \$0.63 it will round up to \$0.75 on your third party platforms.
***
## Set Third-Party Hours
Set daily hours for third-party platforms, so customers can only place orders when you’re ready to serve—keeping things smooth and on your schedule.
1. On the **Web Dashboard**, click the **Dripos logo** in the upper-right corner > [**Restaurants & Devices > Hours > Third Party**](https://dashboard.dripos.com/hours?tab=thirdParty)
2. Click **Edit Hours** to set daily third-party store hours:
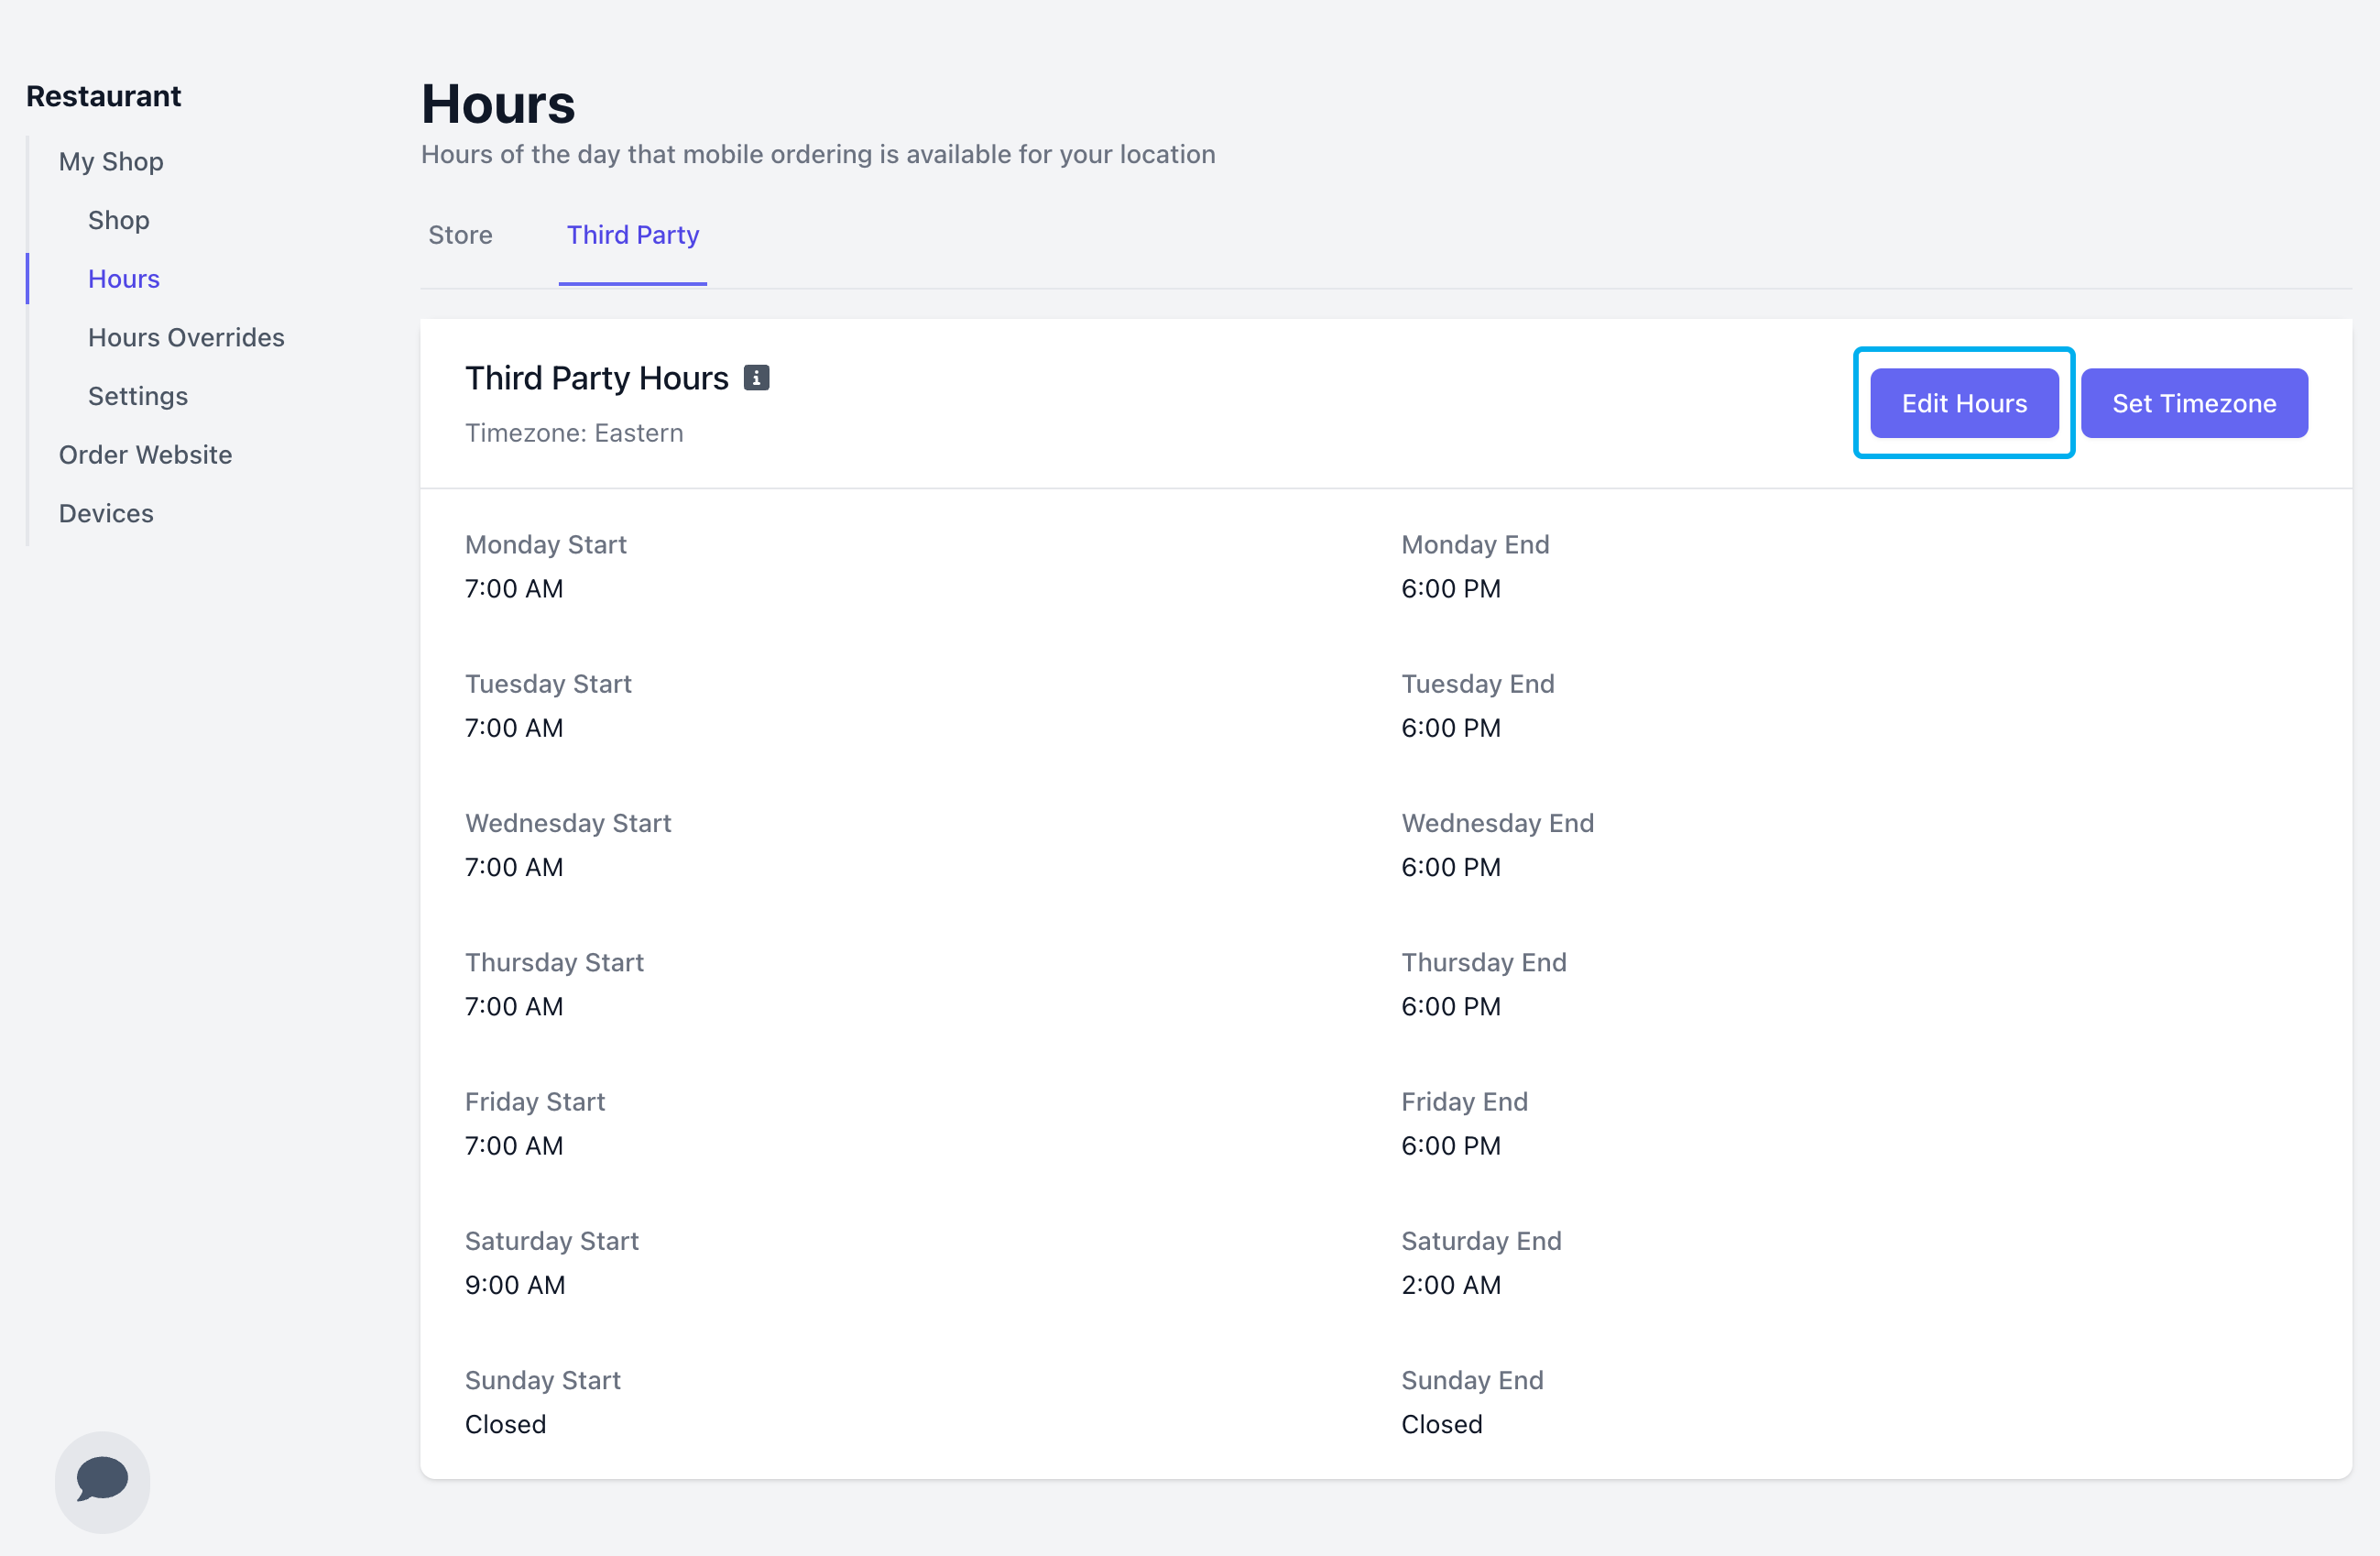 3. Choose whether to match your third-party hours with your mobile ordering store hours or set custom hours instead:
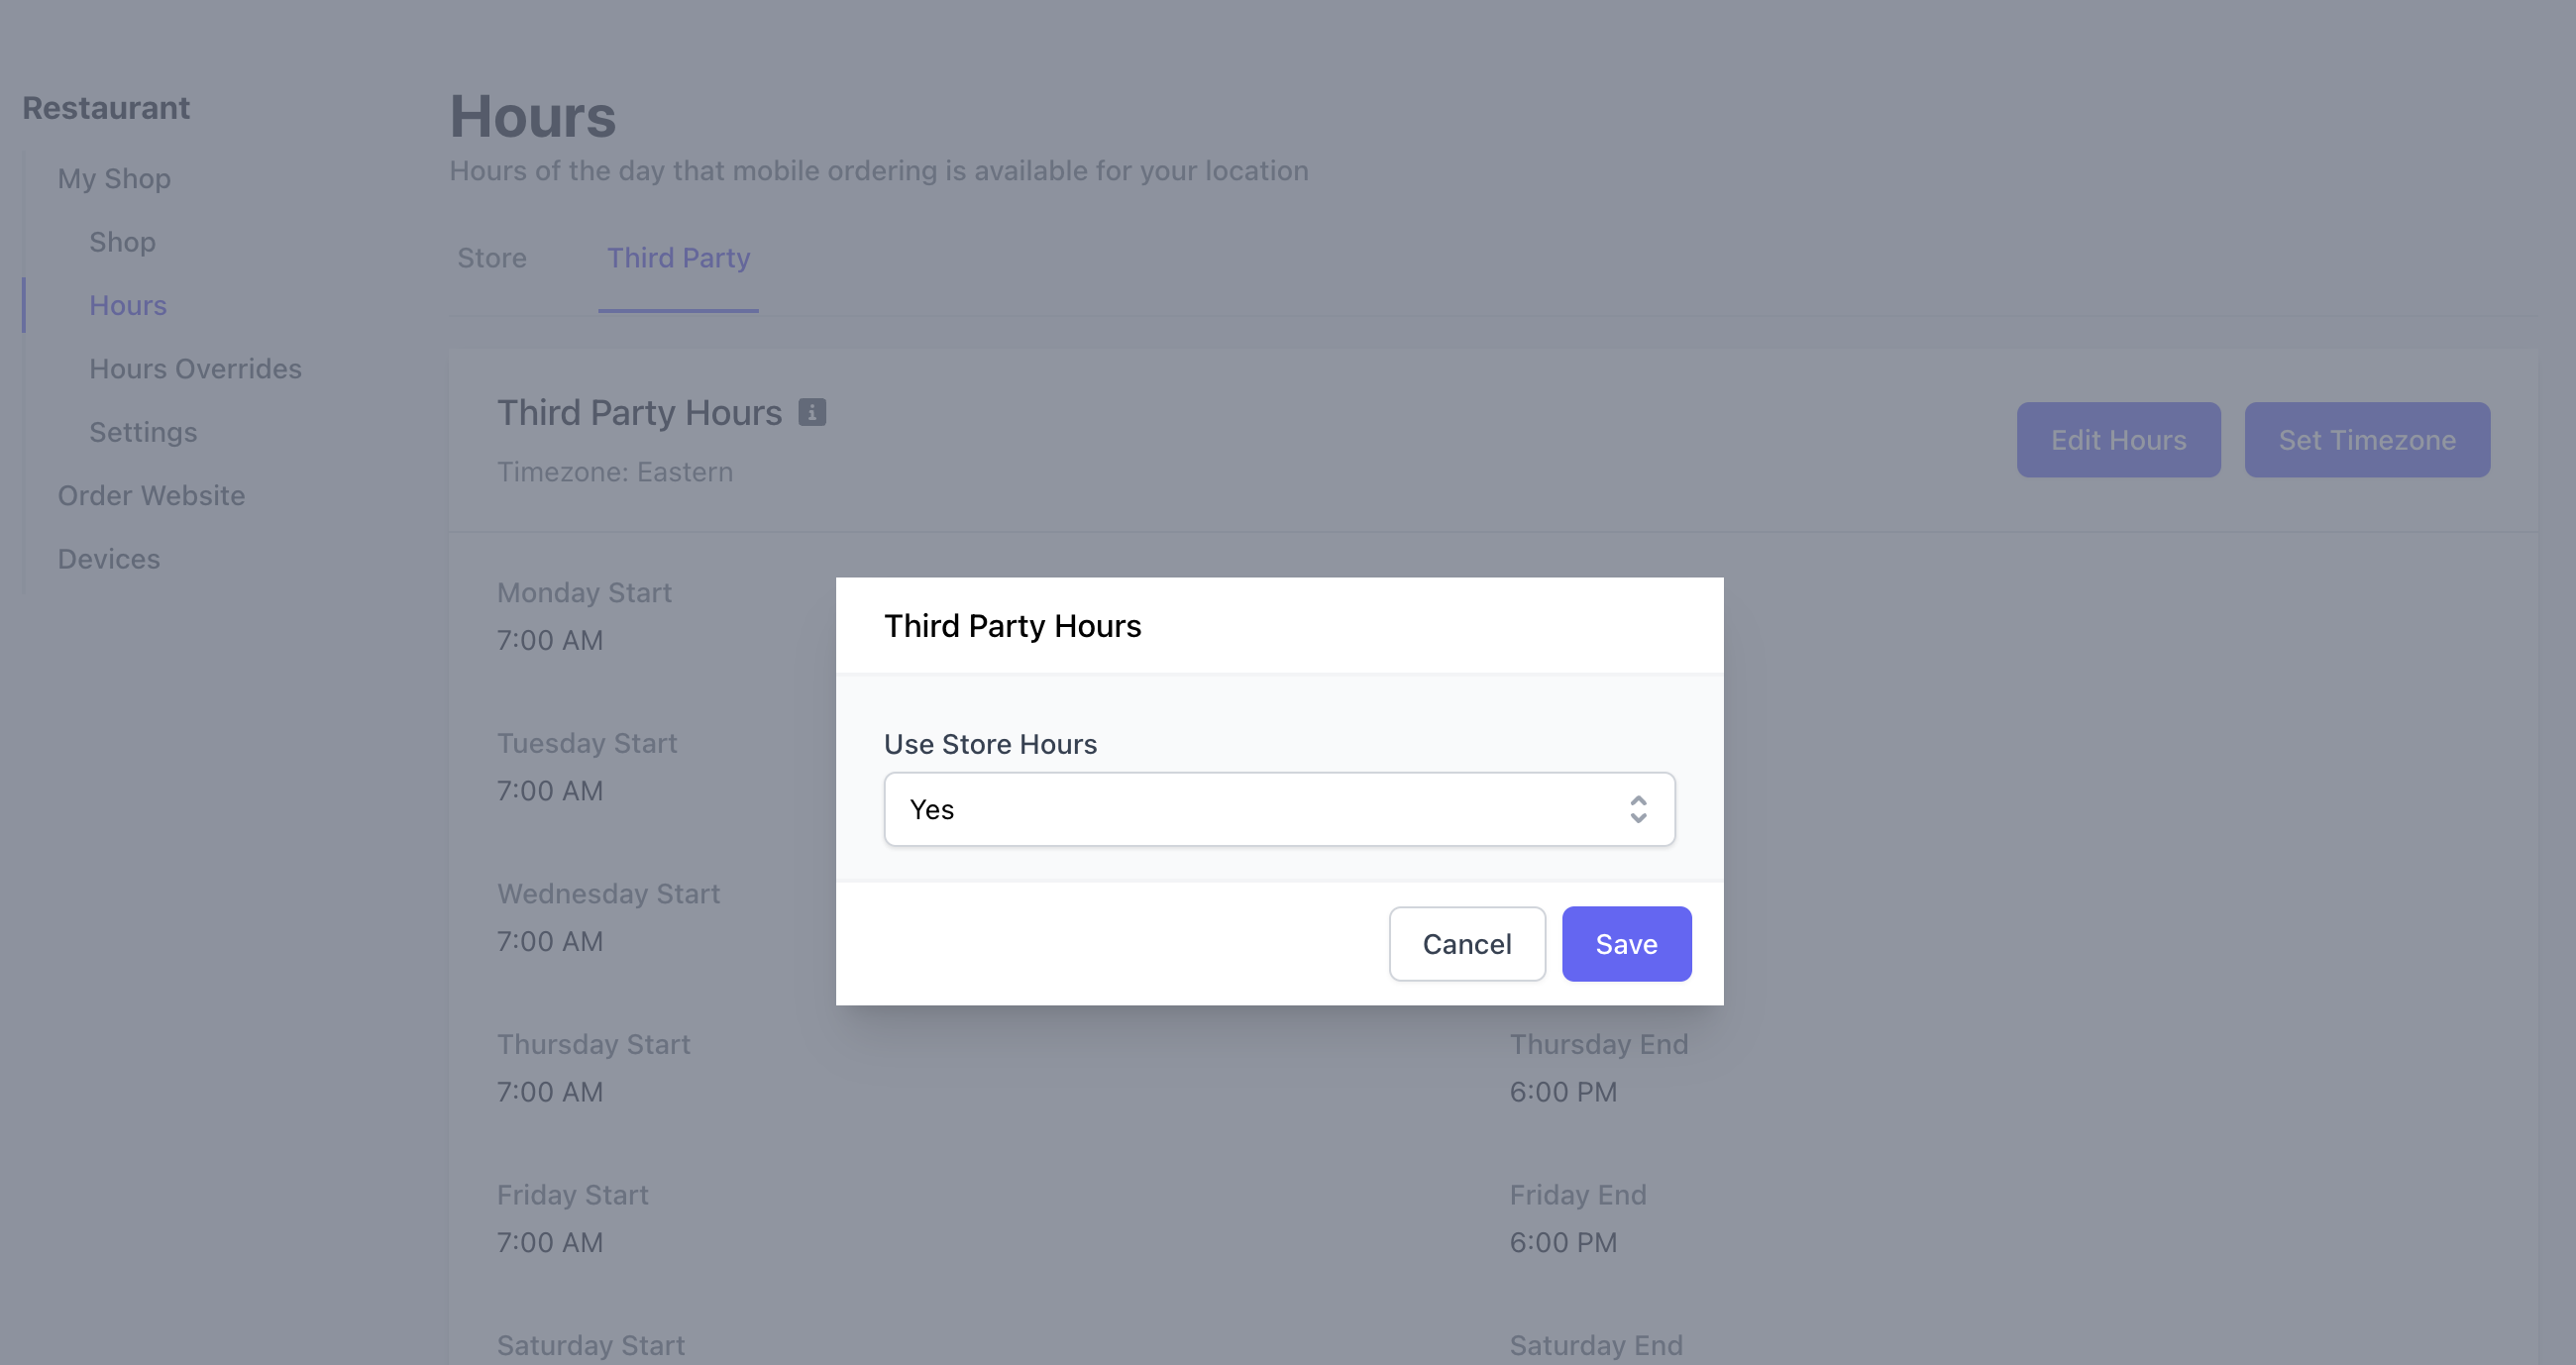 4. Uncheck a day to mark the shop as closed all day > click Save
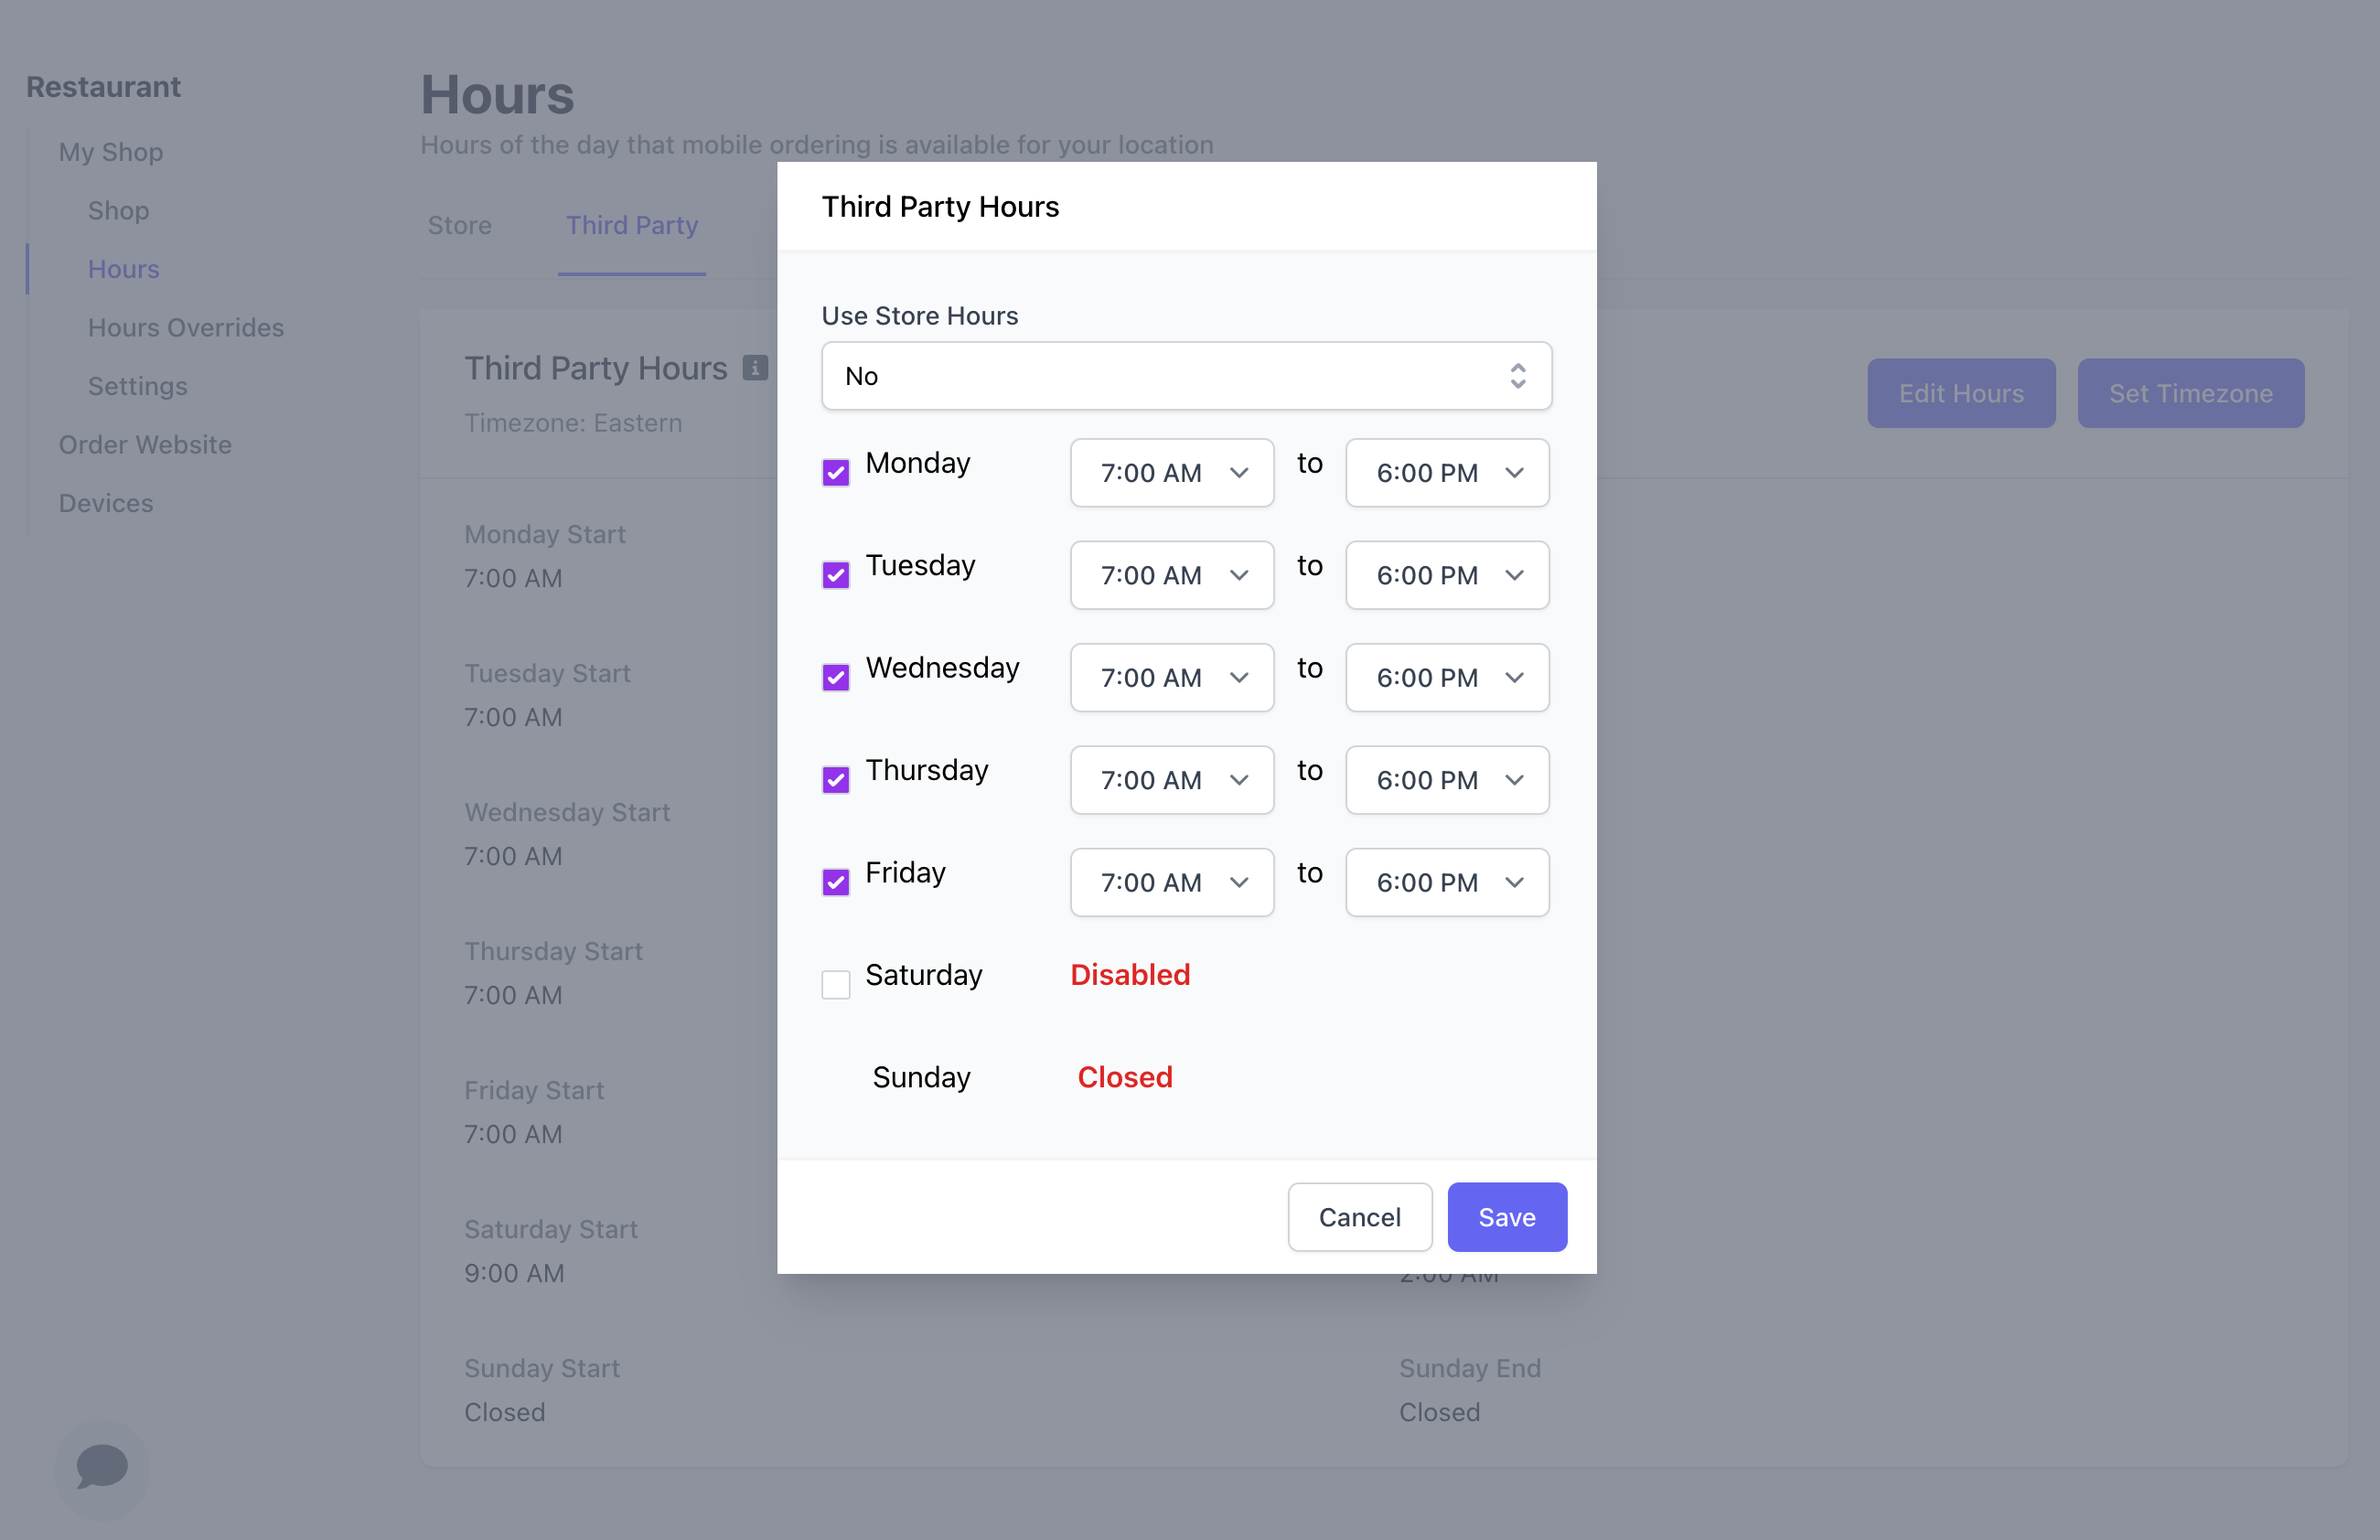 If your store hours are closed on a given day, third party hours will automatically be marked as closed as well
***
## Third Party Ticket Types
Once your third-party delivery platforms are integrated with Dripos, ticket types will automatically be created in the system *after the first third-party order is placed.*
1. To view and edit these ticket types, on the **Web Dashboard** click **Orders** > **Checkout Flow** > **Ticket Types**
If your store hours are closed on a given day, third party hours will automatically be marked as closed as well
***
## Third Party Ticket Types
Once your third-party delivery platforms are integrated with Dripos, ticket types will automatically be created in the system *after the first third-party order is placed.*
1. To view and edit these ticket types, on the **Web Dashboard** click **Orders** > **Checkout Flow** > **Ticket Types**
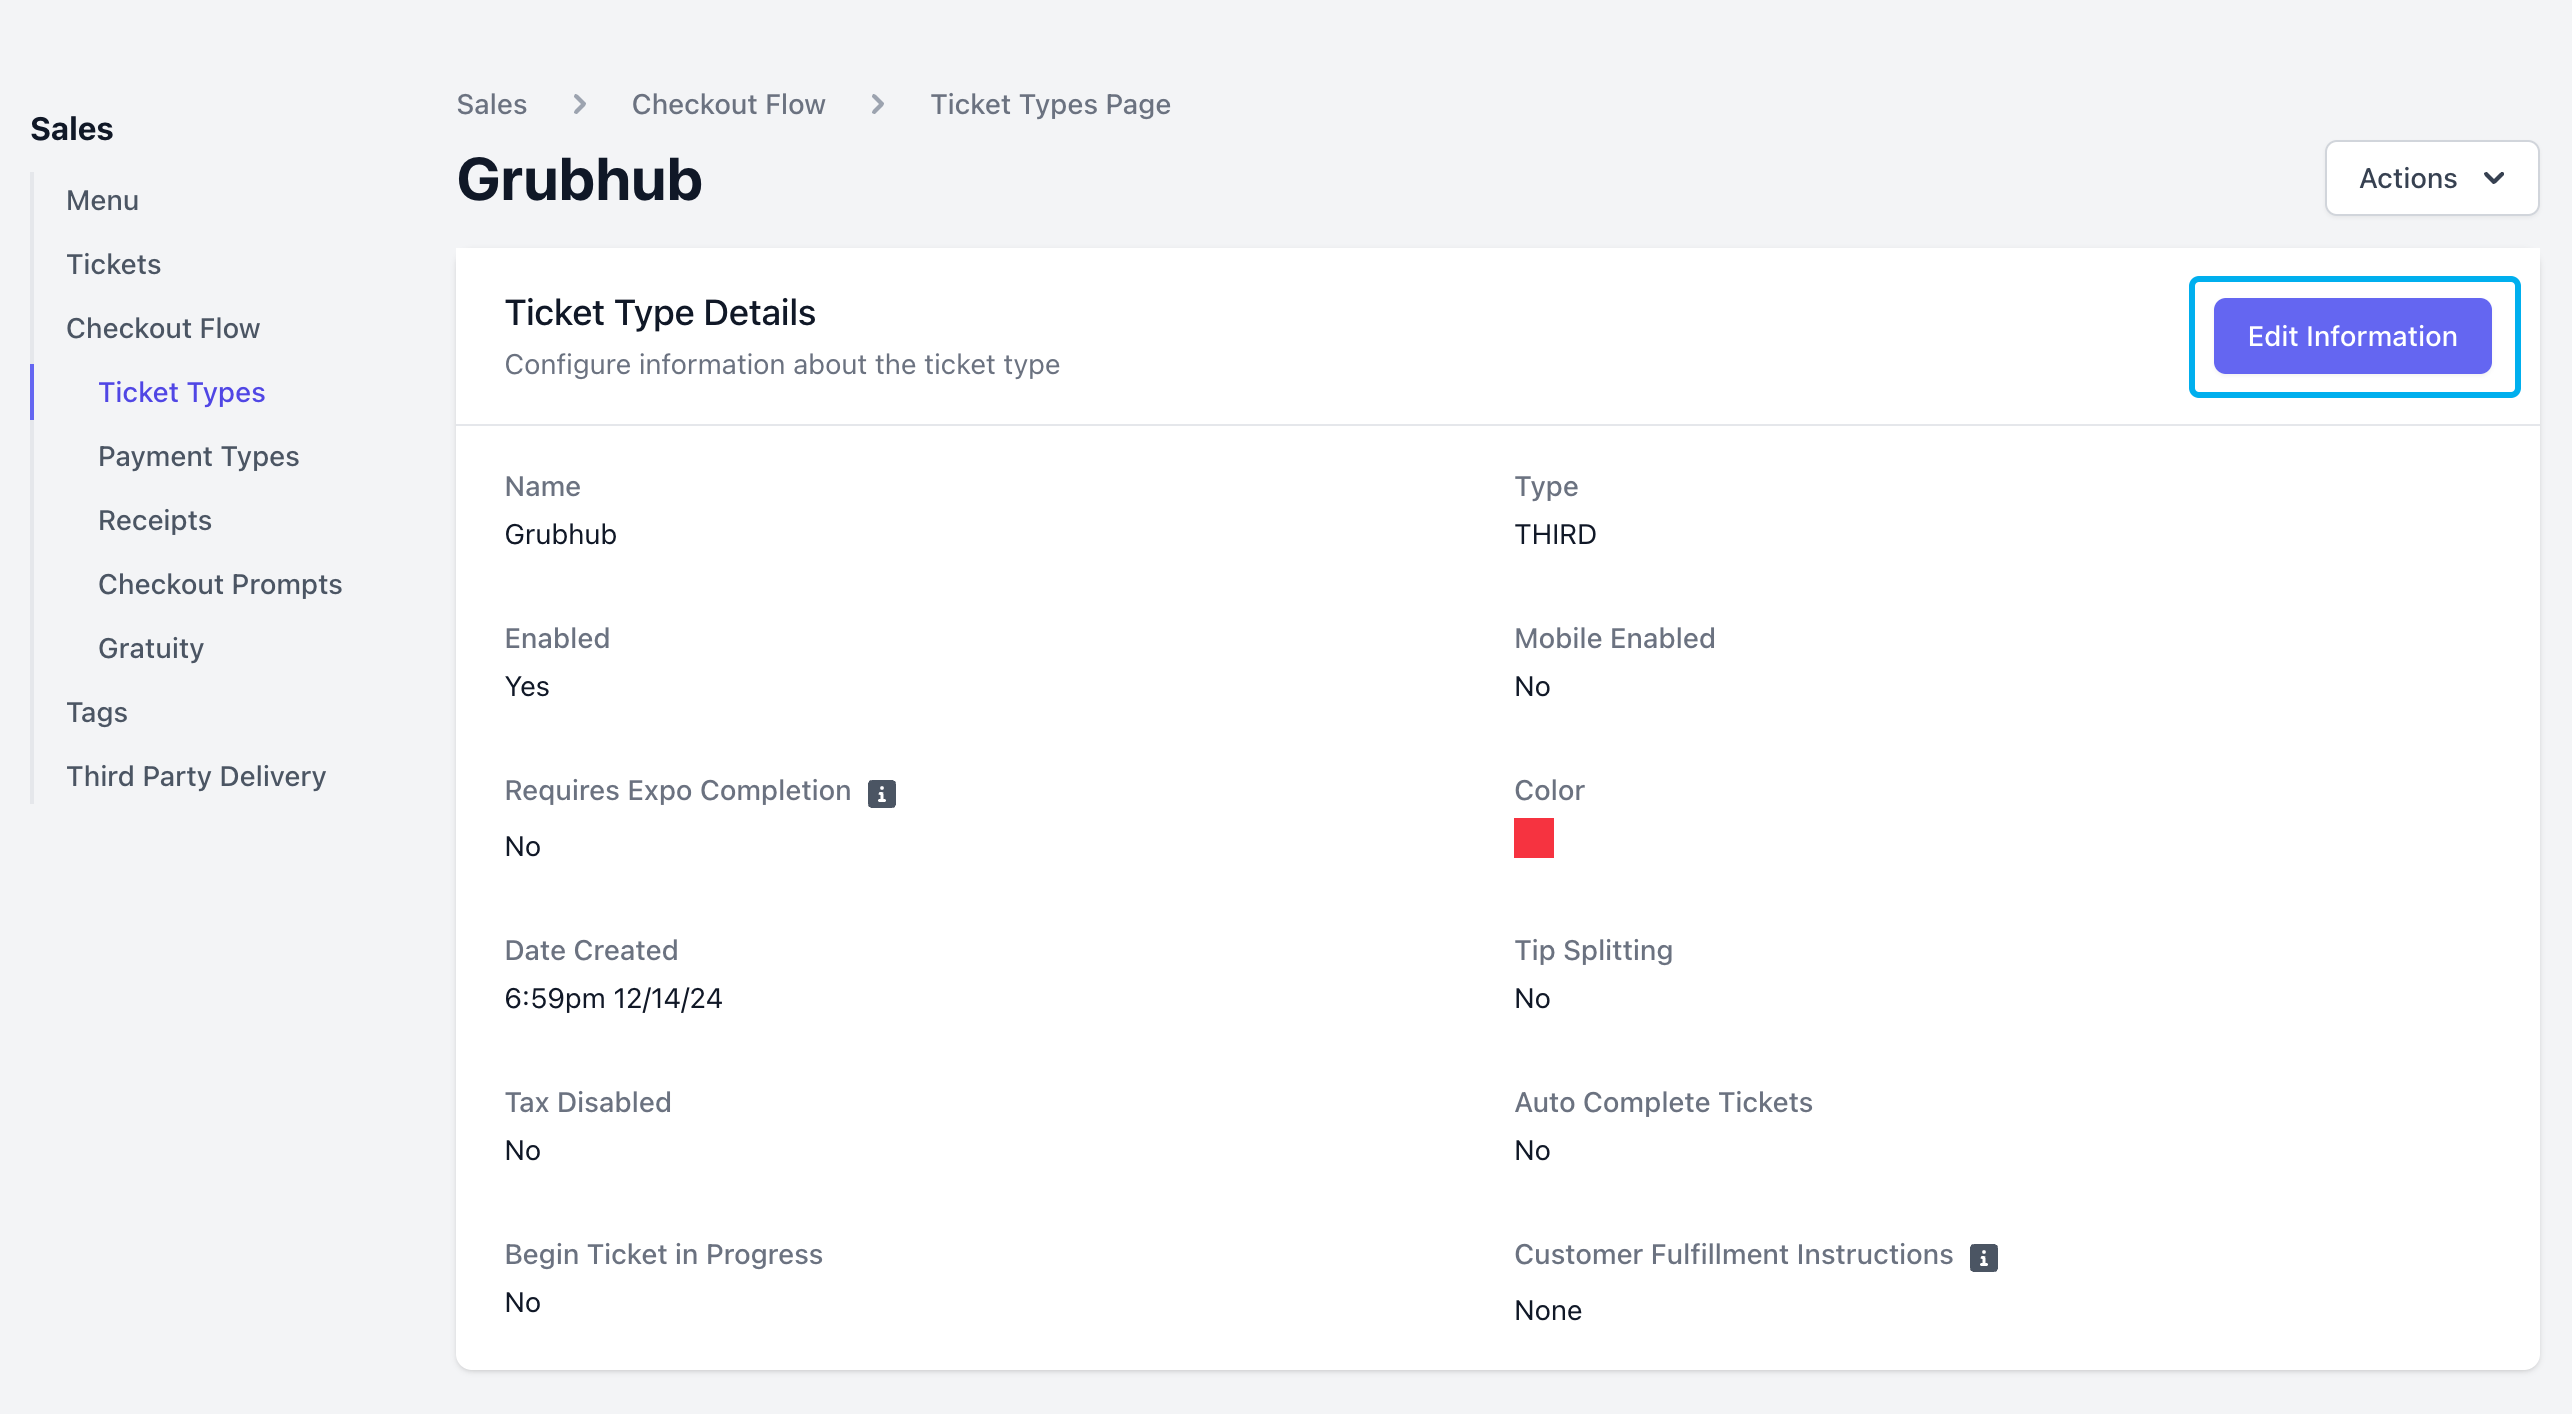
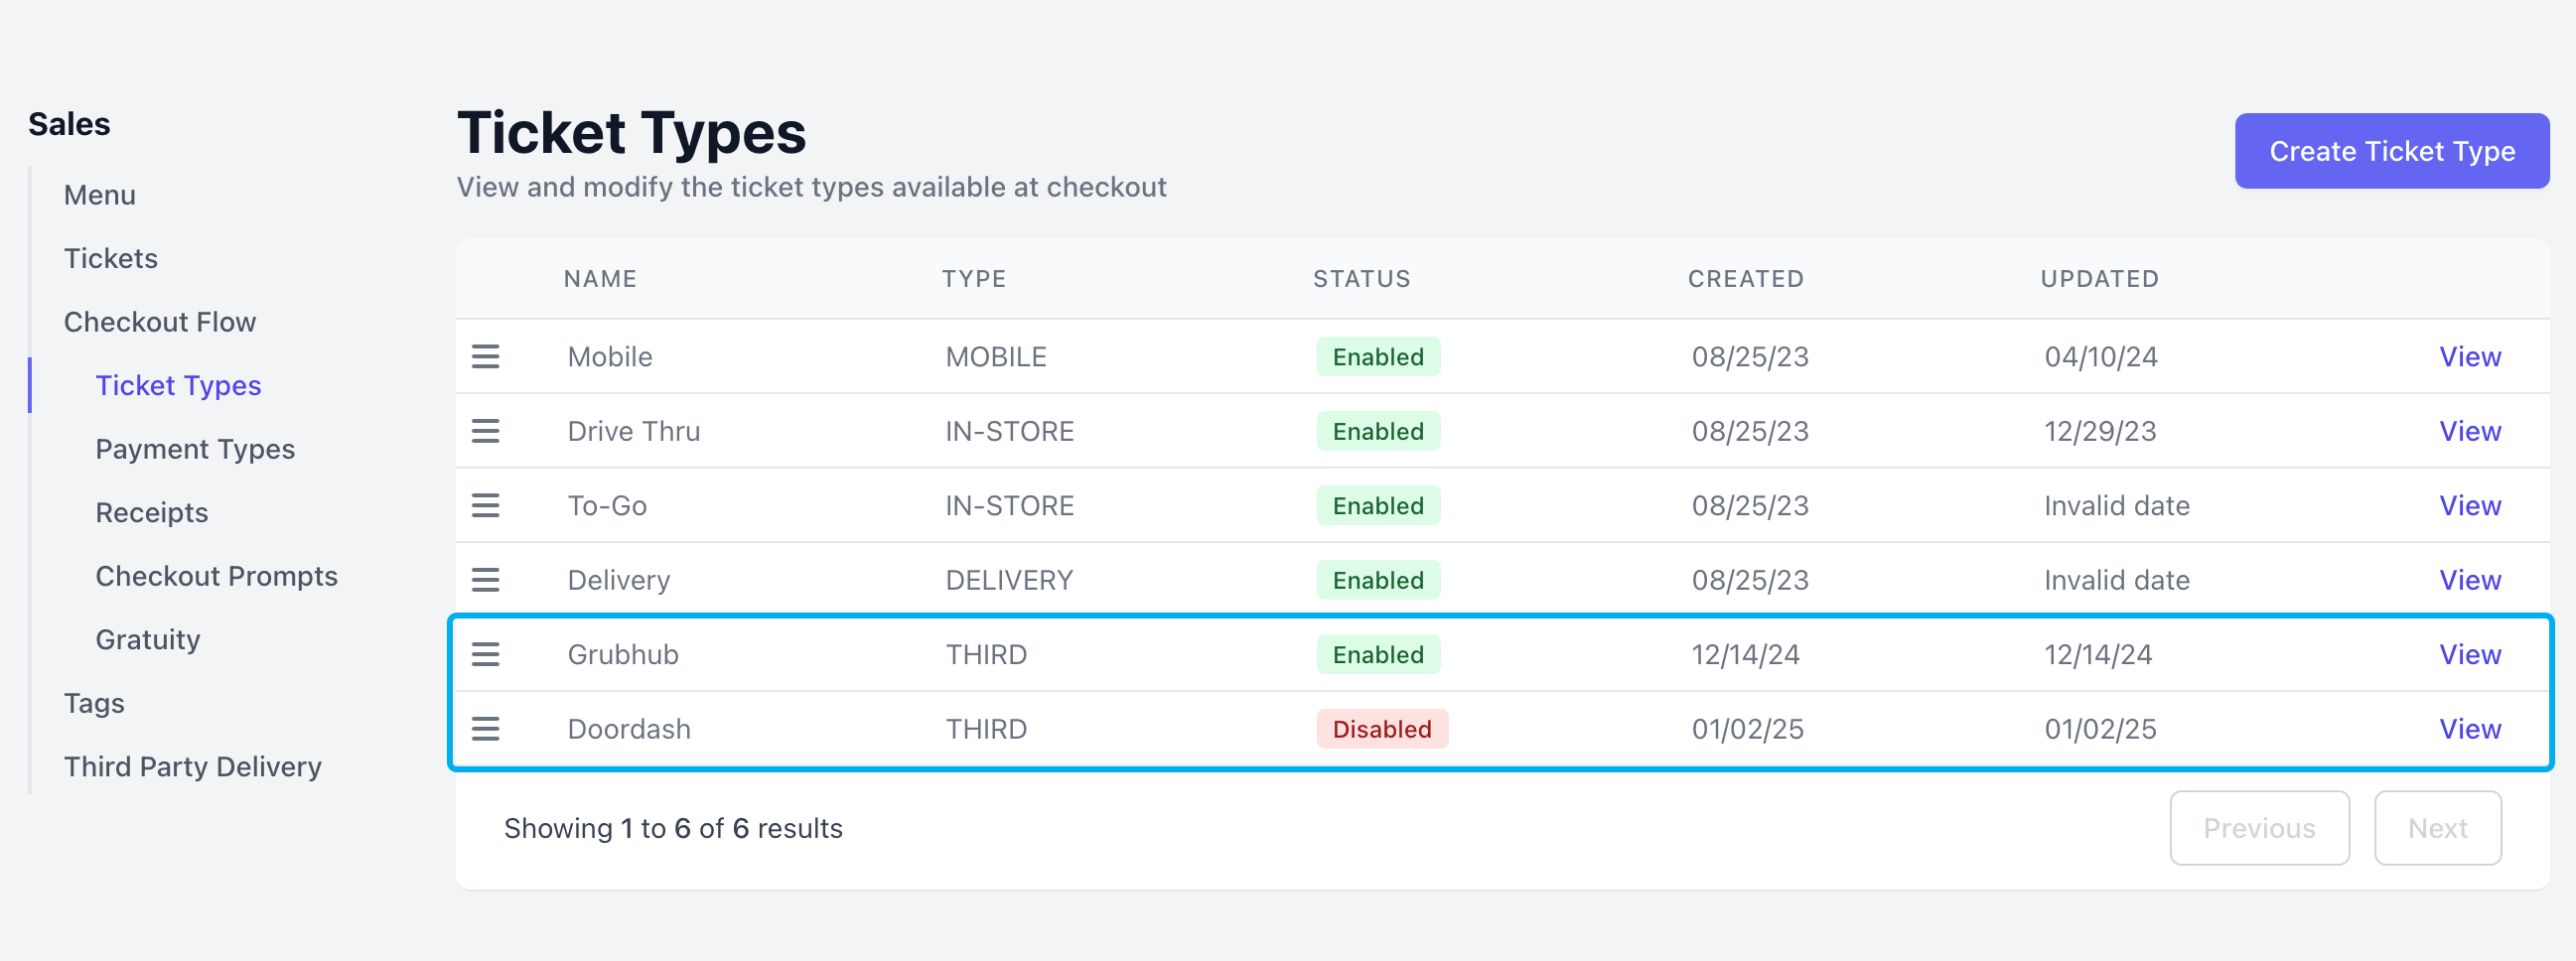 2. Click View to edit ticket types, just like other ticket types. Third-party ticket types can also be disabled from this screen.
 ***
## Third Party Order Notifications
Third Party orders will immediately send to the Point of Sale in the form of a ticket.
View third party order tickets on the Kitchen Display Screen
Print third party orders automatically to your Dripos Printer
The Tickets screen will automatically display all tickets type.
***
## Third Party Order Notifications
Third Party orders will immediately send to the Point of Sale in the form of a ticket.
View third party order tickets on the Kitchen Display Screen
Print third party orders automatically to your Dripos Printer
The Tickets screen will automatically display all tickets type.
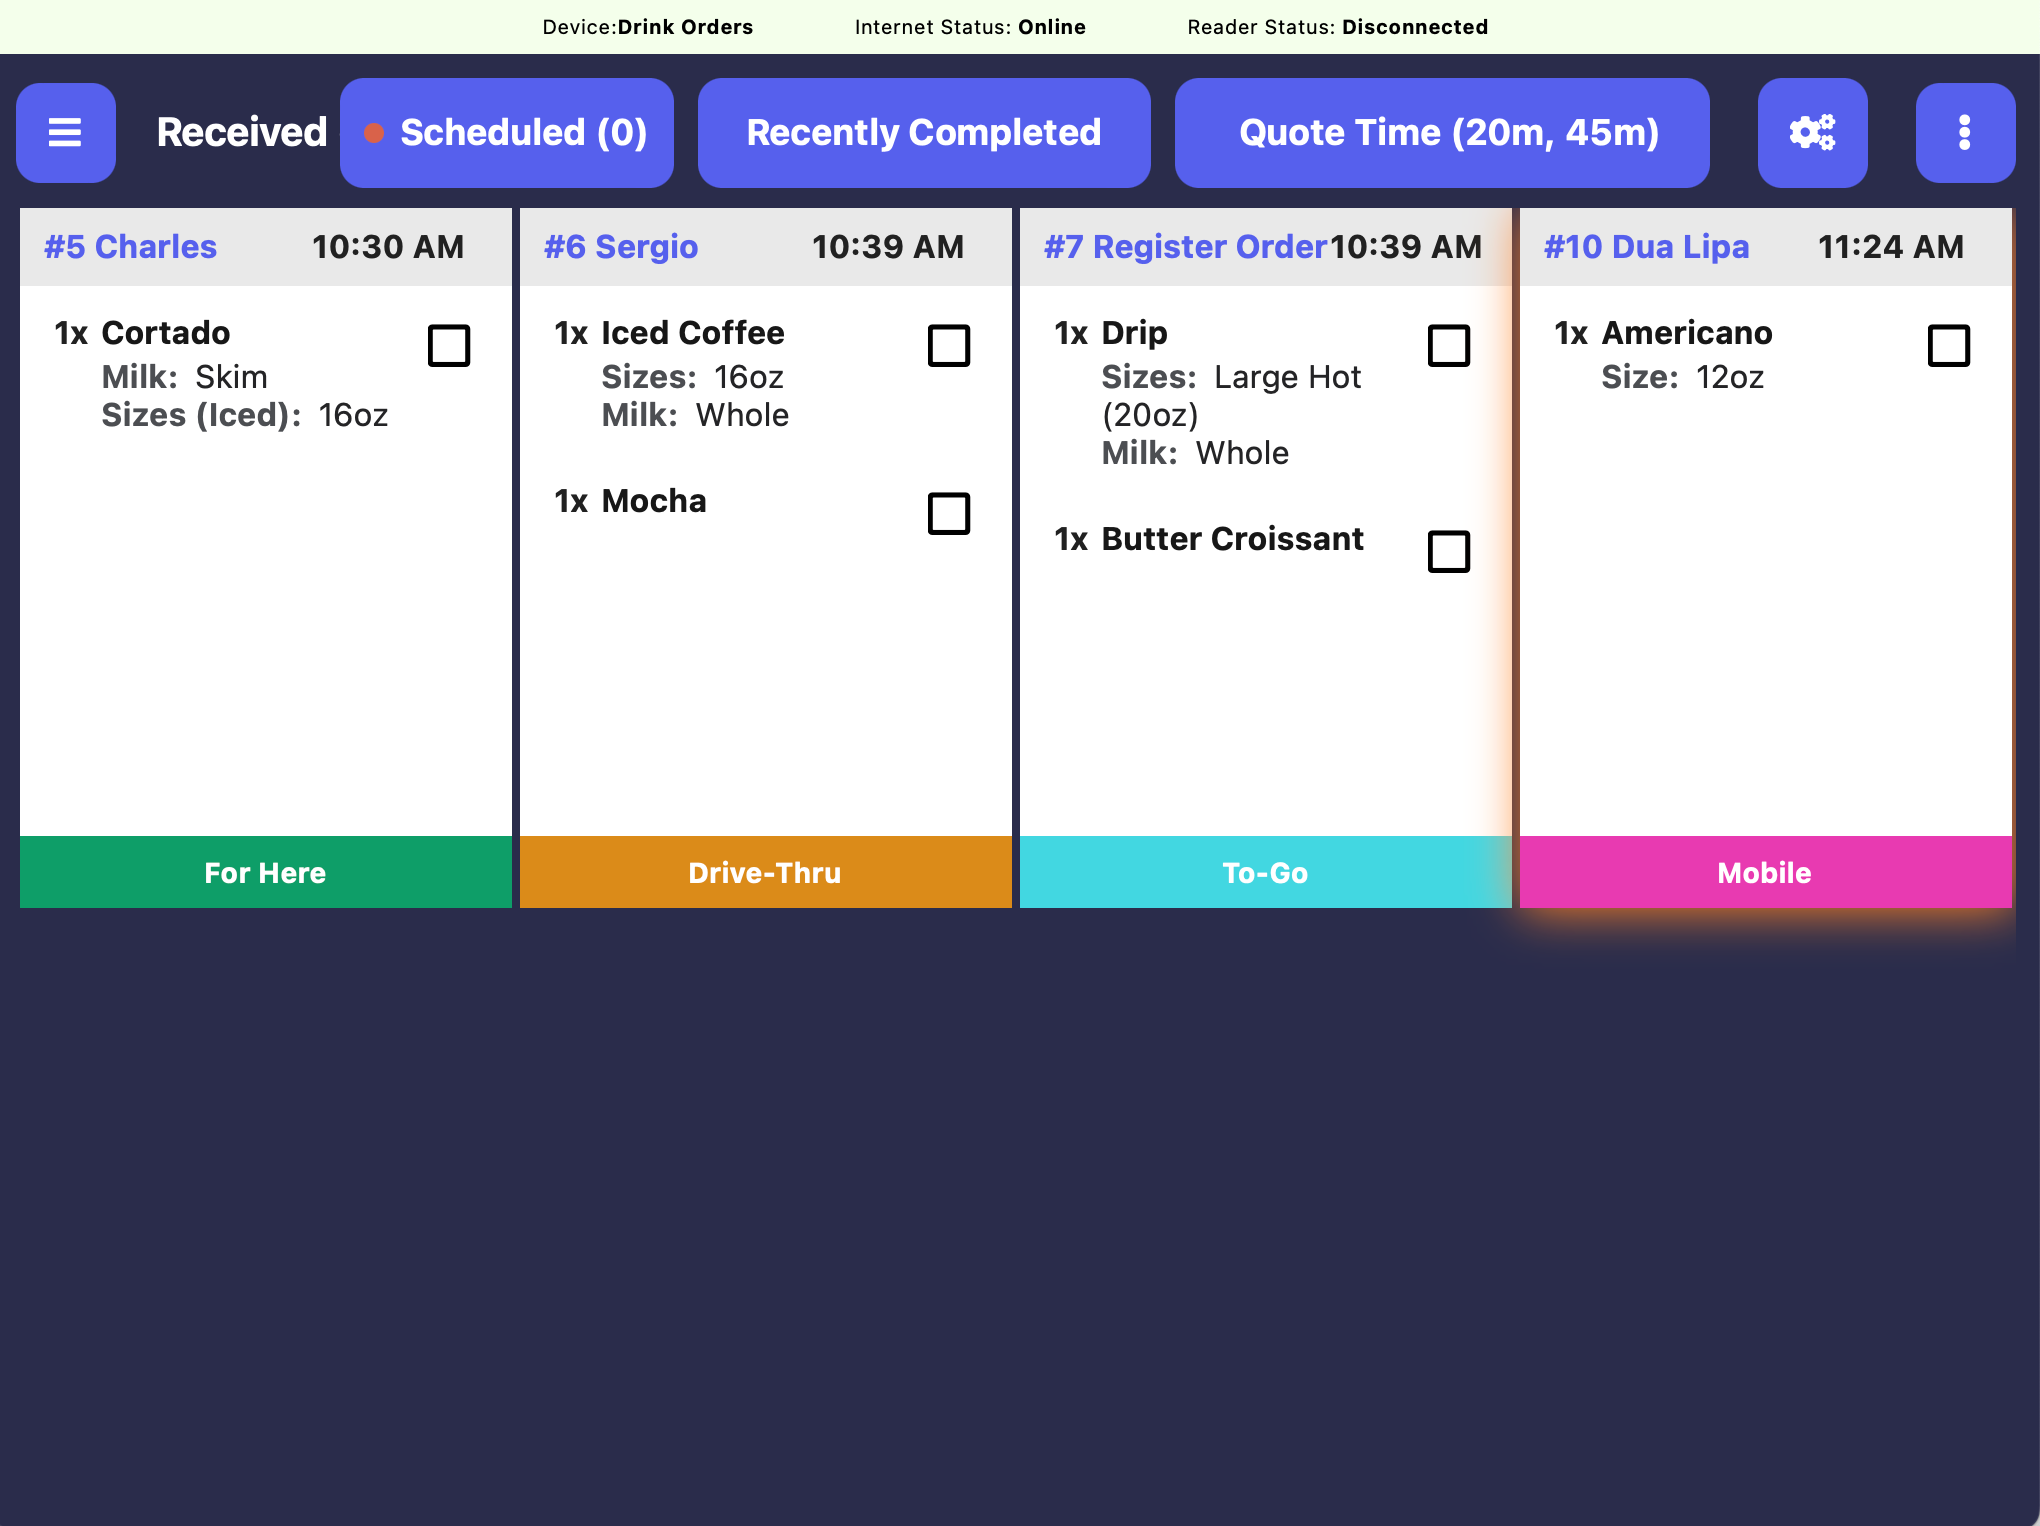 Alternatively, learn how to customize the Tickets screen to **only display third party ticket types**.
Kitchen Display Screen settings are specific to each device. Every tablet using Dripos should be logged into using a different device name. See here for how to create a new device.
On the Point of Sale tablet using the Kitchen Display Screen, press the **tribar** in the upper left screen corner > press the **Settings** button > scroll down to **Device Ticket Options**
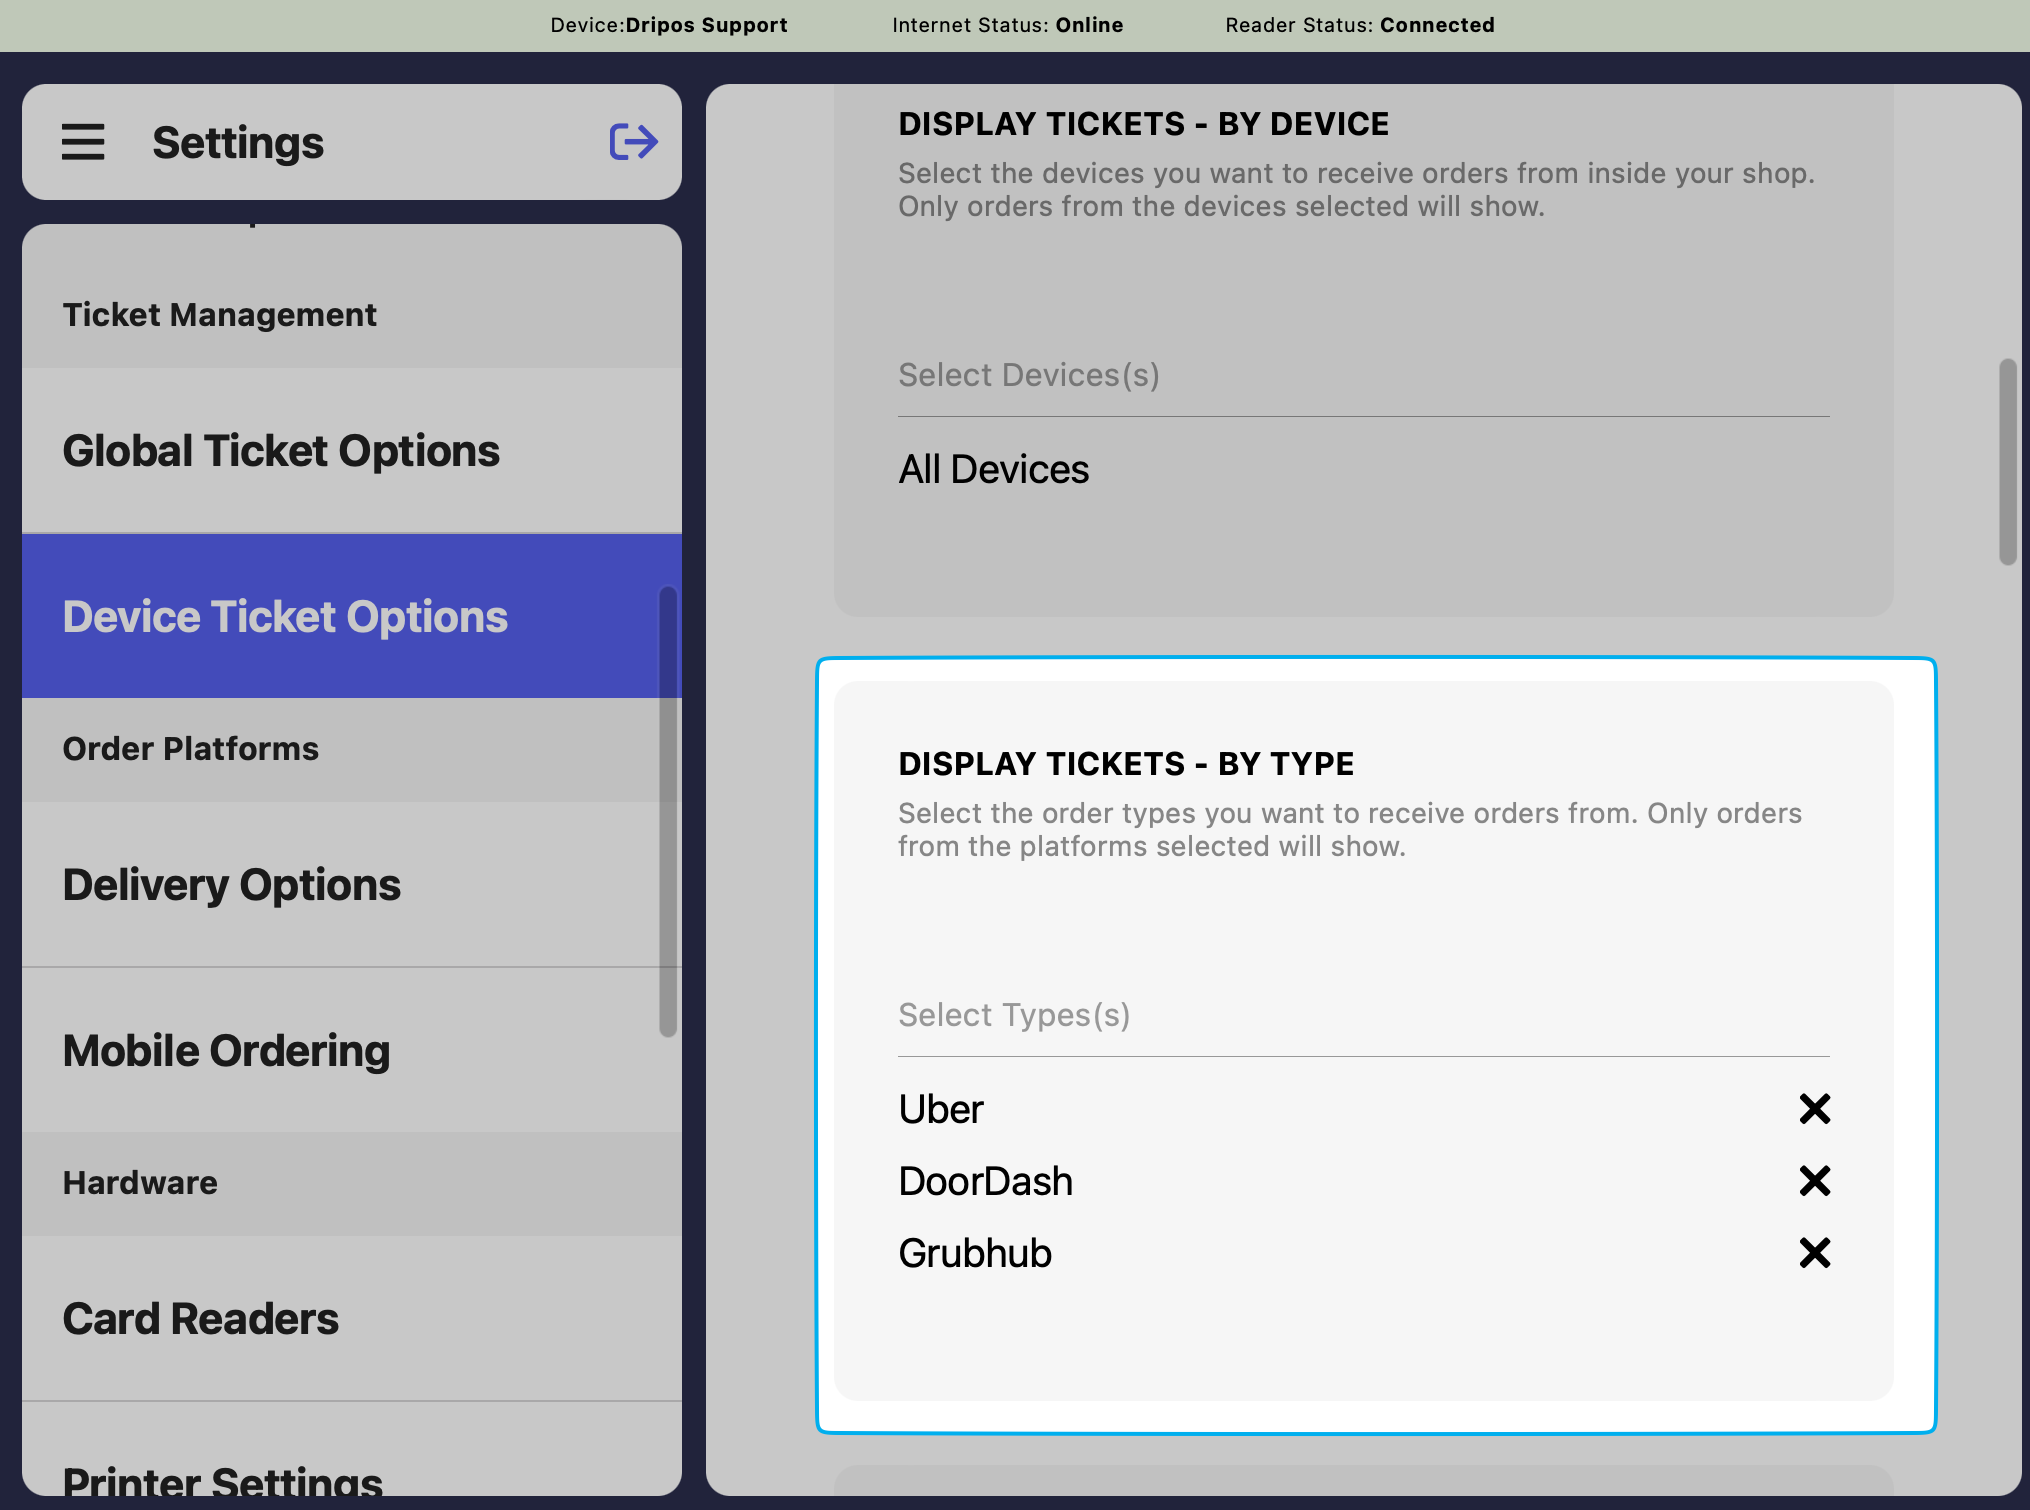
Scroll down to **Display Tickets - By Type** and select the ticket types that will display on this Kitchen Display Screen.
If additional filter are set on this KDS (**By Category** or **By Products**), you may risk missing a third party order if the products ordered do not fall into those filters.
Filtering **By Device** will automatically disclude third party ticket types from the KDS.
Alternatively, learn how to customize the Tickets screen to **only display third party ticket types**.
Kitchen Display Screen settings are specific to each device. Every tablet using Dripos should be logged into using a different device name. See here for how to create a new device.
On the Point of Sale tablet using the Kitchen Display Screen, press the **tribar** in the upper left screen corner > press the **Settings** button > scroll down to **Device Ticket Options**
Scroll down to **Display Tickets - By Type** and select the ticket types that will display on this Kitchen Display Screen.
If additional filter are set on this KDS (**By Category** or **By Products**), you may risk missing a third party order if the products ordered do not fall into those filters.
Filtering **By Device** will automatically disclude third party ticket types from the KDS.
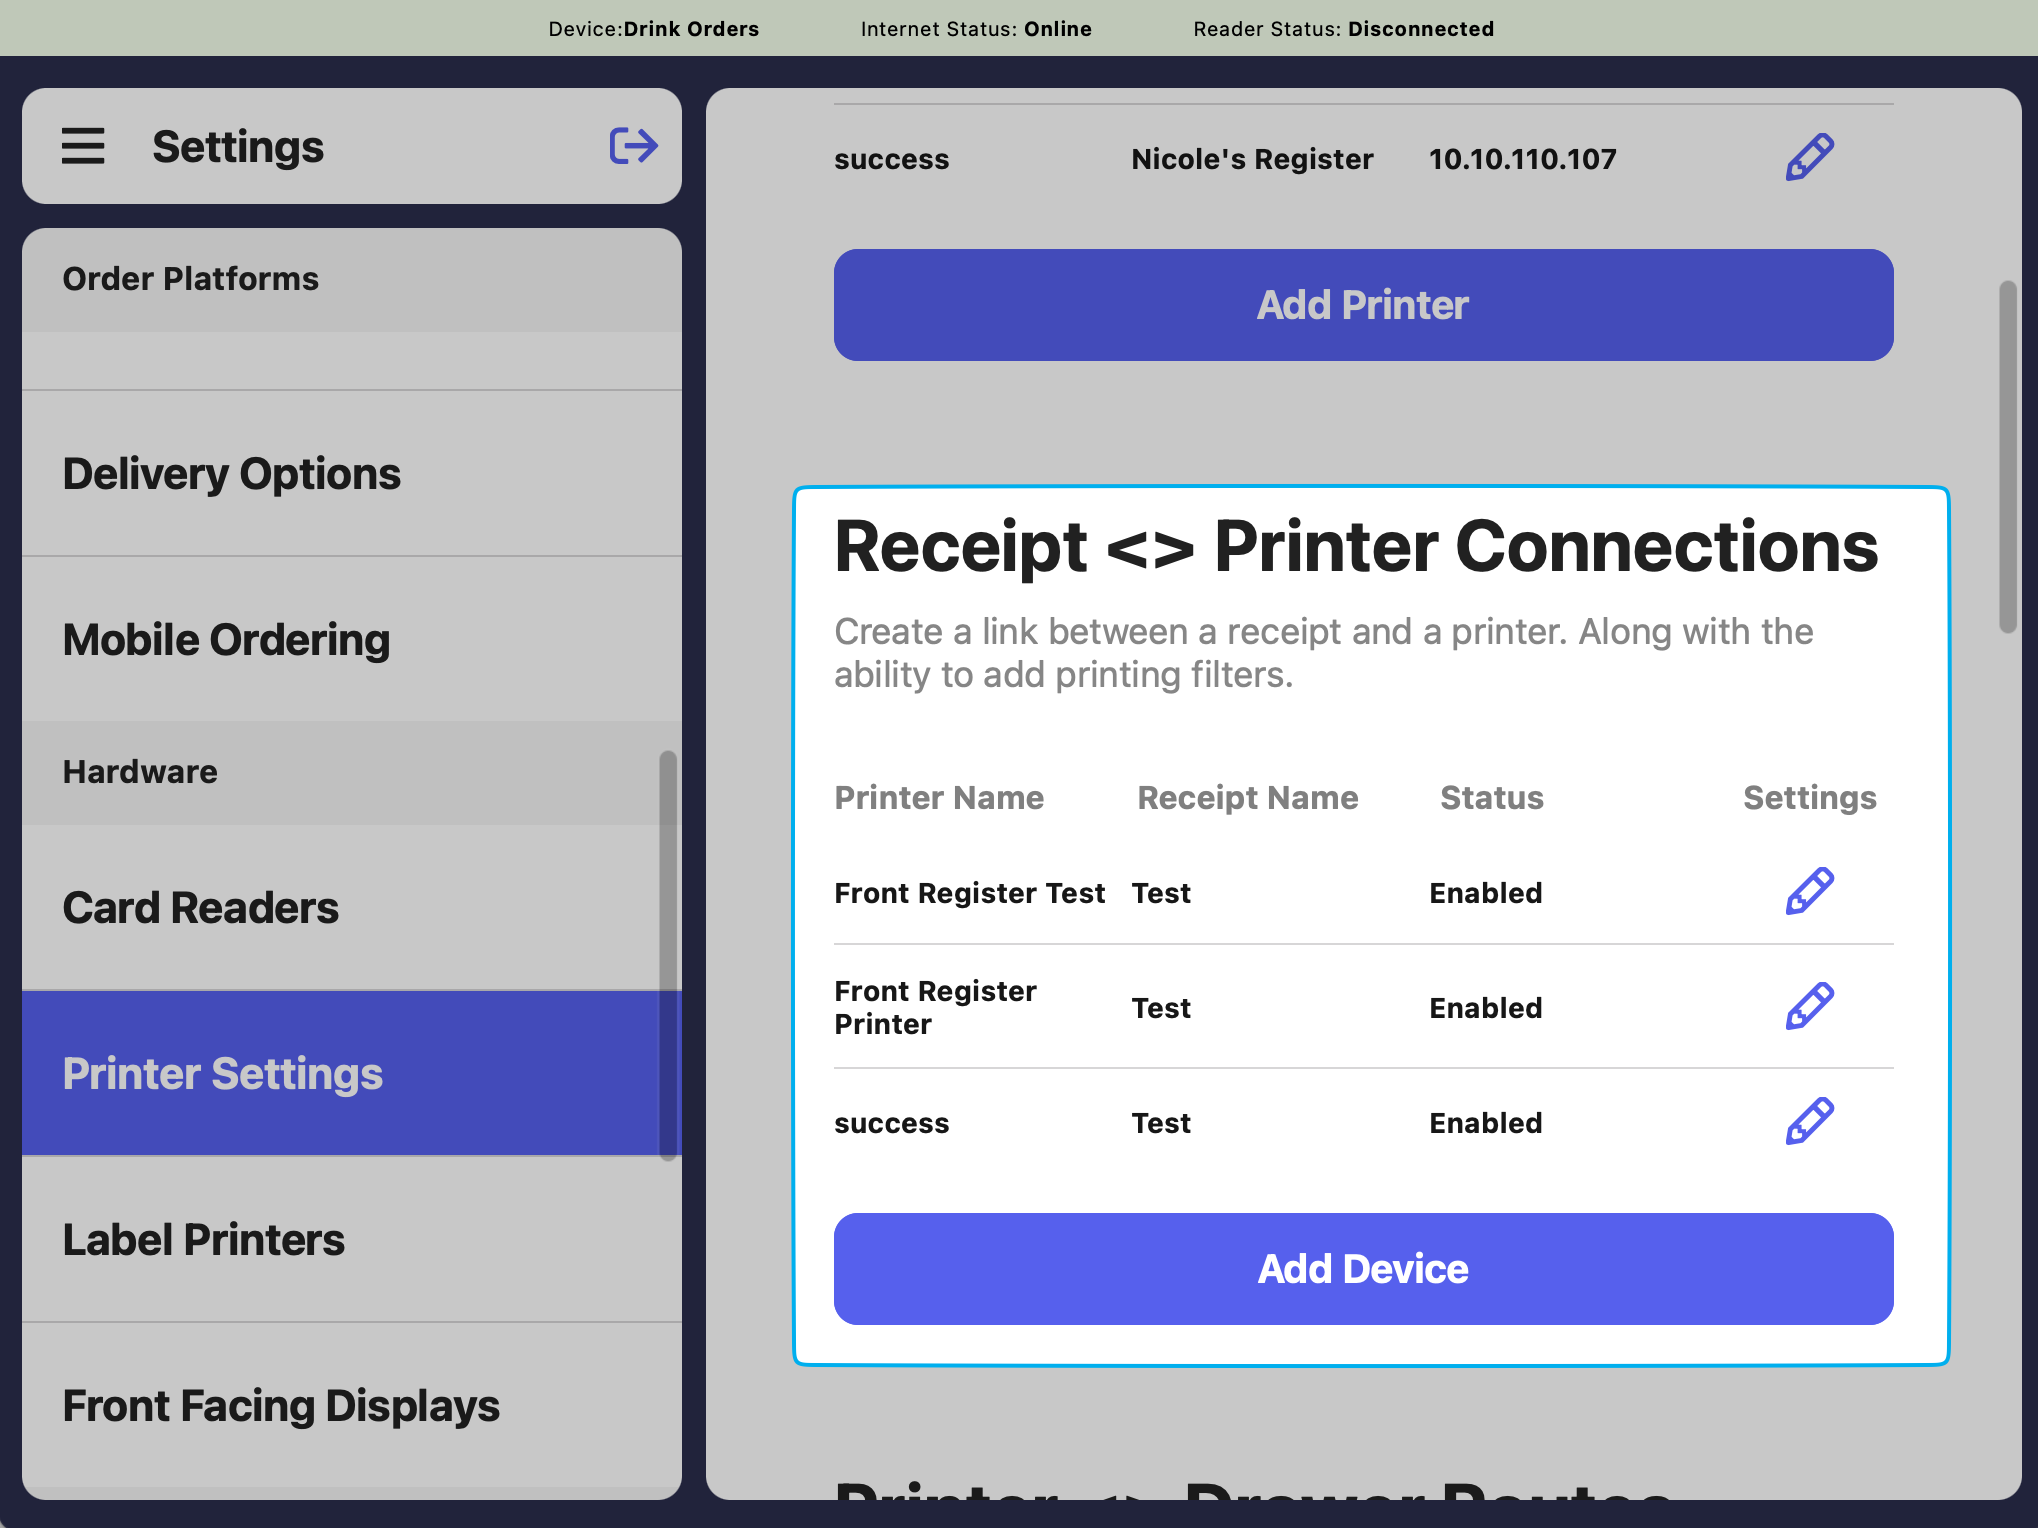
 If your shop utilizes a printer with Dripos, it can be used to print third party order tickets automatically.
Once your printer is added to Dripos, follow these steps to add a receipt/make ticket that prints out third party tickets only.
On any Point of Sale tablet, press the **tribar** in the upper left screen corner > press the **Settings** button > scroll down to **Printer Settings**
Under **Receipt \<> Printer Connections** press **Add Device**
If your shop utilizes a printer with Dripos, it can be used to print third party order tickets automatically.
Once your printer is added to Dripos, follow these steps to add a receipt/make ticket that prints out third party tickets only.
On any Point of Sale tablet, press the **tribar** in the upper left screen corner > press the **Settings** button > scroll down to **Printer Settings**
Under **Receipt \<> Printer Connections** press **Add Device**
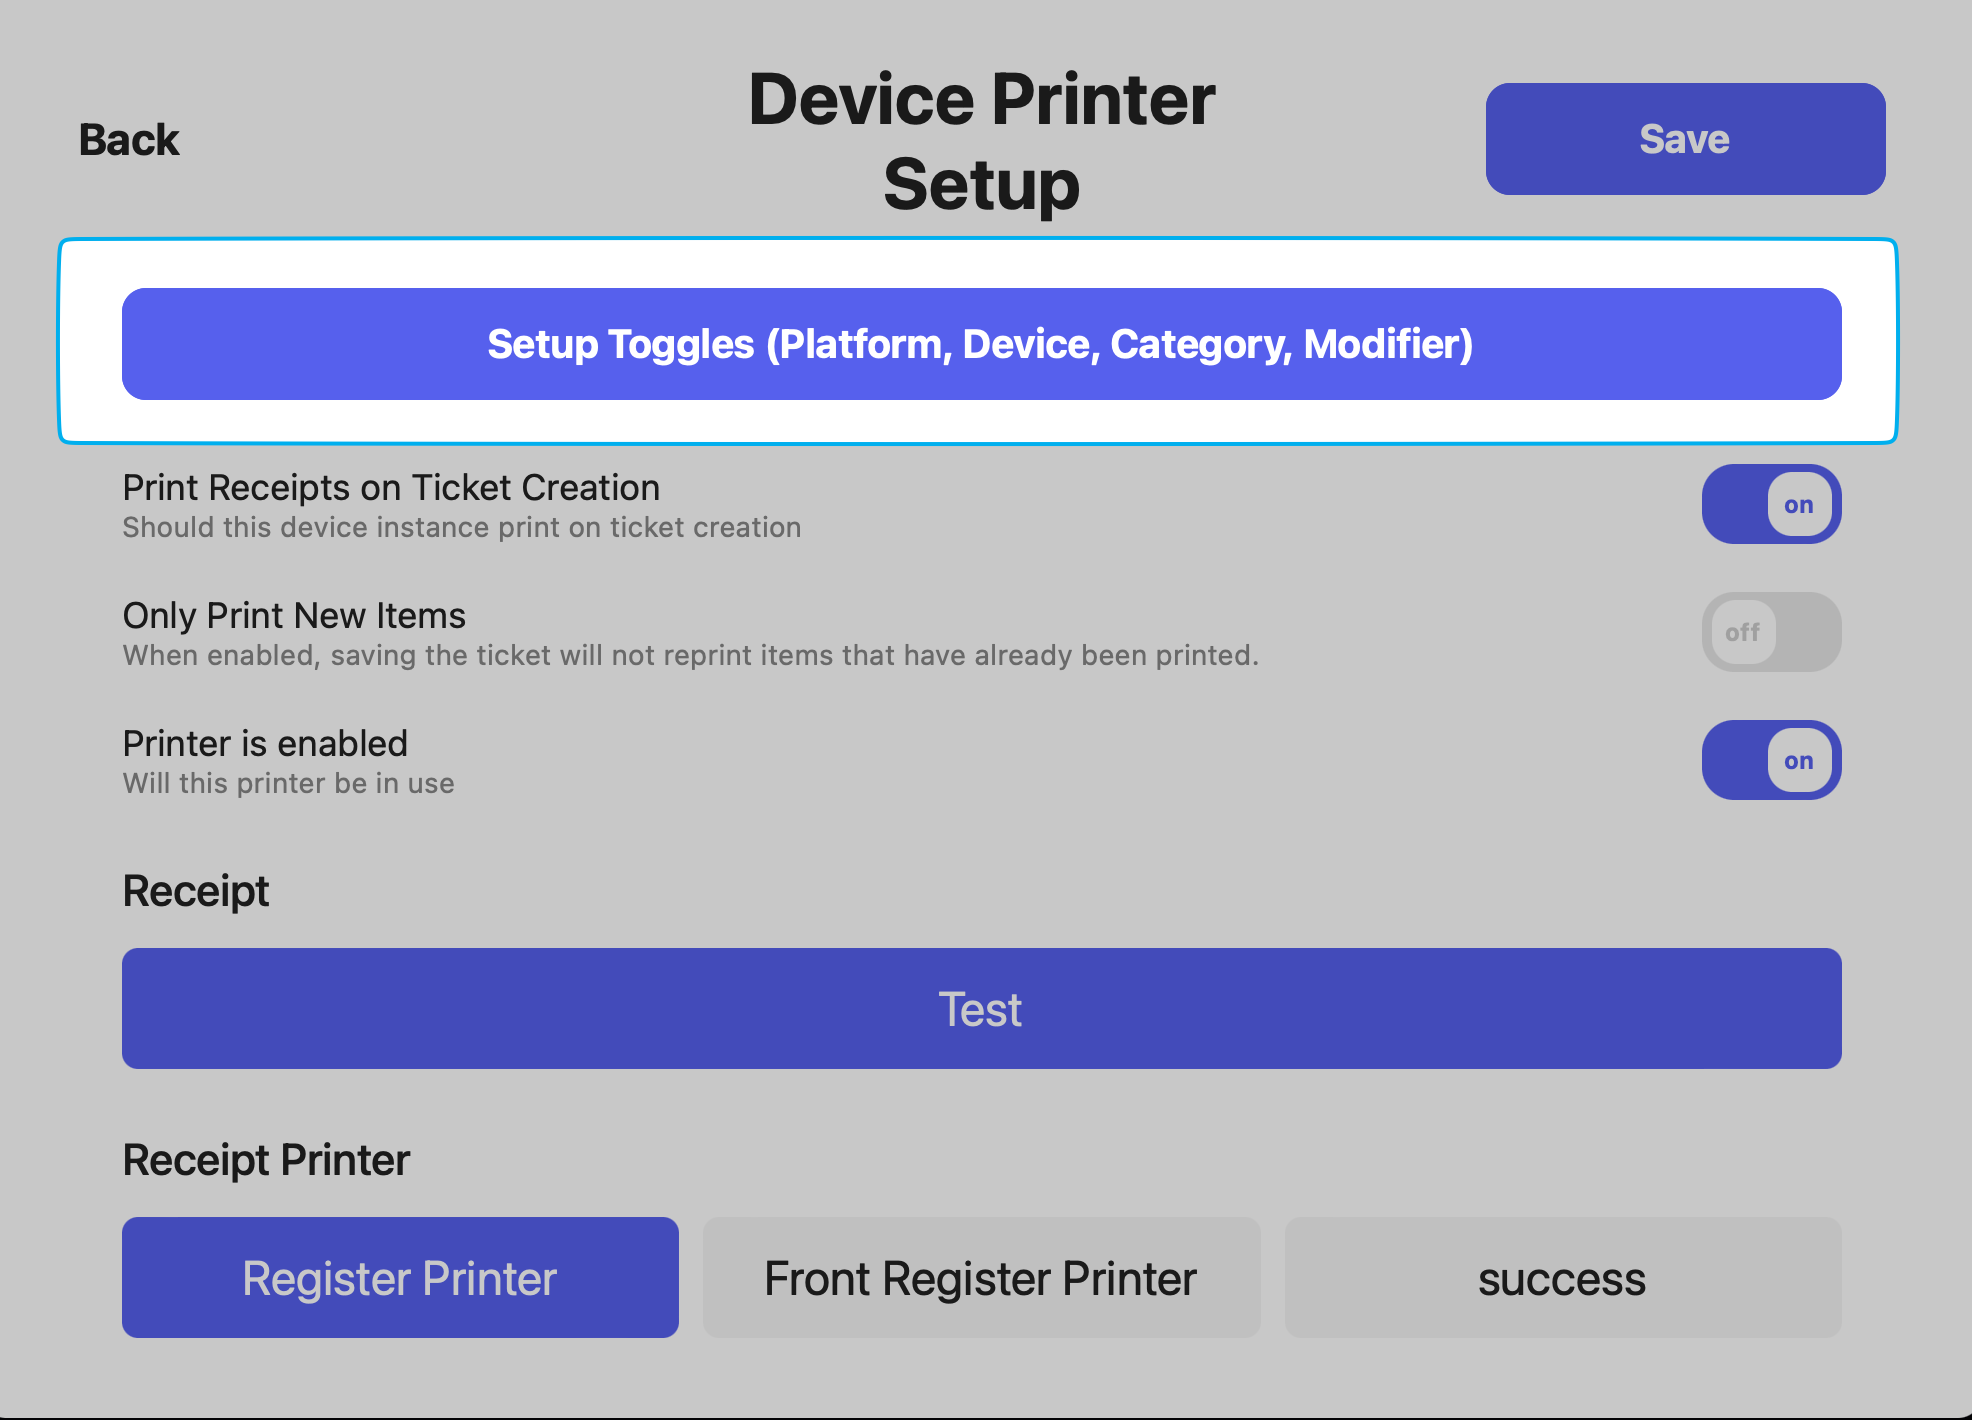
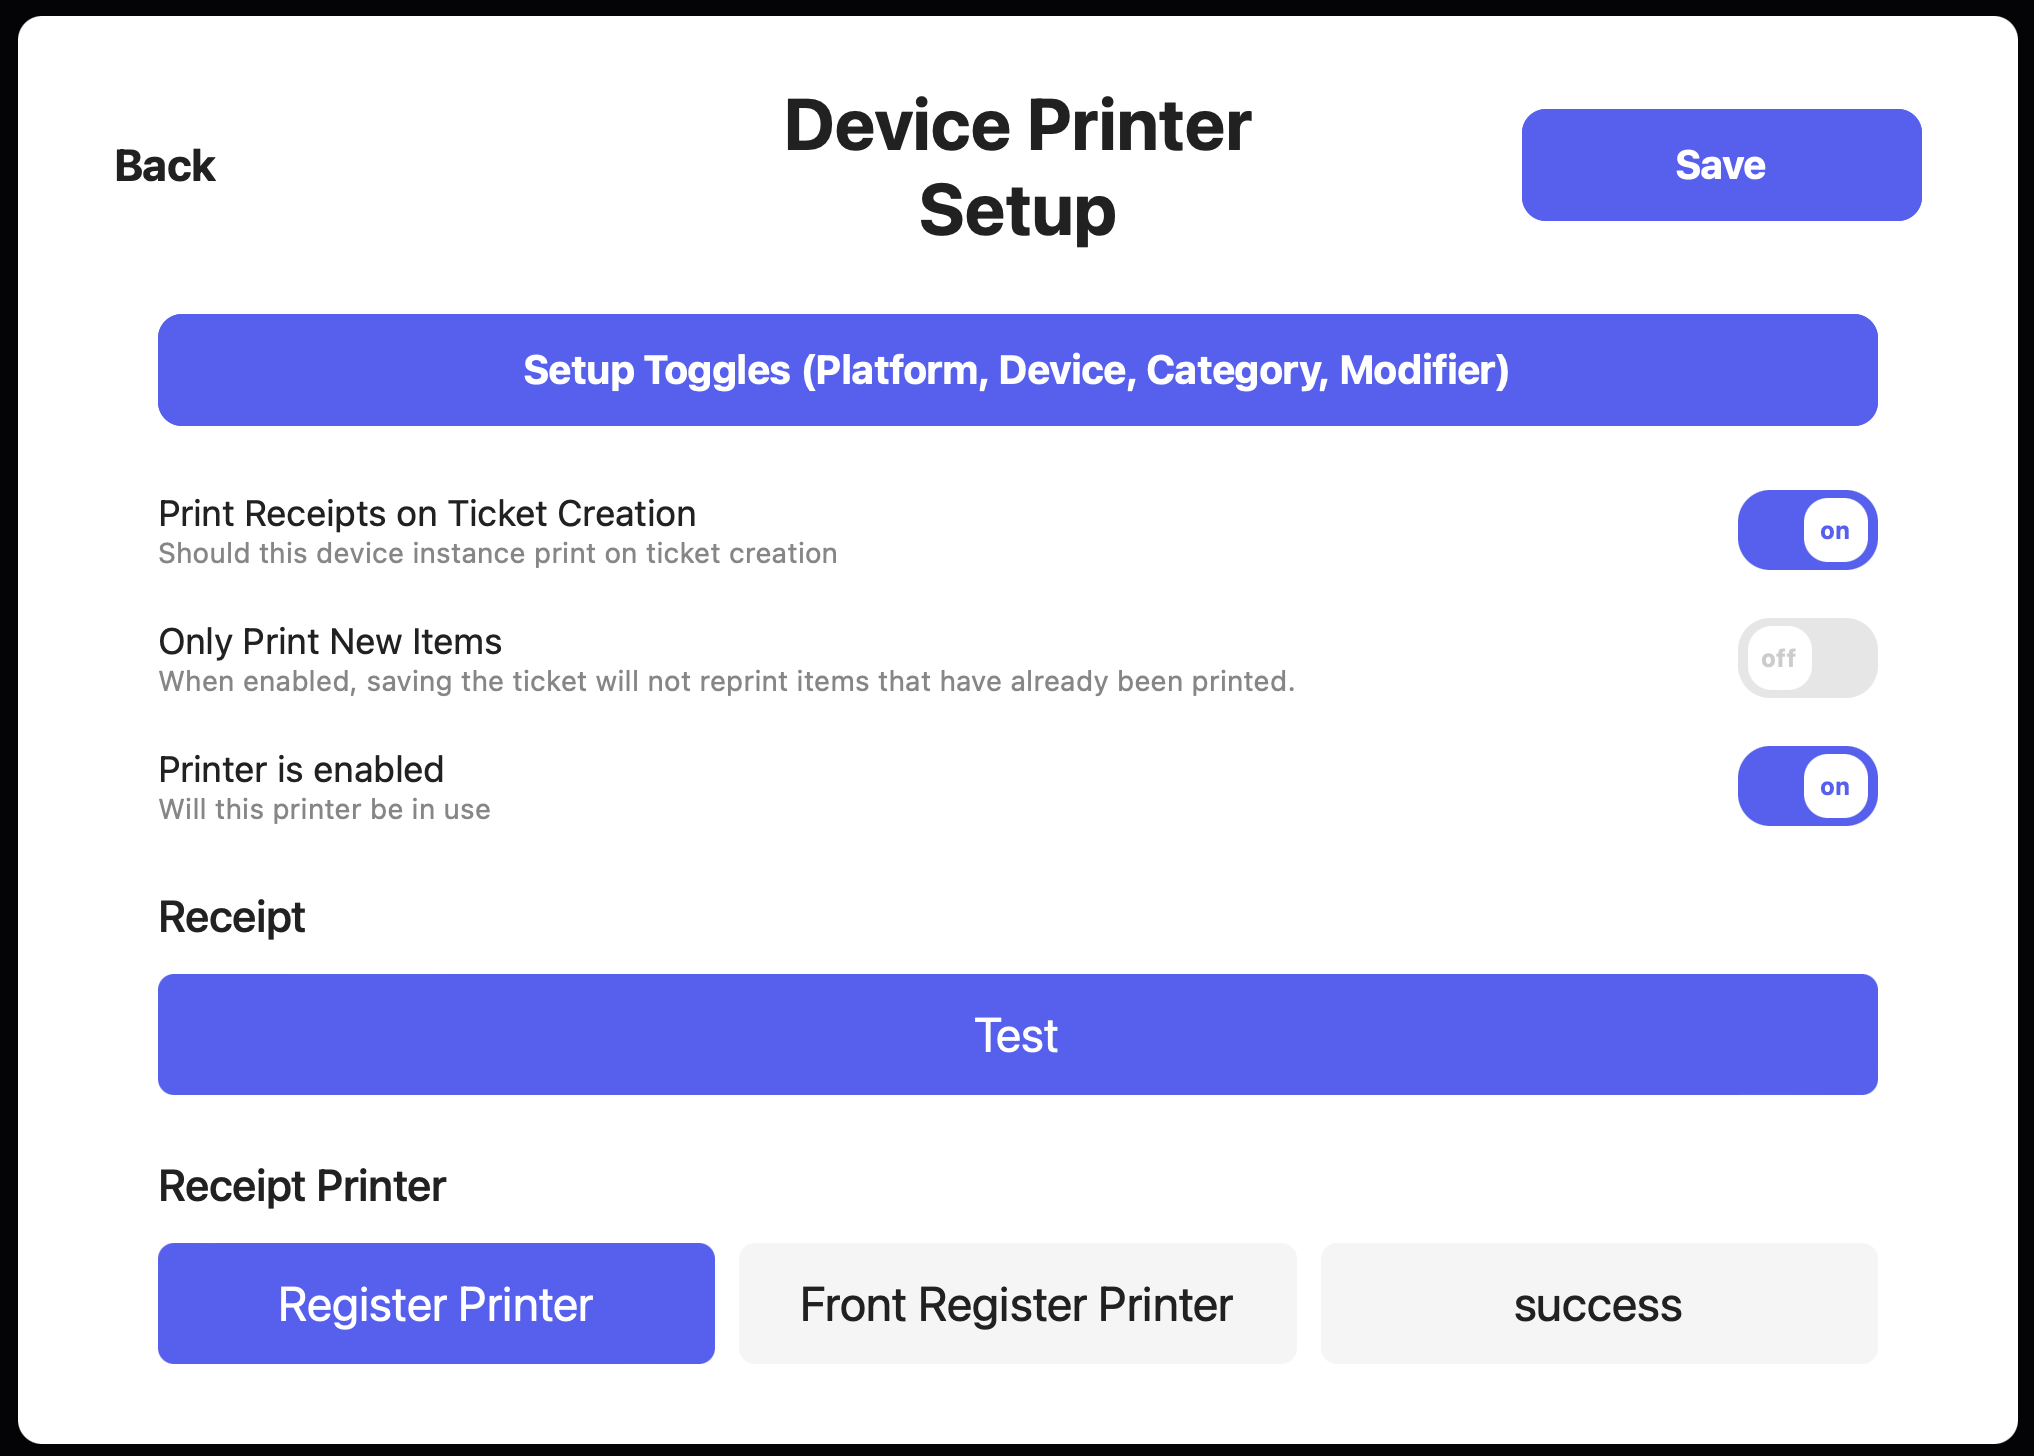 * **Print Receipts on Ticket Creation** = **ON**
* **Only Print New Items** = Optional
* **Printer is enabled** = **ON**
* Select a **Receipt Template**
* Select a **Receipt Printer**
Press **Setup Toggles** to filter what prints on this receipt.
* **Print Receipts on Ticket Creation** = **ON**
* **Only Print New Items** = Optional
* **Printer is enabled** = **ON**
* Select a **Receipt Template**
* Select a **Receipt Printer**
Press **Setup Toggles** to filter what prints on this receipt.
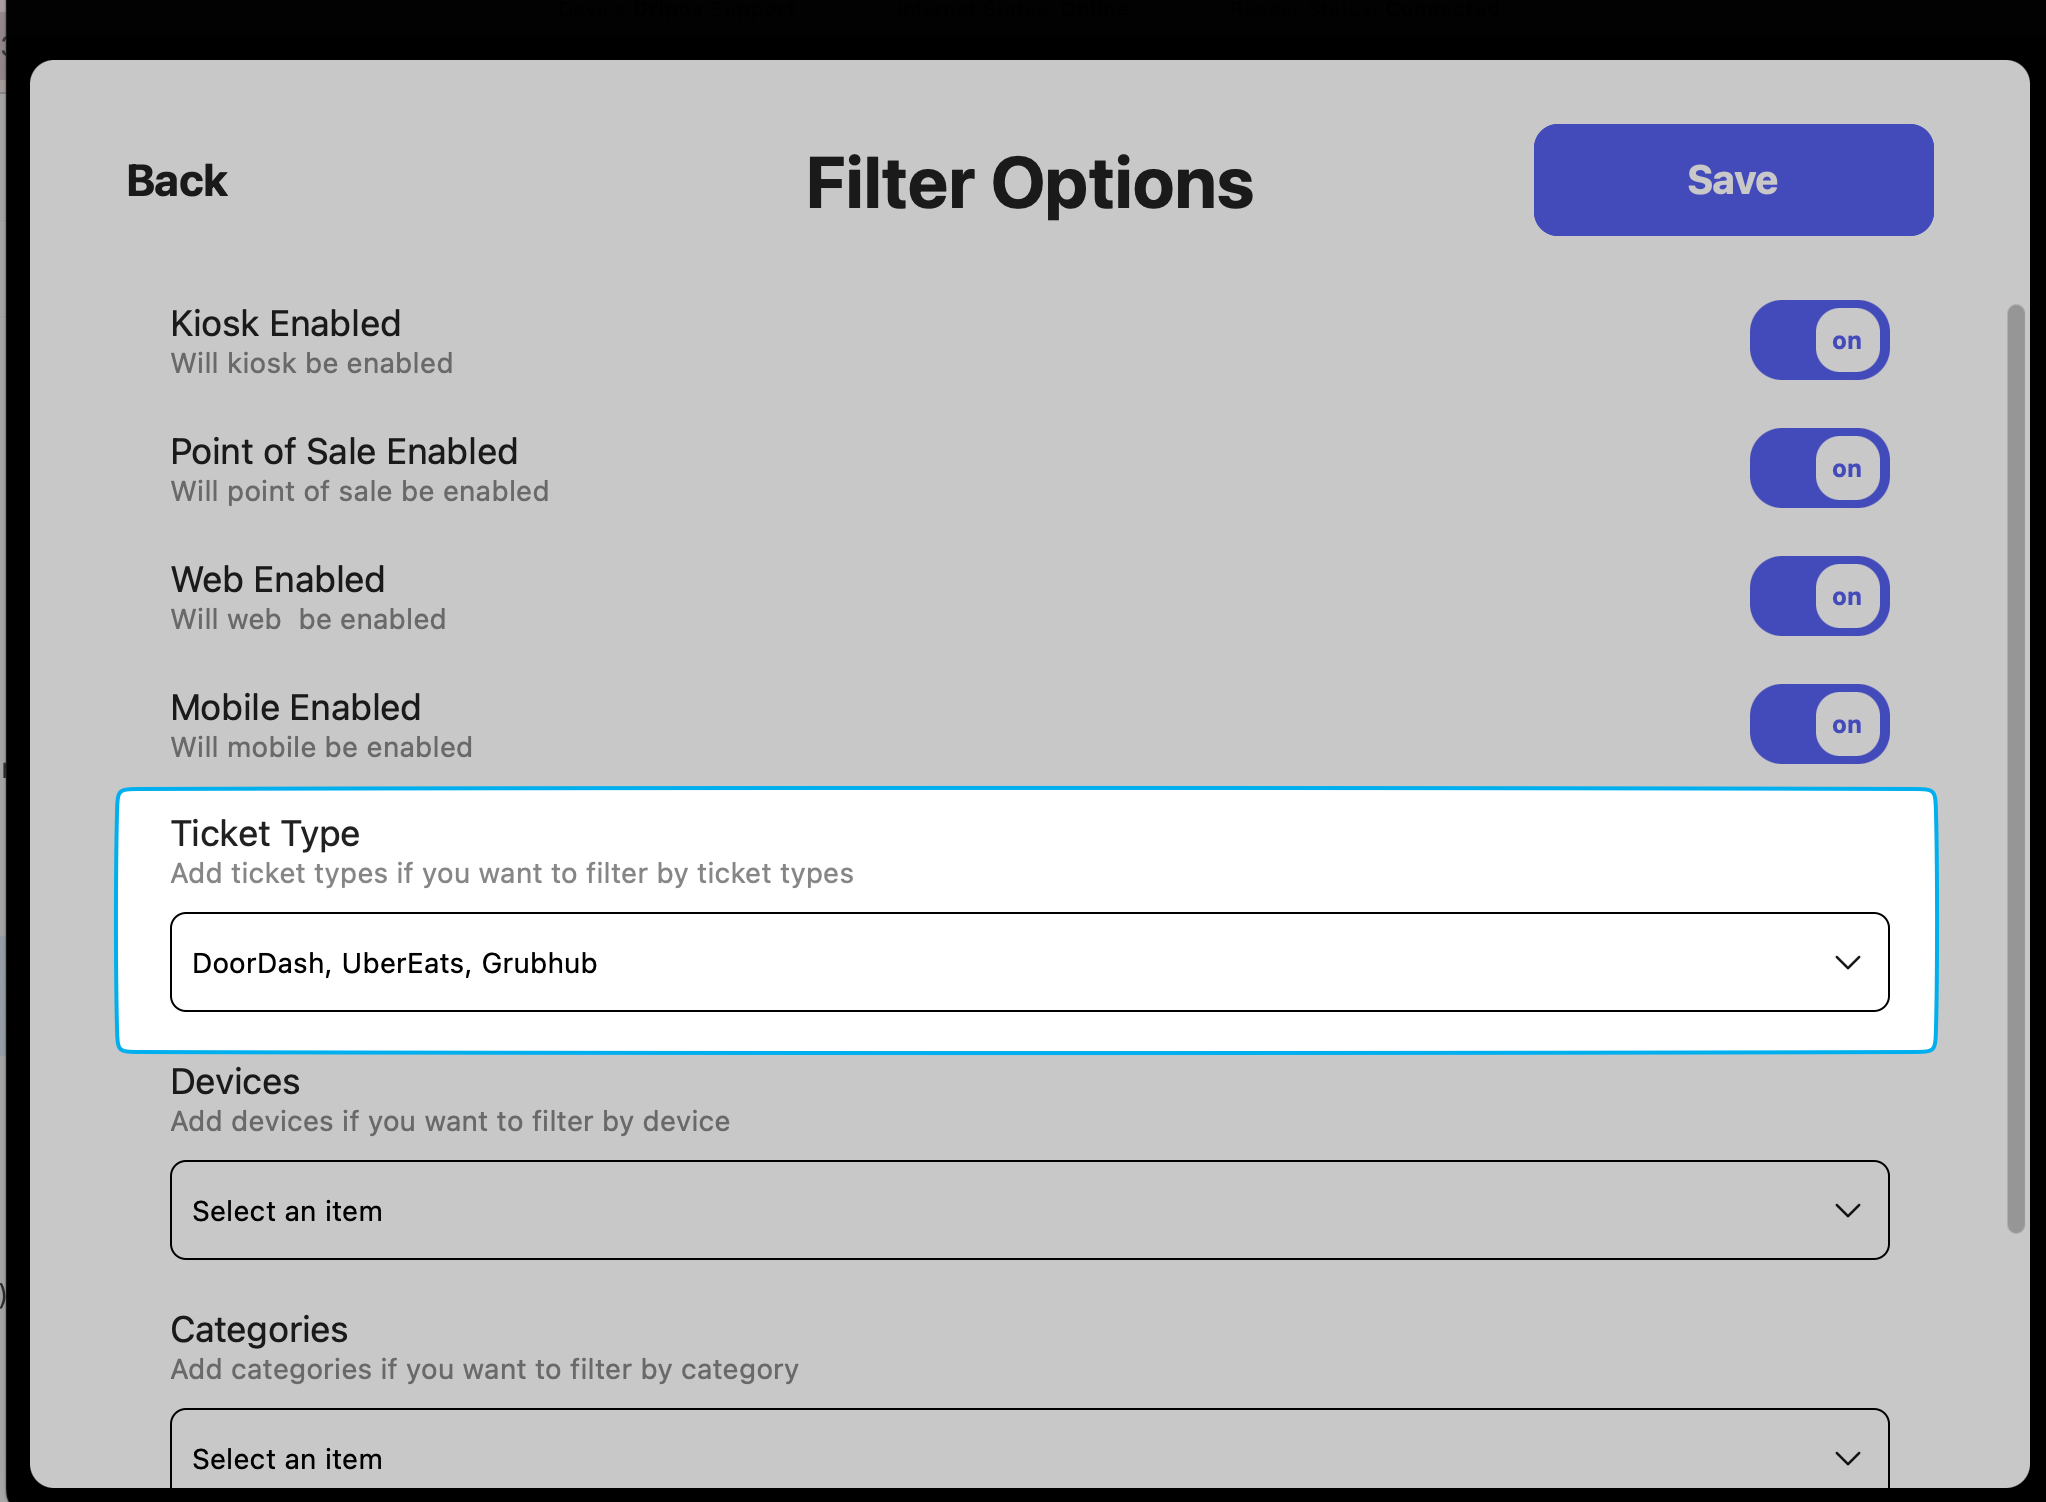
 To filter this receipt type to only print third party ticket types, add the desired ticket type(s) under the **Ticket Type** filter
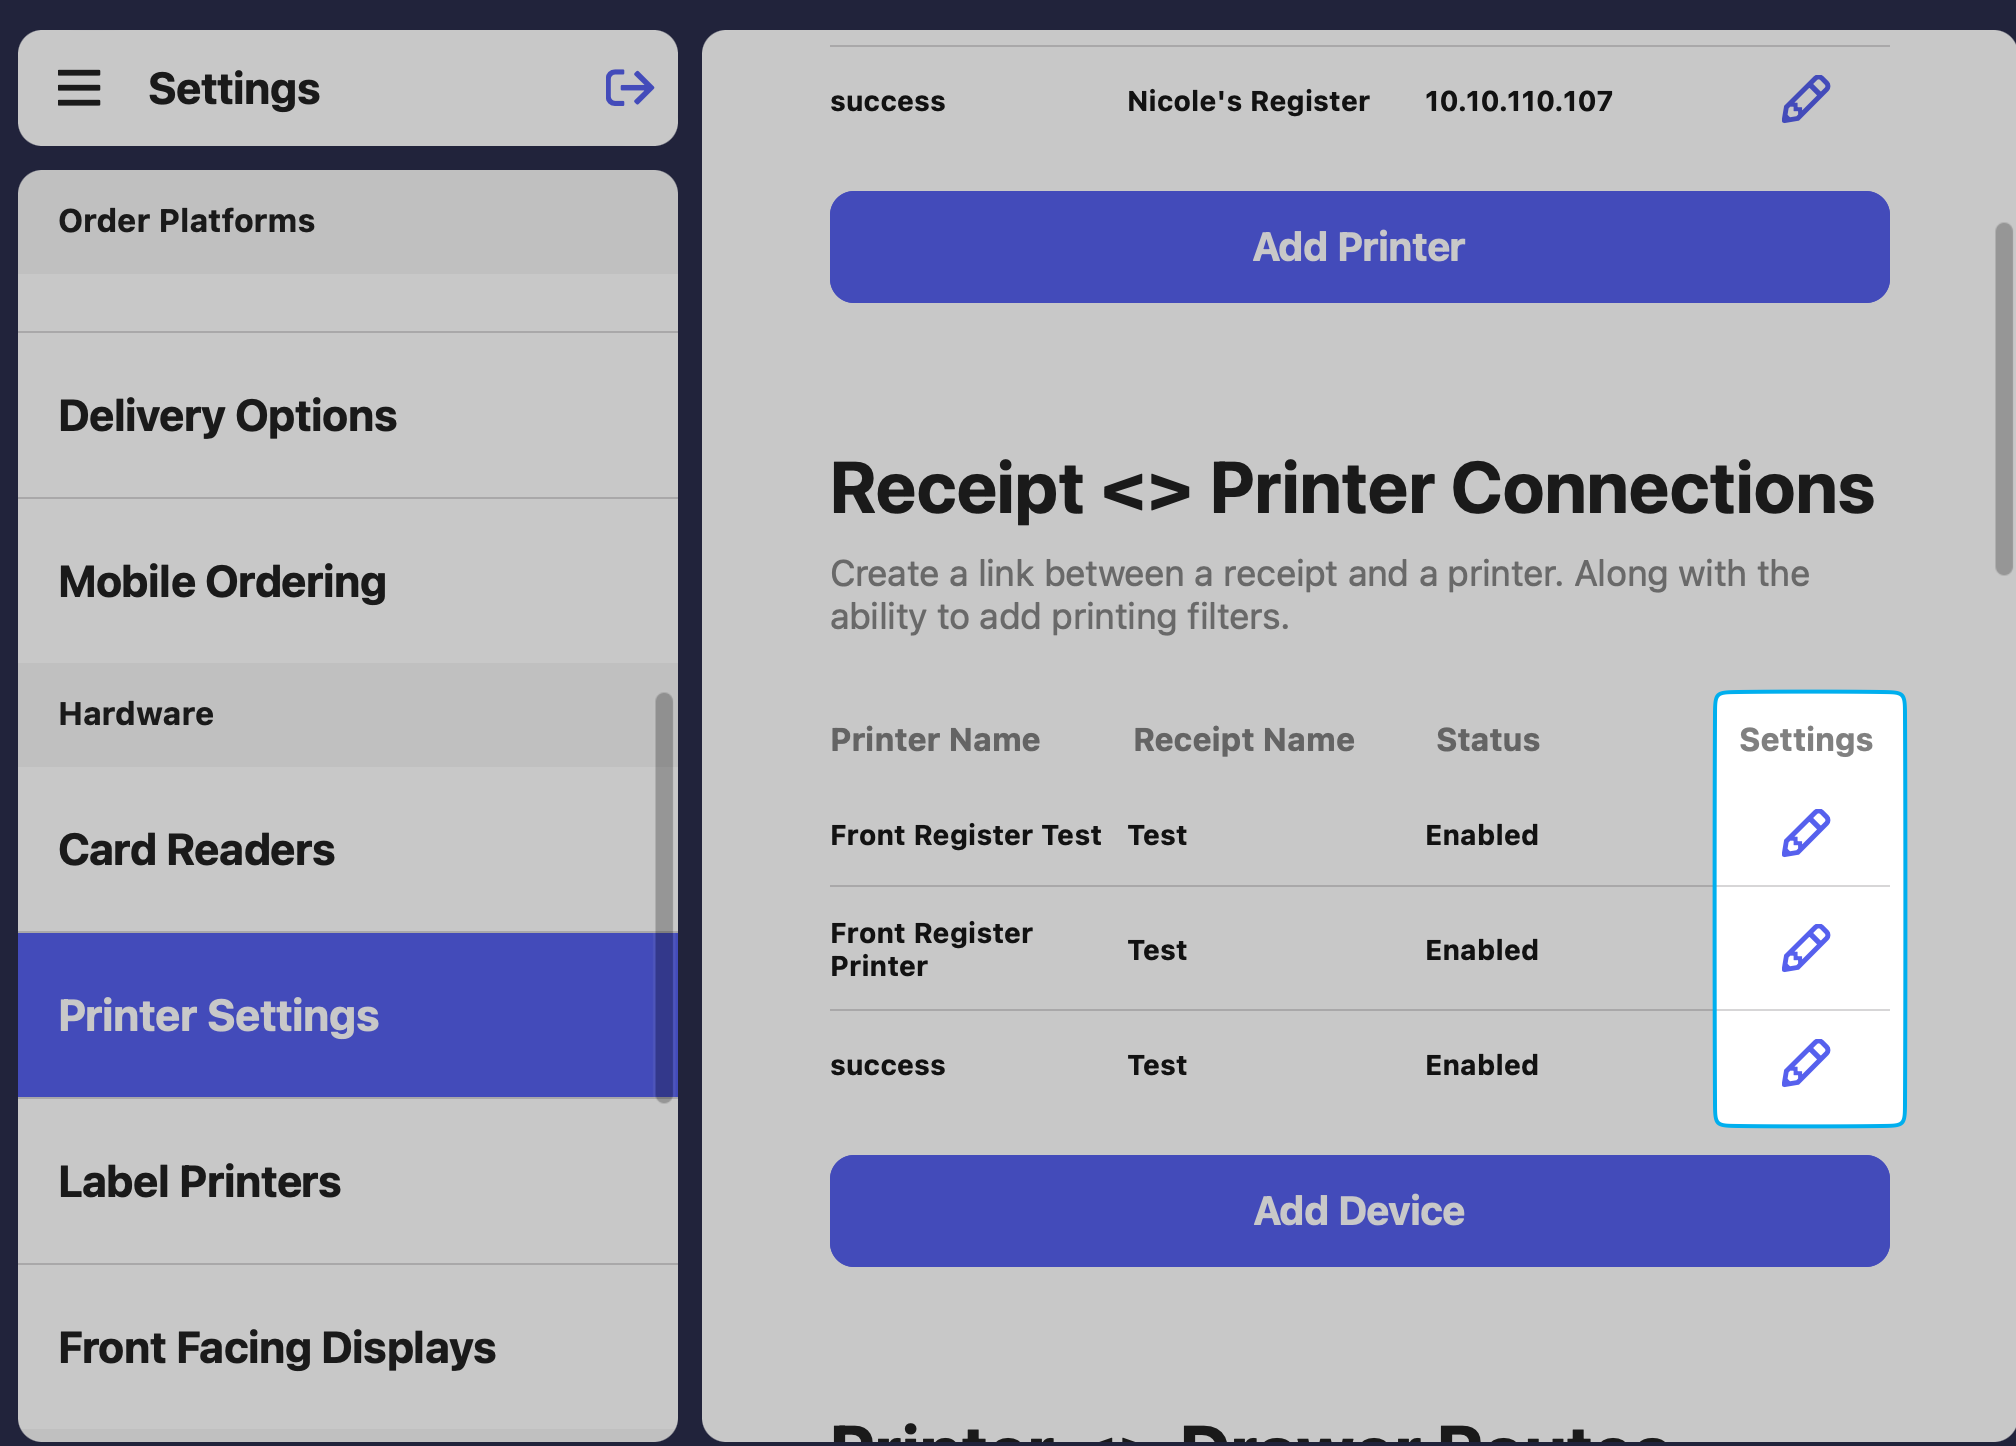
 To edit any existing connections, click the pencil icon next to the connection
 ***
## View Third Party Sales Reports
View sales from integrated third party platforms on multiple Dripos reports.
On the **Web Dashboard** navigate to **Reports**
On the **Point of Sale** press the **tribar** in the upper left screen corner > **Reports**
On the **Hub App** press **Reports** on the home page
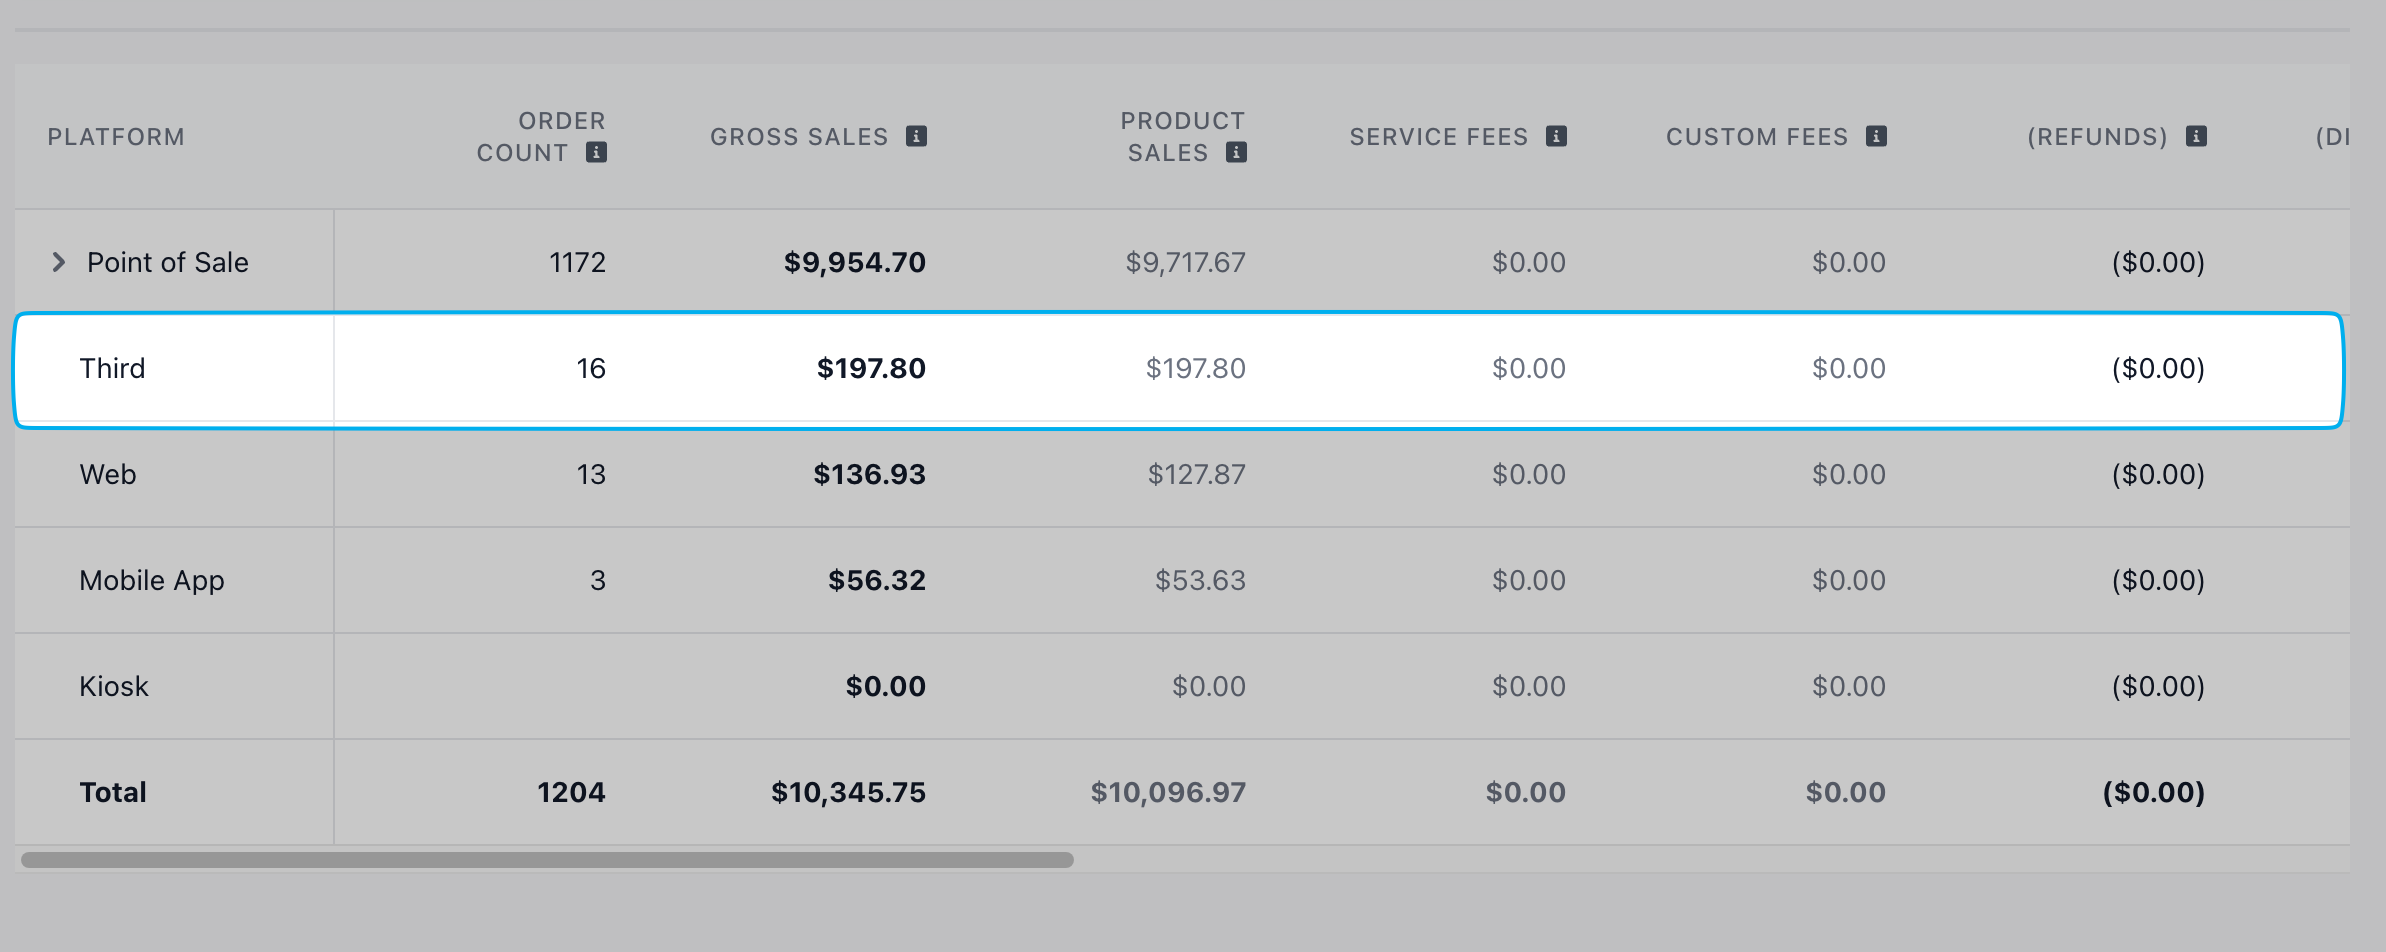
View Third Party sales at the bottom of the Sales Summary Report on the Web Dashboard, POS, and Hub app.
***
## View Third Party Sales Reports
View sales from integrated third party platforms on multiple Dripos reports.
On the **Web Dashboard** navigate to **Reports**
On the **Point of Sale** press the **tribar** in the upper left screen corner > **Reports**
On the **Hub App** press **Reports** on the home page
View Third Party sales at the bottom of the Sales Summary Report on the Web Dashboard, POS, and Hub app.
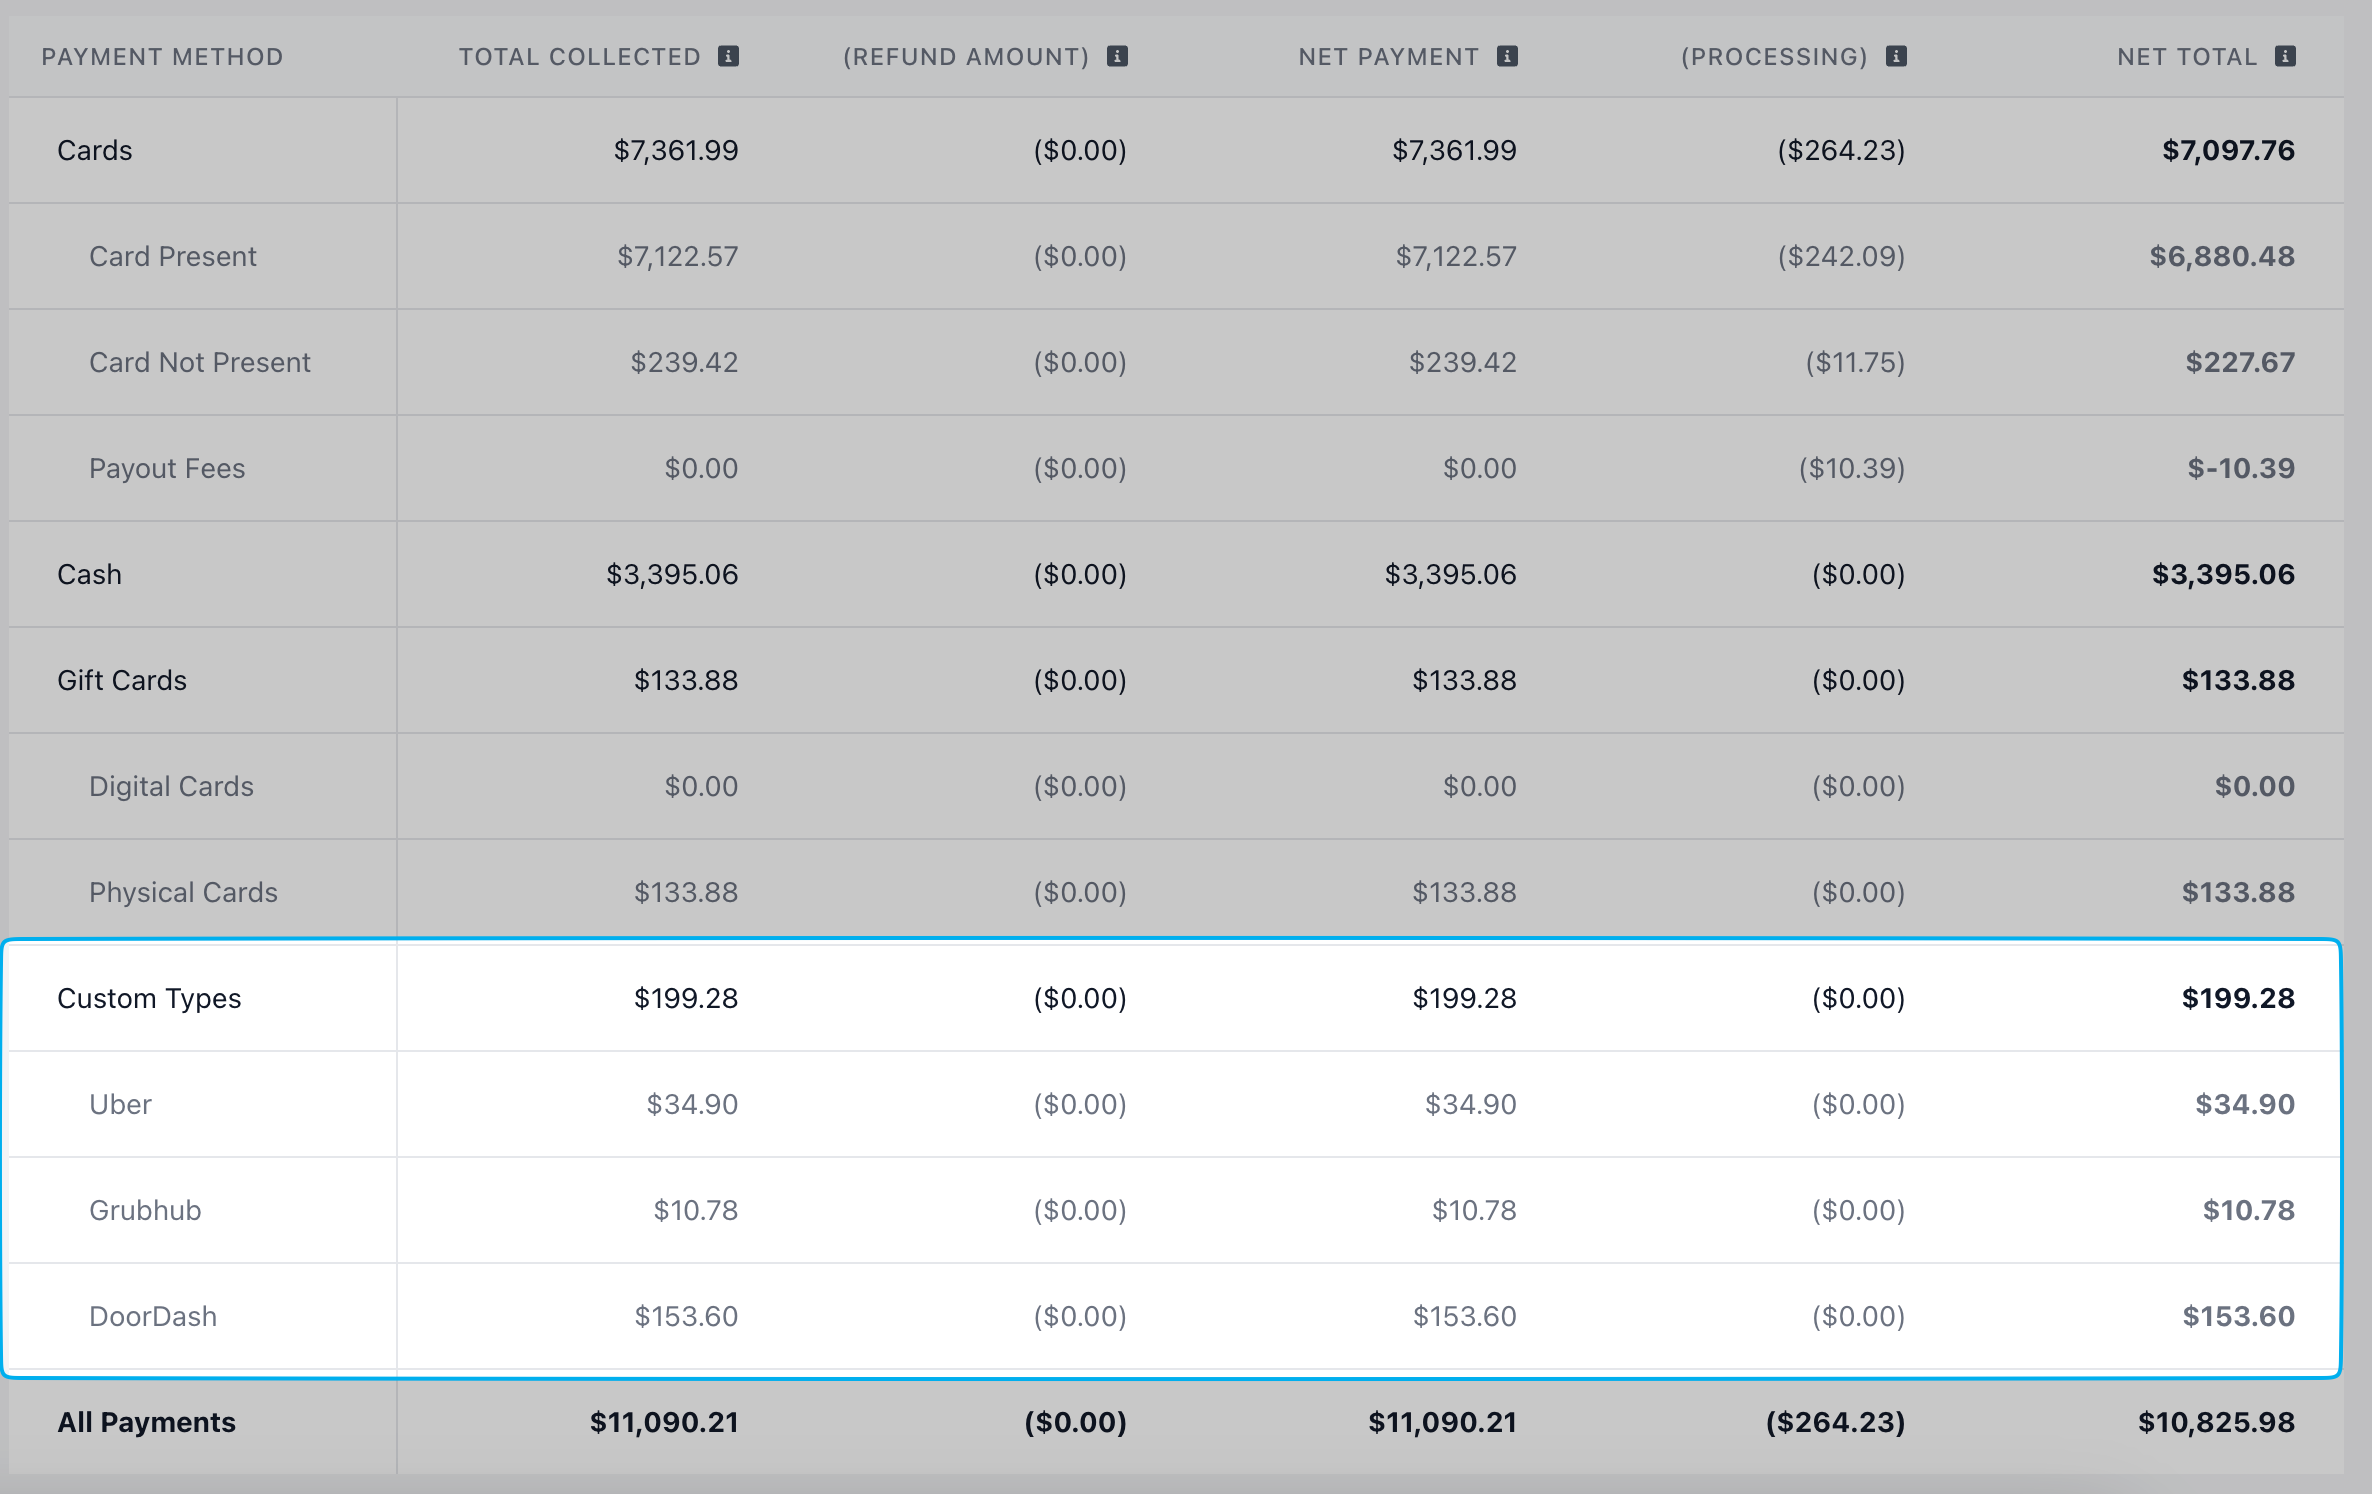
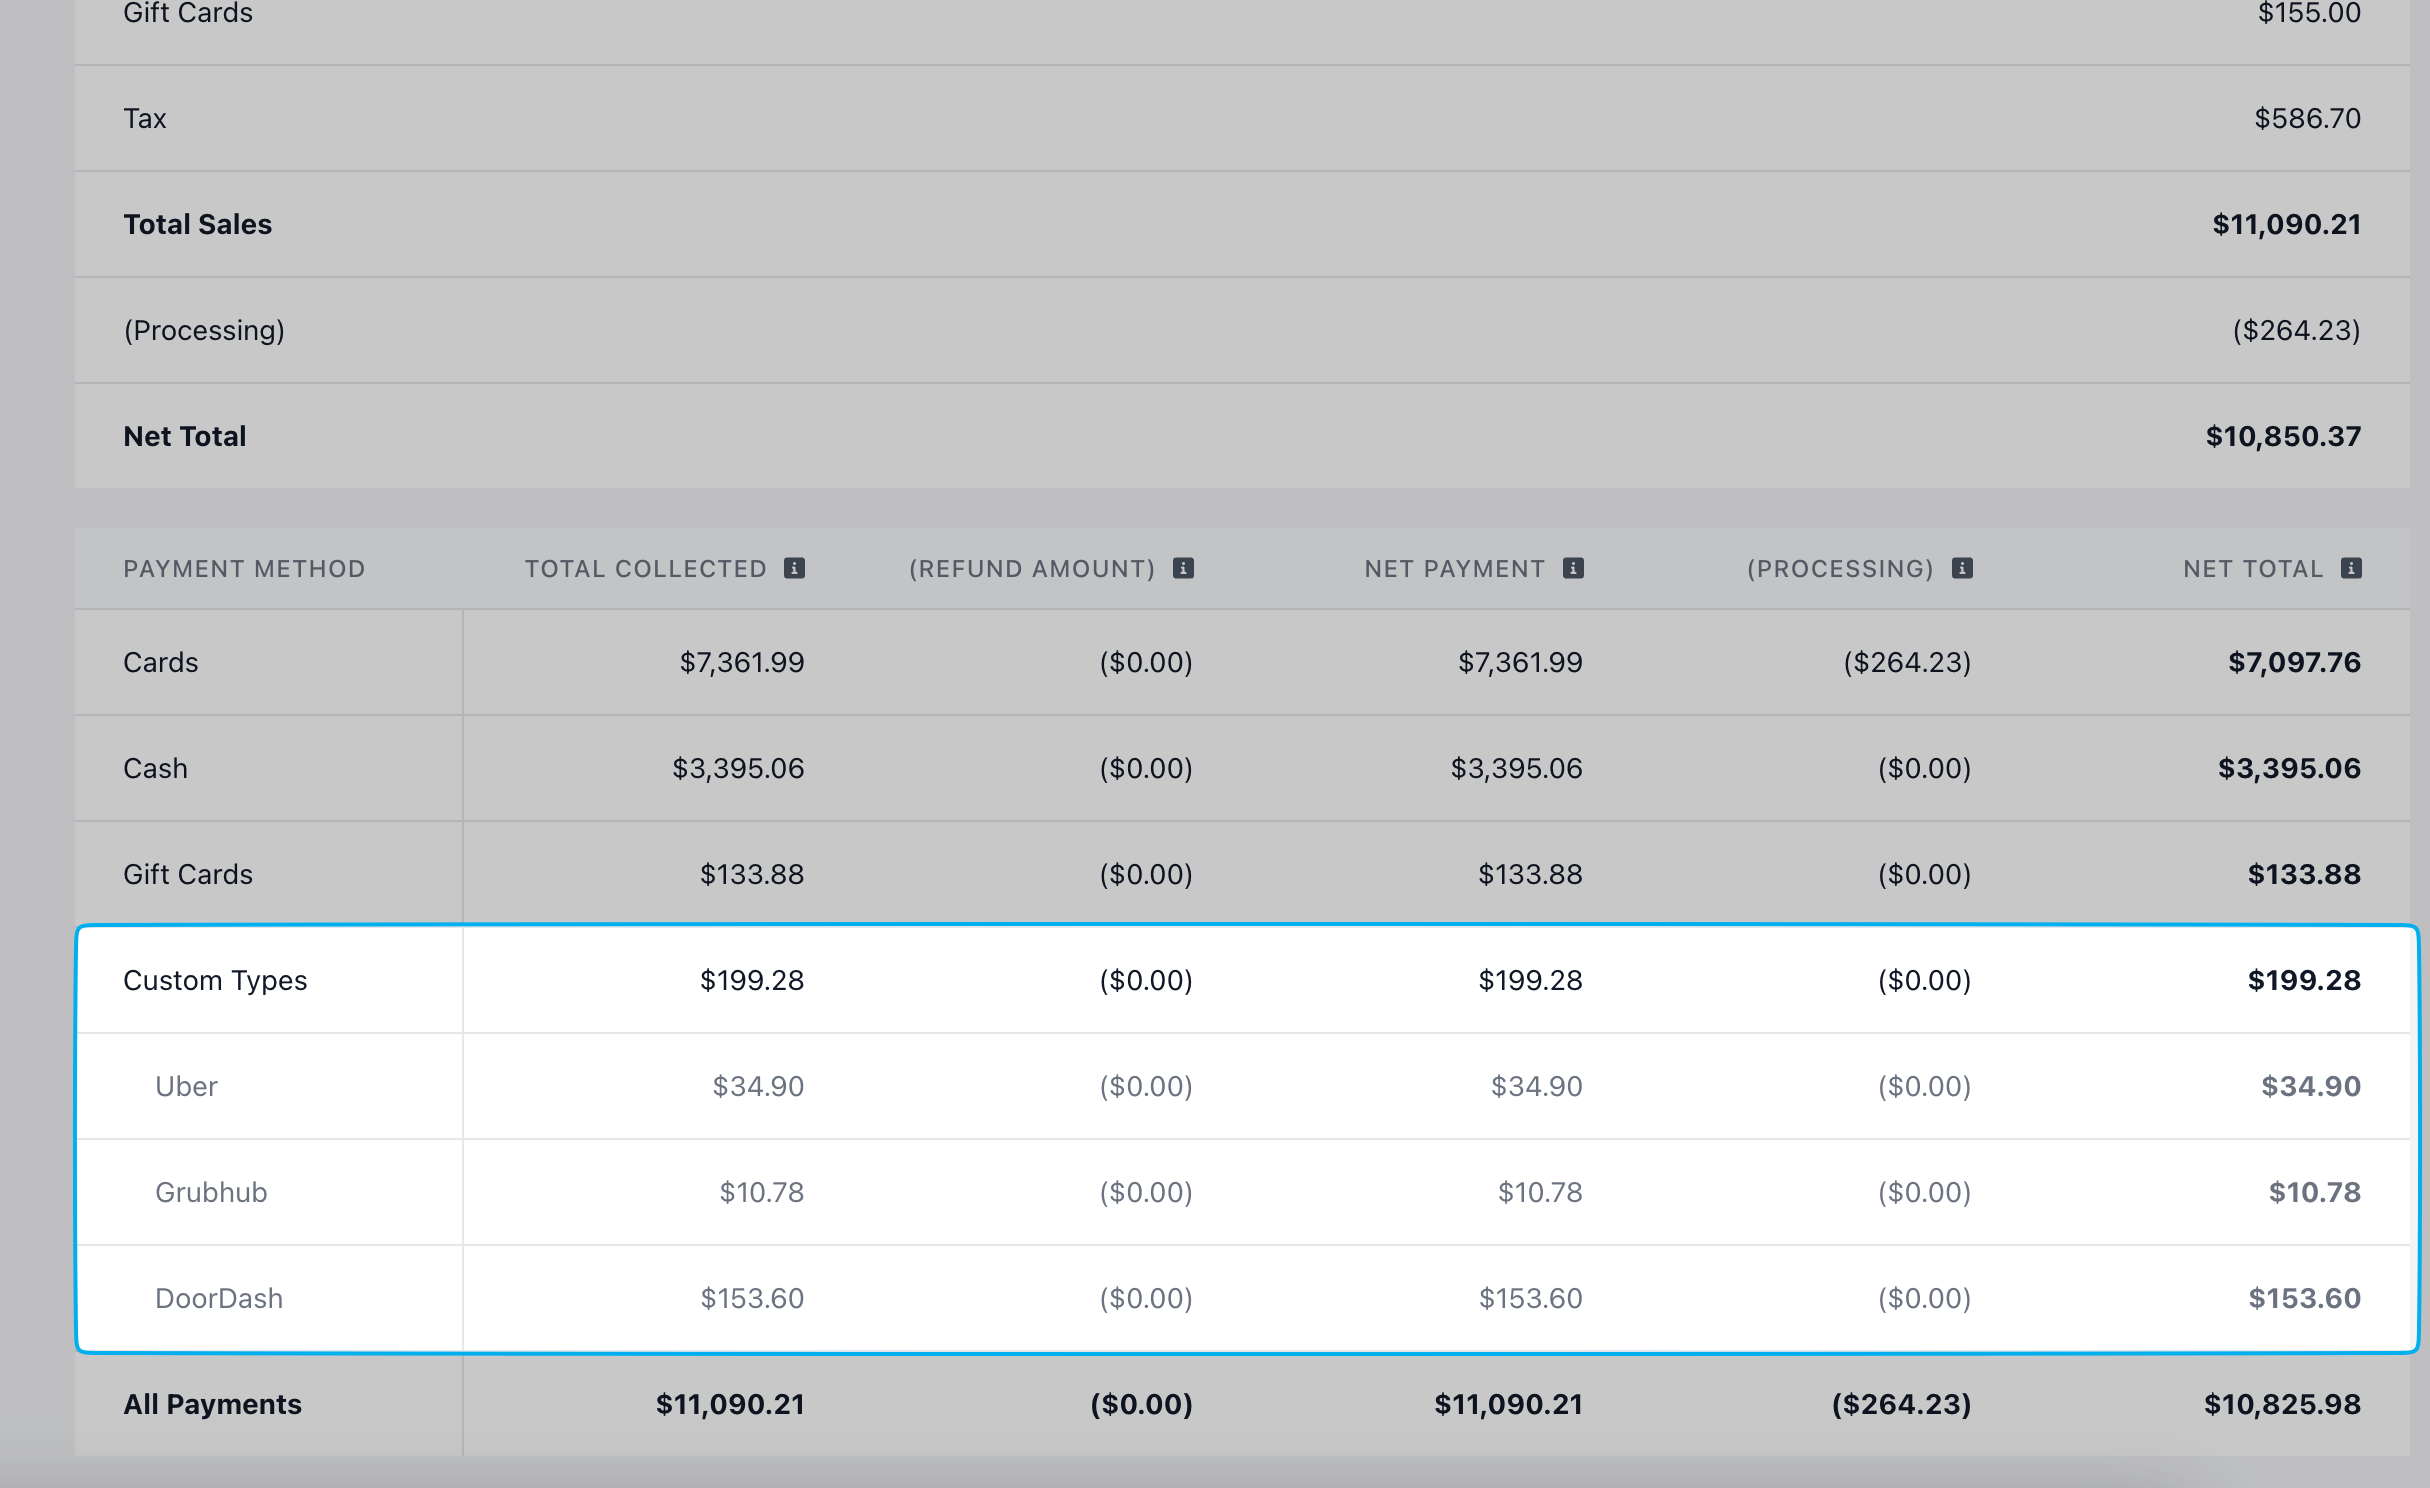 View Third Party sales on the Payment Methods Report on the Web Dashboard, POS, and Hub app.
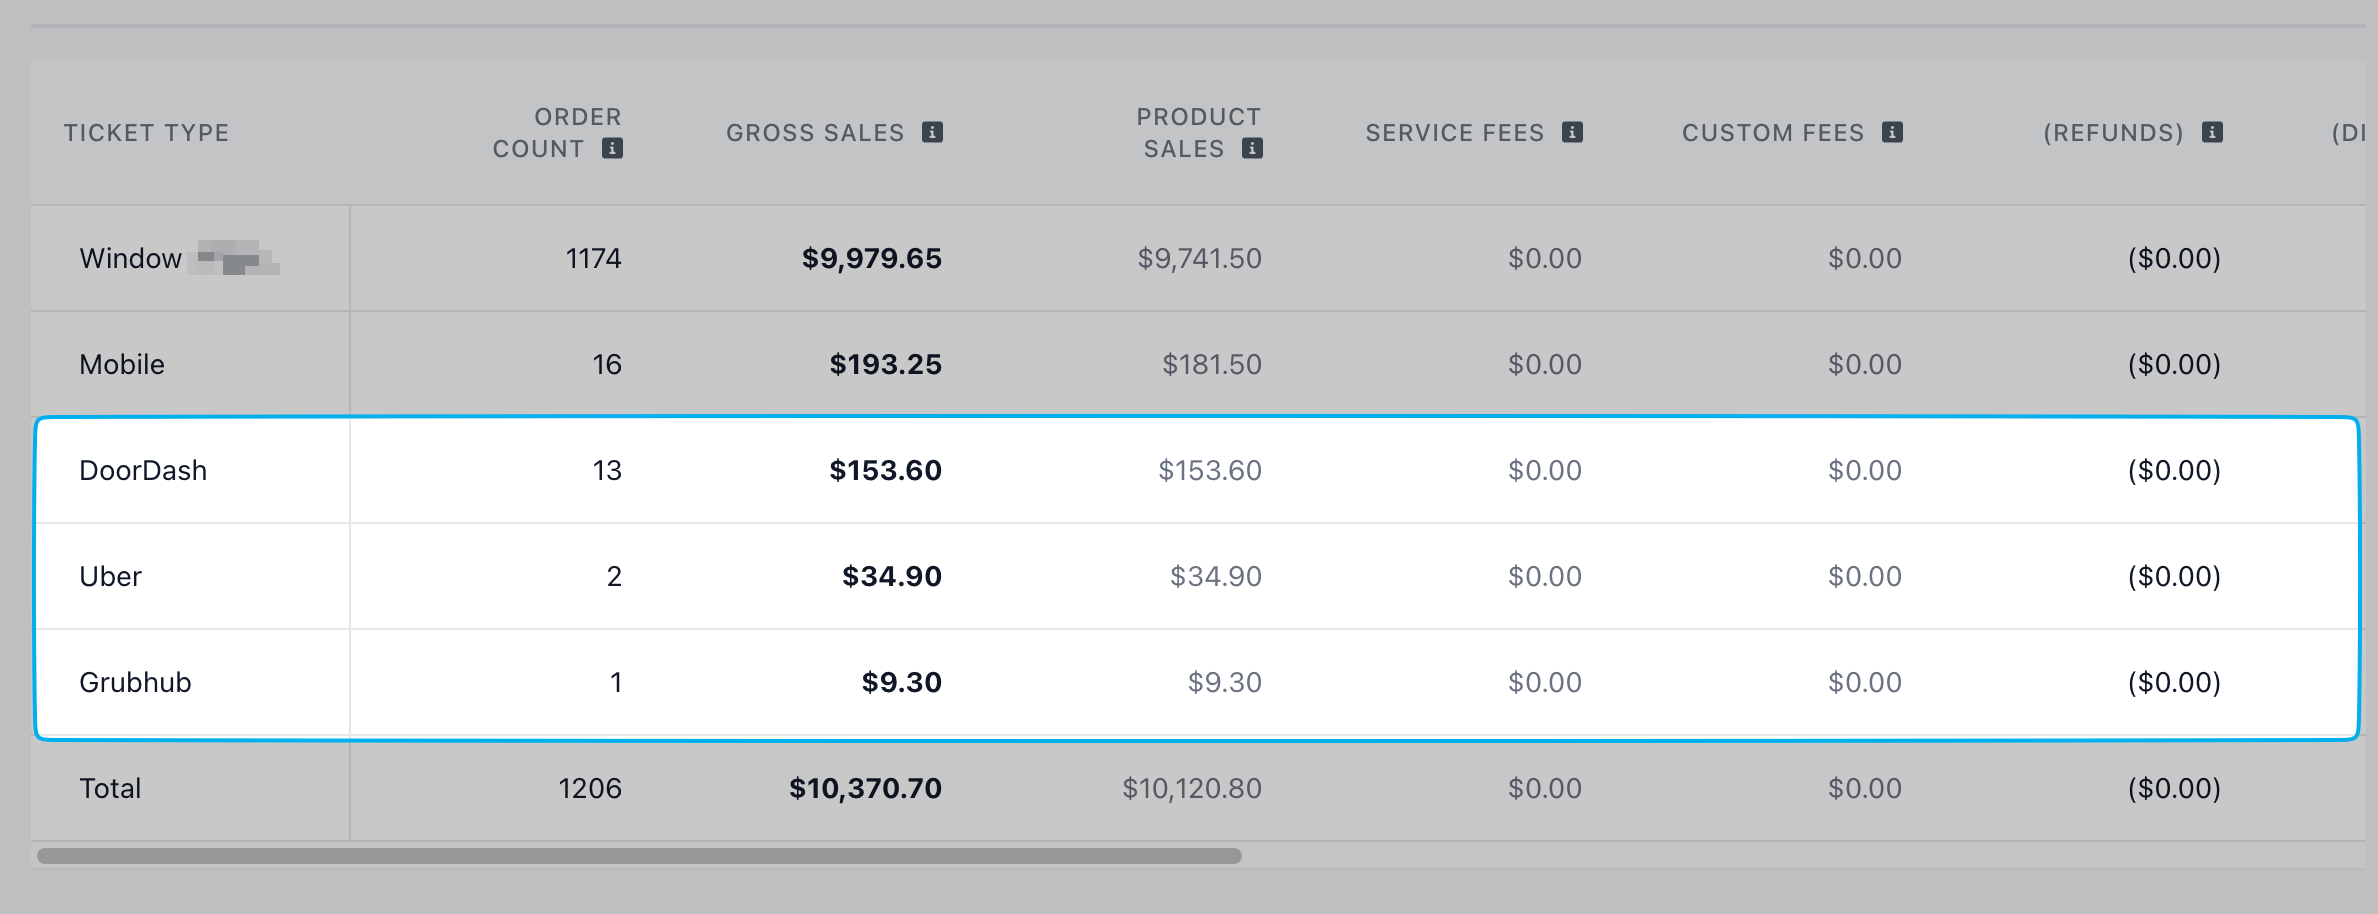
 View Third Party sales on the Ticket Type Sales Report on the Web Dashboard, POS, and Hub app.
 View Third Party sales on the Platform Sales Report on the Web Dashboard, POS, and Hub app.