> ## Documentation Index
> Fetch the complete documentation index at: https://support.dripos.com/llms.txt
> Use this file to discover all available pages before exploring further.
# Navigate the Scheduler
> Learn how to read and utilize the Dripos scheduler tool
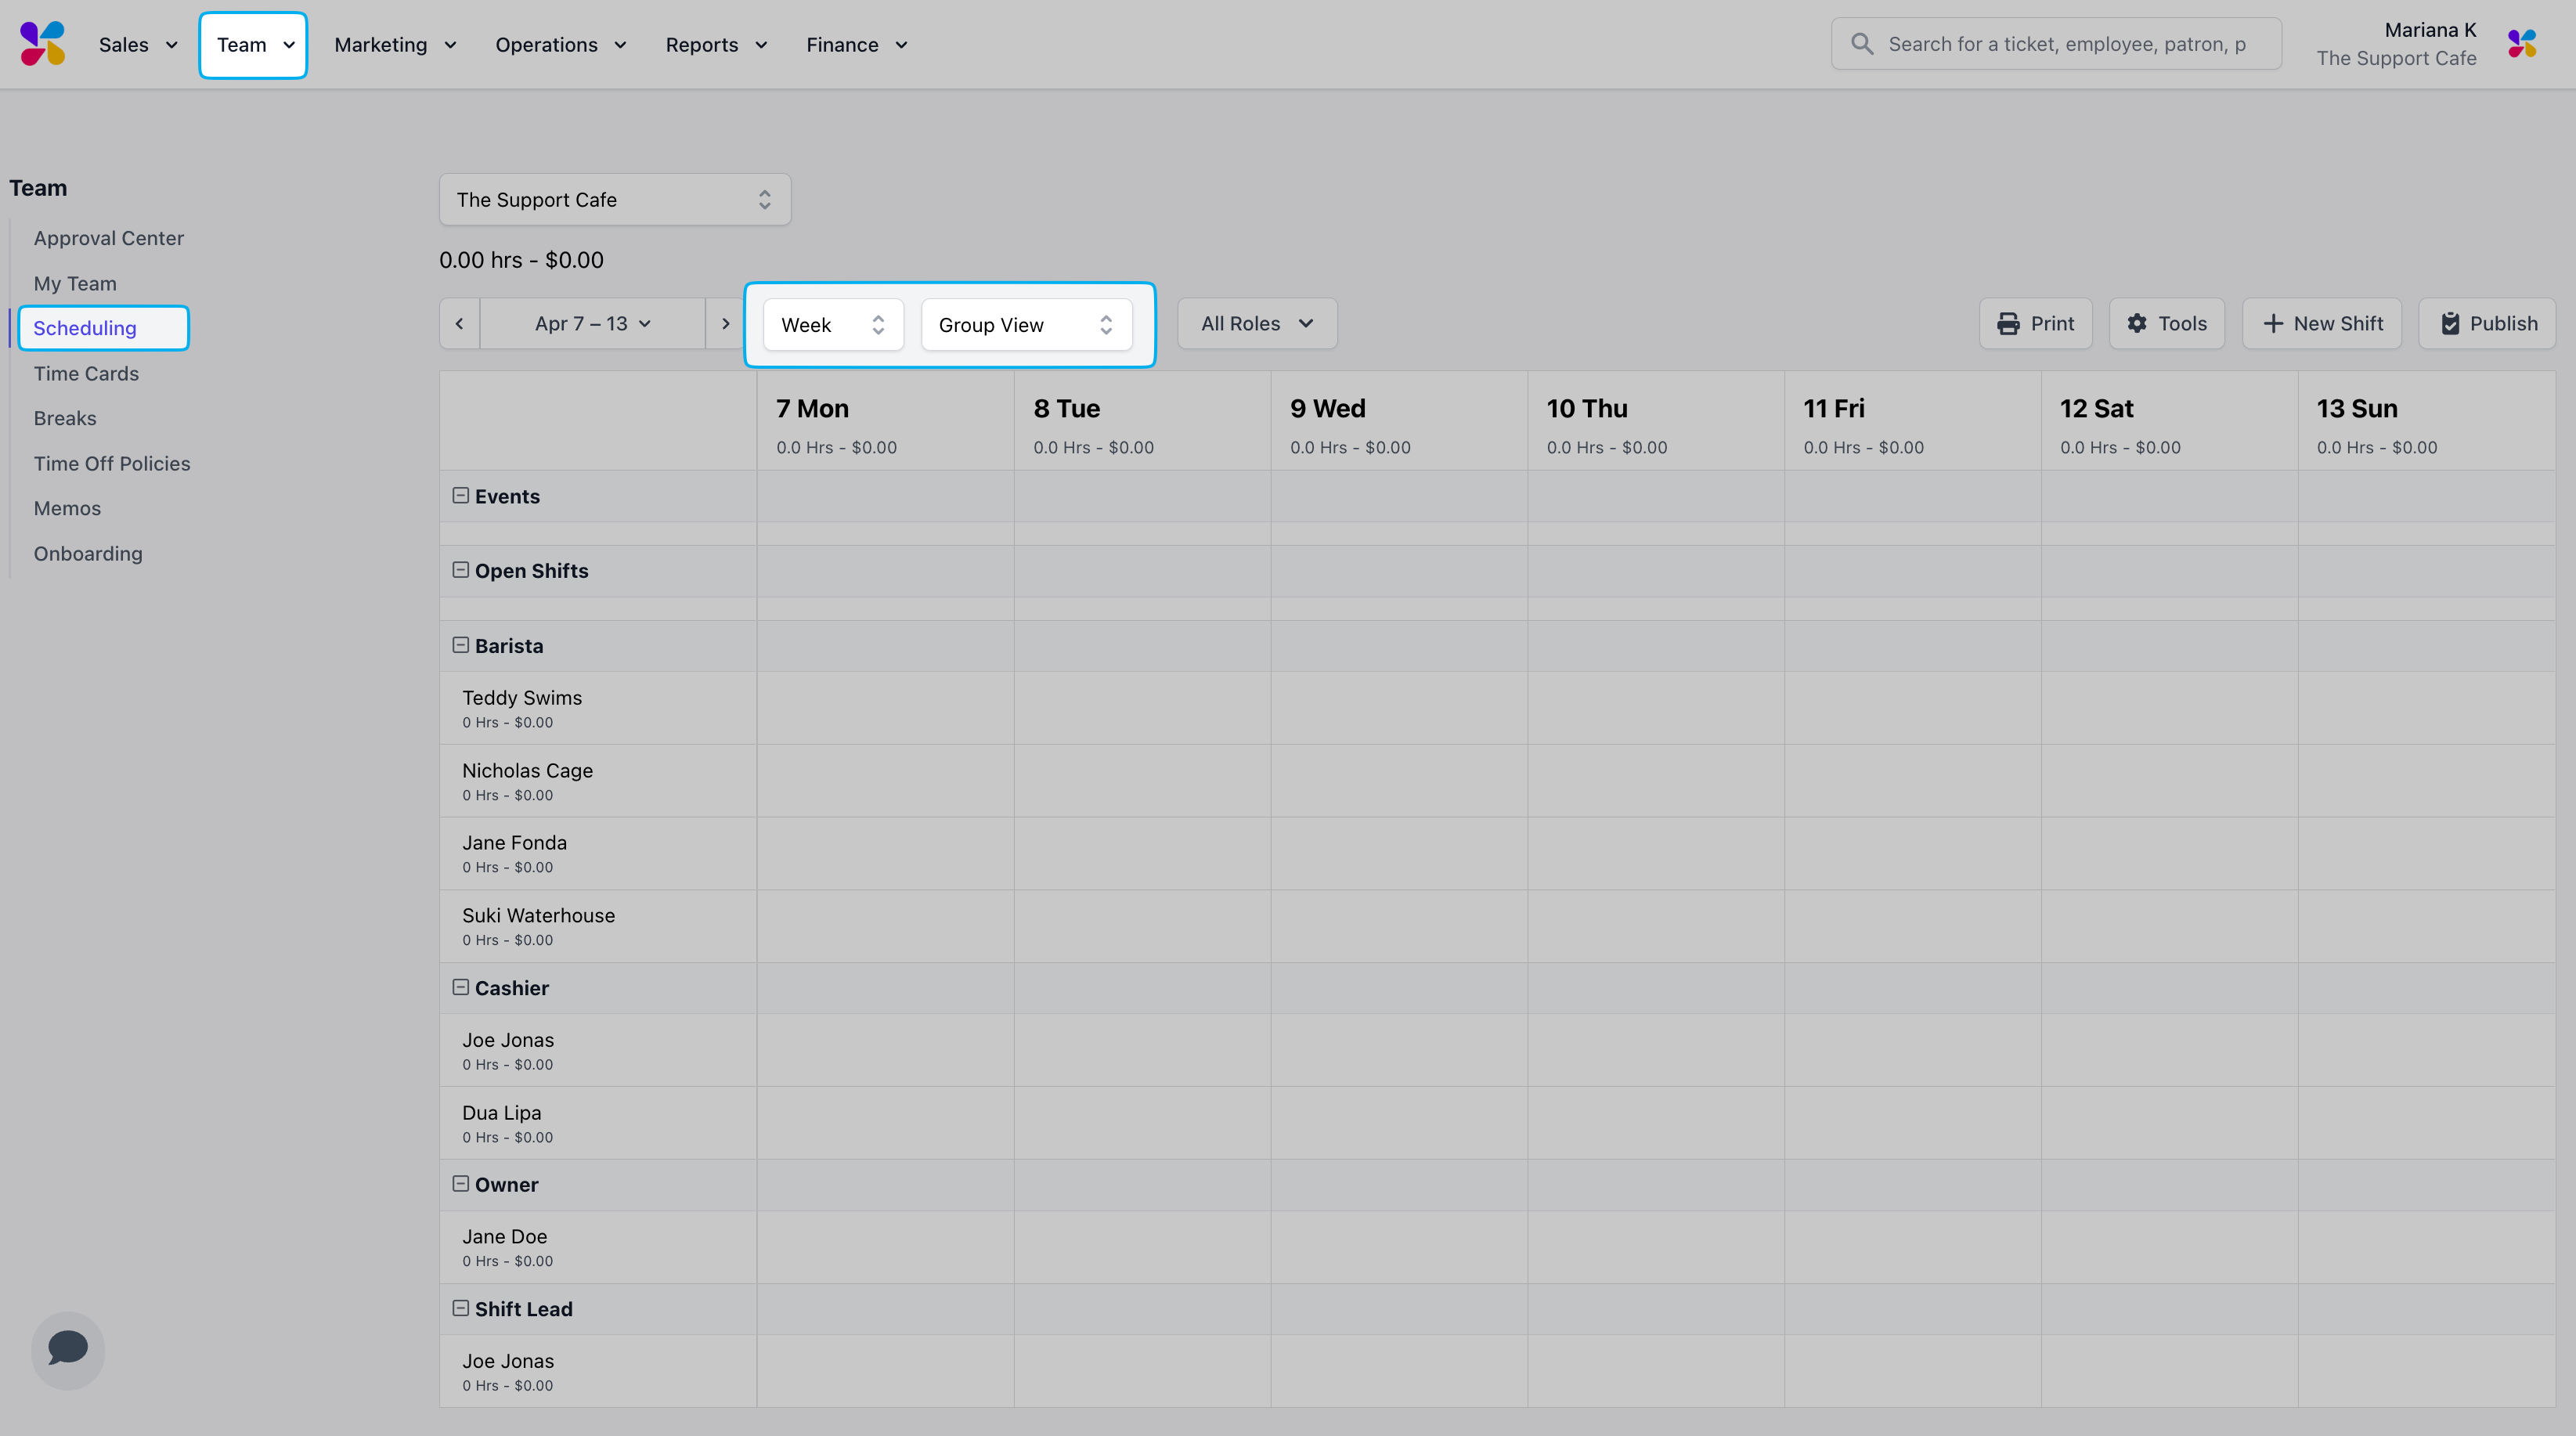
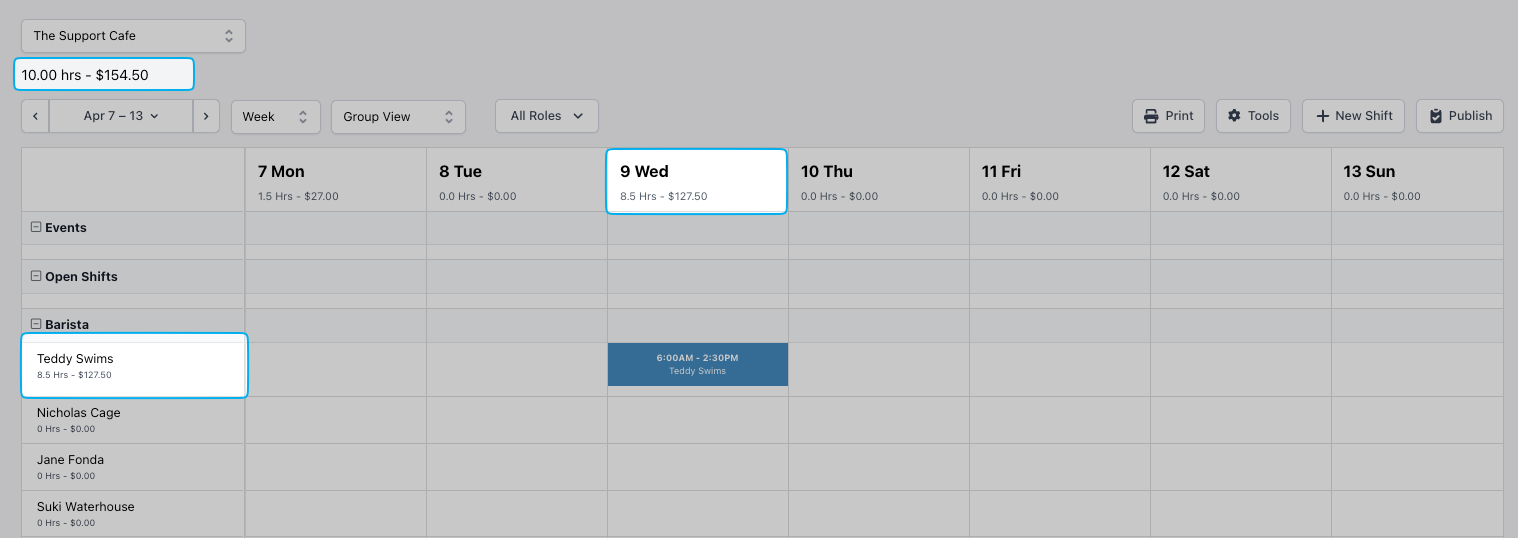
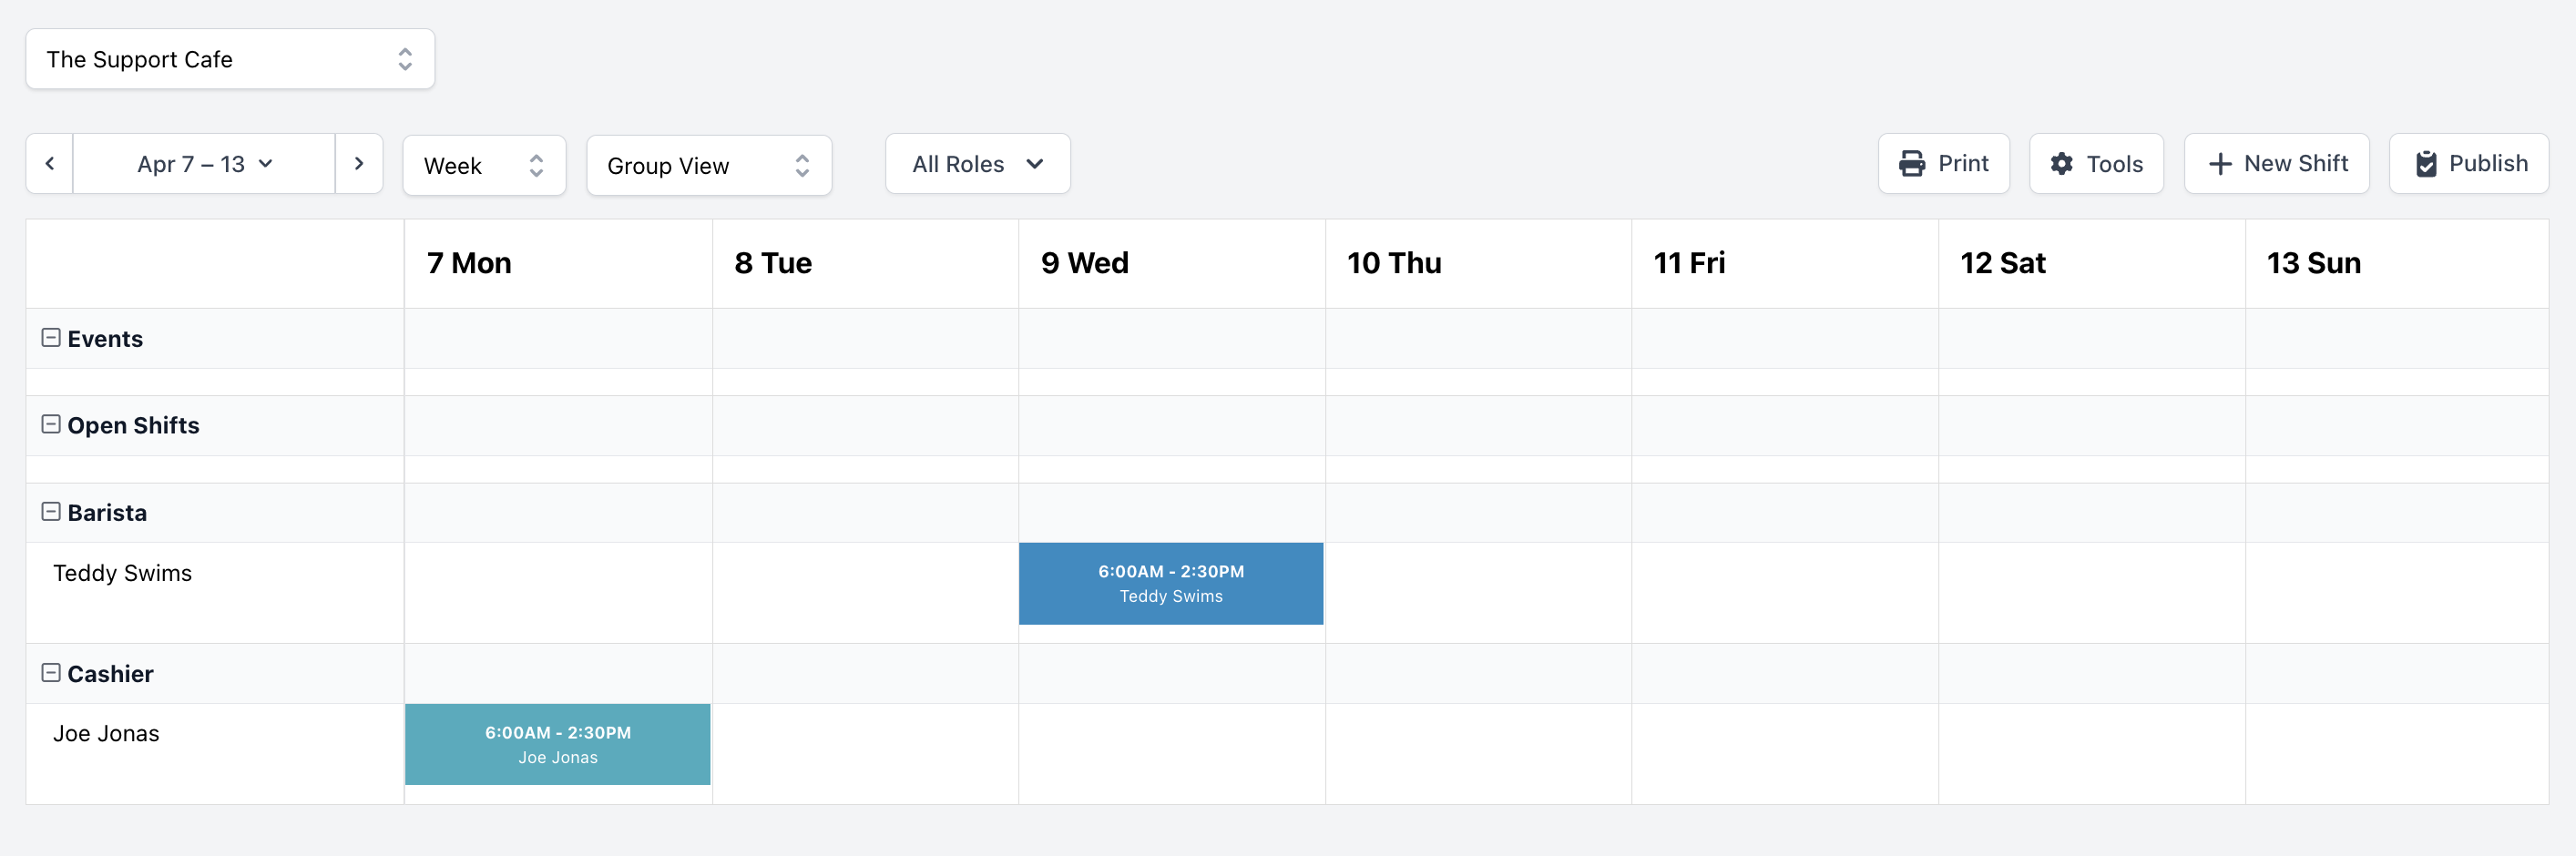
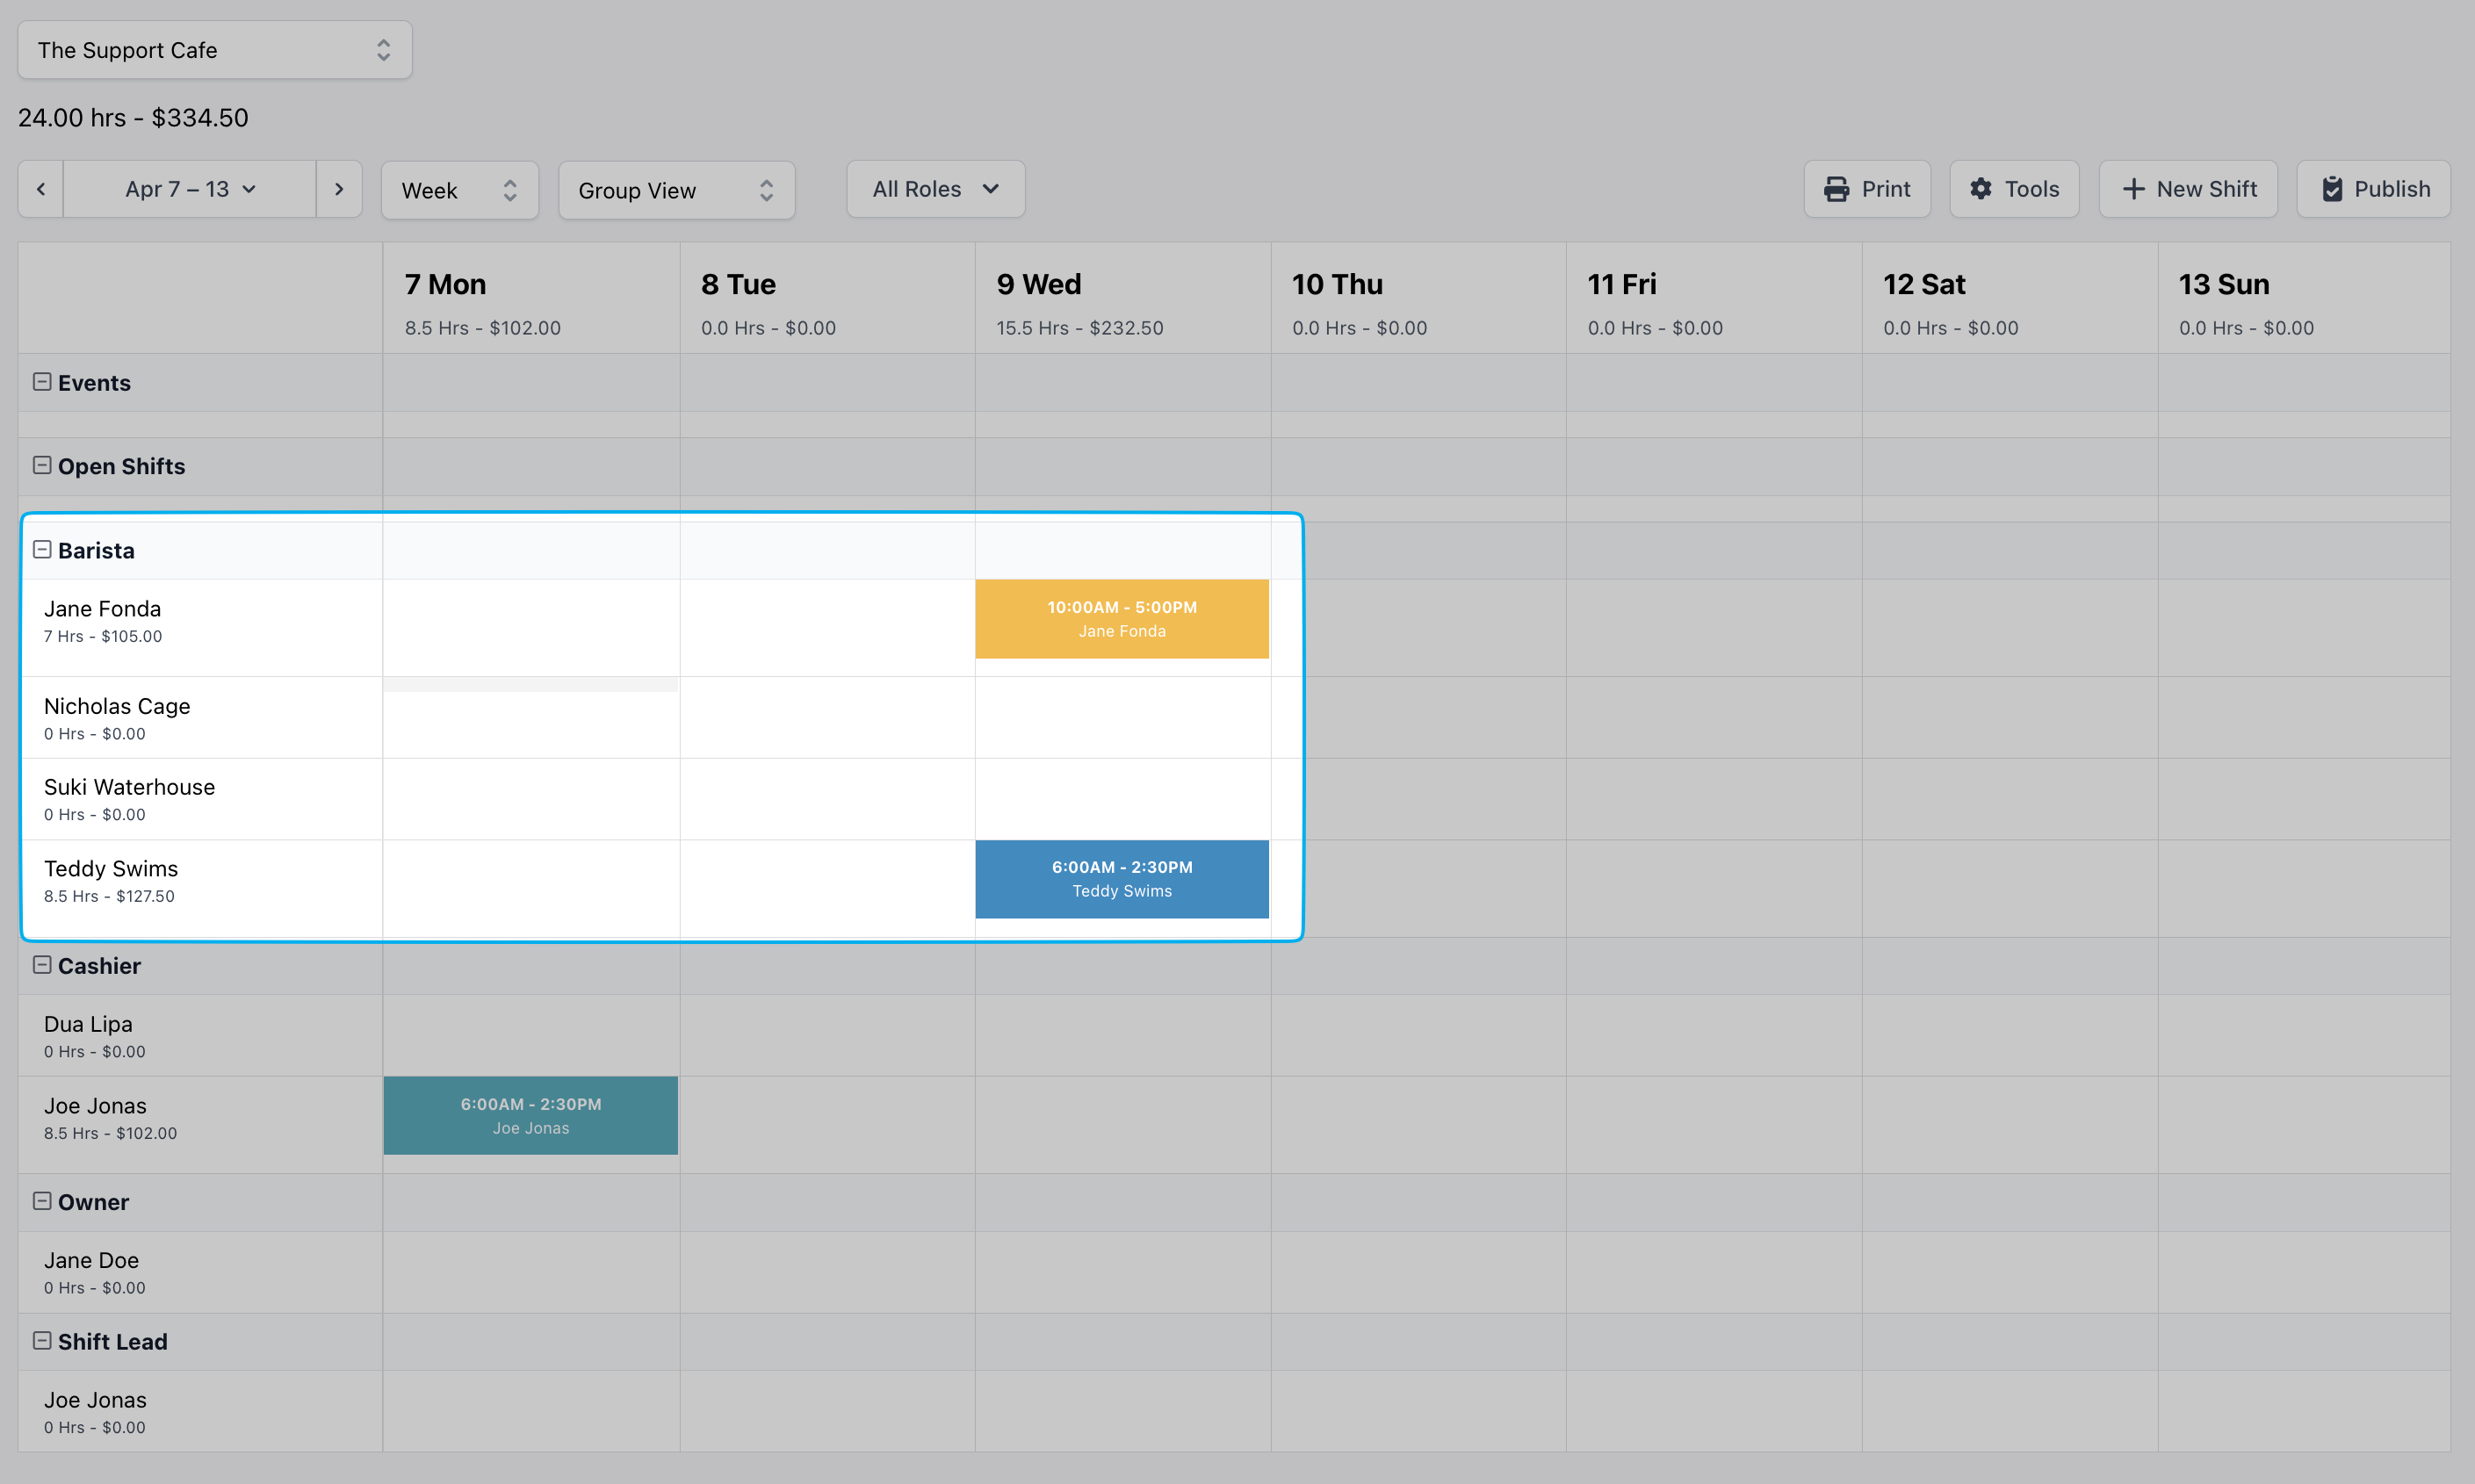
On the dashboard, navigate to **Team** > **Scheduling** to view the current week and all employees categorized by their role (Group View).
### Scheduler View
* View the schedule by the week, day, or month
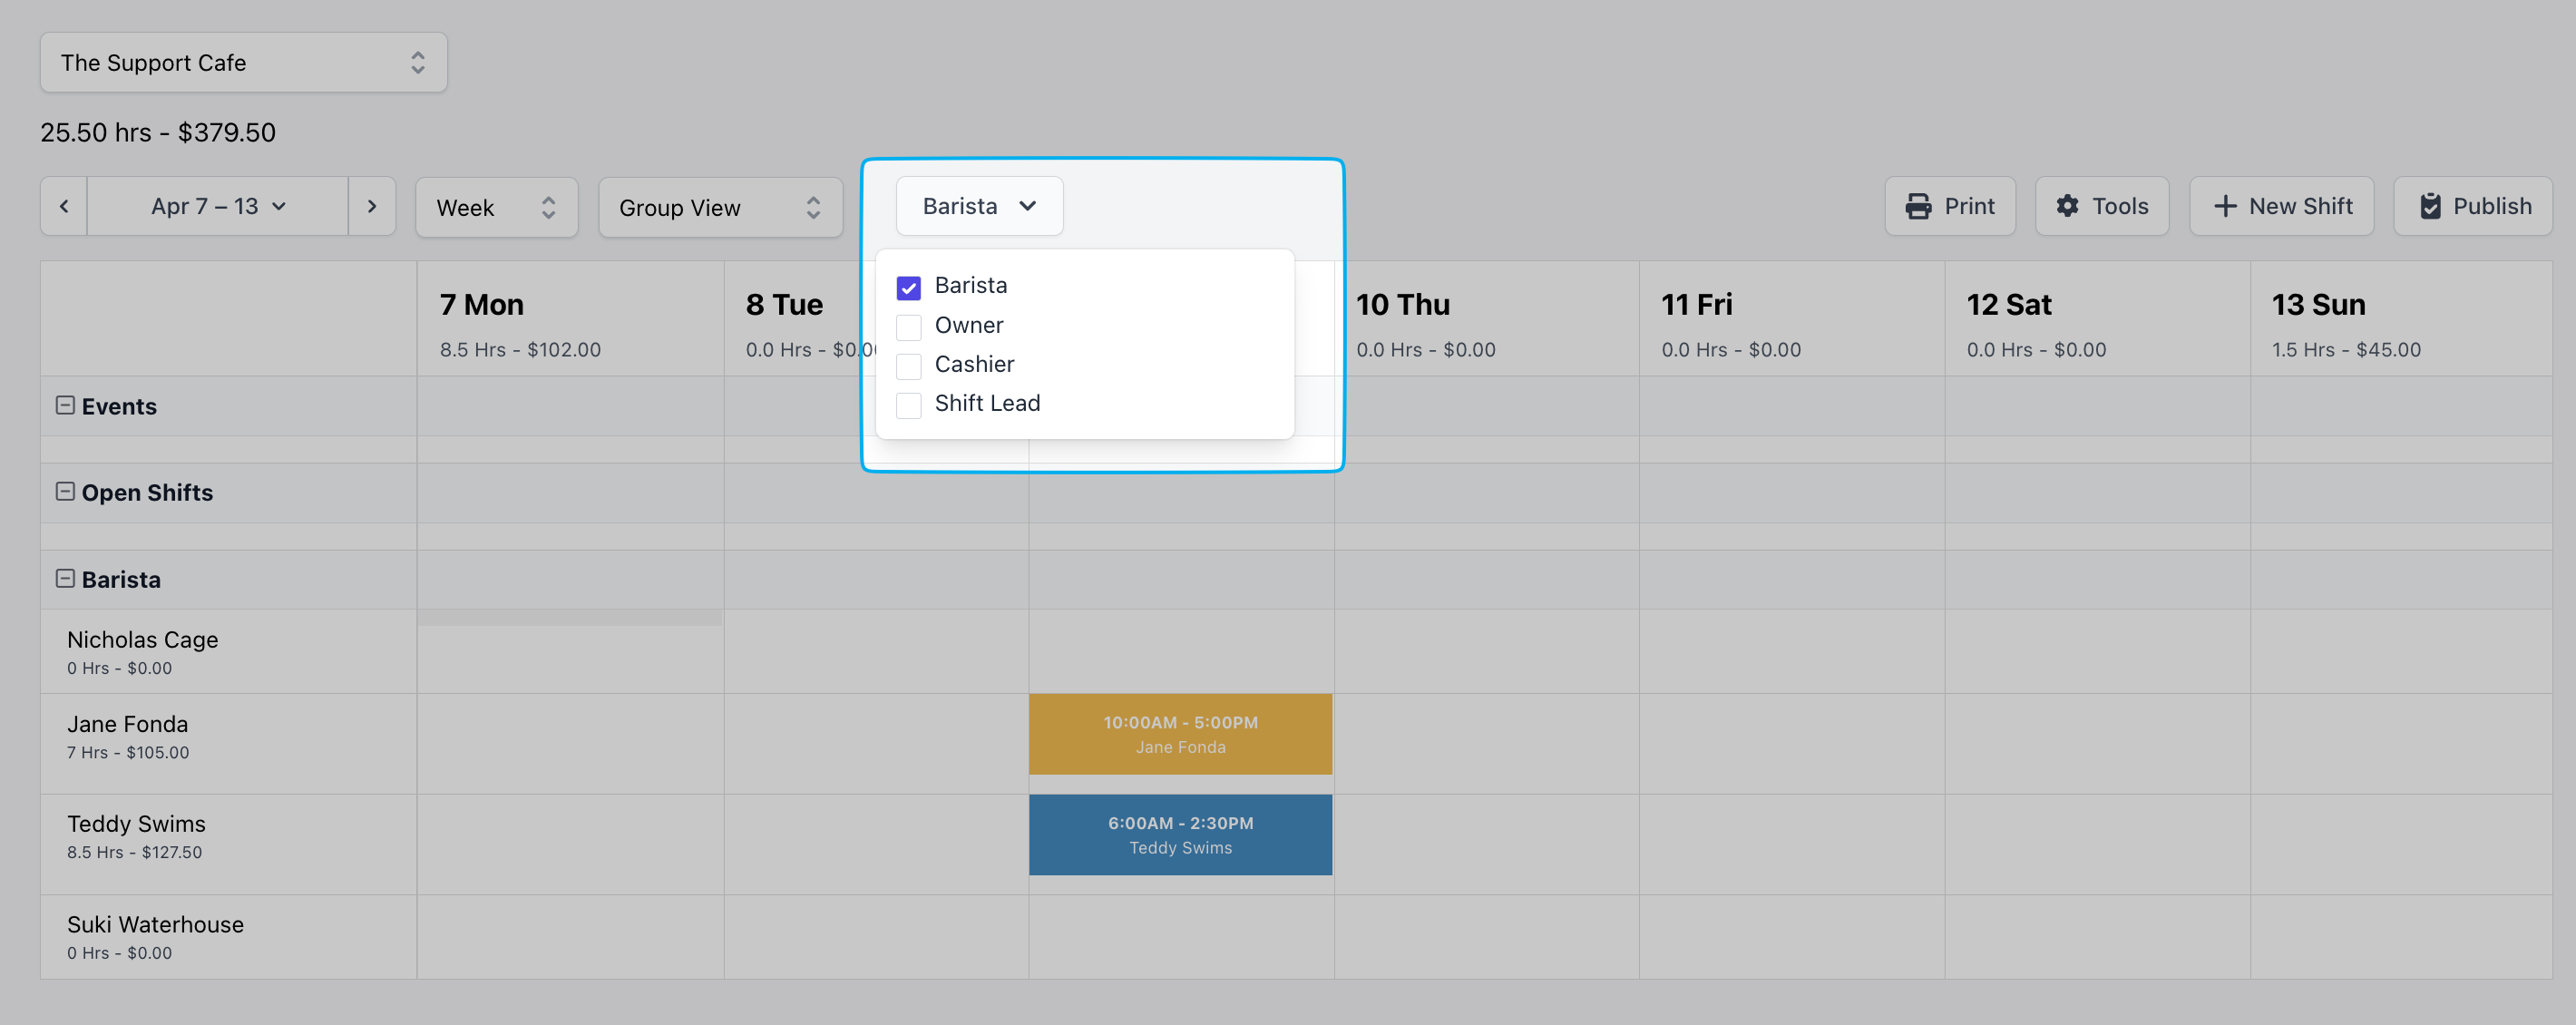
* View and filter the schedule sorted by employees, roles, or both
 ### Events, Shifts & Hours
* **Events** created on the scheduler will display on the Hub app to remind employees of upcoming events
* **Open Shifts** can be created for employees to pick up
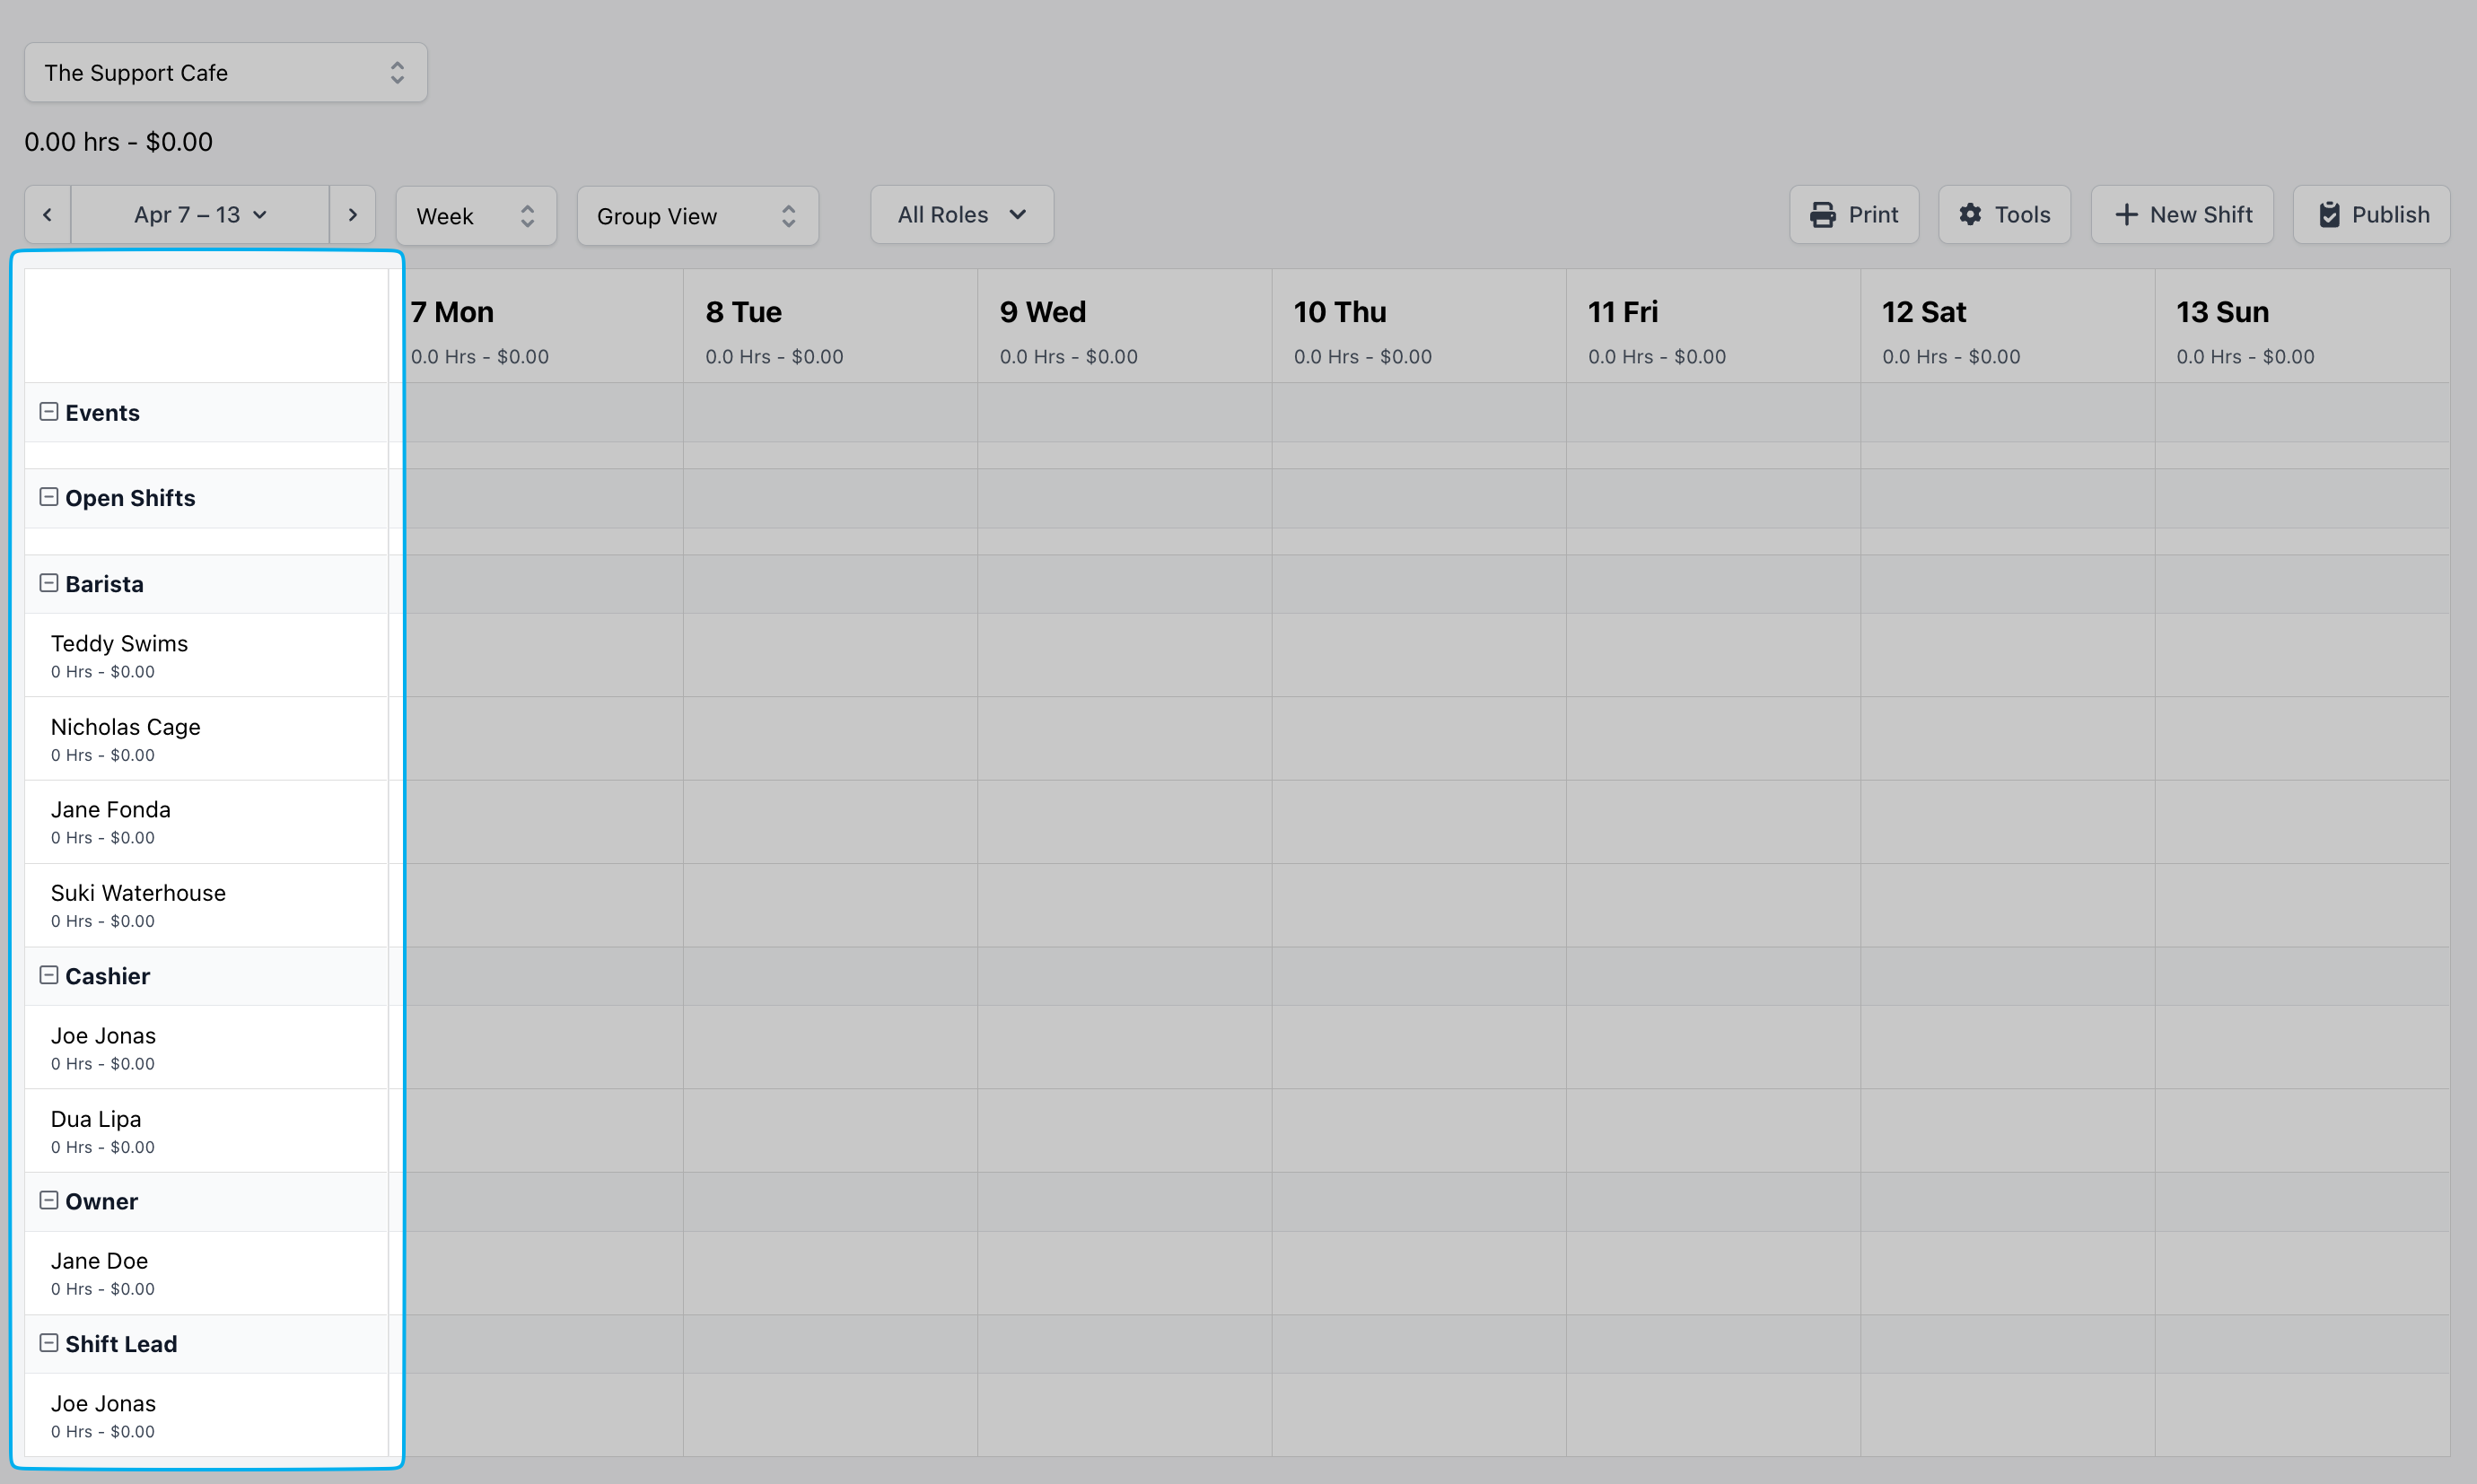
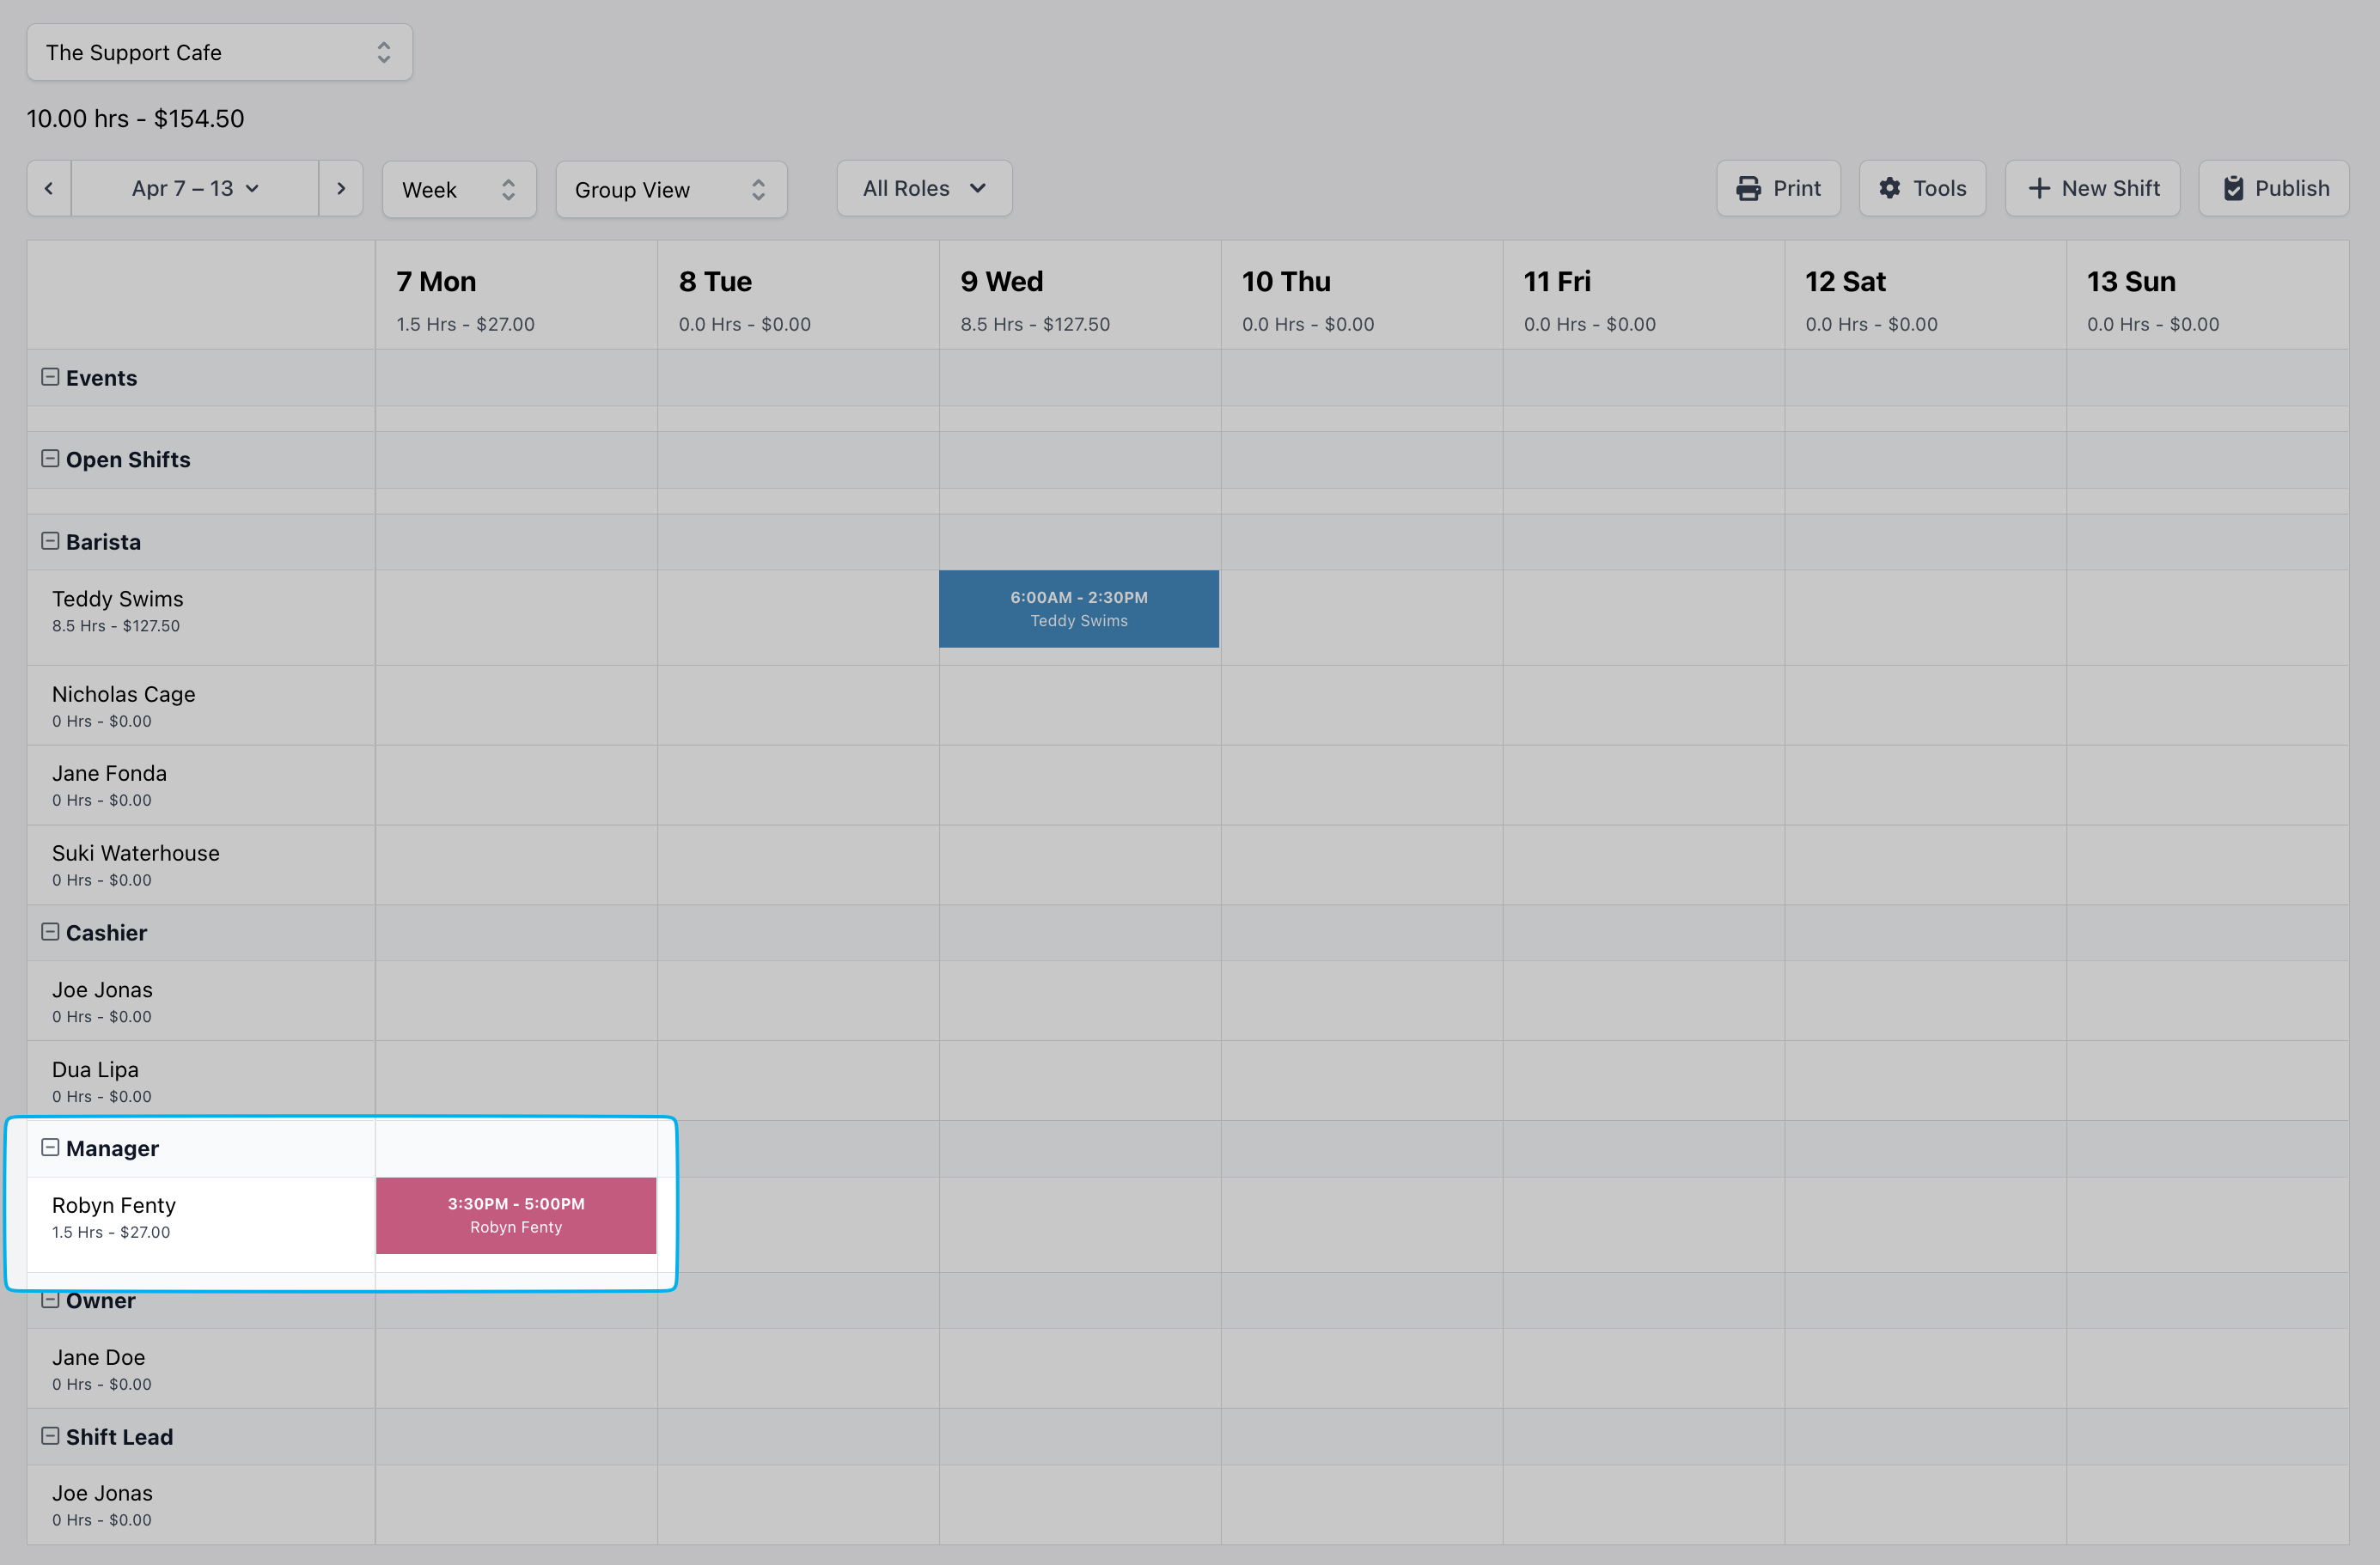
* The number of hours scheduled and associated pay for the scheduled time will appear under an employee’s name
### Events, Shifts & Hours
* **Events** created on the scheduler will display on the Hub app to remind employees of upcoming events
* **Open Shifts** can be created for employees to pick up
* The number of hours scheduled and associated pay for the scheduled time will appear under an employee’s name
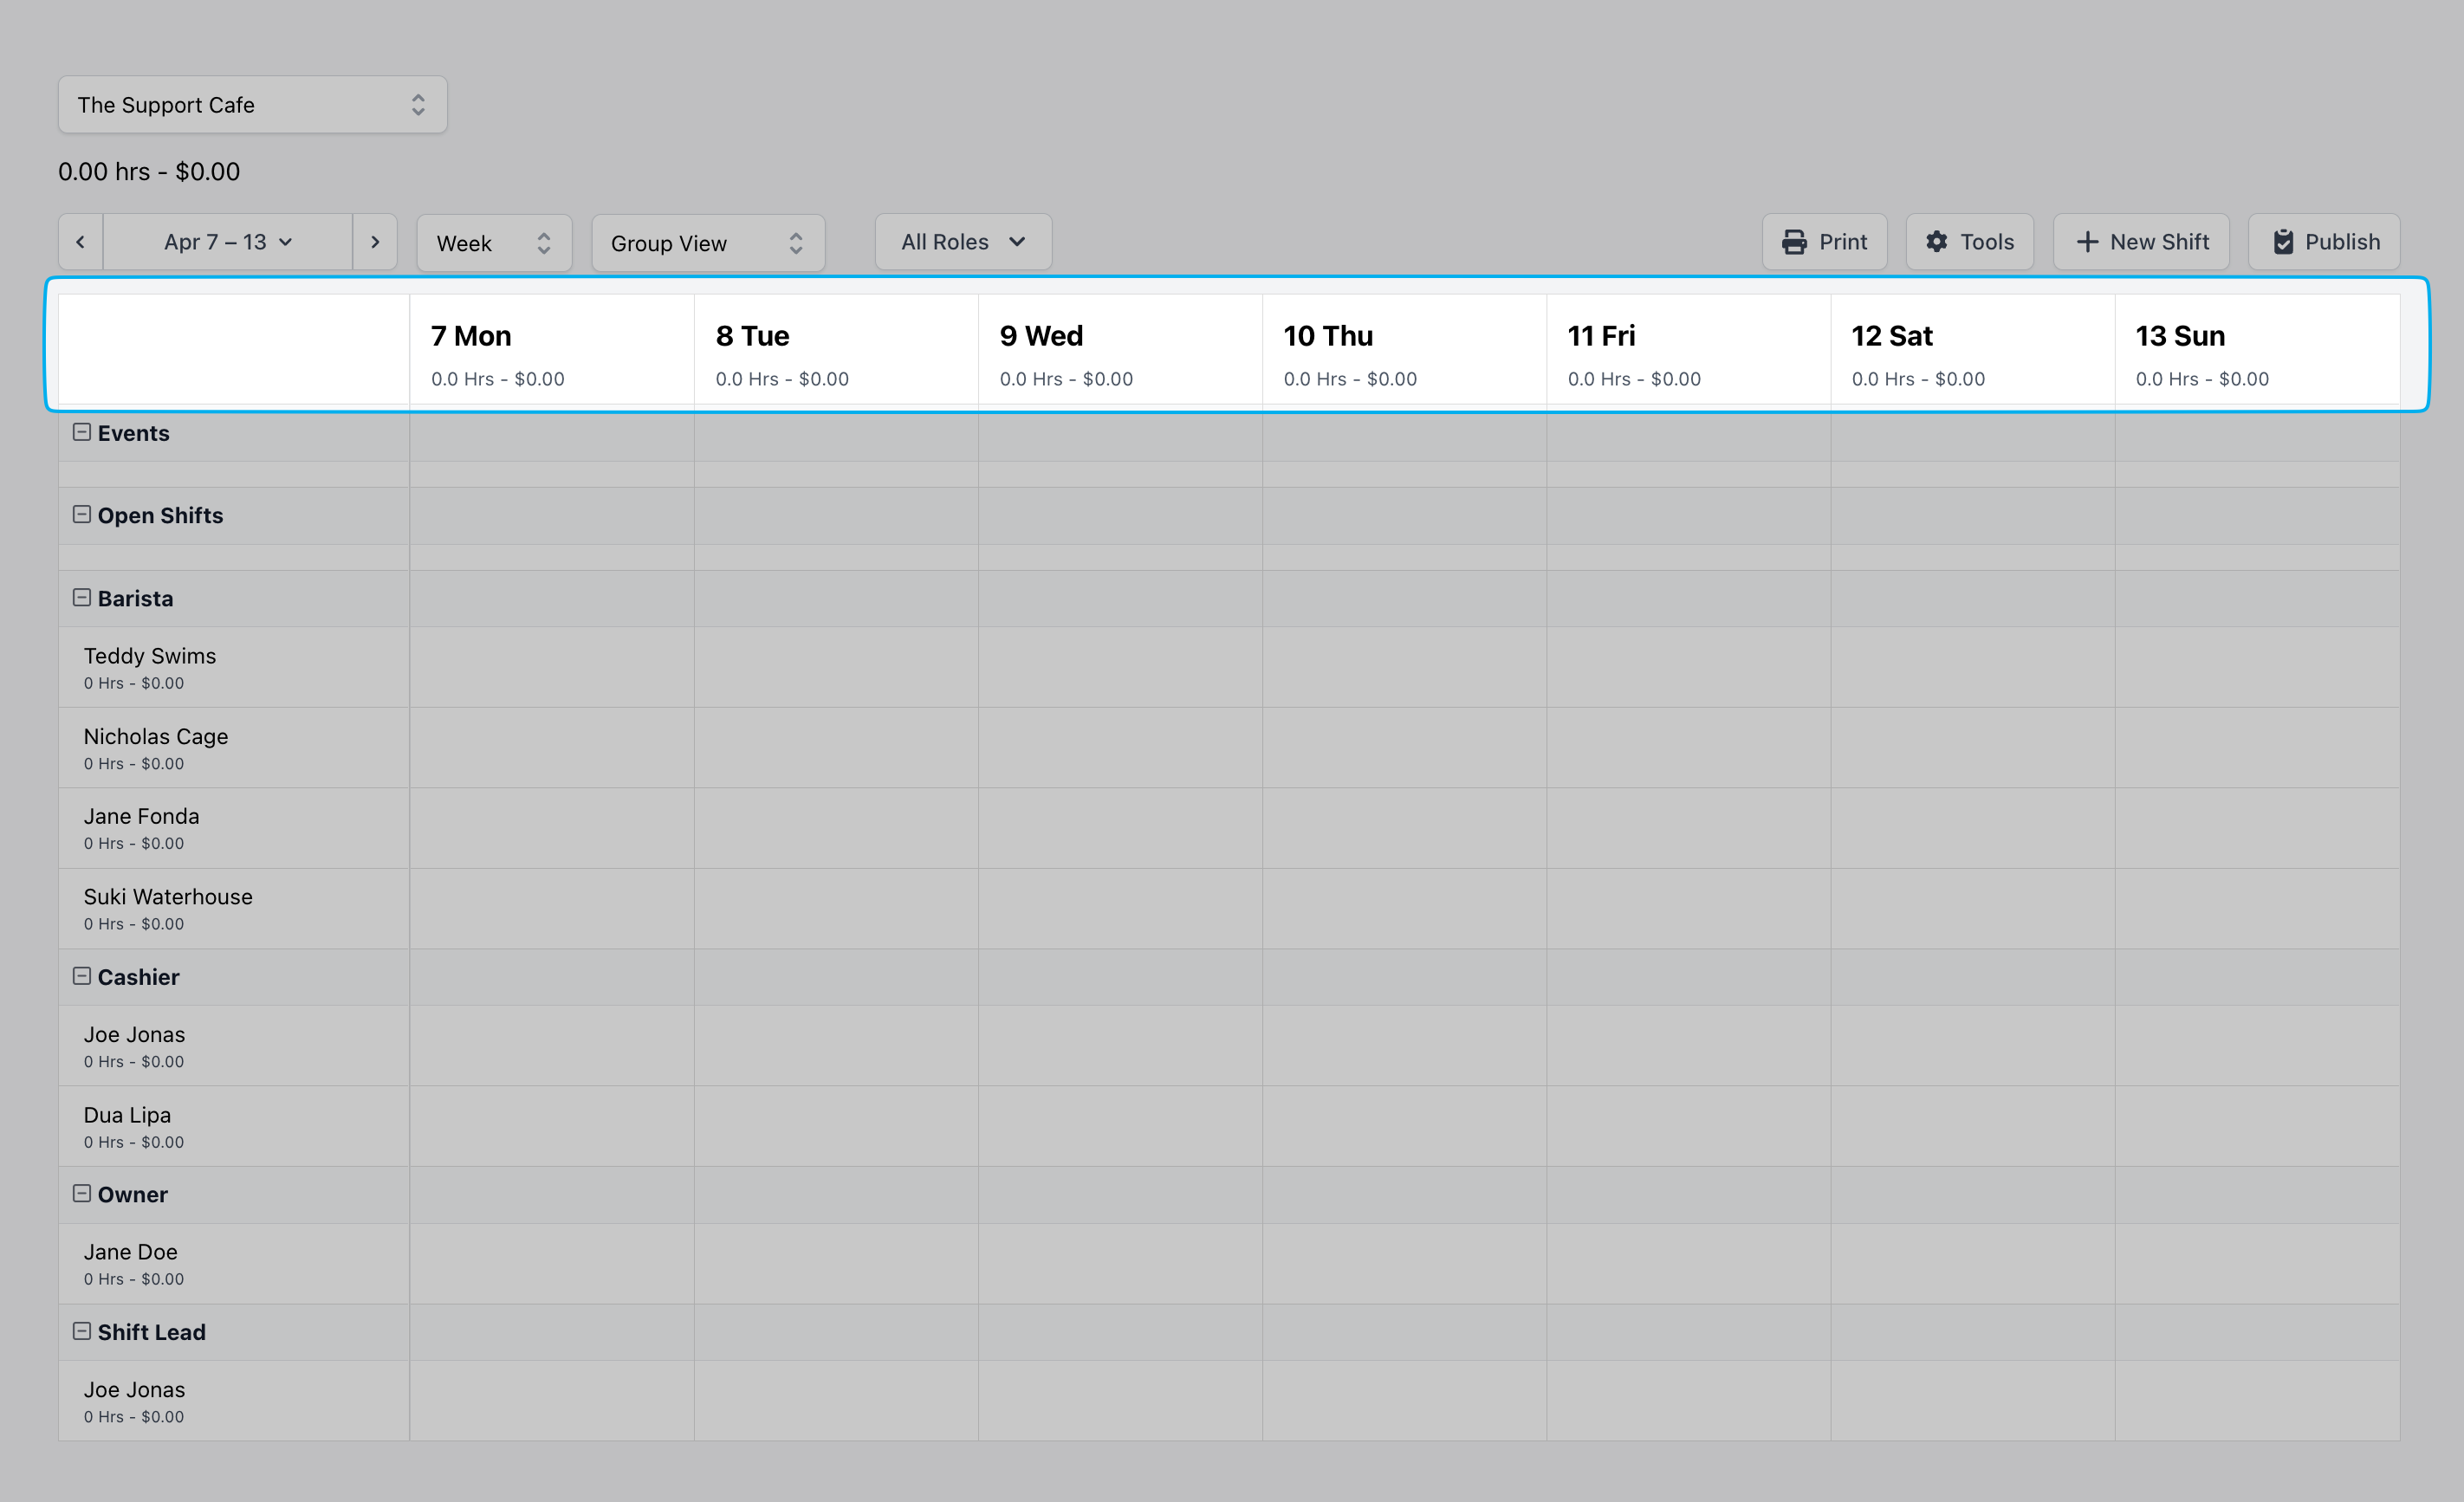
 * The total number of hours and associated pay for all shifts scheduled that day is displayed under each day of the week.
 * At the top above the date range, the total number of hours and pay for the entire date range will display.
 ***
## Scheduler Blocks
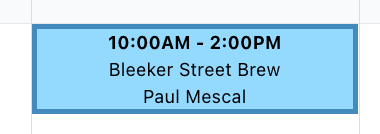
A shift will appear with a dark colored border and light colored fill if the shift hasn’t been published to the scheduler for all employees to view
***
## Scheduler Blocks
A shift will appear with a dark colored border and light colored fill if the shift hasn’t been published to the scheduler for all employees to view
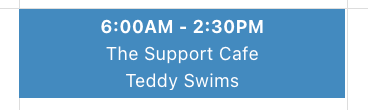
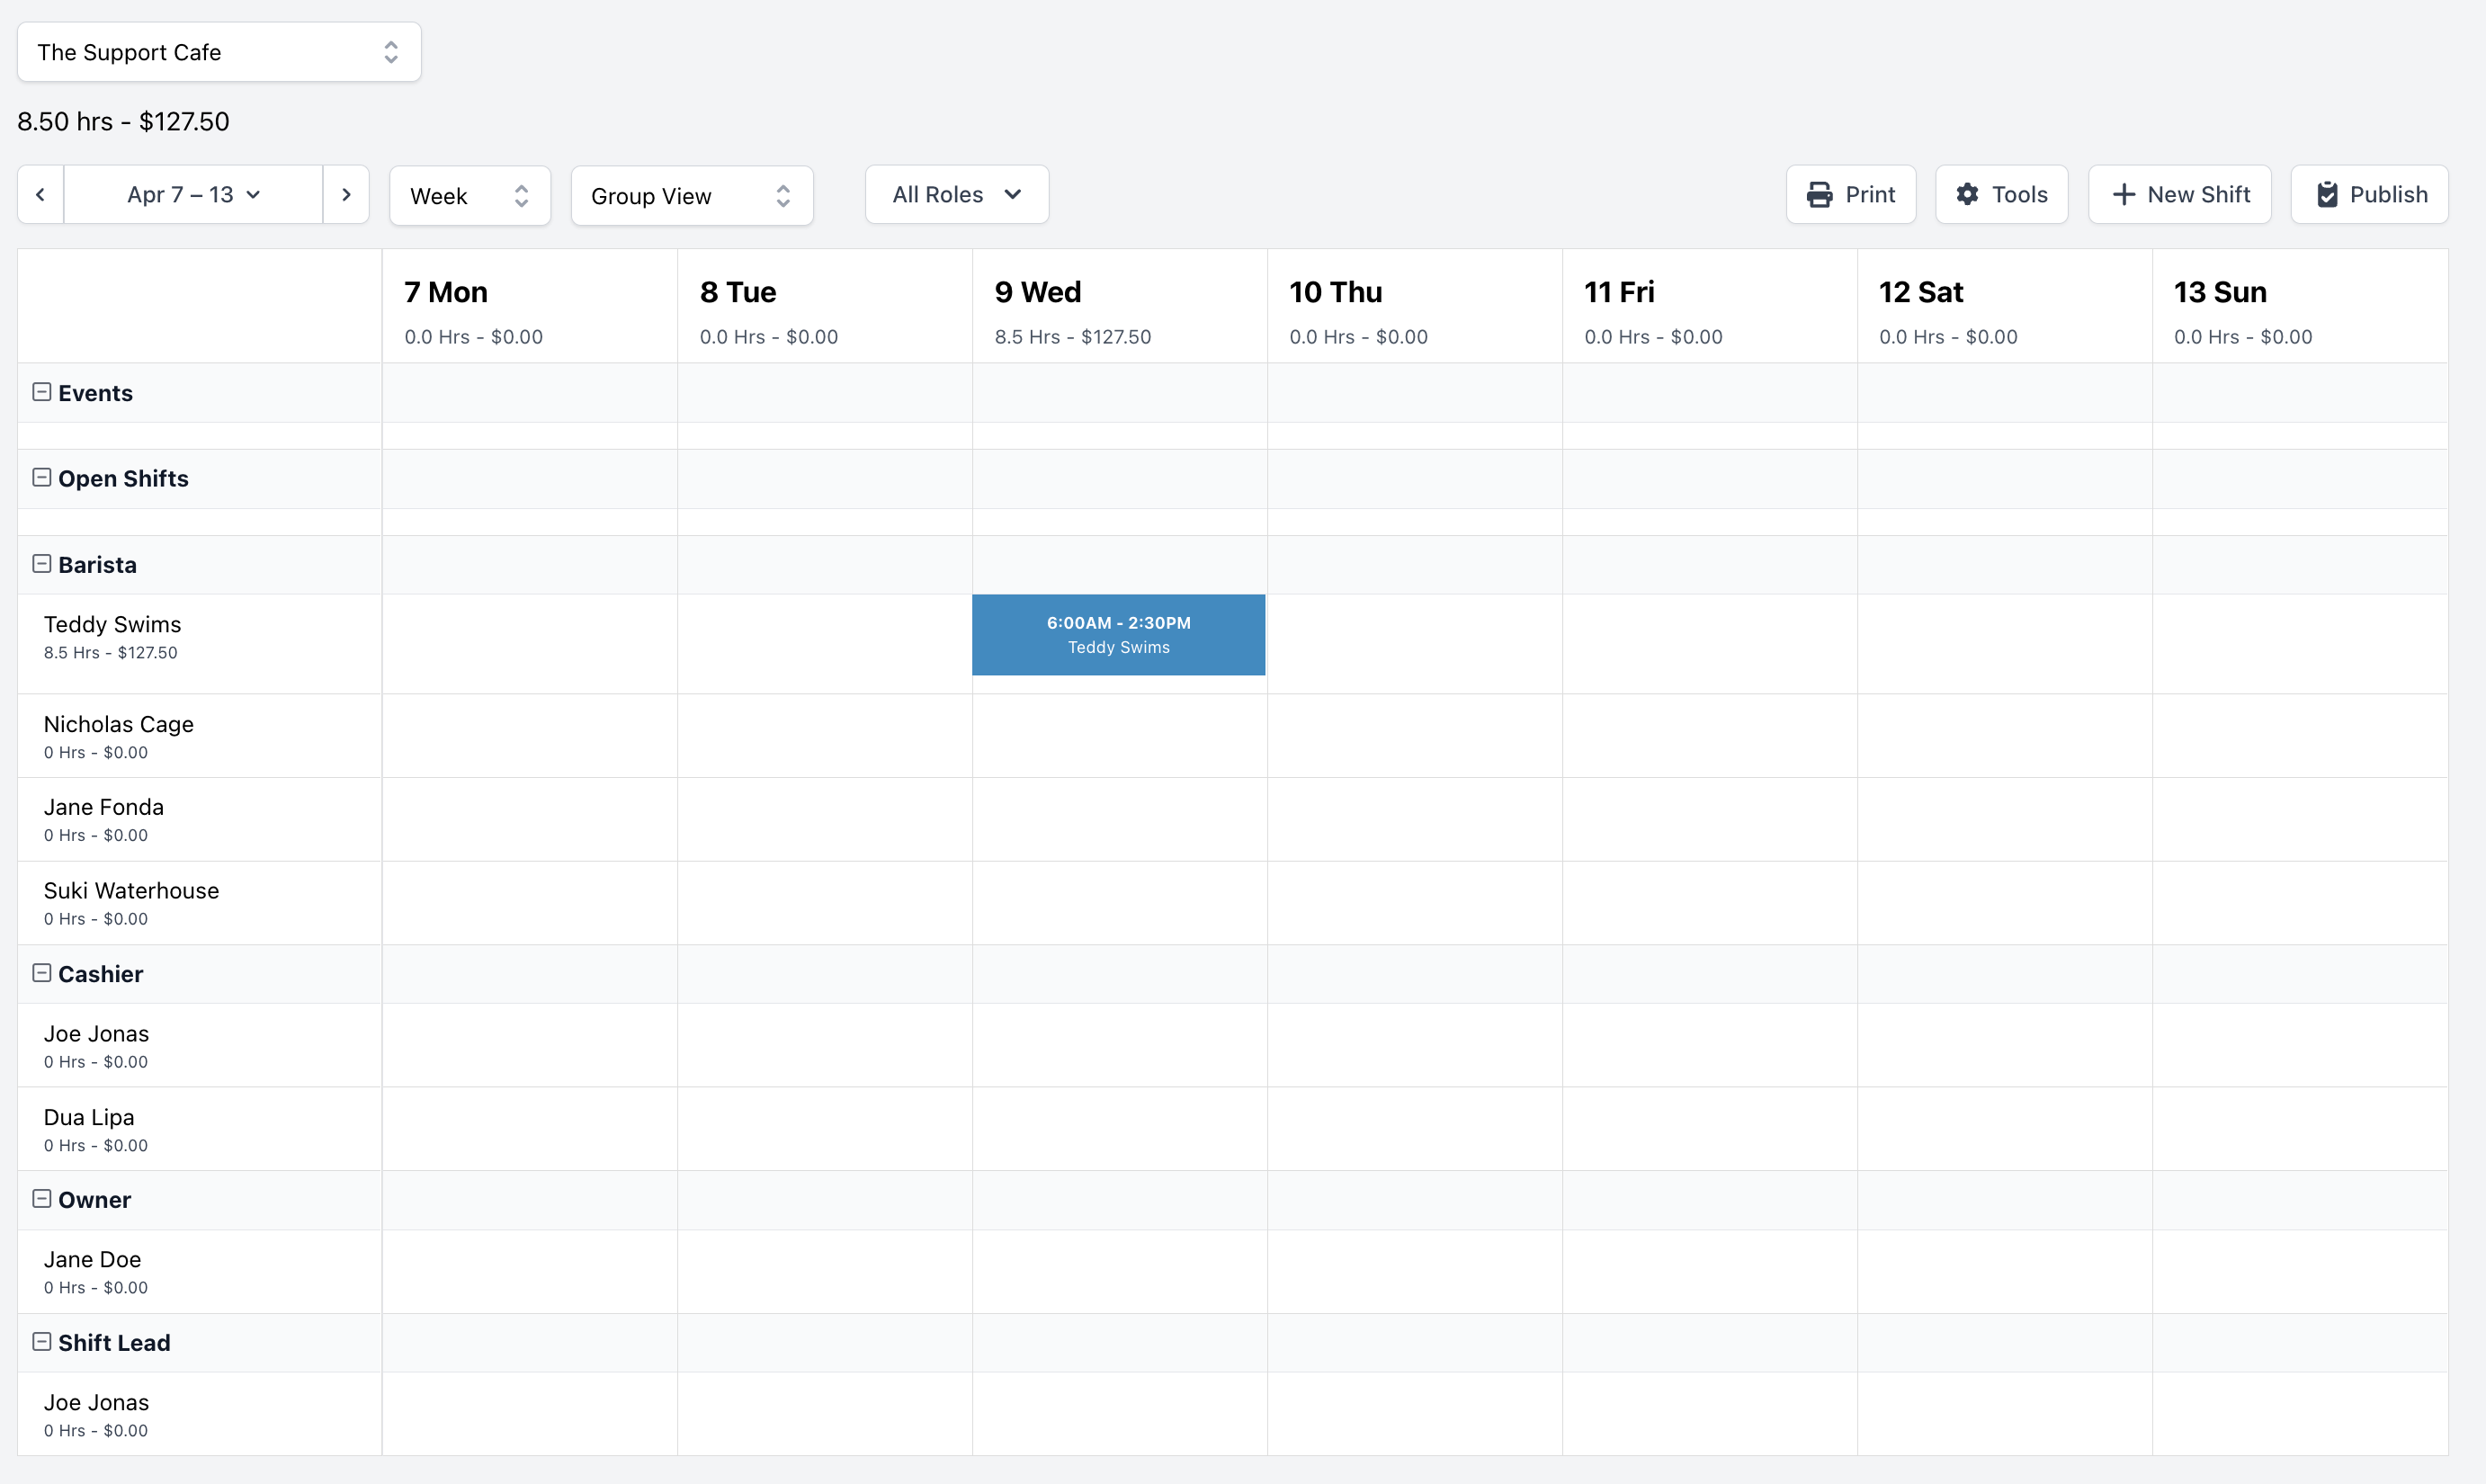
 A shift will appear with a dark colored border and fill if the shift has been published to the scheduler for all employees to view
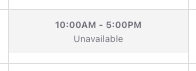
 If an employee has unavailability marked in their Shift Preferences, a gray block displays on the specified days
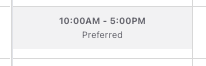
 If an employee has preferred hours marked in their Shift Preferences, a smaller gray block will display on the specified days.
 ***
## Create a Schedule
Learn how to create a week's schedule on both the Dashboard and the Hub App
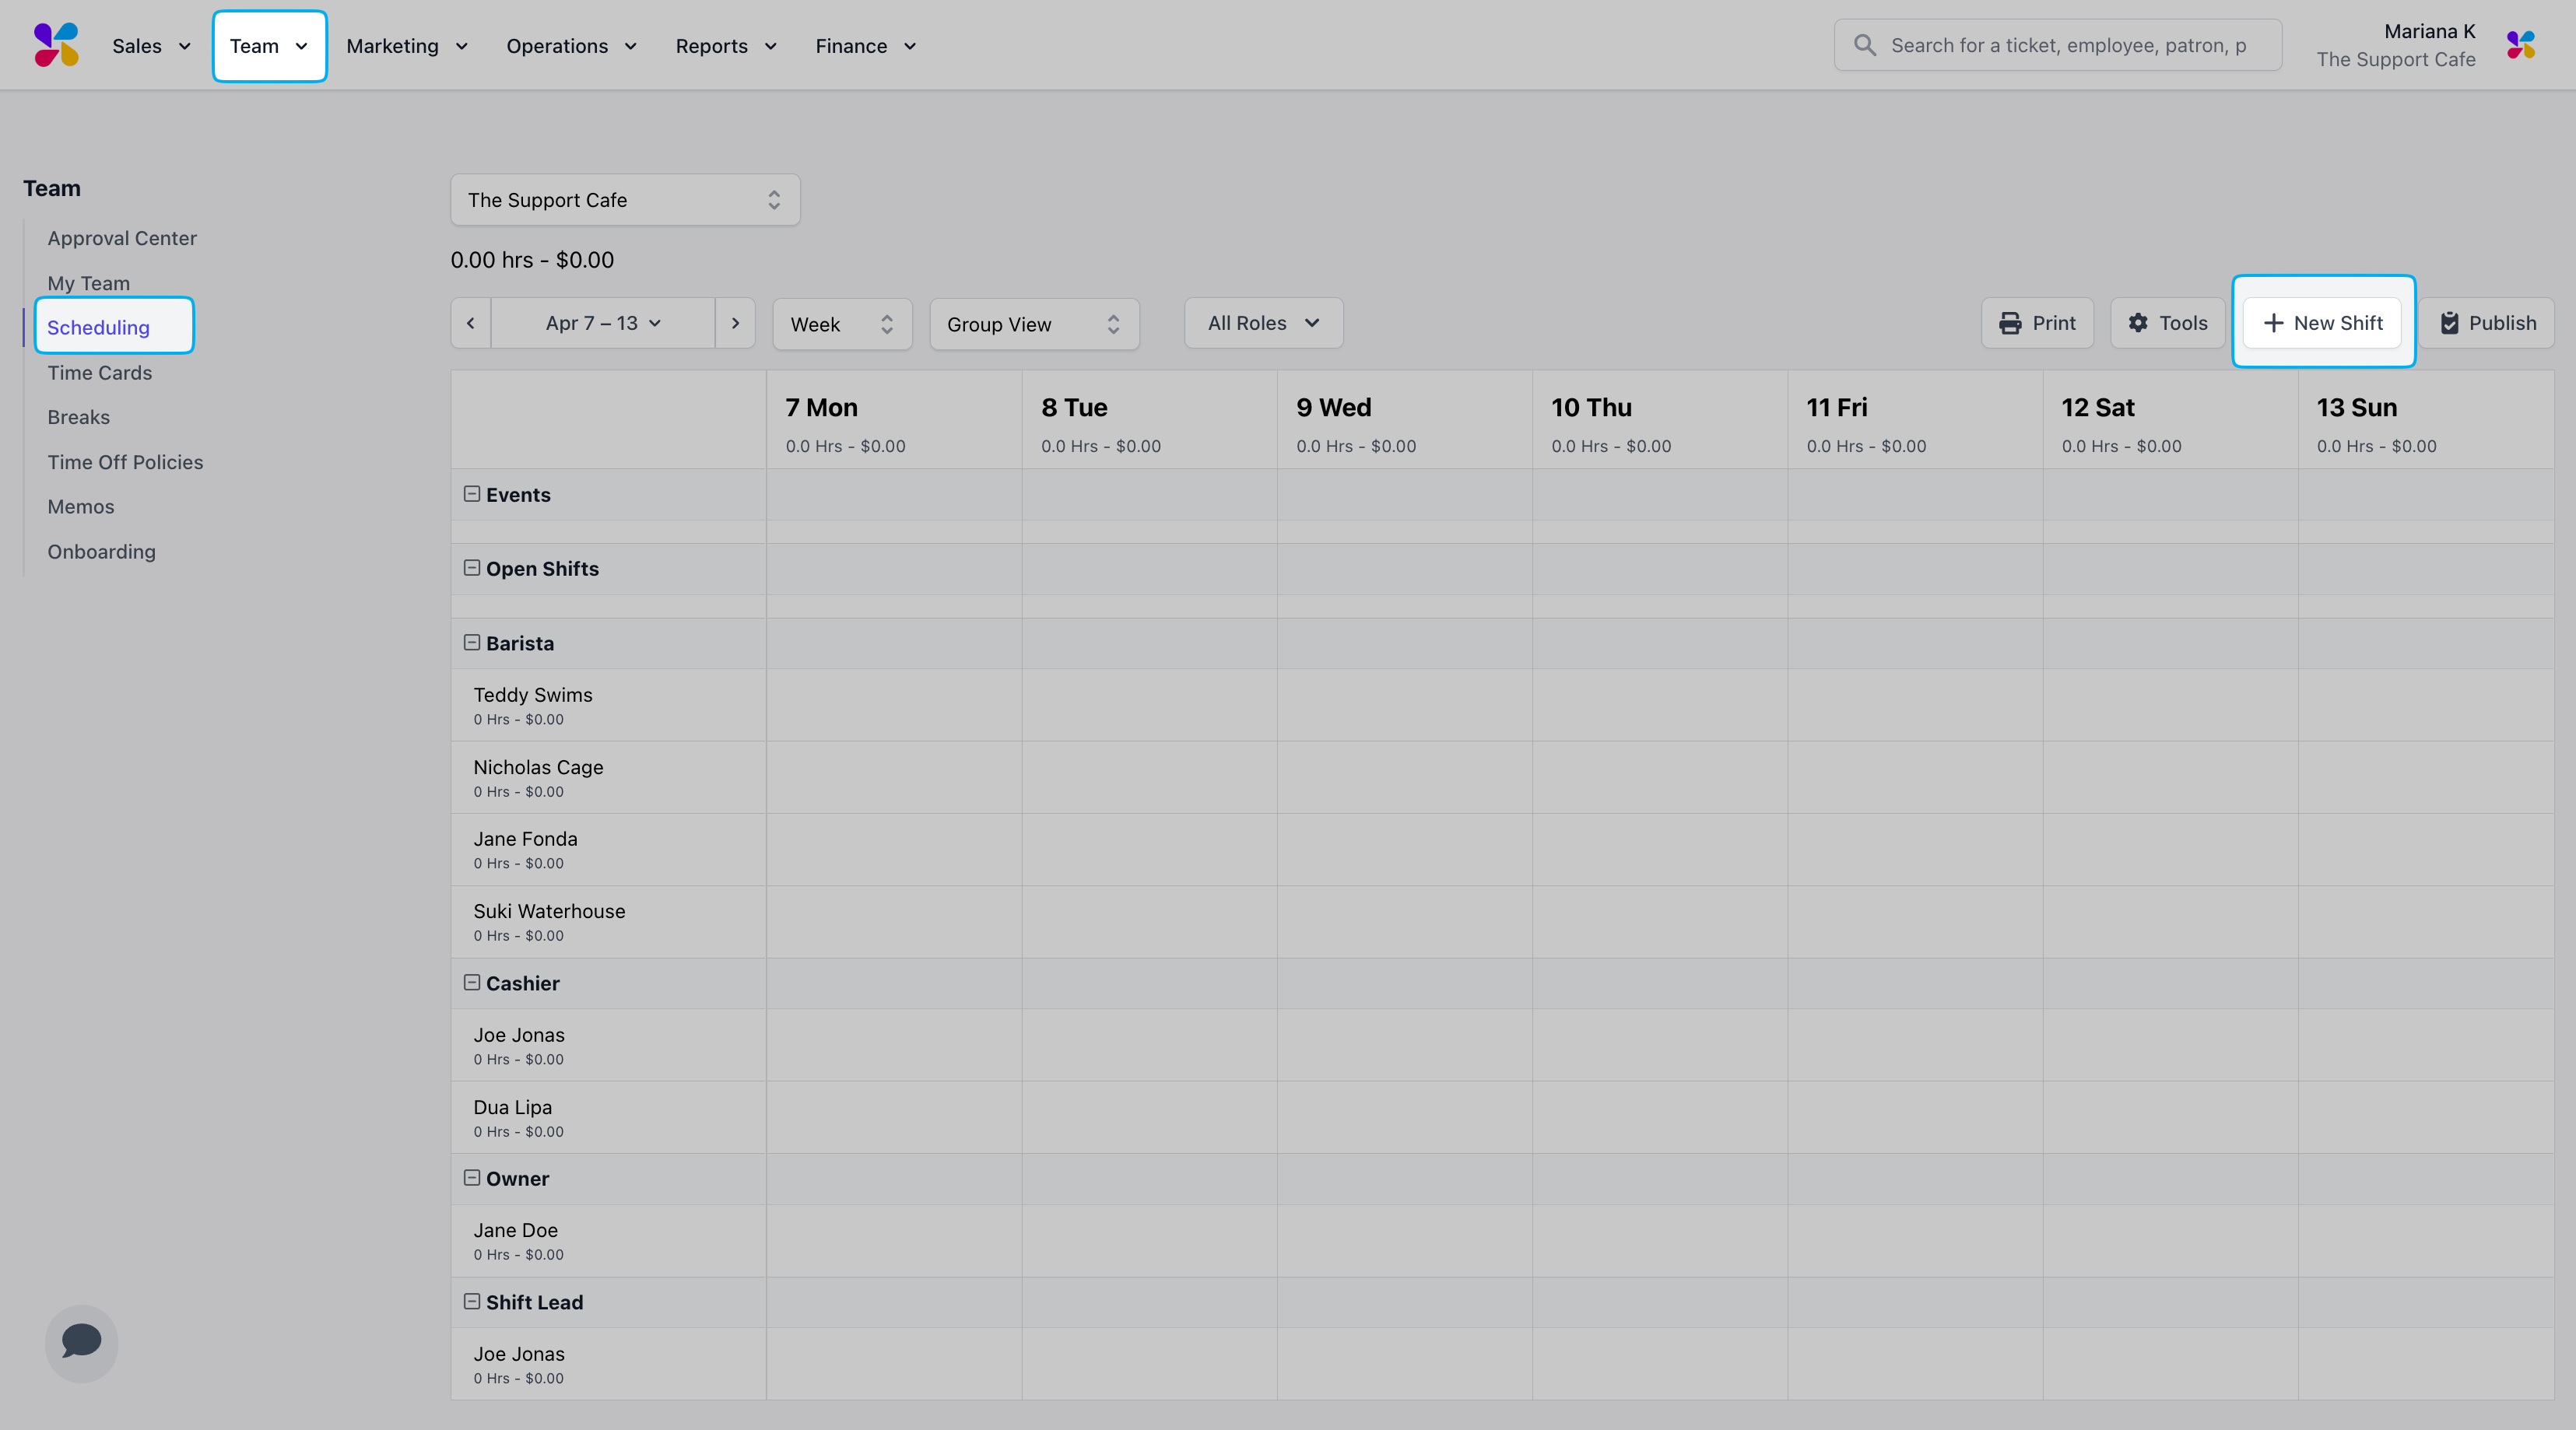
1. Click **Team** > click **Scheduling** > click **+New Shift**
***
## Create a Schedule
Learn how to create a week's schedule on both the Dashboard and the Hub App
1. Click **Team** > click **Scheduling** > click **+New Shift**
 2. Click the **Employee Name** dropdown to view all employees or type an employee’s name > click the **Role** Dropdown to view the employee’s attached roles
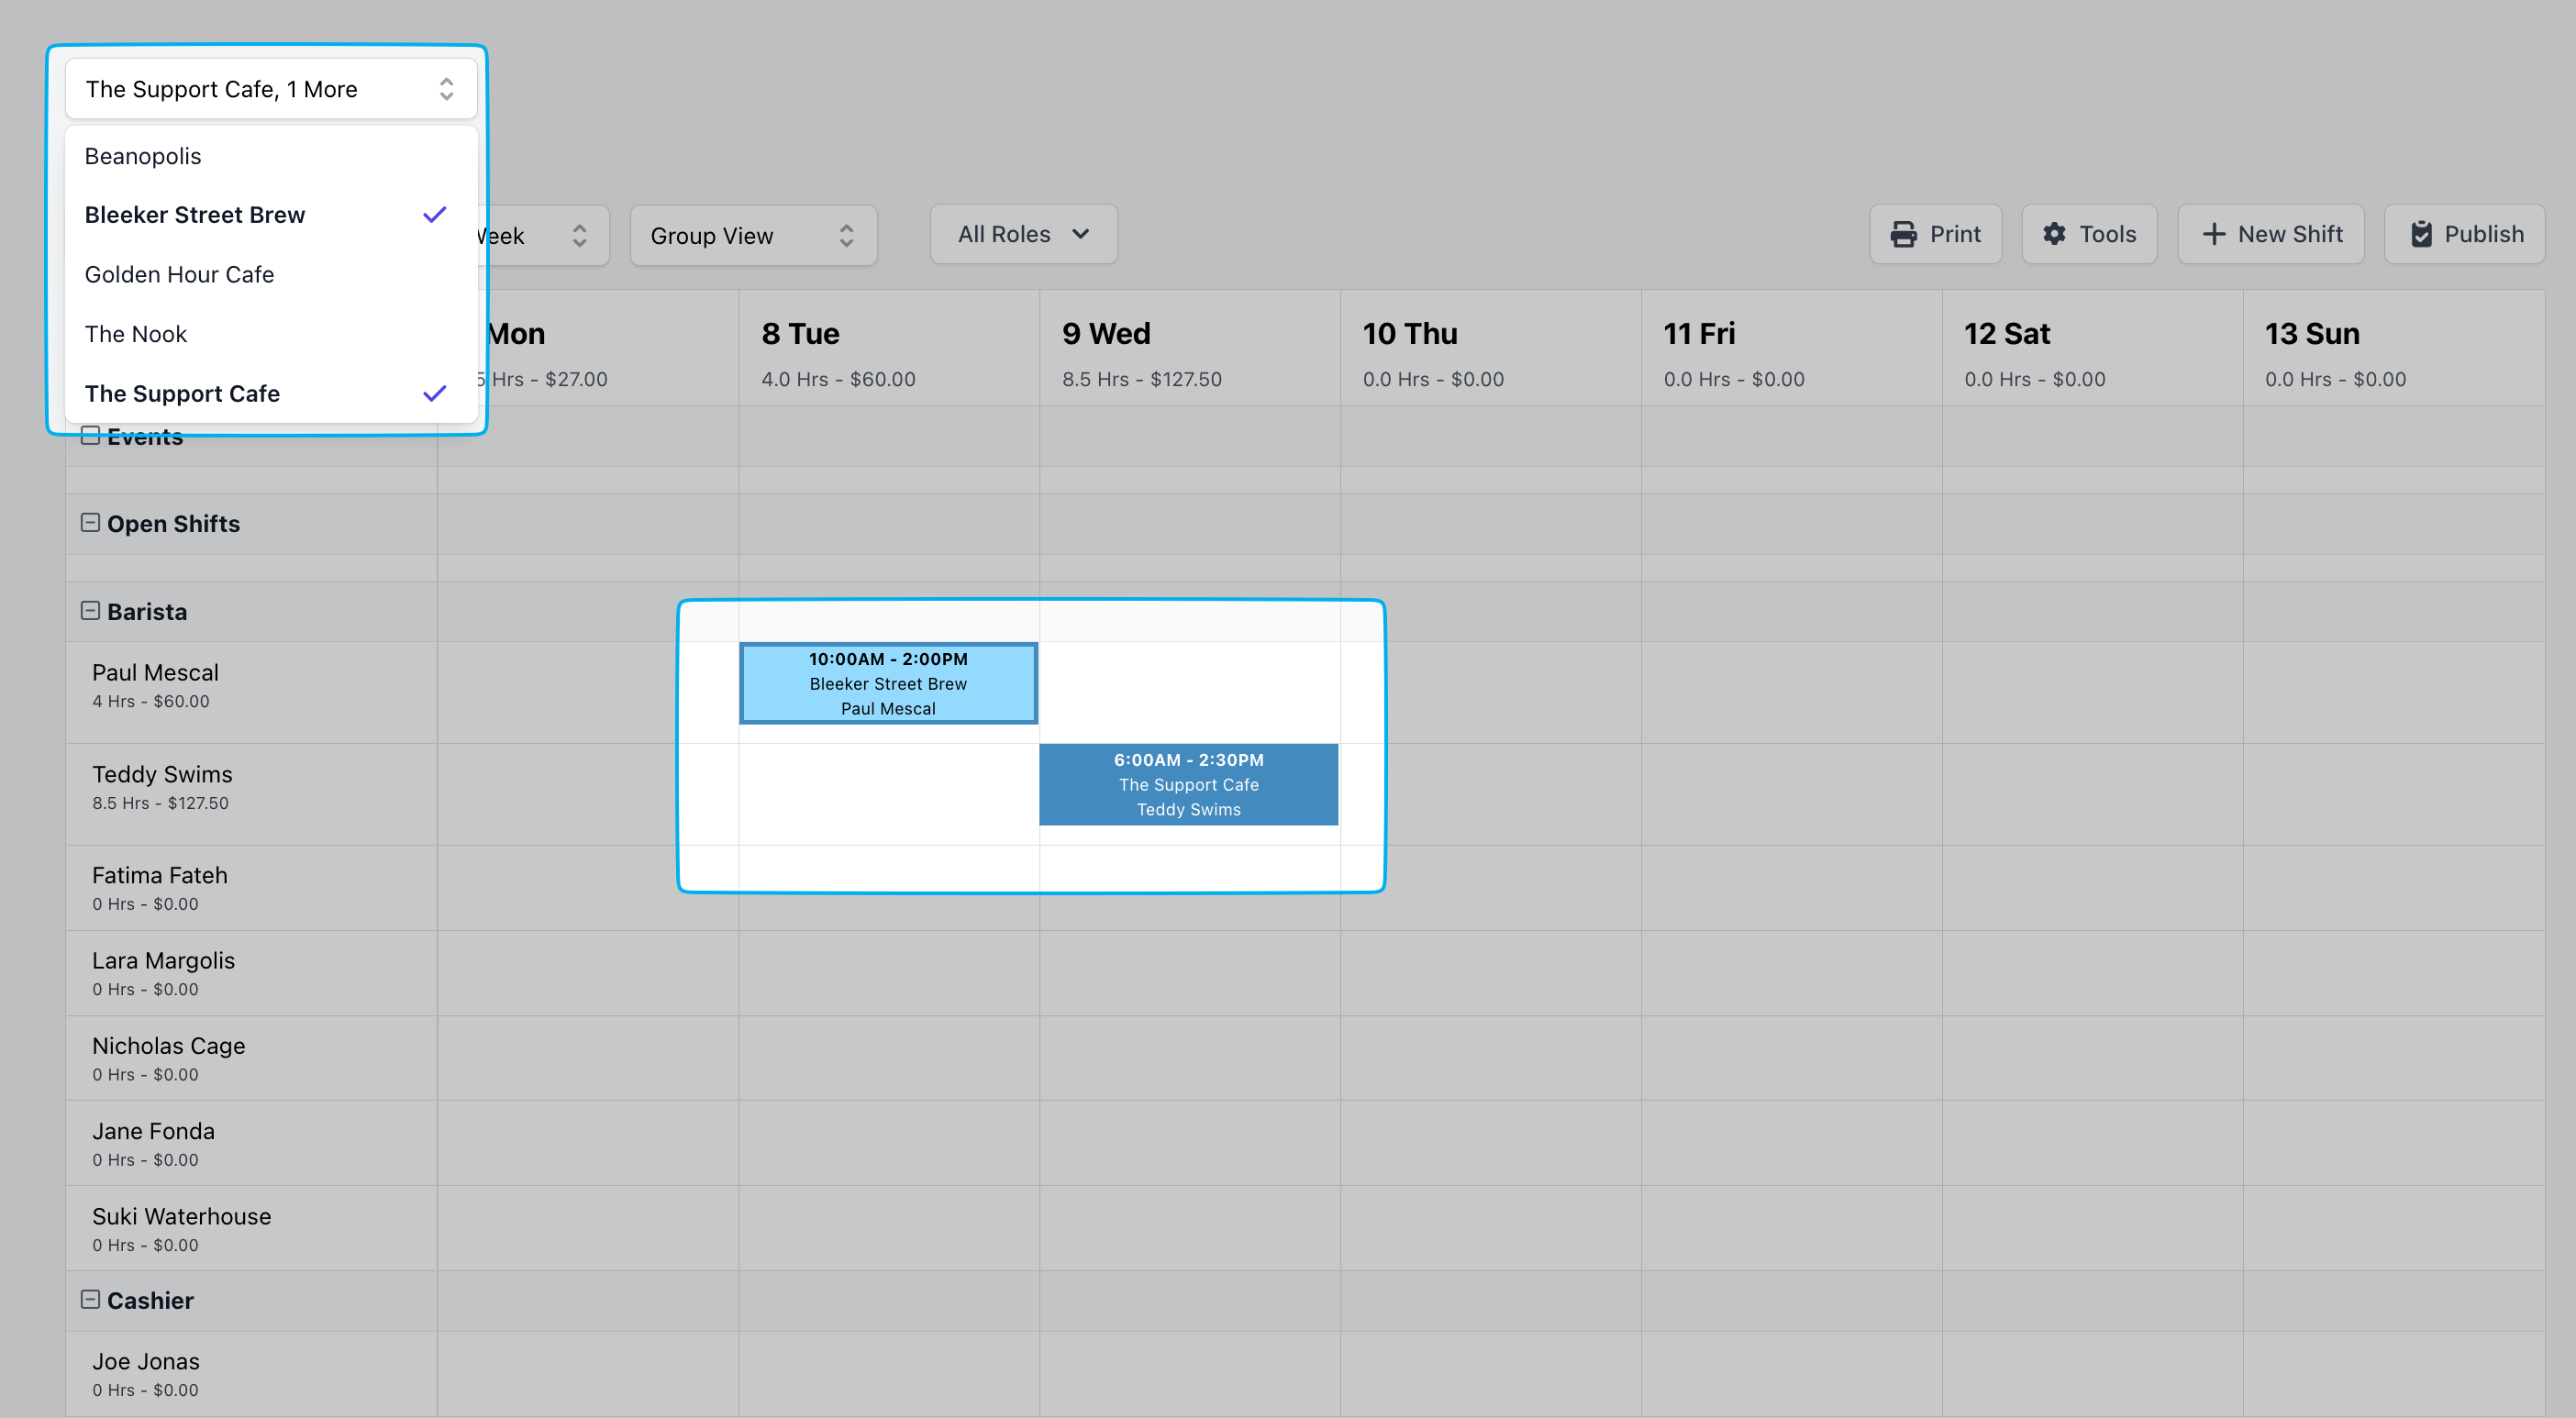
3. Click on the **Location** dropdown to select the location to schedule the employee at
If your company has more than one **location** you can create shifts on the scheduler for any locations for the employees attached to other locations.
The shifts scheduled for the selected locations will display with the location listed within the shift’s colored block
2. Click the **Employee Name** dropdown to view all employees or type an employee’s name > click the **Role** Dropdown to view the employee’s attached roles
3. Click on the **Location** dropdown to select the location to schedule the employee at
If your company has more than one **location** you can create shifts on the scheduler for any locations for the employees attached to other locations.
The shifts scheduled for the selected locations will display with the location listed within the shift’s colored block
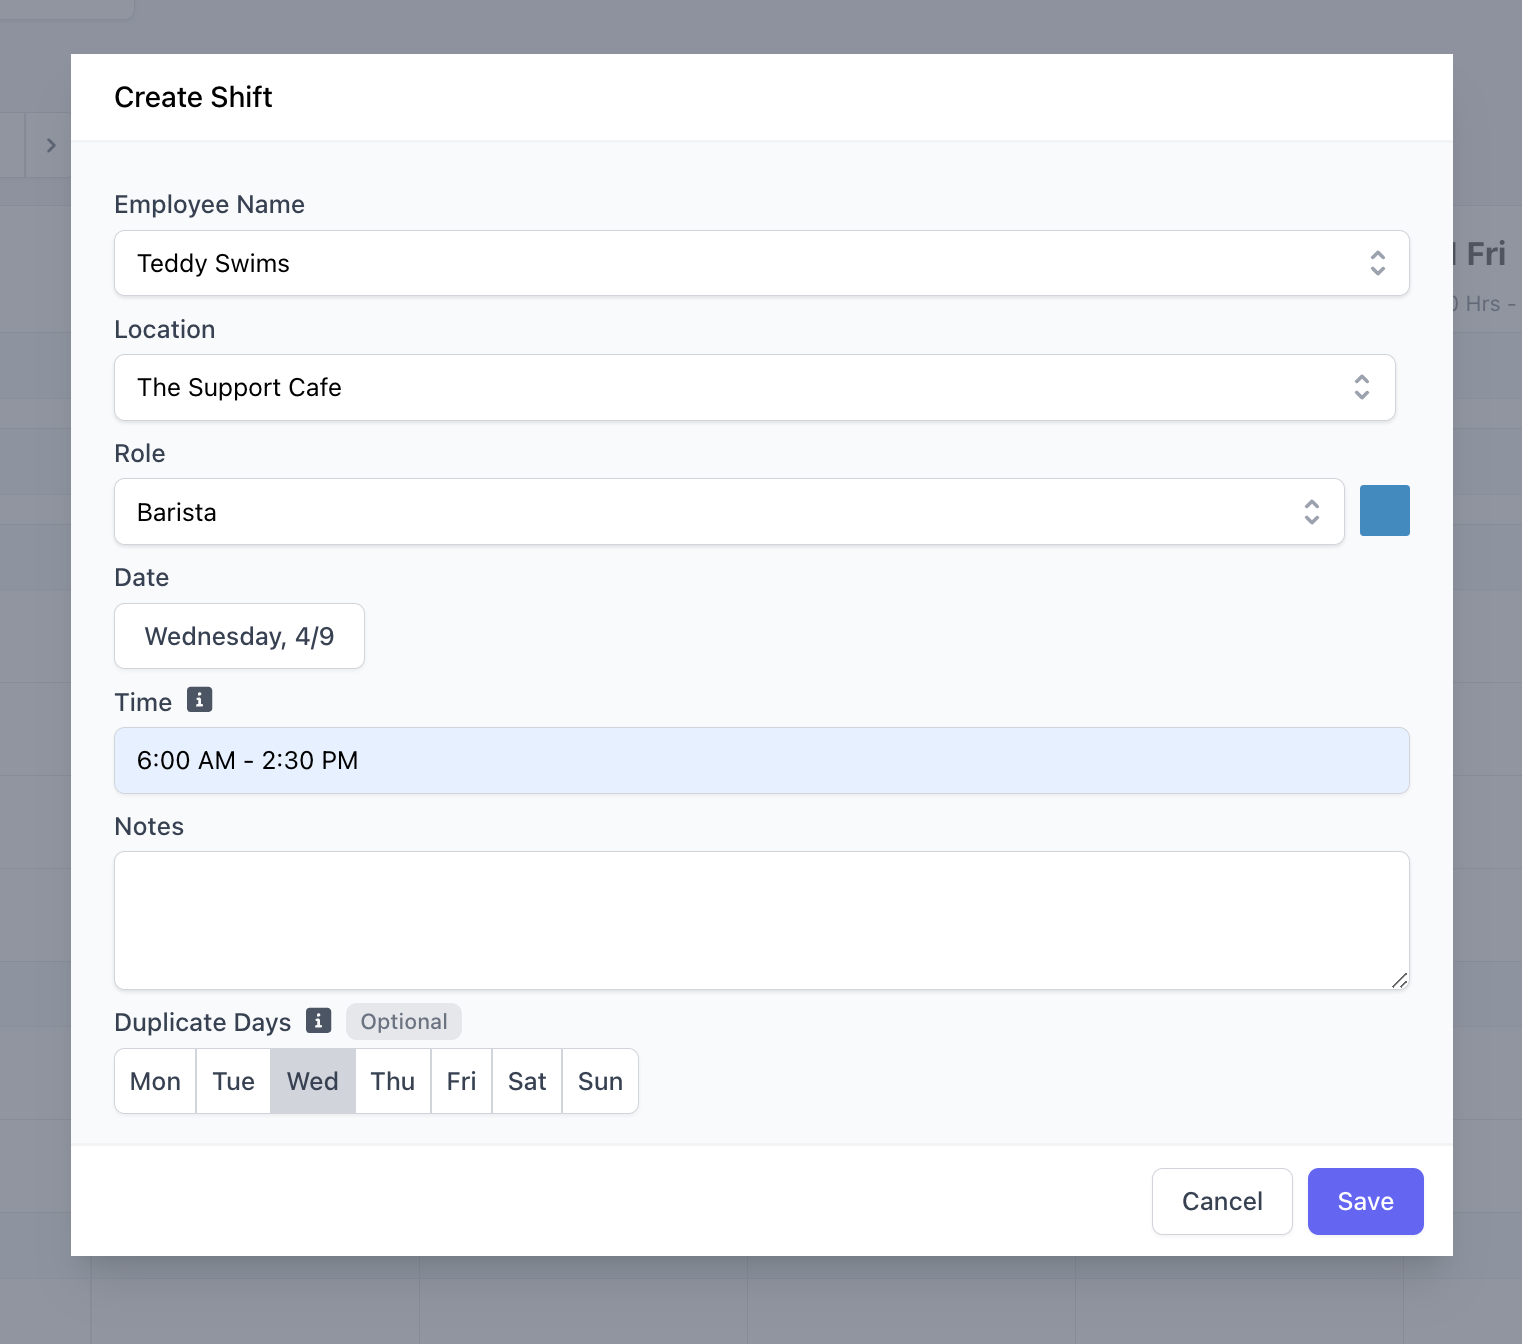
 3. Click the **Date** field to display the monthly calendar
4. Click the **Time** field to select or type the start and end time of the shift
5. You can add **Notes** for the employee to view
6. You can select multiple days of the week under **Duplicate Days** to create multiple shifts for the employee with the same times
3. Click the **Date** field to display the monthly calendar
4. Click the **Time** field to select or type the start and end time of the shift
5. You can add **Notes** for the employee to view
6. You can select multiple days of the week under **Duplicate Days** to create multiple shifts for the employee with the same times
 7. Hit **Save**
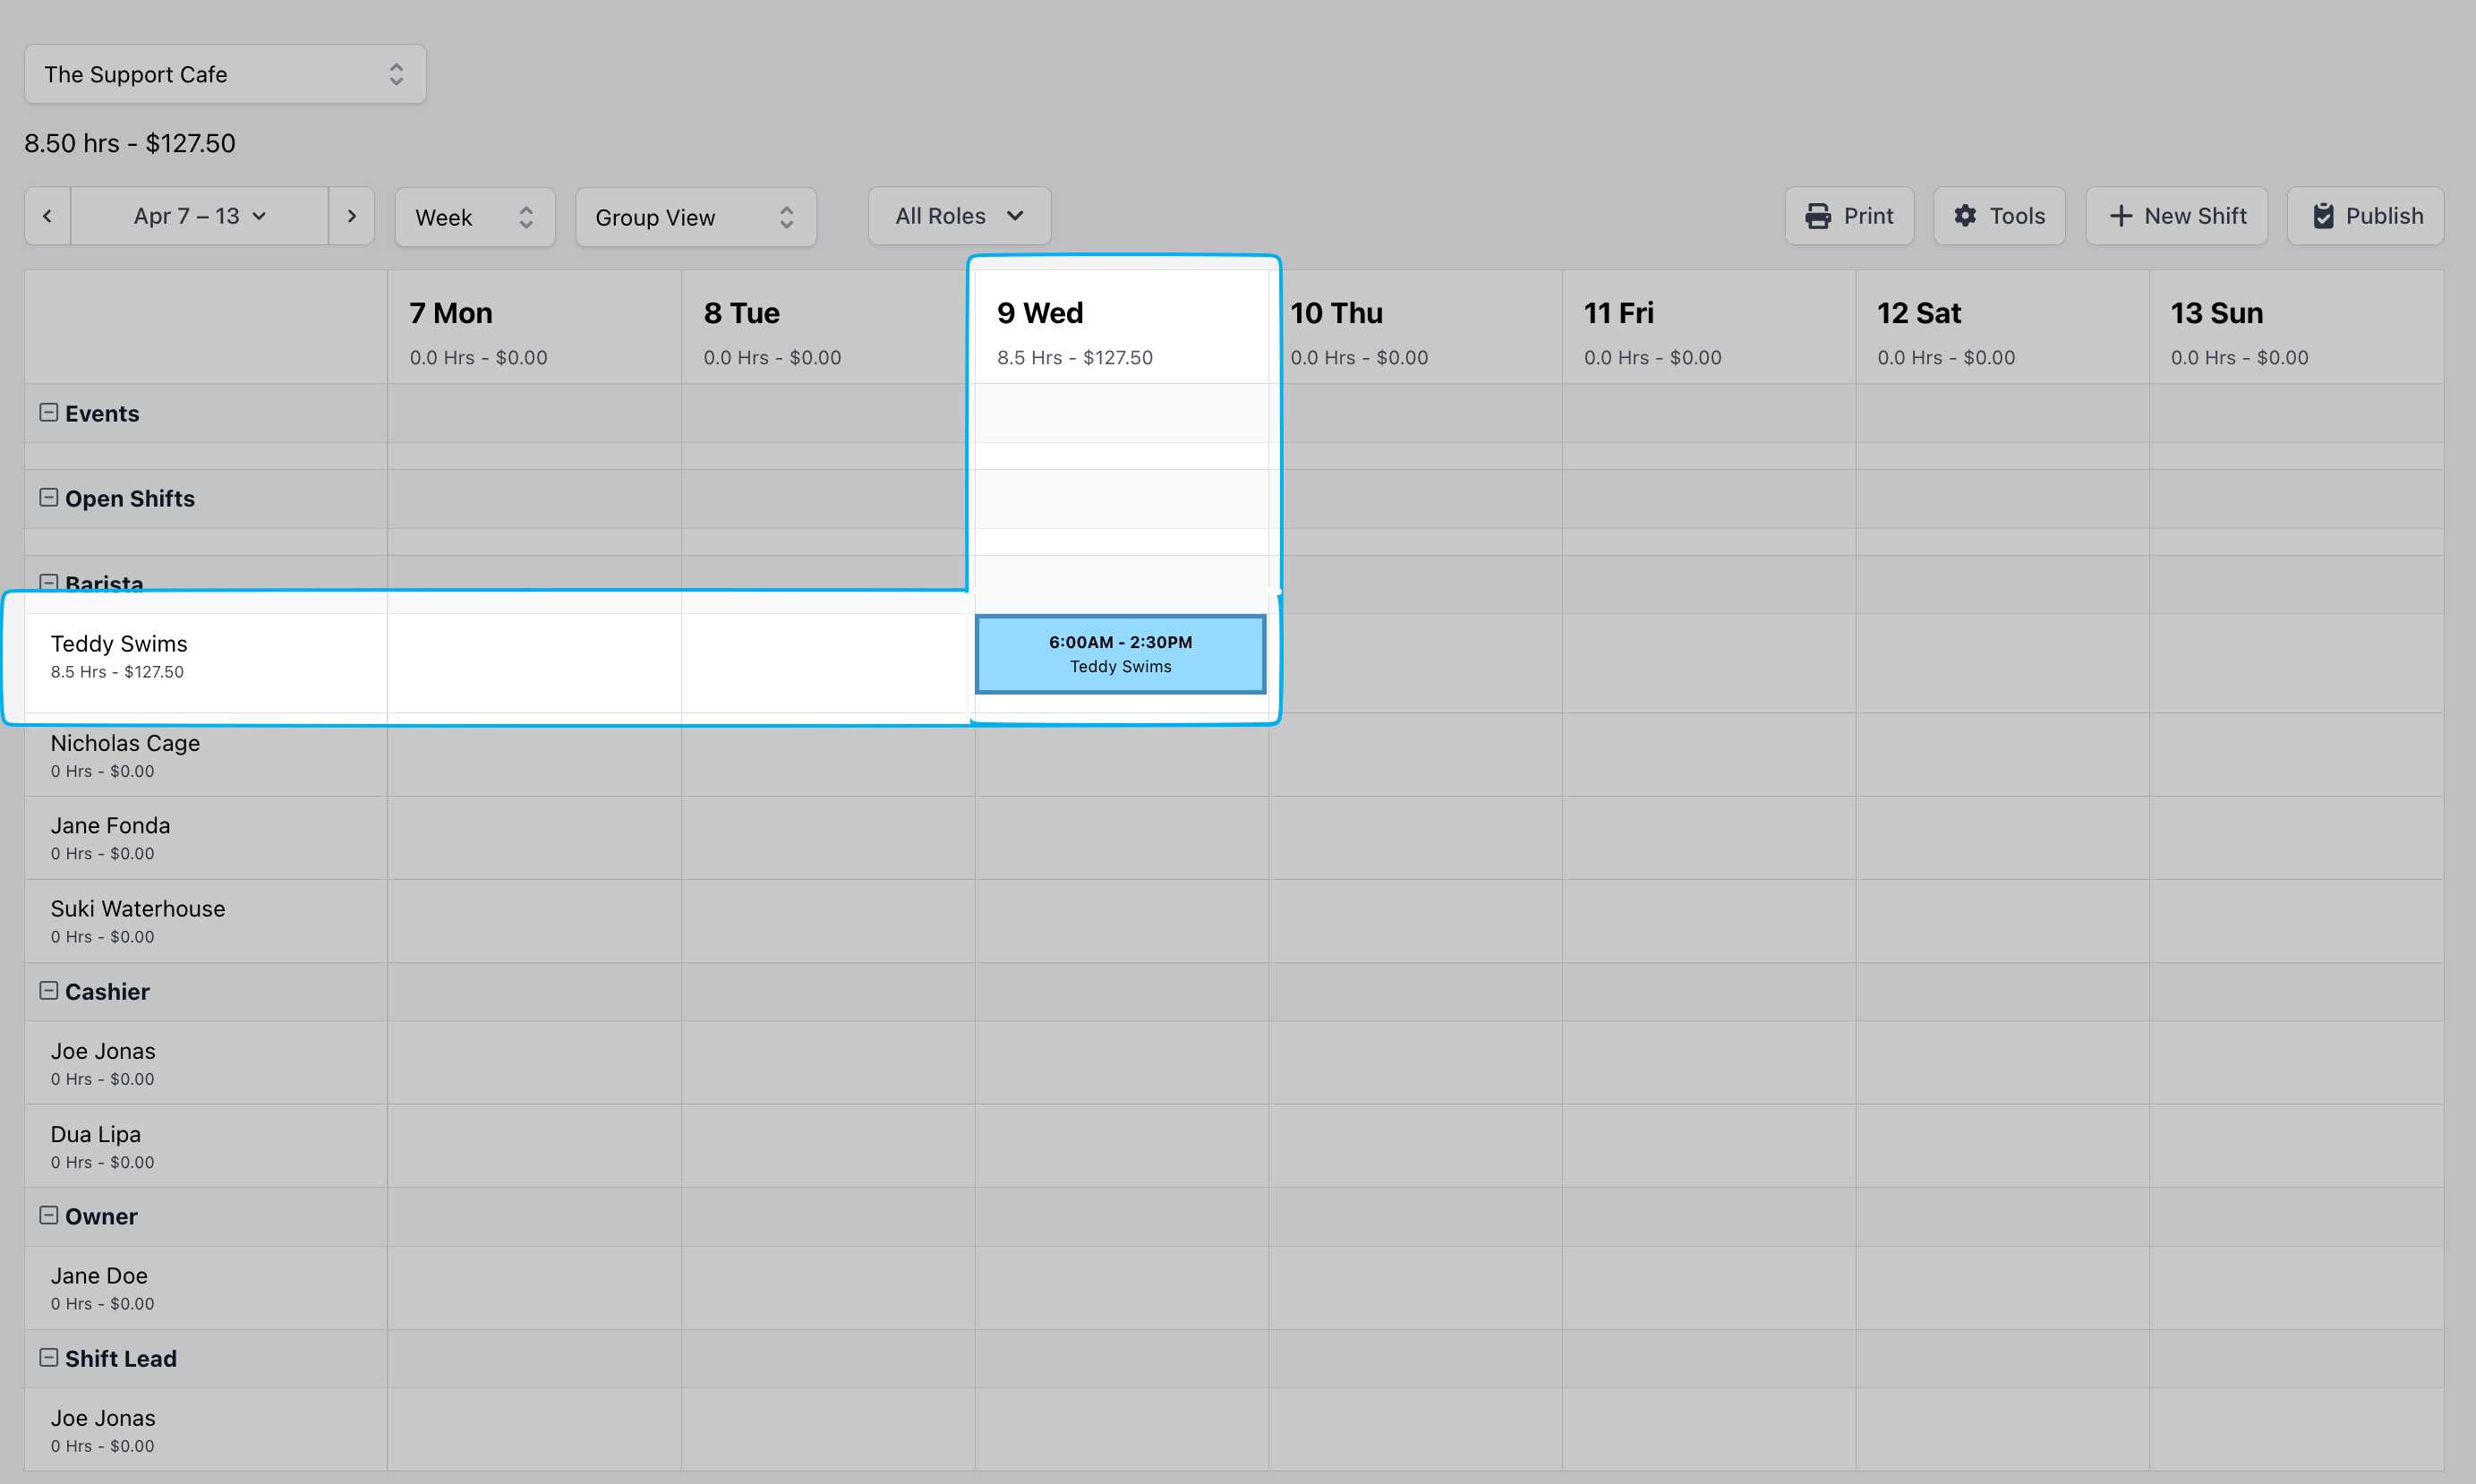
8. The shift will appear under the Date to the right of the employee’s name with a dark colored border and light colored fill with the shift information
* The dark colored border and light colored fill block indicates the shift is a draft and not yet published for employees without the associated permissions to view
7. Hit **Save**
8. The shift will appear under the Date to the right of the employee’s name with a dark colored border and light colored fill with the shift information
* The dark colored border and light colored fill block indicates the shift is a draft and not yet published for employees without the associated permissions to view
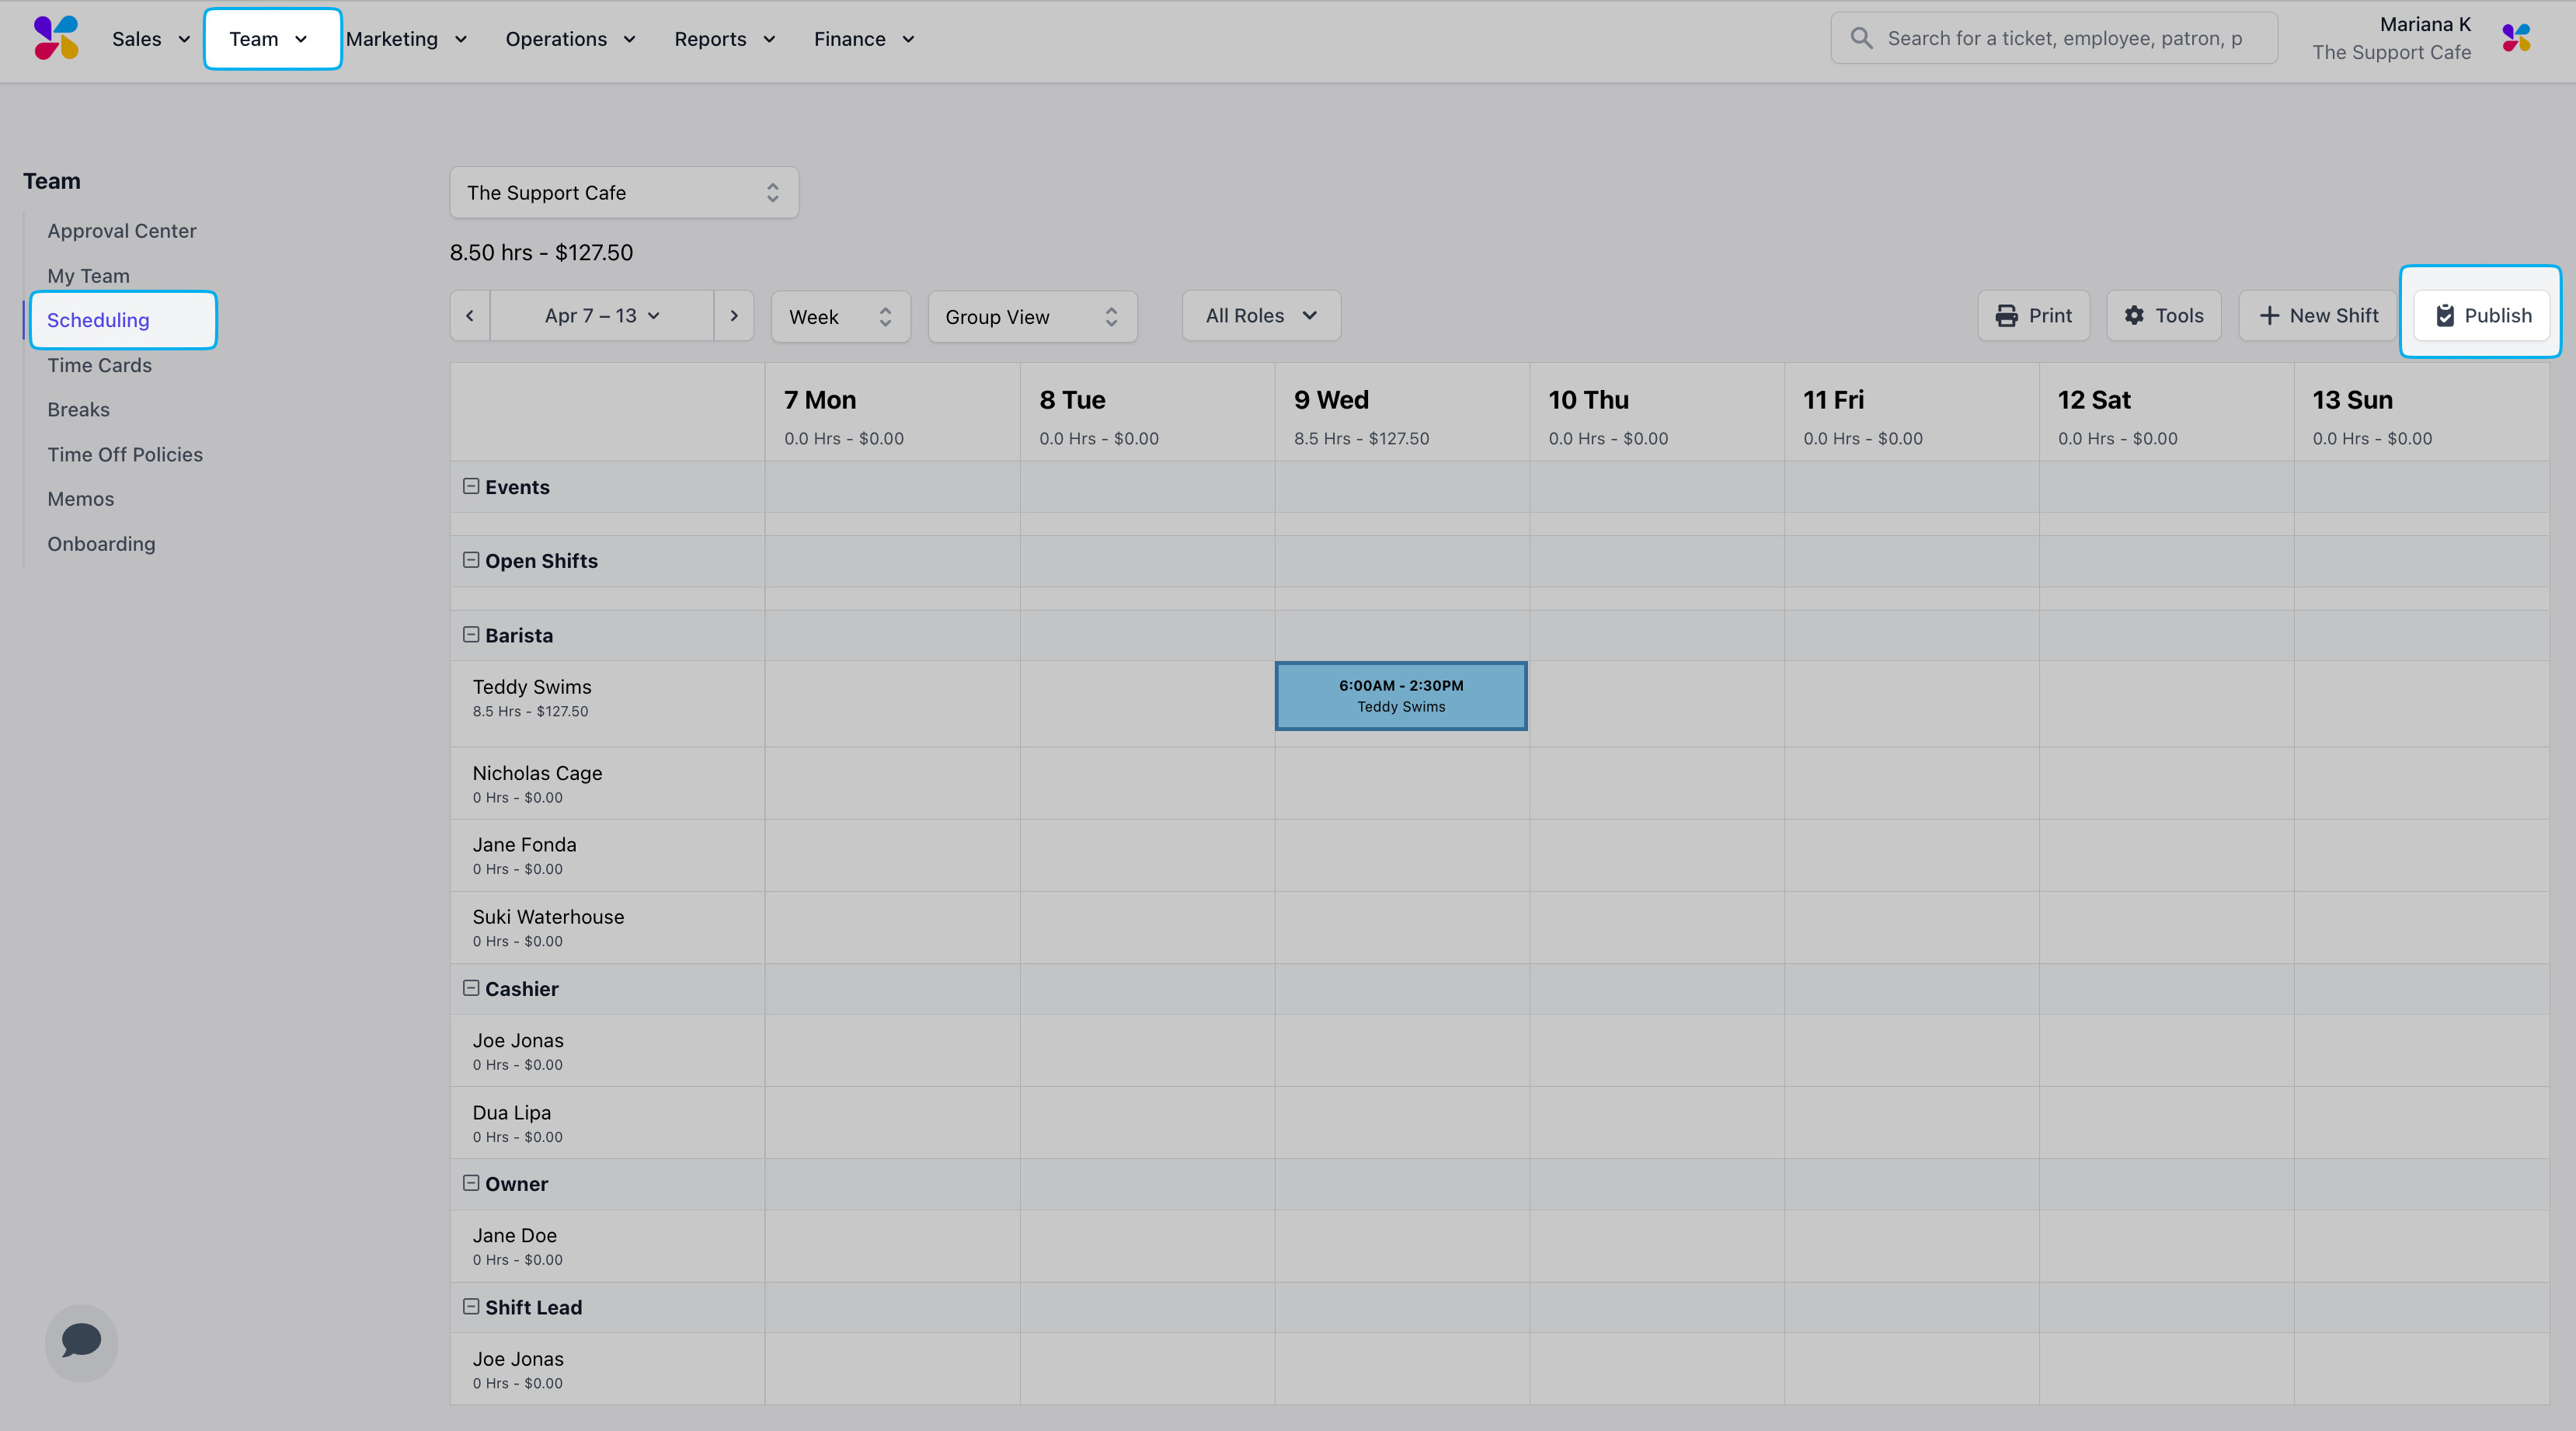
 9. To publish the shift click **Publish** > click the **Notification Settings** dropdown to select who will receive the publish notification
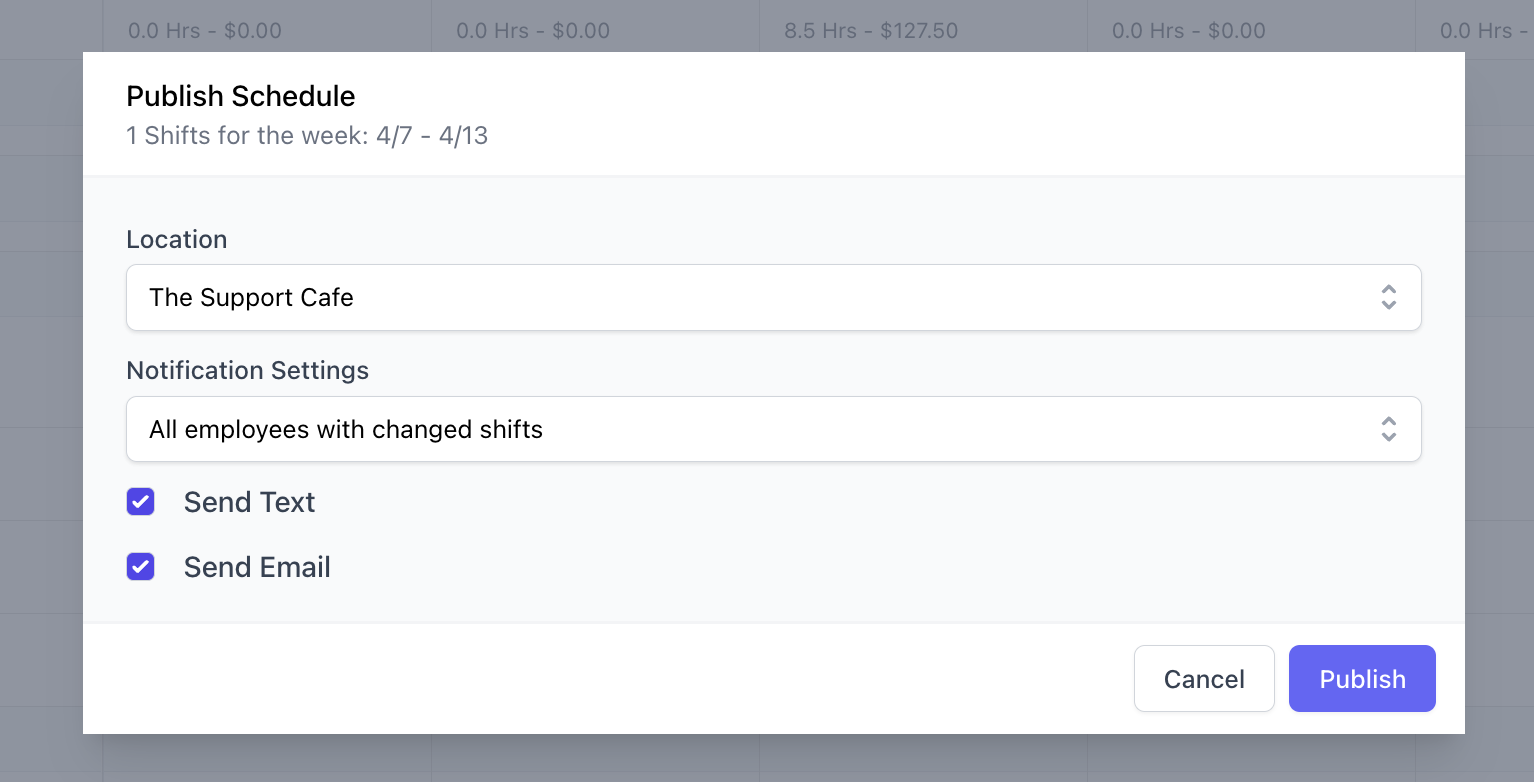
 10. Click the pre-selected **Send Text** and **Send Email** checkboxes to select how the employees will receive the publish notification > click **Publish**
 11. Once published, the shift will appear as a solid color
 1. Tap the **Schedule** icon at the bottom > tap the blue pencil icon
2. Tap **Create Shift**
3. Complete the following fields > tap **Create**
1. Employee
2. Role
3. Select multiple days to duplicate the shift
4. Start Time
5. End Time
6. Optional Notes
4. The shift will appear under the Date within All Shifts with the shift information as a draft
5. To publish the shift tap > tap **Publish Shifts**
* Tap Notification Settings to select who will receive the publish notification
* Tap the pre-selected **Email** and **Text** toggles to select how the employees will receive the publish notification > tap **Publish Shifts**
6. The published shift will appear without a red “Draft” notice
***
## Create Open Shifts
An Open Shift is a shift assigned to a role rather than a specific employee, giving eligible team members the opportunity to claim and work the shift if they choose.
1. Click Team > click Scheduling > click the white space under the Open Shifts row for a specific day
1. Tap the **Schedule** icon at the bottom > tap the blue pencil icon
2. Tap **Create Shift**
3. Complete the following fields > tap **Create**
1. Employee
2. Role
3. Select multiple days to duplicate the shift
4. Start Time
5. End Time
6. Optional Notes
4. The shift will appear under the Date within All Shifts with the shift information as a draft
5. To publish the shift tap > tap **Publish Shifts**
* Tap Notification Settings to select who will receive the publish notification
* Tap the pre-selected **Email** and **Text** toggles to select how the employees will receive the publish notification > tap **Publish Shifts**
6. The published shift will appear without a red “Draft” notice
***
## Create Open Shifts
An Open Shift is a shift assigned to a role rather than a specific employee, giving eligible team members the opportunity to claim and work the shift if they choose.
1. Click Team > click Scheduling > click the white space under the Open Shifts row for a specific day
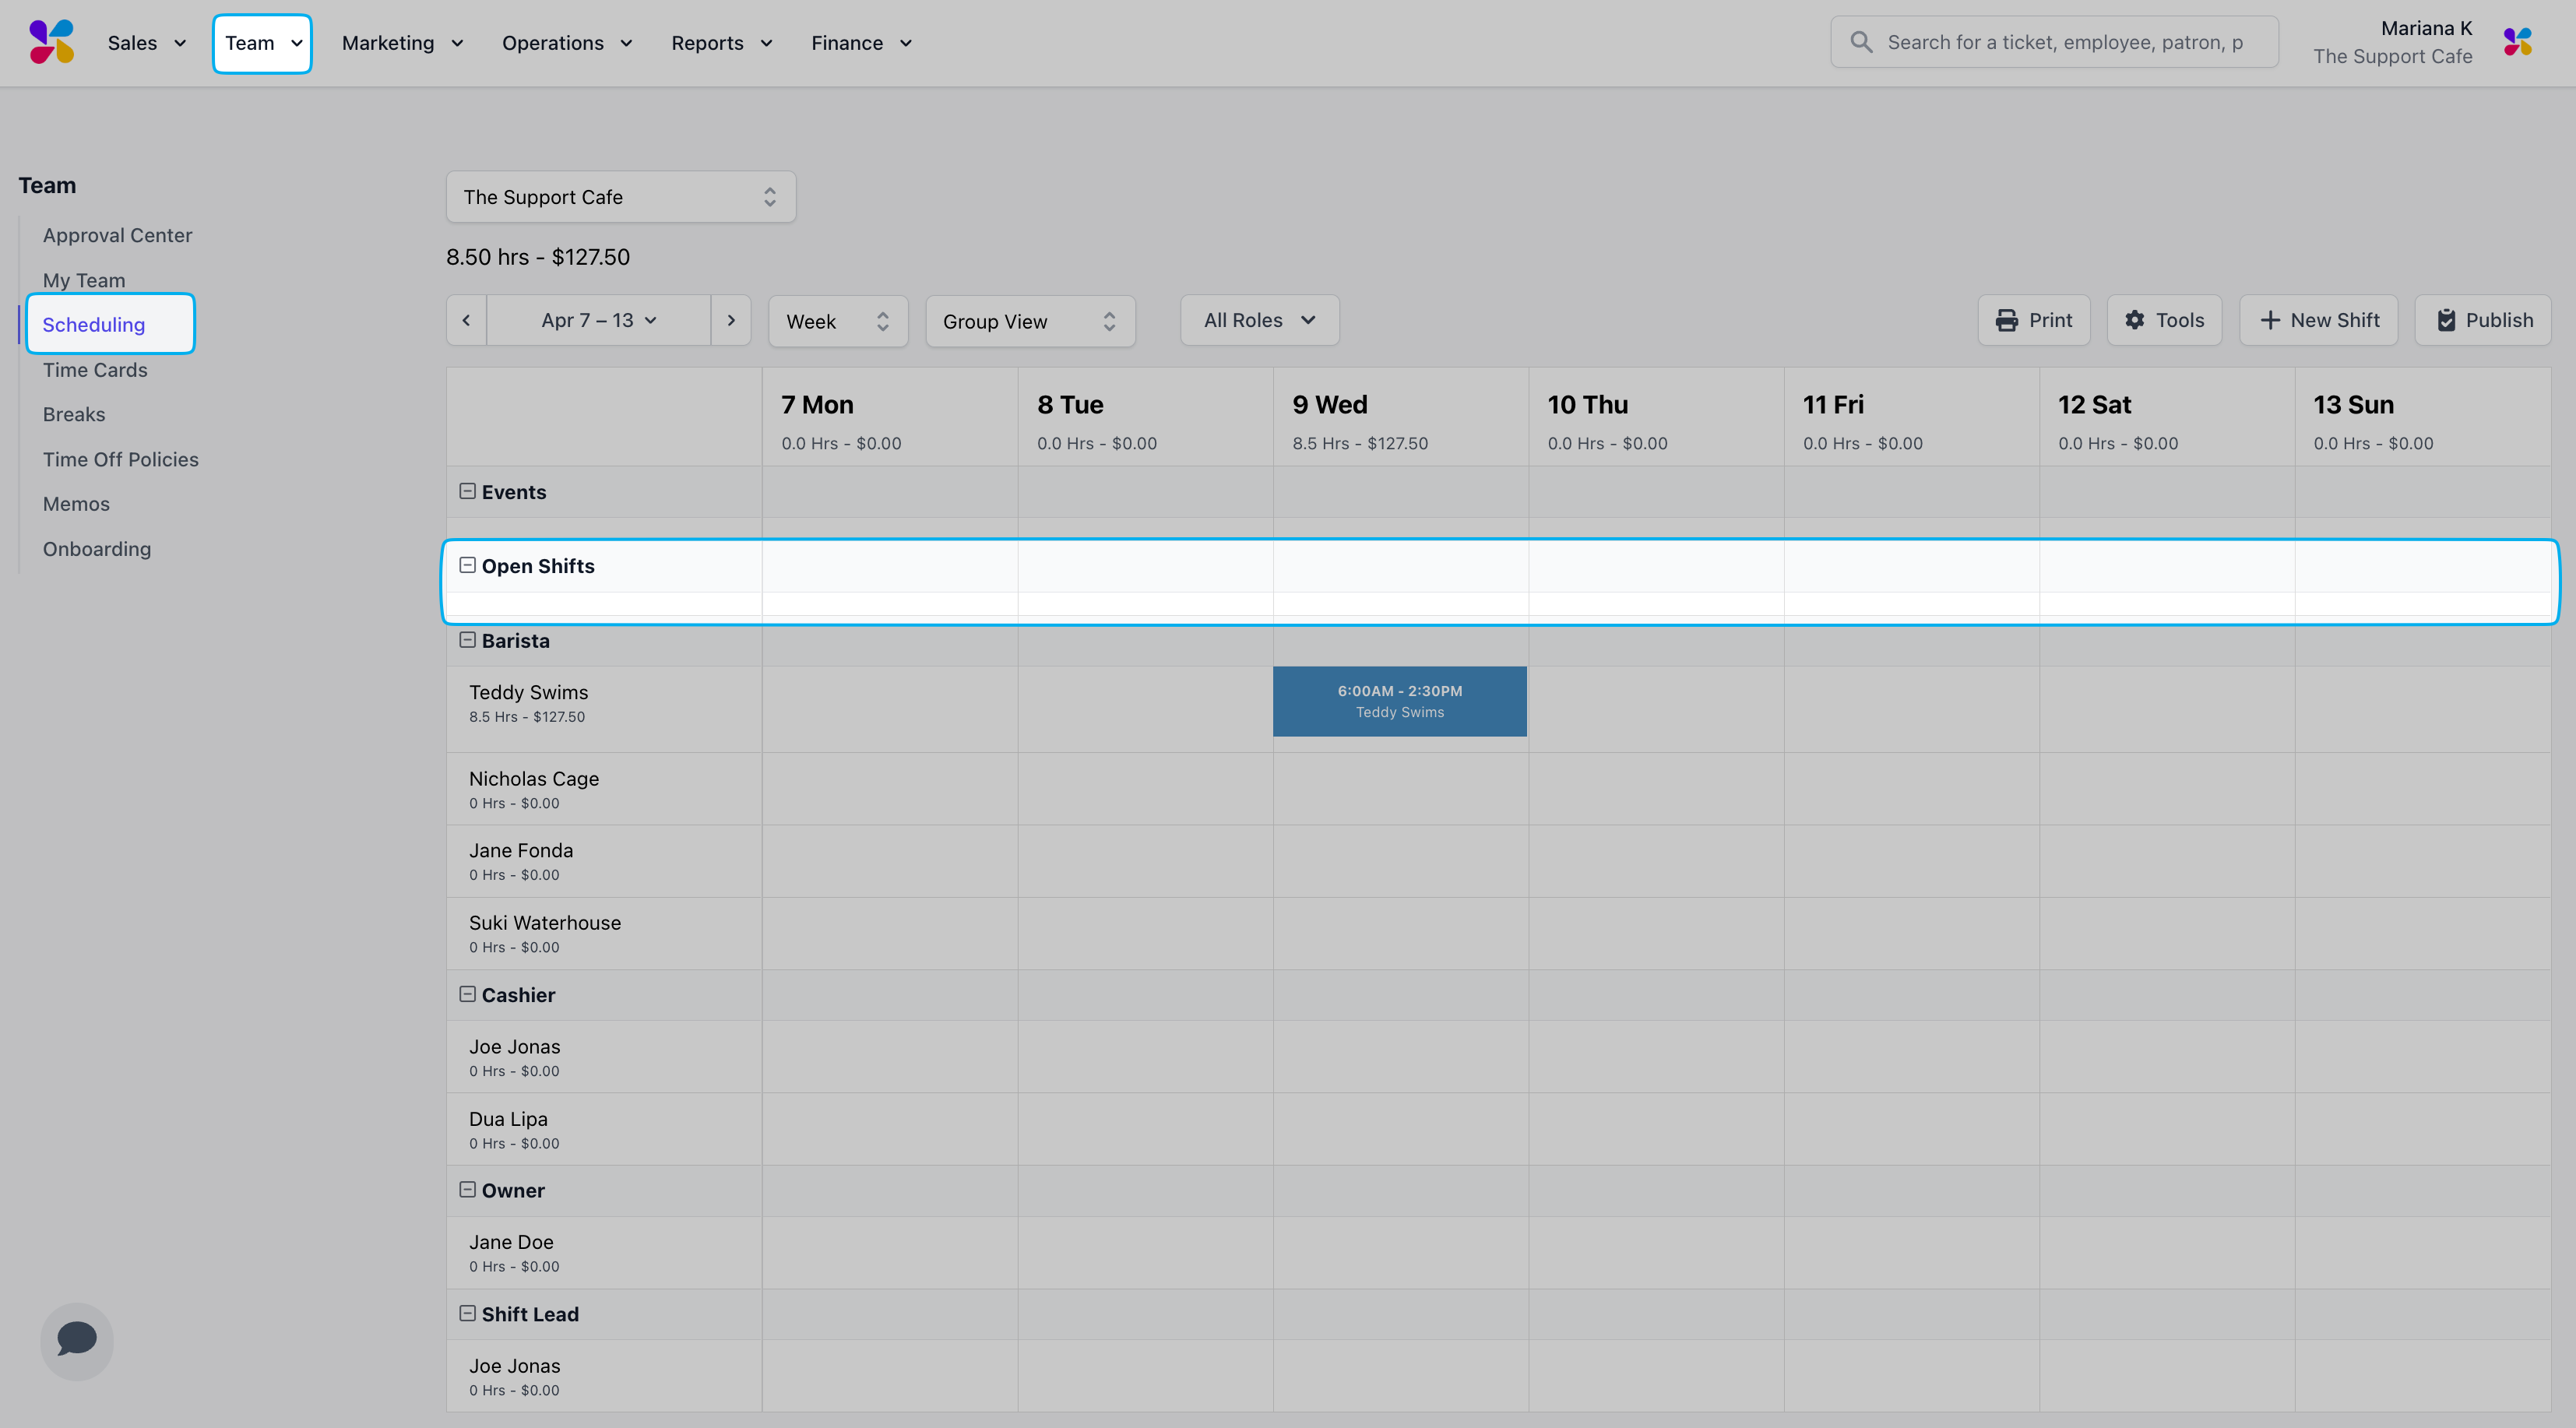 2. Within the Open Shift pop-up select a role by clicking the Role dropdown
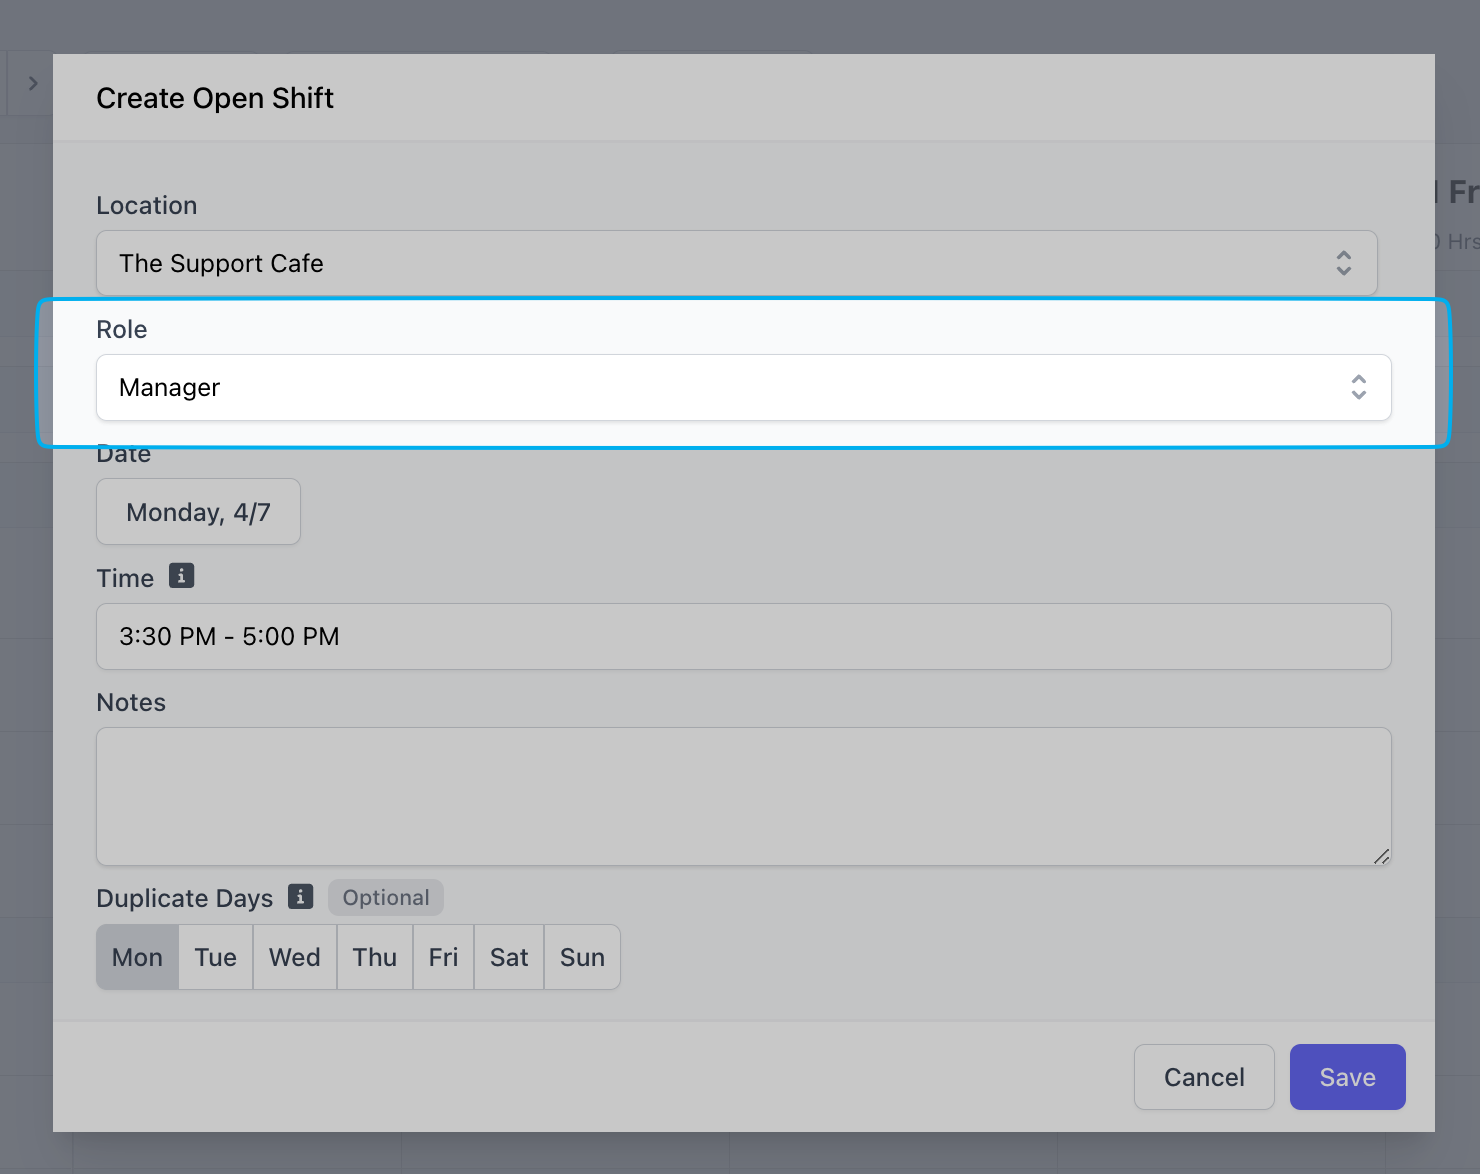 3. Complete the following fields > click **Save**:
* Date
* Time
* Optional: Notes
* Optional: Duplicate Days
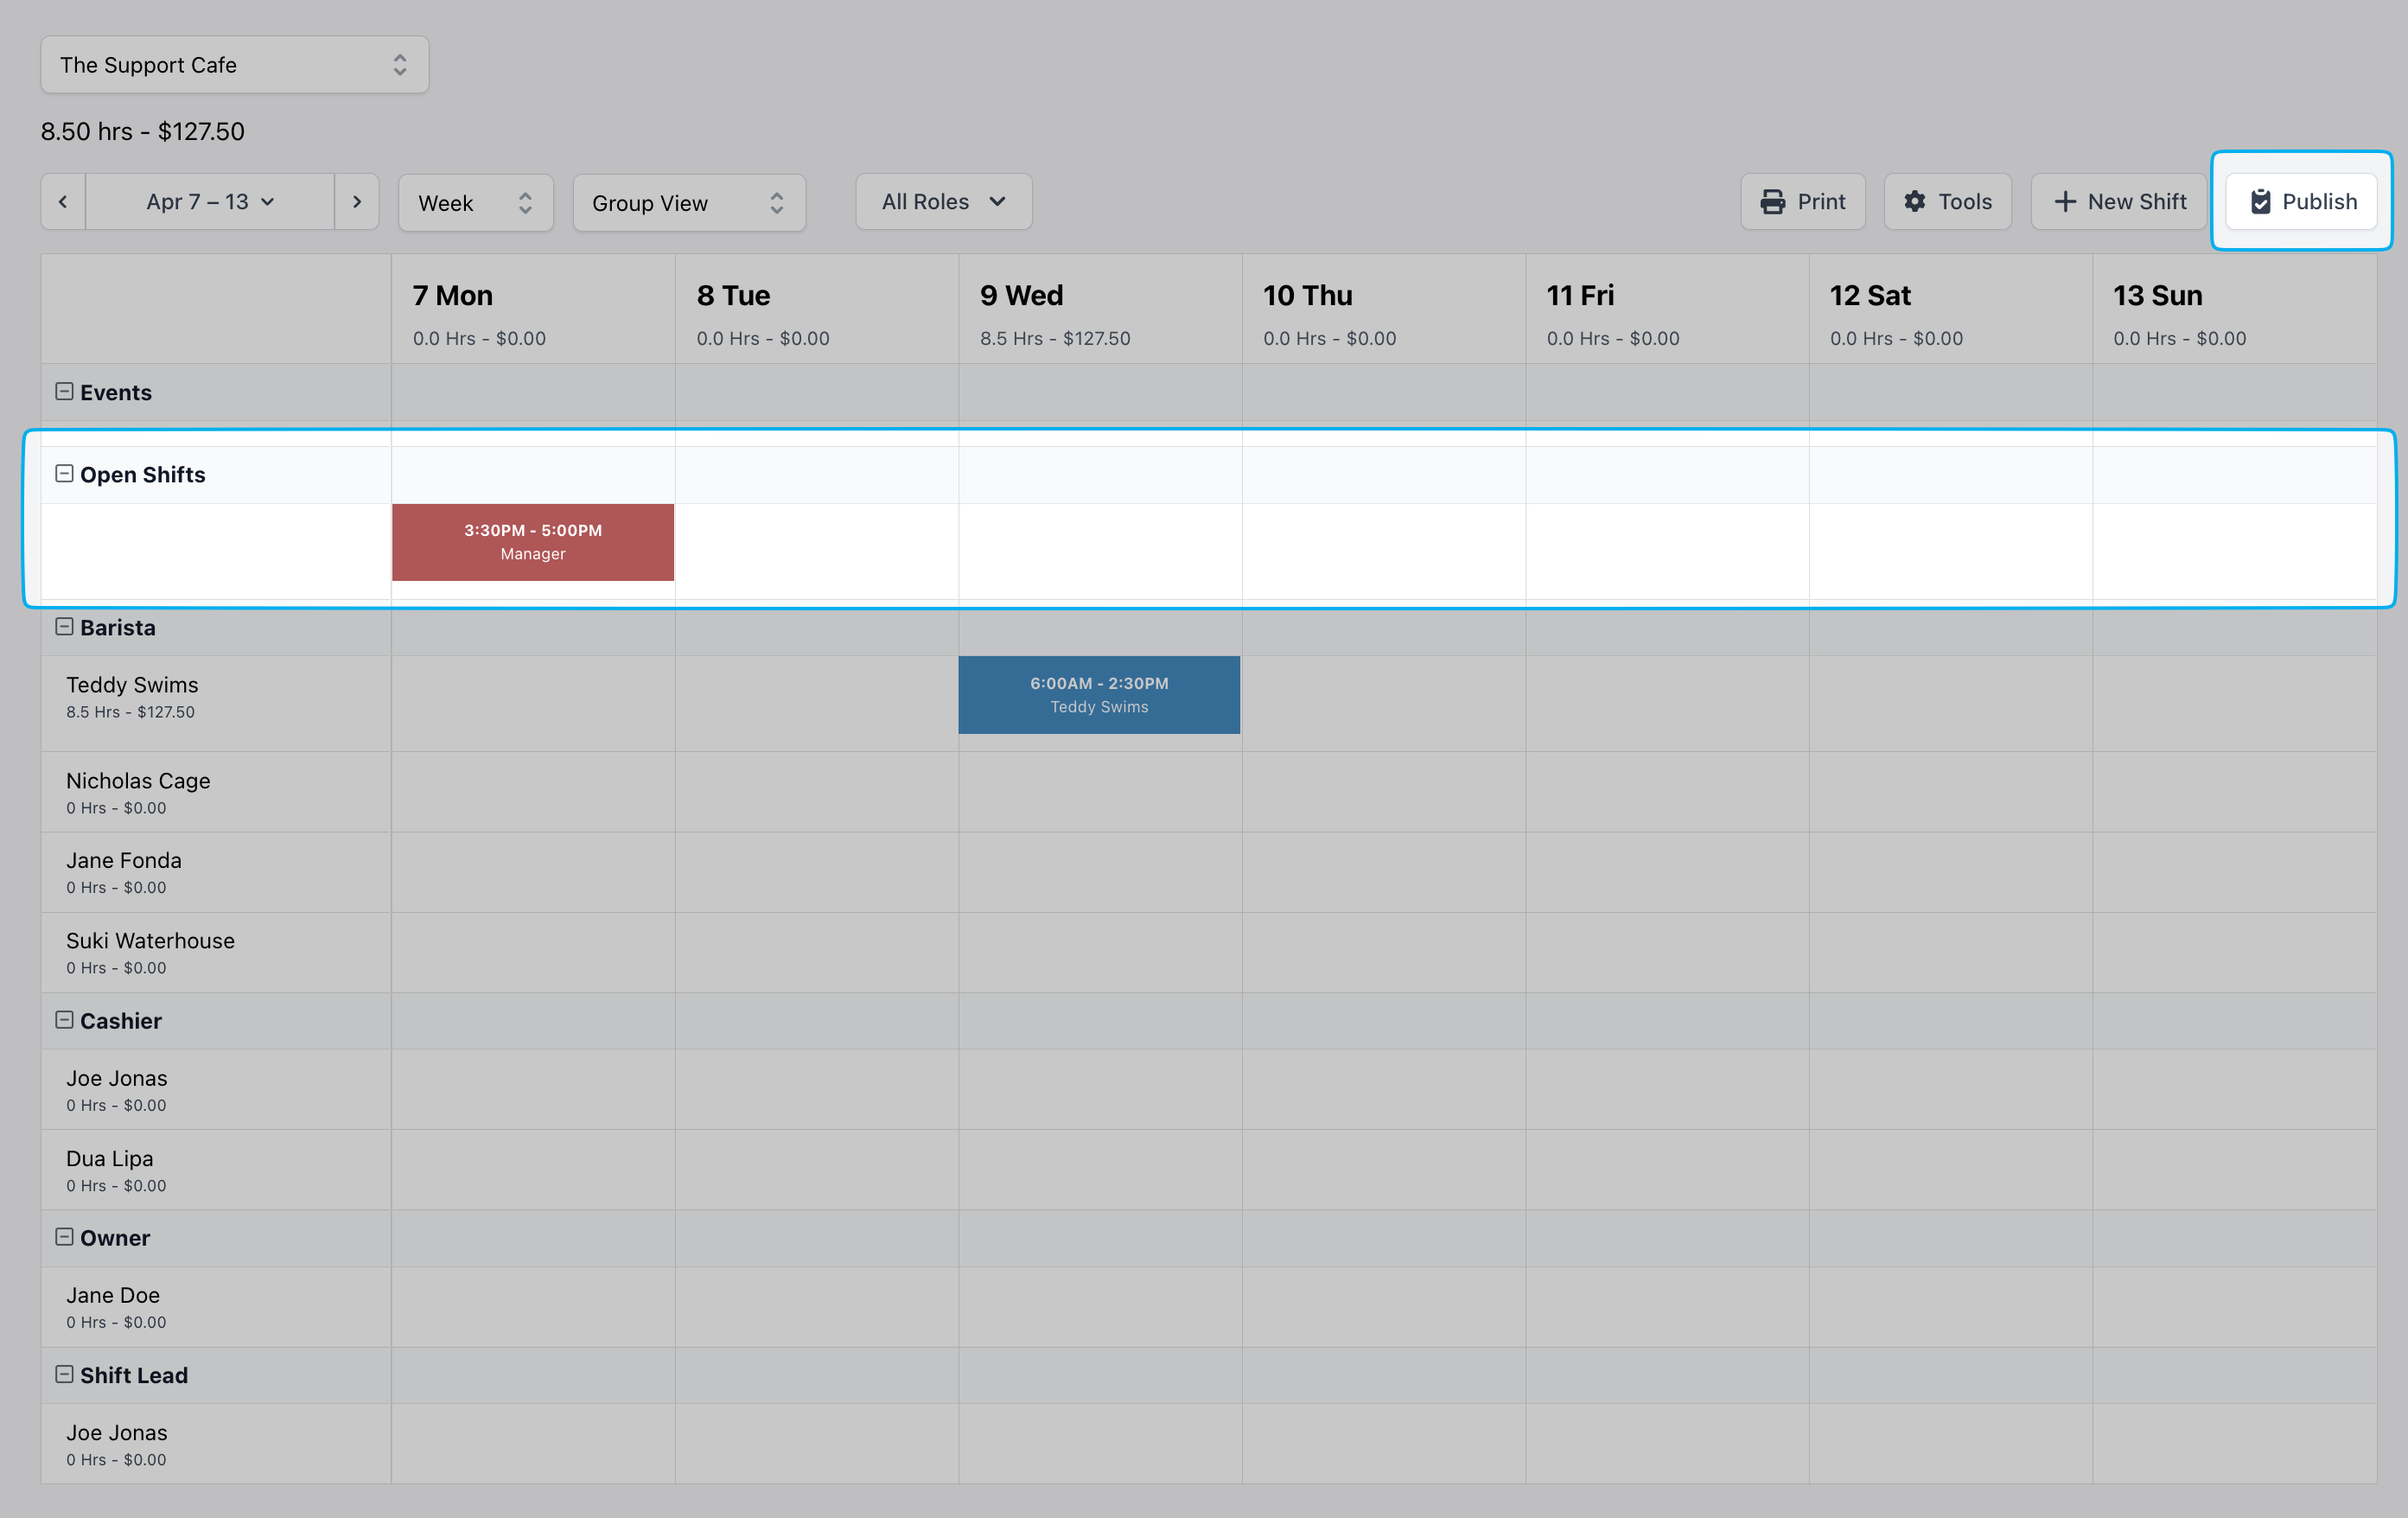
4. The open shift will appear as a draft > click **Publish**
3. Complete the following fields > click **Save**:
* Date
* Time
* Optional: Notes
* Optional: Duplicate Days
4. The open shift will appear as a draft > click **Publish**
 ### Assign an Open Shift to an Employee
1. Click on the published open shift > click the **Assign To** dropdown to select an employee assigned to the open shift’s role > click **Assign**
### Assign an Open Shift to an Employee
1. Click on the published open shift > click the **Assign To** dropdown to select an employee assigned to the open shift’s role > click **Assign**
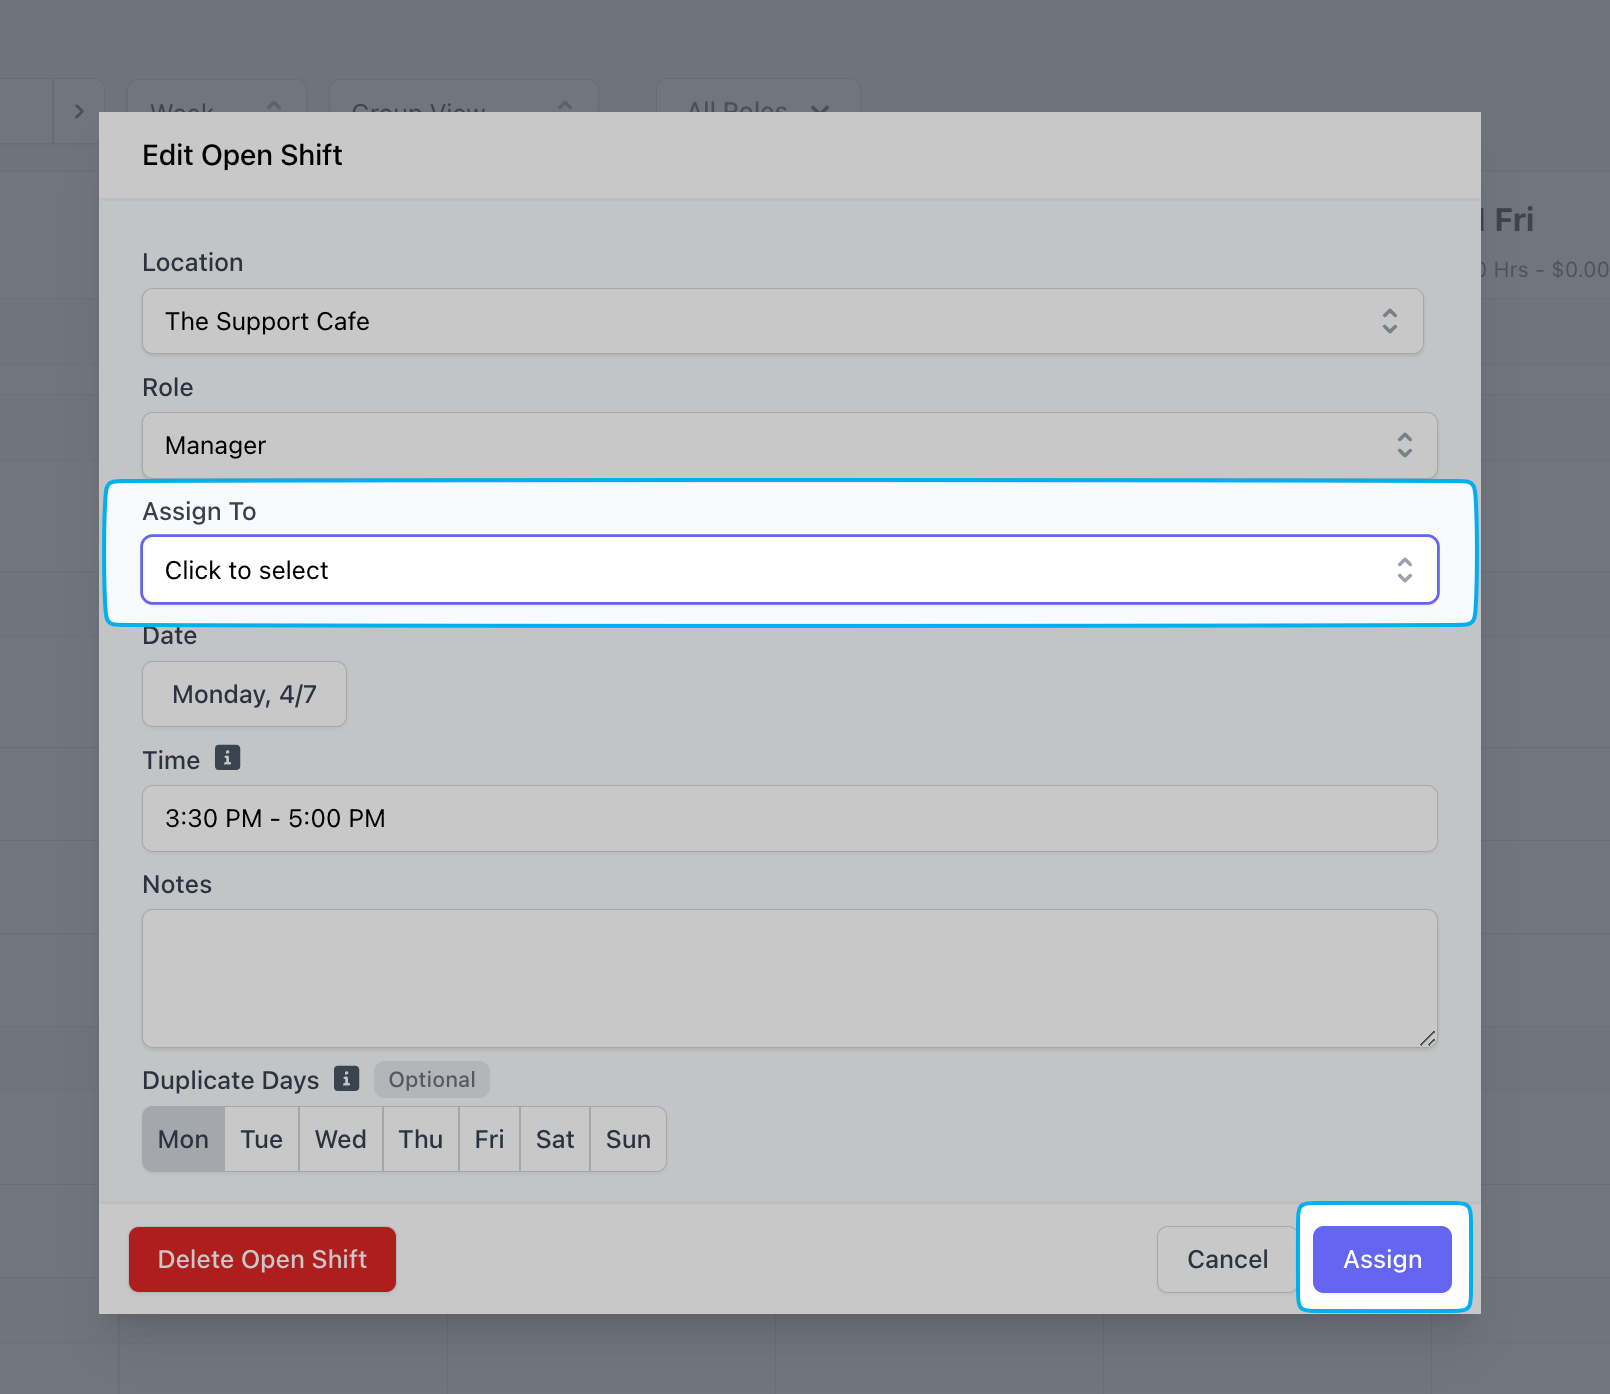 2. Once assigned, the Open Shift will move from the Open Shifts row to the assigned employee’s row as a published shift
 1. Tap the **Schedule** icon at the bottom > tap the blue pencil icon
2. Tap Create Shift
3. Complete the following fields > tap **Create**
* Role
* Select multiple days to duplicate the shift
* Start Time
* End Time
* Optional Notes
4. The shift will appear under the Date within All Shifts and Open Shifts with the shift information as a draft
5. To publish the open shift tap > tap **Publish Shifts**
* Tap Notification Settings to select who will receive the publish notification
* Tap the pre-selected **Email** and **Text** toggles to select how the employees will receive the publish notification > tap **Publish Shifts**
6. The published open shift will appear with an “Up For Grabs” notice without a red “Draft” notice and
***
## Scheduler Tools
Use the **Scheduler Tools** to customize your schedule
Click **Team** > click **Scheduling** > click **Tools**
1. Tap the **Schedule** icon at the bottom > tap the blue pencil icon
2. Tap Create Shift
3. Complete the following fields > tap **Create**
* Role
* Select multiple days to duplicate the shift
* Start Time
* End Time
* Optional Notes
4. The shift will appear under the Date within All Shifts and Open Shifts with the shift information as a draft
5. To publish the open shift tap > tap **Publish Shifts**
* Tap Notification Settings to select who will receive the publish notification
* Tap the pre-selected **Email** and **Text** toggles to select how the employees will receive the publish notification > tap **Publish Shifts**
6. The published open shift will appear with an “Up For Grabs” notice without a red “Draft” notice and
***
## Scheduler Tools
Use the **Scheduler Tools** to customize your schedule
Click **Team** > click **Scheduling** > click **Tools**
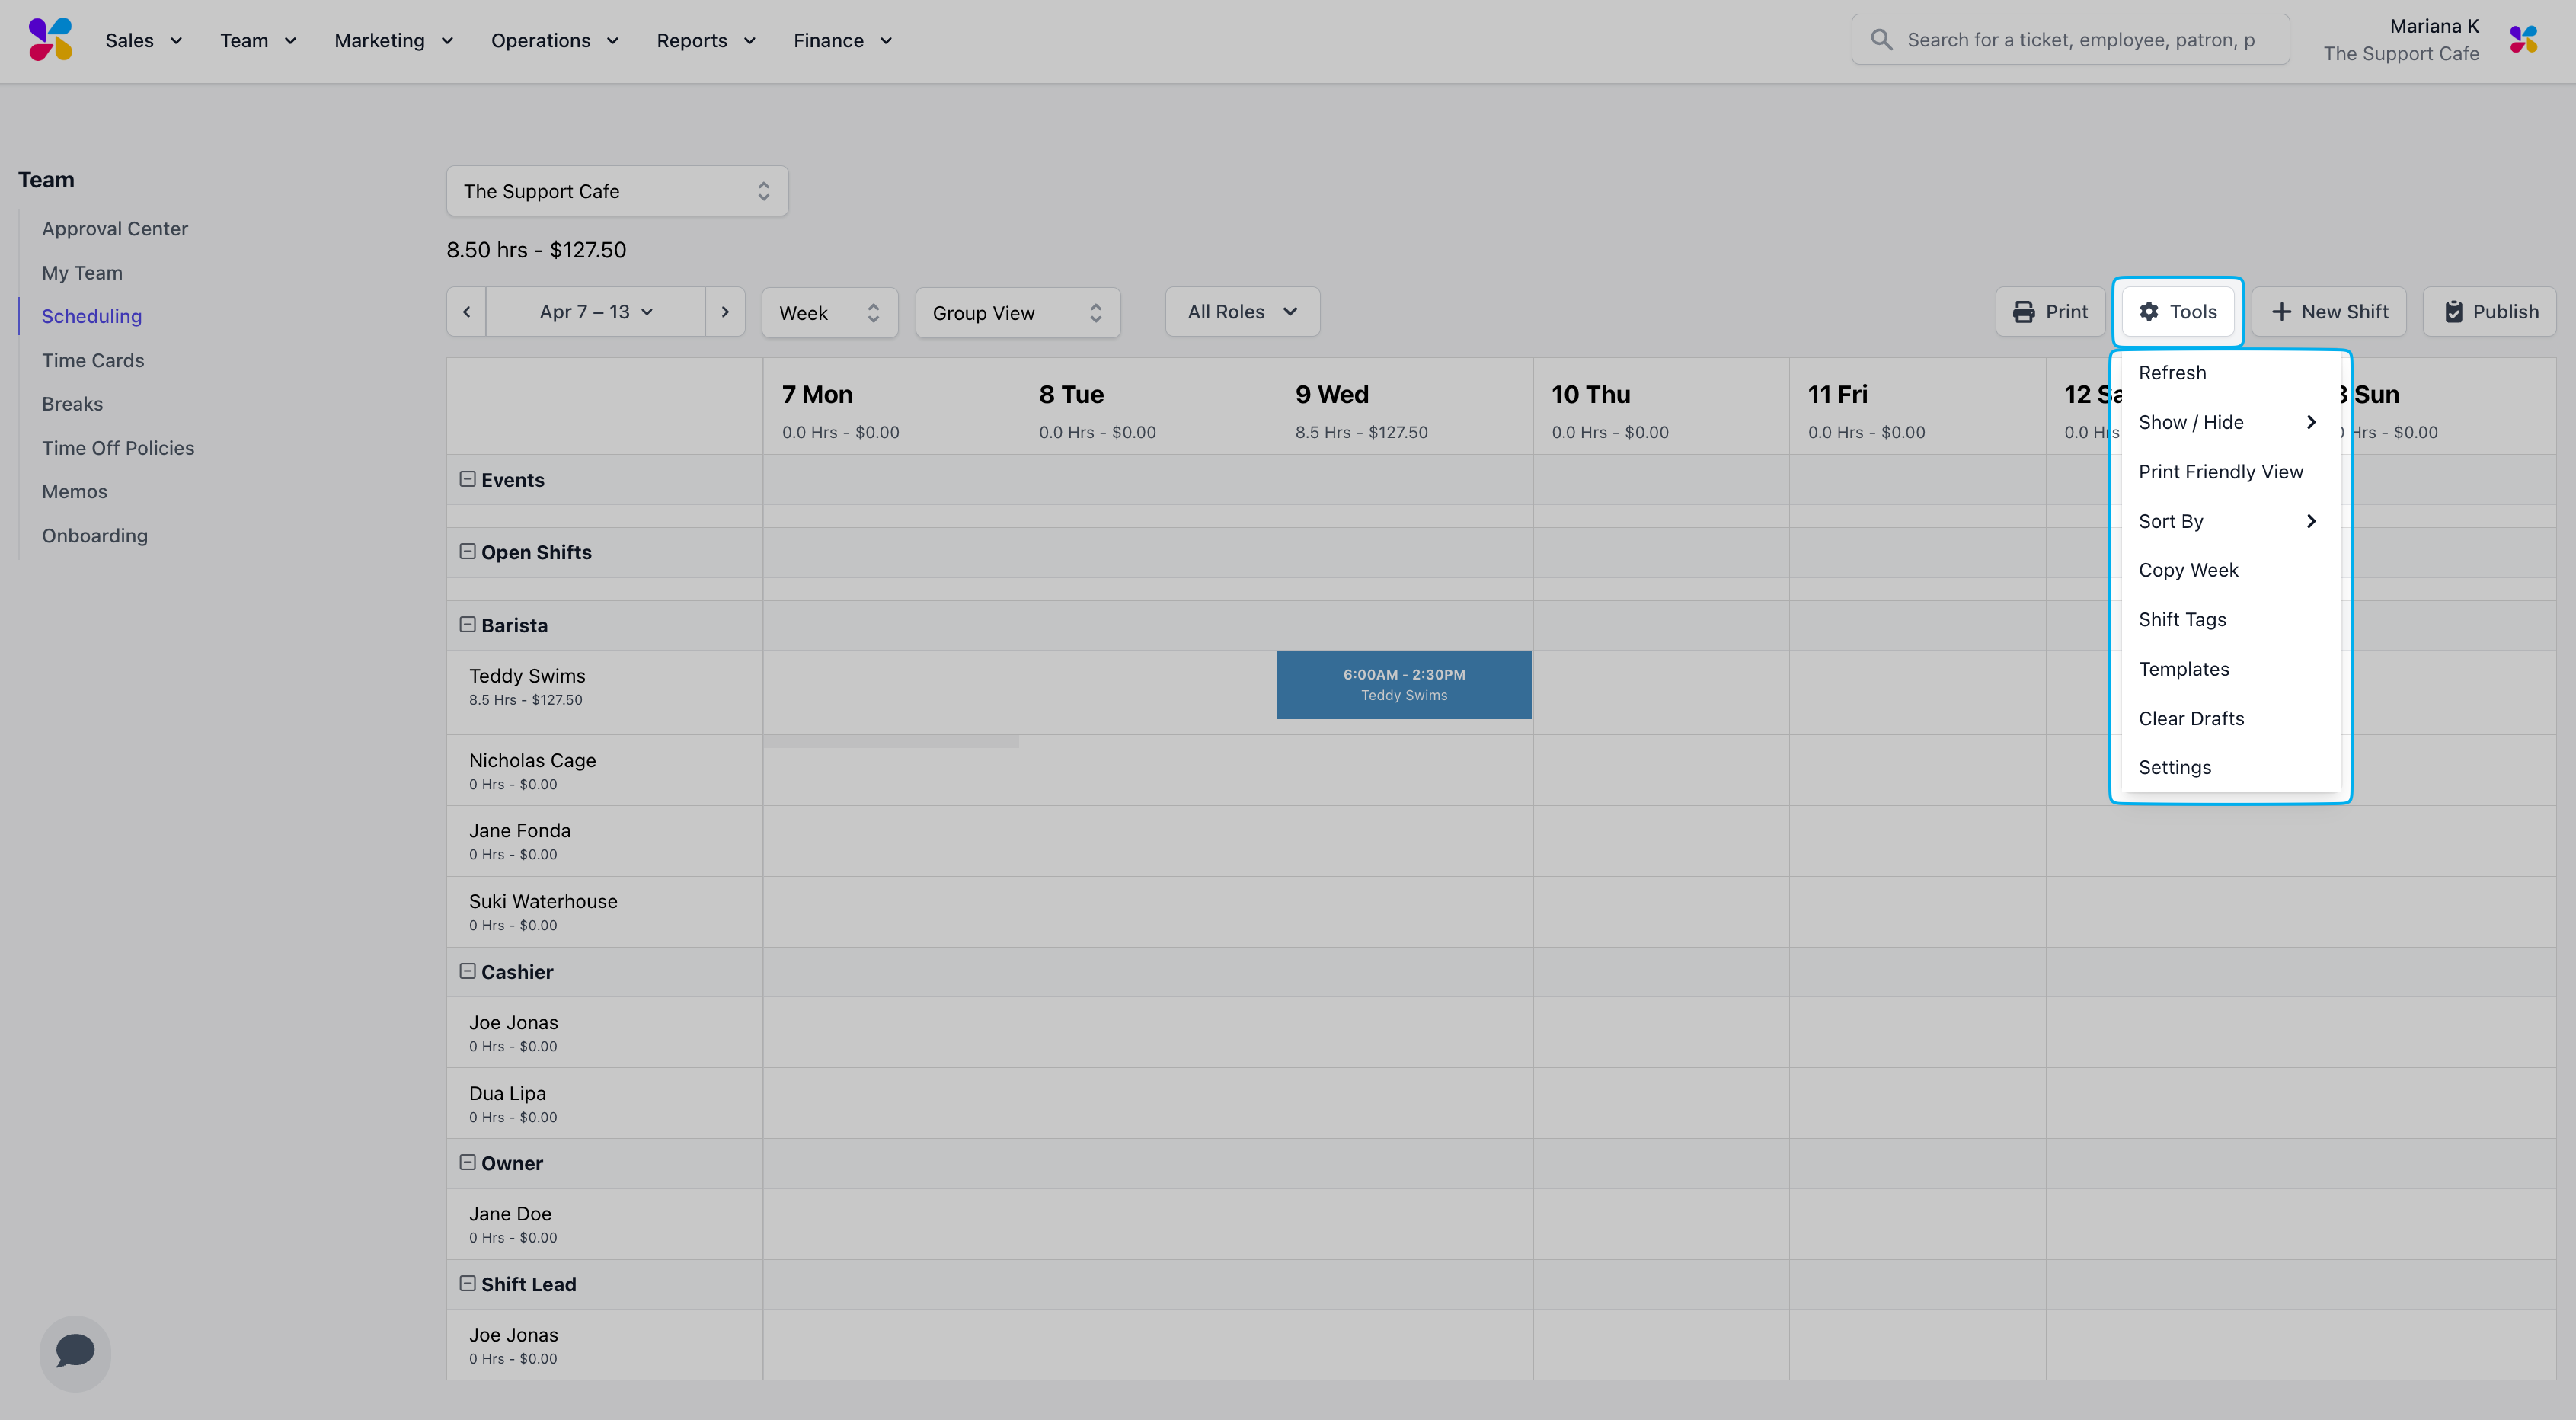 Reloads the schedule to display any changes not yet displayed
1. Show Scheduled Only: Removes employees without shifts during the time frame from the schedule display
2. Hide Preferences: Removes employees’ shift preferences and unavailability from the schedule display
3. Hide Labor Cost: Removes the hours scheduled and associated pay from the employee column and day header rows
Hides all of the display options listed in “Show / Hide” for an easy to read schedule view
Reloads the schedule to display any changes not yet displayed
1. Show Scheduled Only: Removes employees without shifts during the time frame from the schedule display
2. Hide Preferences: Removes employees’ shift preferences and unavailability from the schedule display
3. Hide Labor Cost: Removes the hours scheduled and associated pay from the employee column and day header rows
Hides all of the display options listed in “Show / Hide” for an easy to read schedule view
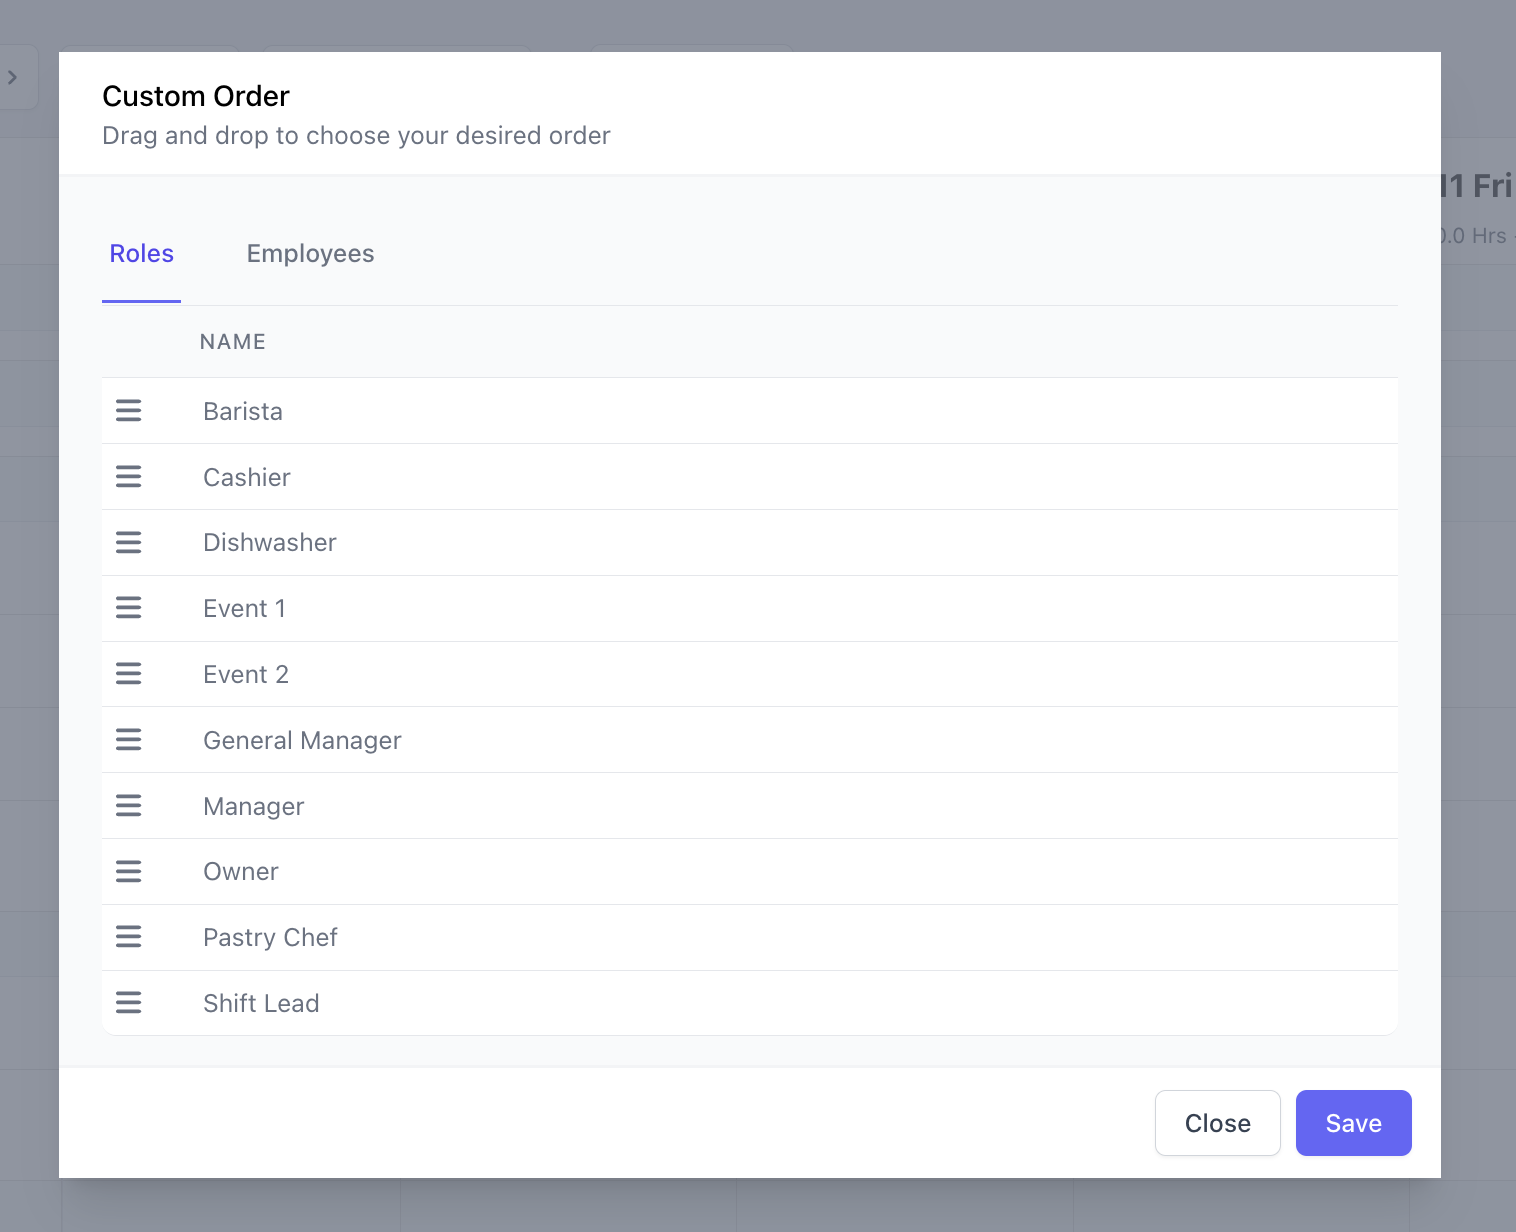
 1. First Name: Displays employees alphabetically by first name
2. Last Name: Displays employees alphabetically by last name
3. Custom: Displays roles and employees by a custom order
Drag and drop each line's tribar to rearrange the order
1. First Name: Displays employees alphabetically by first name
2. Last Name: Displays employees alphabetically by last name
3. Custom: Displays roles and employees by a custom order
Drag and drop each line's tribar to rearrange the order
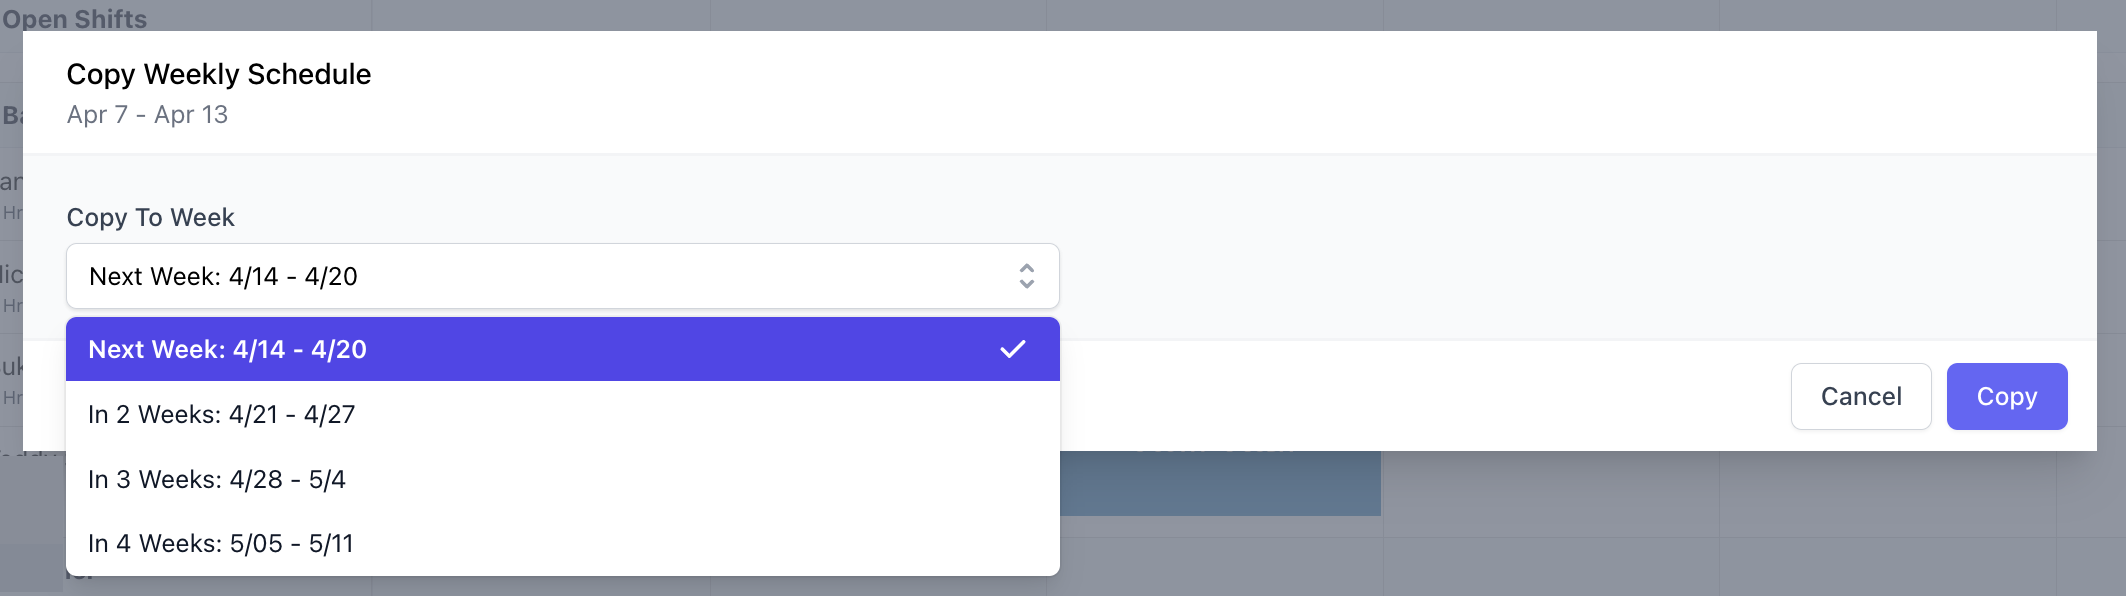
 Duplicates the displayed schedule’s shifts to the following week(s)
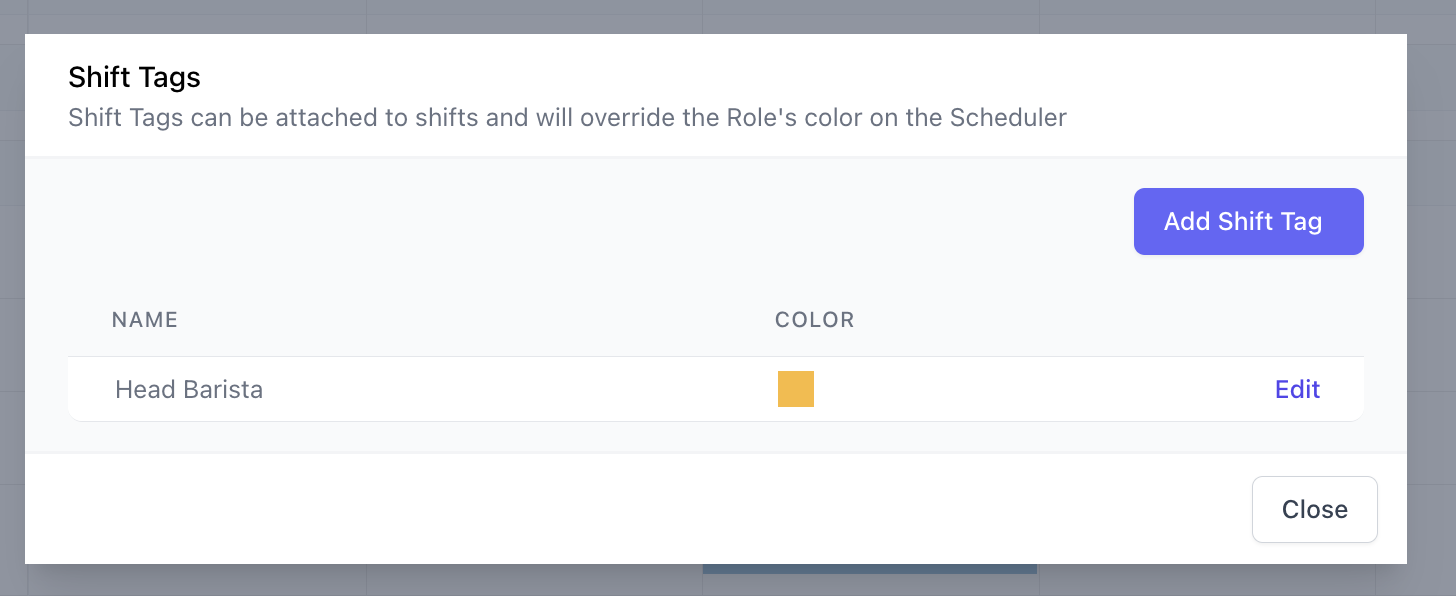
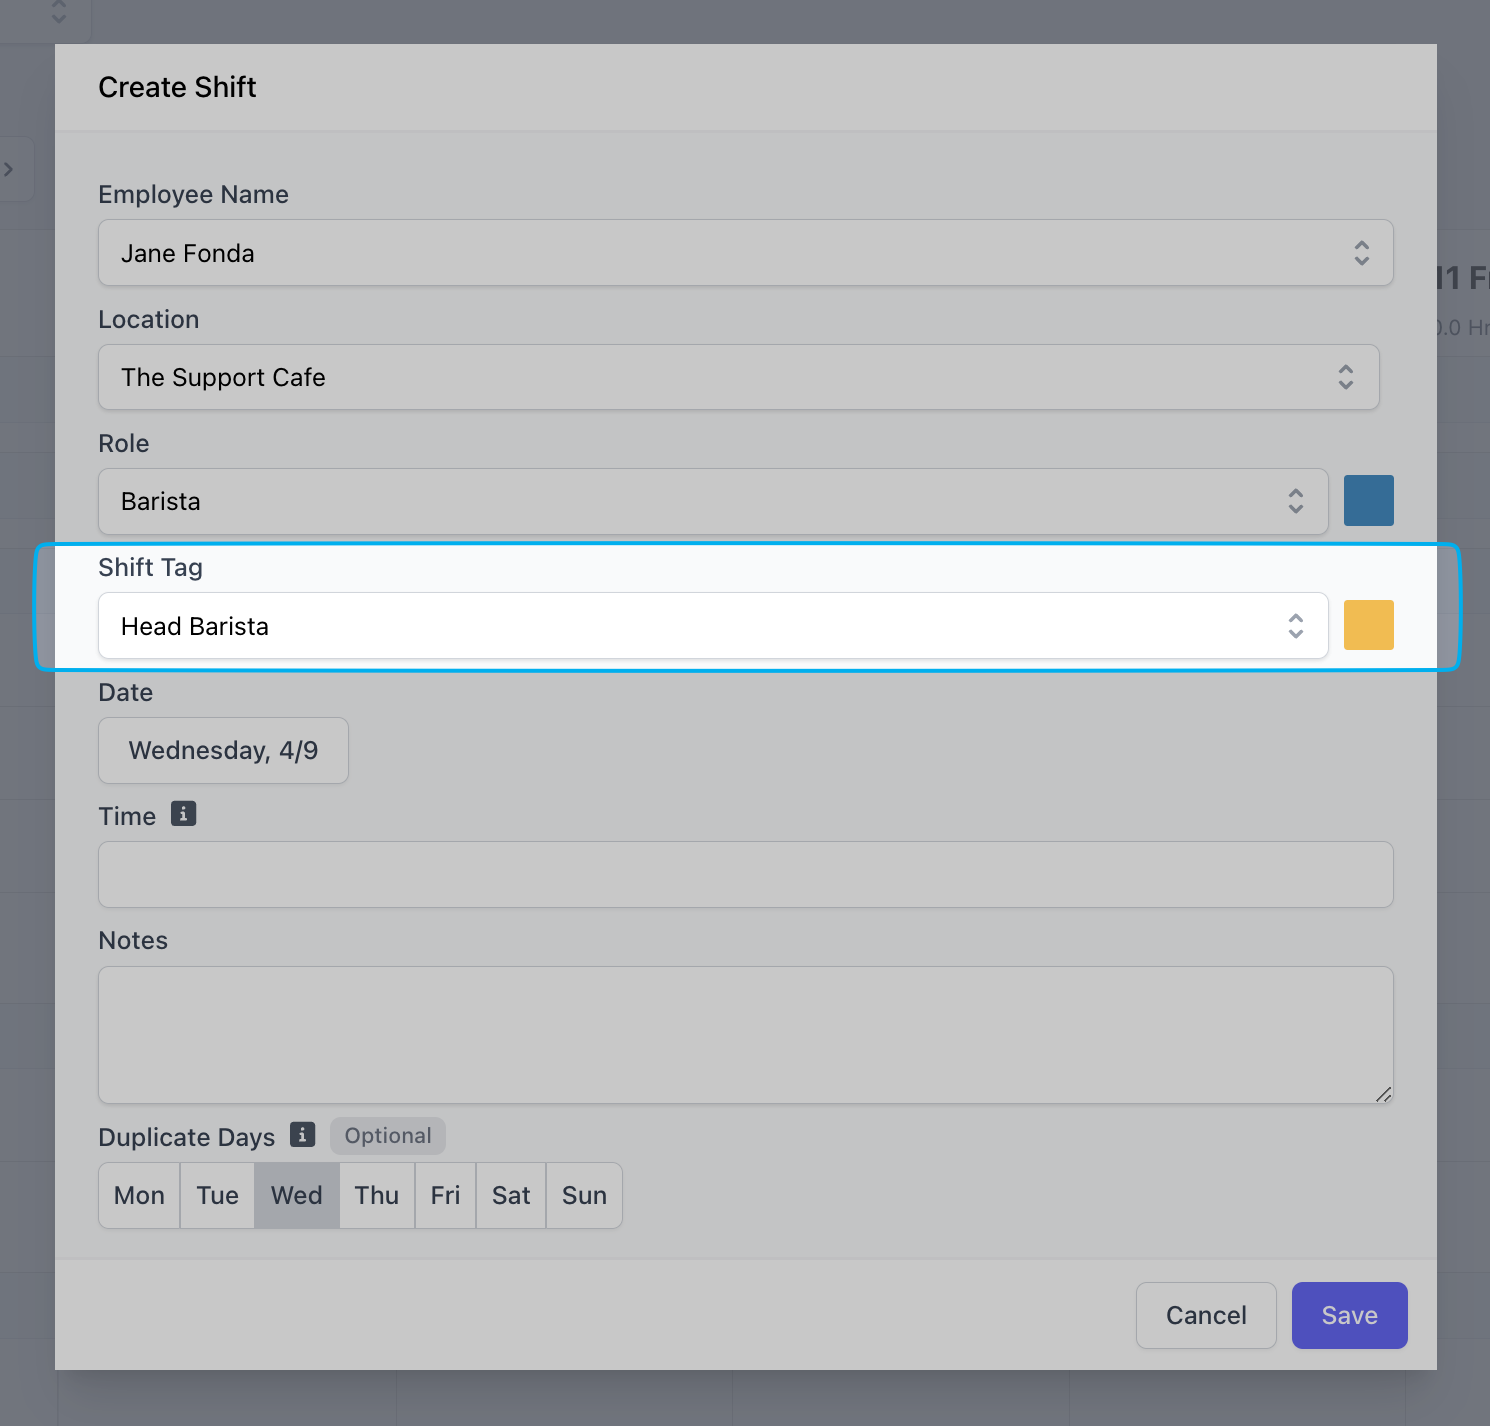
 Creates a tag to differentiate a shift from others based on your team’s needs by color
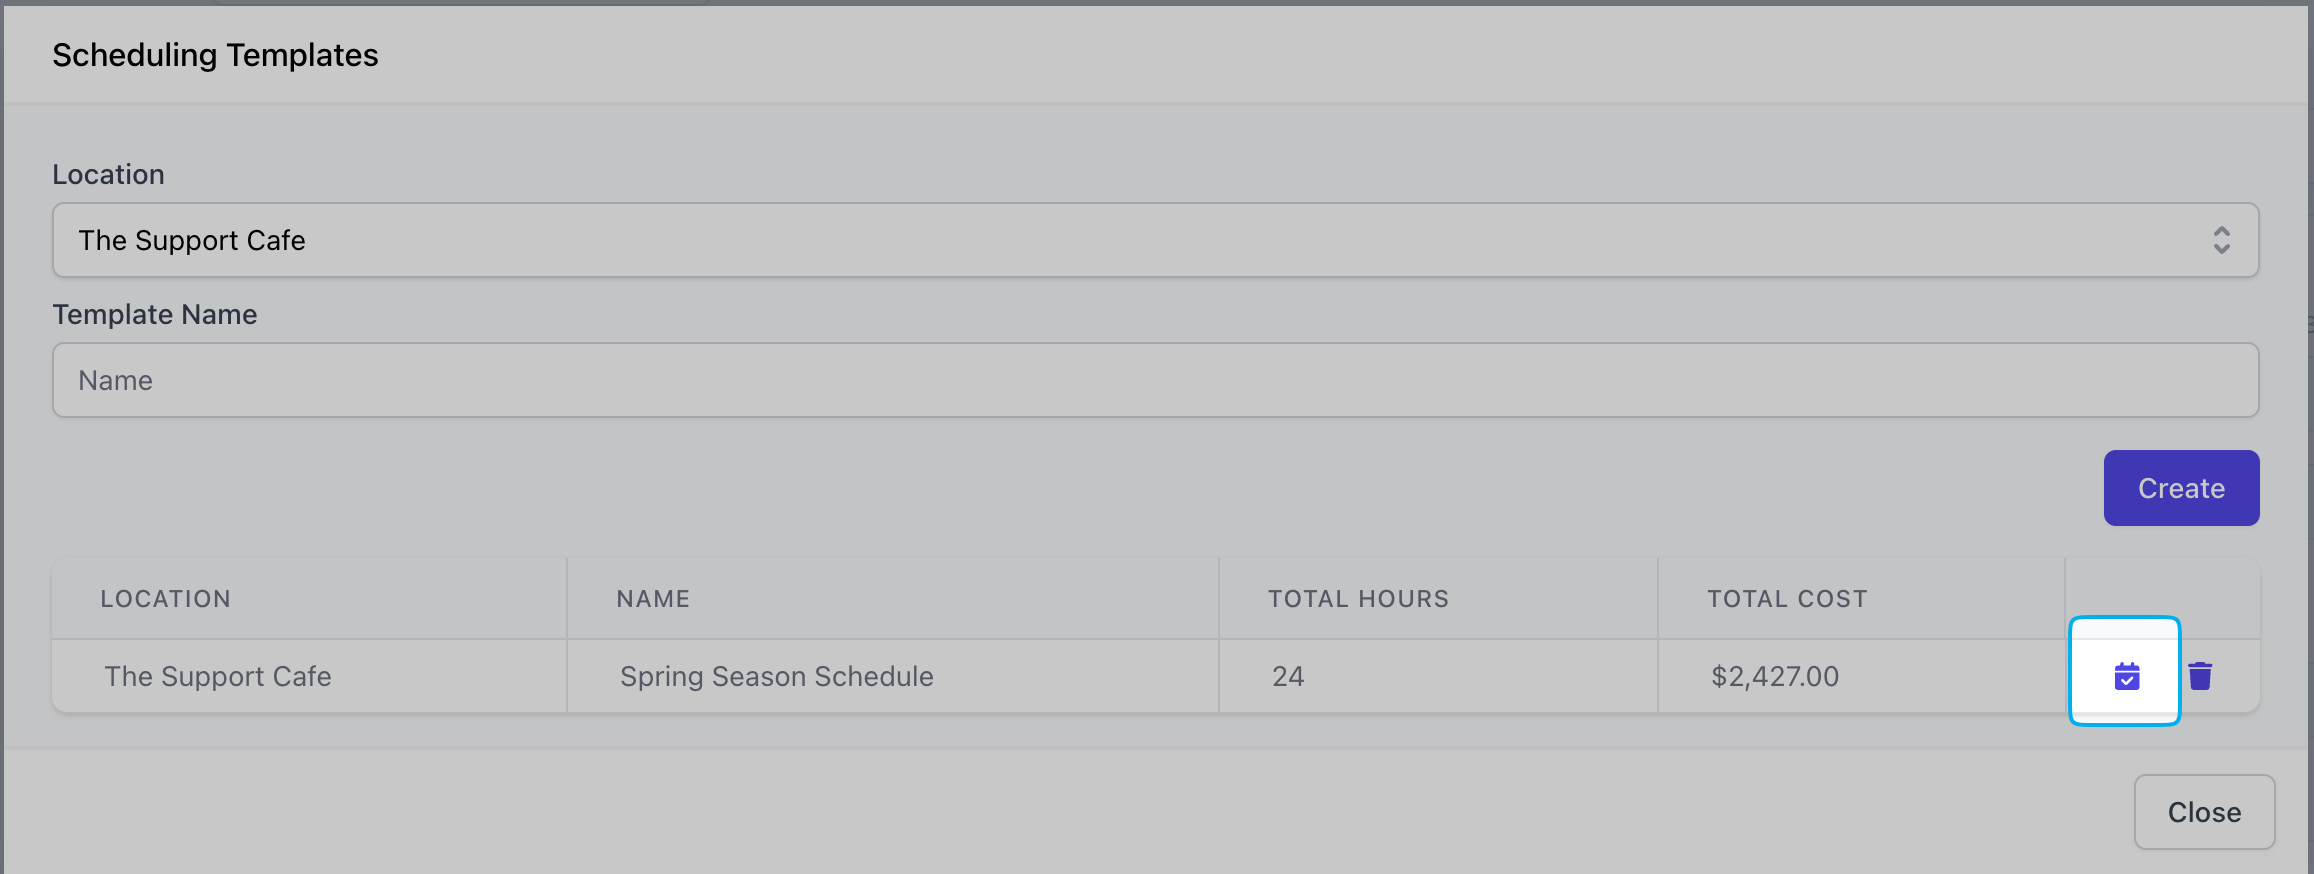
 Creates the displayed schedule as a template to apply to future weeks when needed.
Click the calendar icon to add the shifts attached to the template to the current week displayed
Creates the displayed schedule as a template to apply to future weeks when needed.
Click the calendar icon to add the shifts attached to the template to the current week displayed
 Removes any drafted shifts from the schedule display
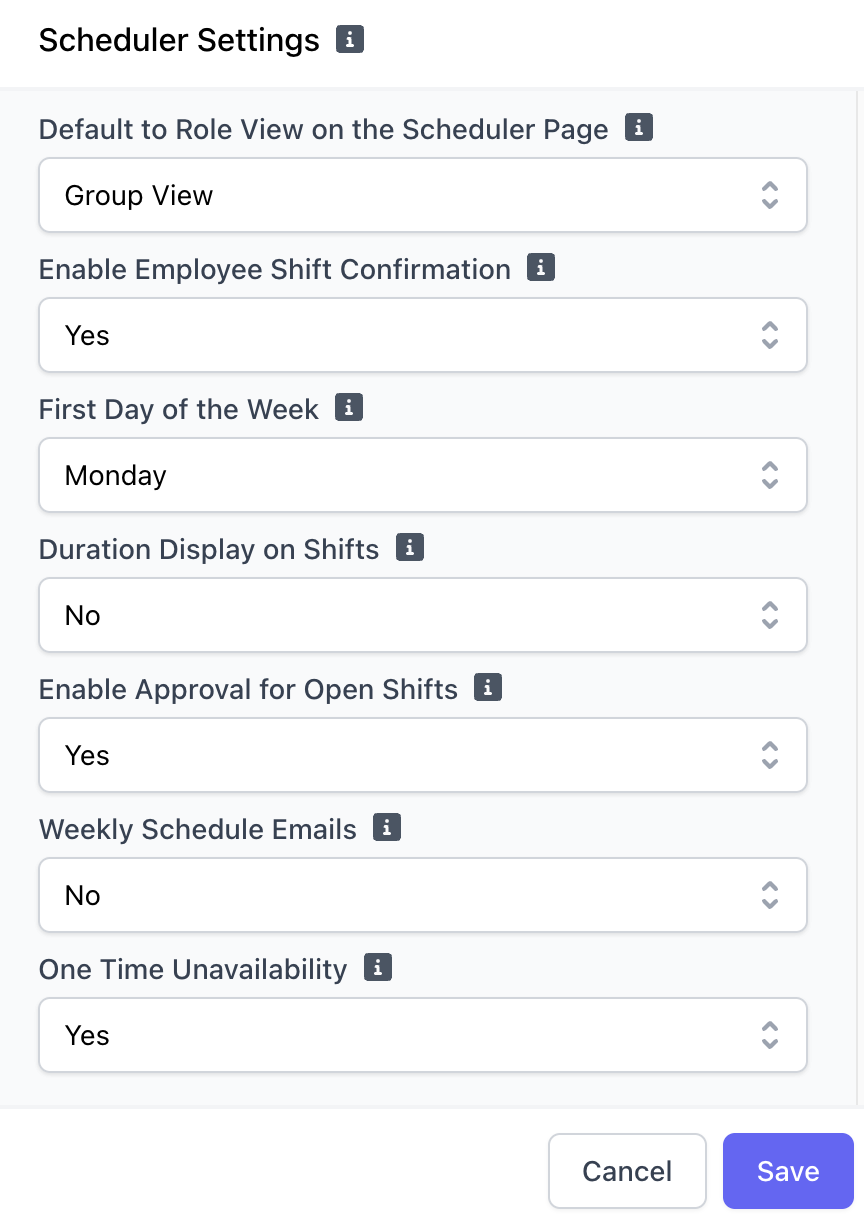 > **Default to Role View on the Scheduler Page**: Toggle to change how employees and roles will display upon clicking Scheduling
> **Enable Employee Shift Confirmation**: Toggle to allow employees to acknowledge newly published shifts via the Hub App for shift confirmation
> **First Day of the Week**: The day that appears as the first day of the week on the scheduler
> **Duration Display on Shifts**: Toggle to display the length of a shift in hours on the shift block
> **Enable Approval for Open Shifts**: Toggle to require manager approval when employees claim Open Shifts
> **Weekly Schedule Emails**: If enabled, employees will be sent a recurring weekly schedule email with upcoming shifts and open shifts
> **One Time Unavailability**: - If enabled, employees will be able to create unavailability and shift preferences for a specific date
> Unavailability and Shift Preferences are separate from Time Off Requests
> **Default to Role View on the Scheduler Page**: Toggle to change how employees and roles will display upon clicking Scheduling
> **Enable Employee Shift Confirmation**: Toggle to allow employees to acknowledge newly published shifts via the Hub App for shift confirmation
> **First Day of the Week**: The day that appears as the first day of the week on the scheduler
> **Duration Display on Shifts**: Toggle to display the length of a shift in hours on the shift block
> **Enable Approval for Open Shifts**: Toggle to require manager approval when employees claim Open Shifts
> **Weekly Schedule Emails**: If enabled, employees will be sent a recurring weekly schedule email with upcoming shifts and open shifts
> **One Time Unavailability**: - If enabled, employees will be able to create unavailability and shift preferences for a specific date
> Unavailability and Shift Preferences are separate from Time Off Requests