Click the settings icon > click Settings > click Scheduler:
Scheduler Settings
Enable Shift Confirmation
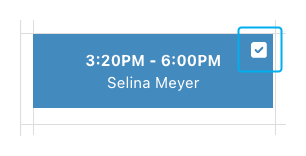
Toggle to allow employees to acknowledge newly published shifts via the Hub App for shift confirmation.When enabled, employees will receive a confirmation prompt when new shifts are published and will need to acknowledge these shifts. Acknowledged shifts will appear on the scheduler with a checkmark.
Set Default Scheduler View
Toggle to change how employees and roles will display upon clicking Scheduling
Start Week On
The day that appears as the first day of the week on the scheduler
Display Duration on Shiftstle
Toggle to display the length of a shift in hours on the shift block
Require Approval to Claim Open Shifts
Toggle to require manager approval when employees claim Open Shifts
Enable Weekly Schedule Emails
If enabled, employees will be sent a recurring weekly schedule email with upcoming shifts and open shifts
Enable One Time Unavailability
If enabled, employees will be able to create unavailability and shift preferences for a specific date
Unavailability and Shift Preferences are separate from Time Off Requests
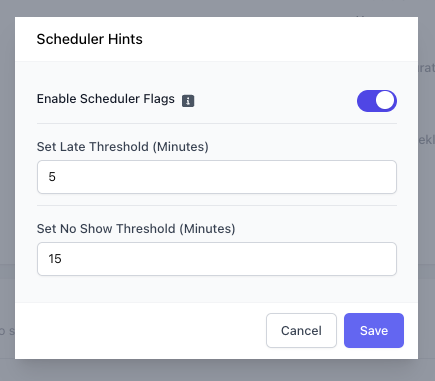
Scheduler HintsGain insights into recently completed shifts using Scheduler Hints to schedule employees more efficiently.
Enable Scheduler Flags: If enabled, scheduler shifts will display flags for late clock-ins and no shows.
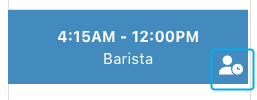
Hover over the icon in the bottom right corner of the scheduler event to see those flags.
Set Late Threshold
The time at which the employee’s scheduled shift will be marked as a late clock-in
Denoted with a clock icon
Set No Show Threshold
The time at which the employee’s scheduled shift will be marked as a no-show