Order System
Checkout Flow
- Overview
- Checkout Basics
- Saved Tickets
- Barcodes
- Checkout Management
Transactions
Kitchen Display System
Mobile Ordering
Third Party Ordering
Kitchen Display System Overview
Manage orders in real time with the Kitchen Display System
What is a Kitchen Display System (KDS)?
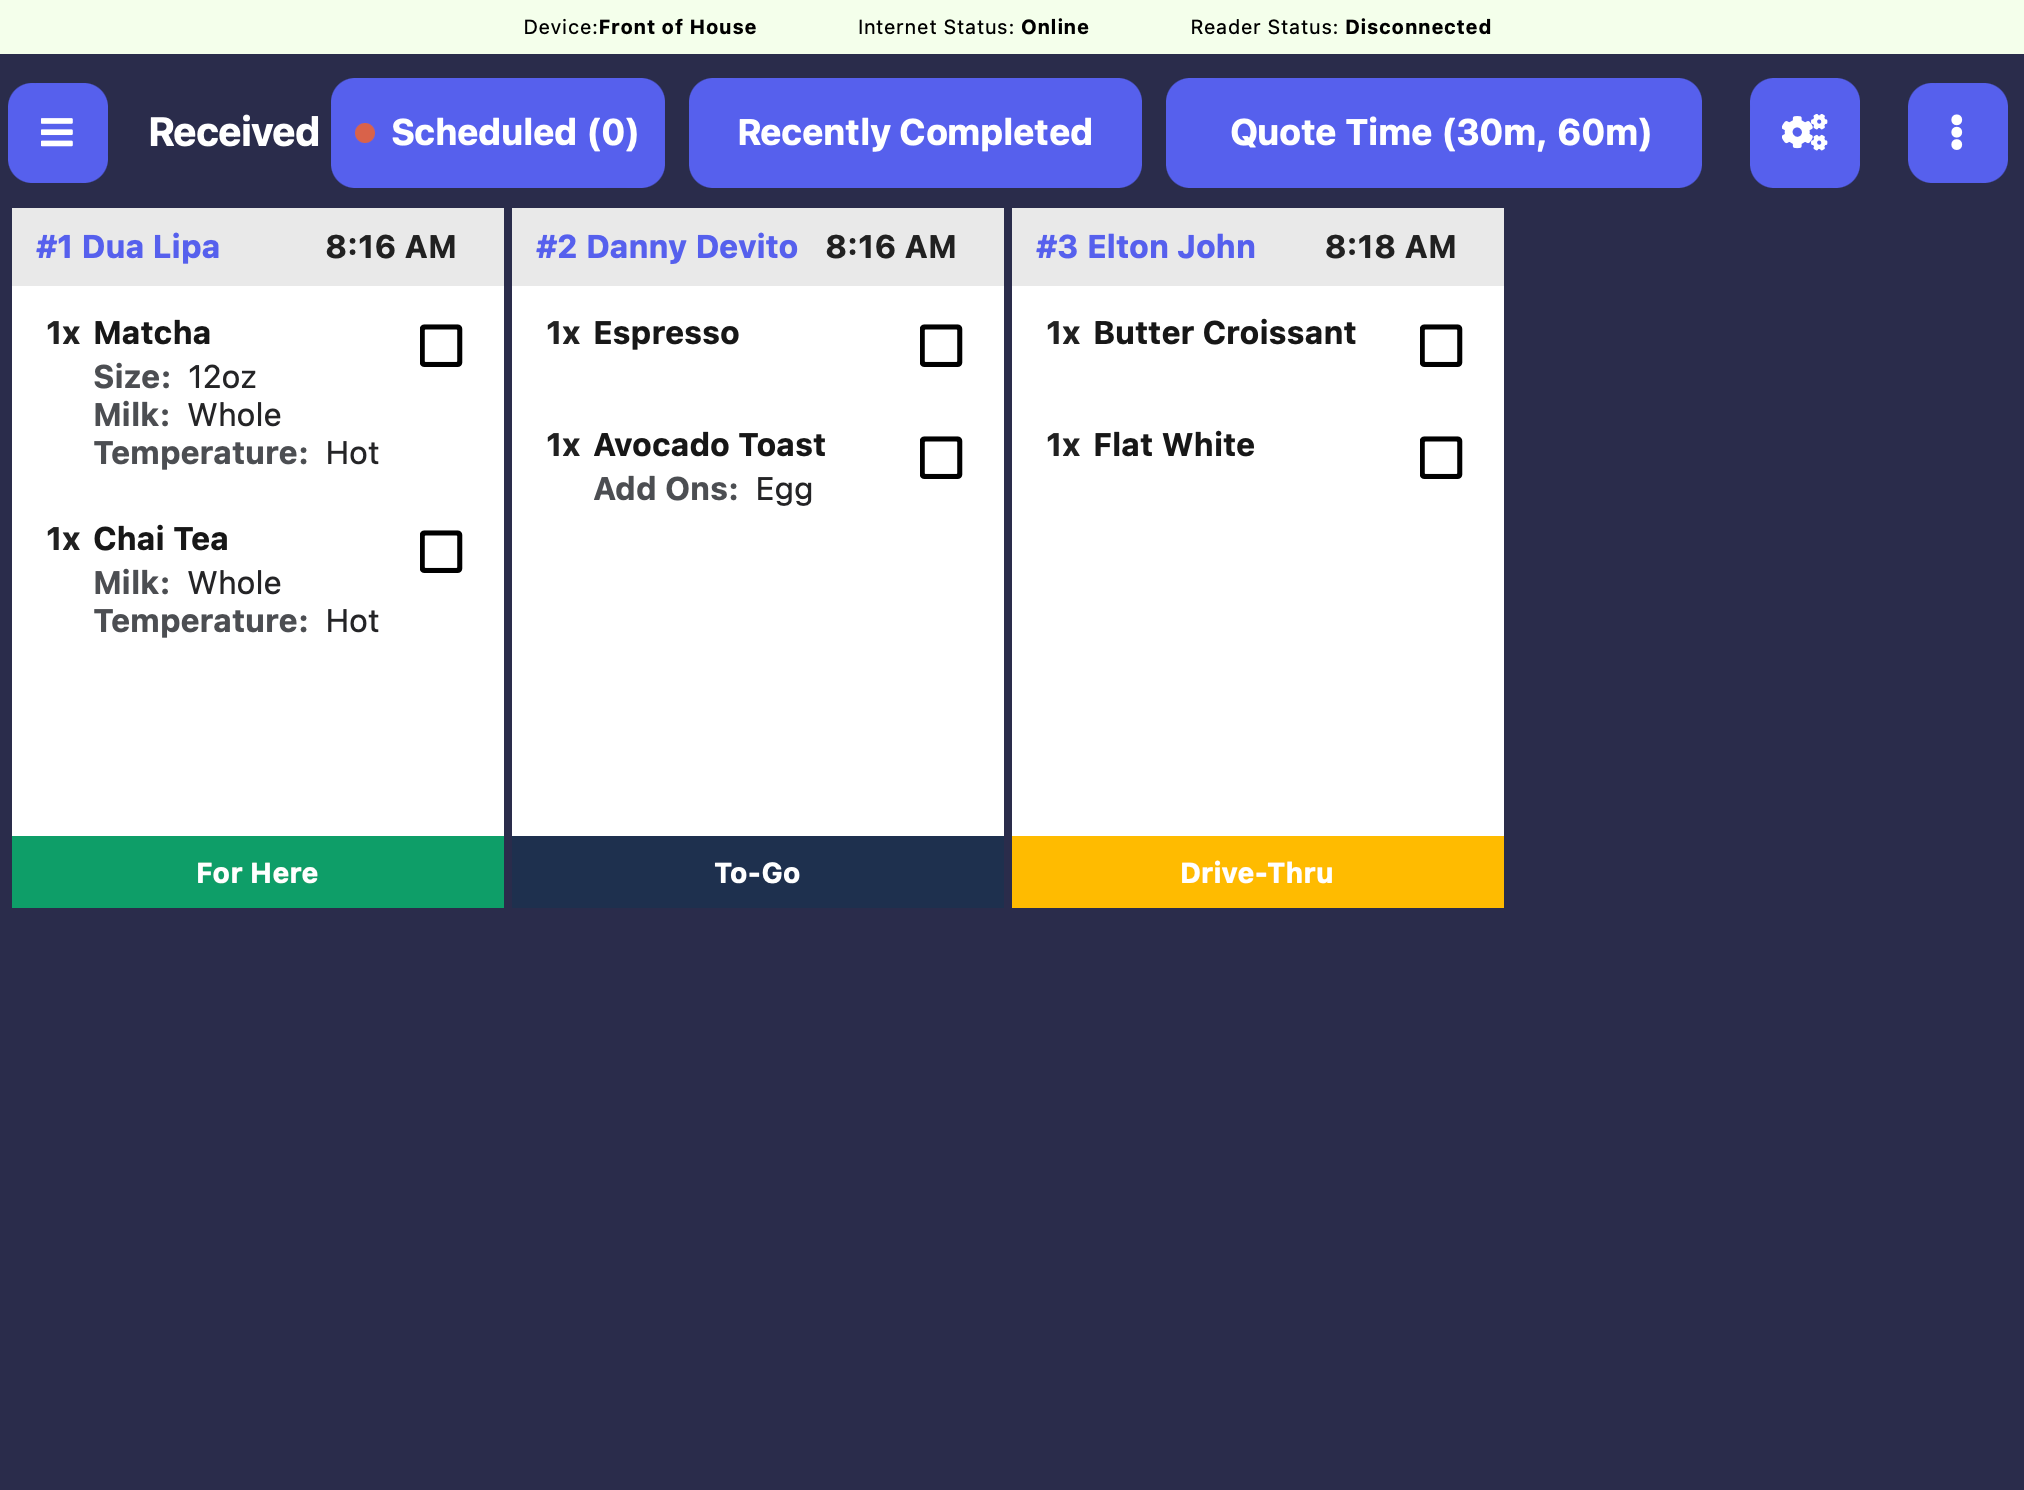
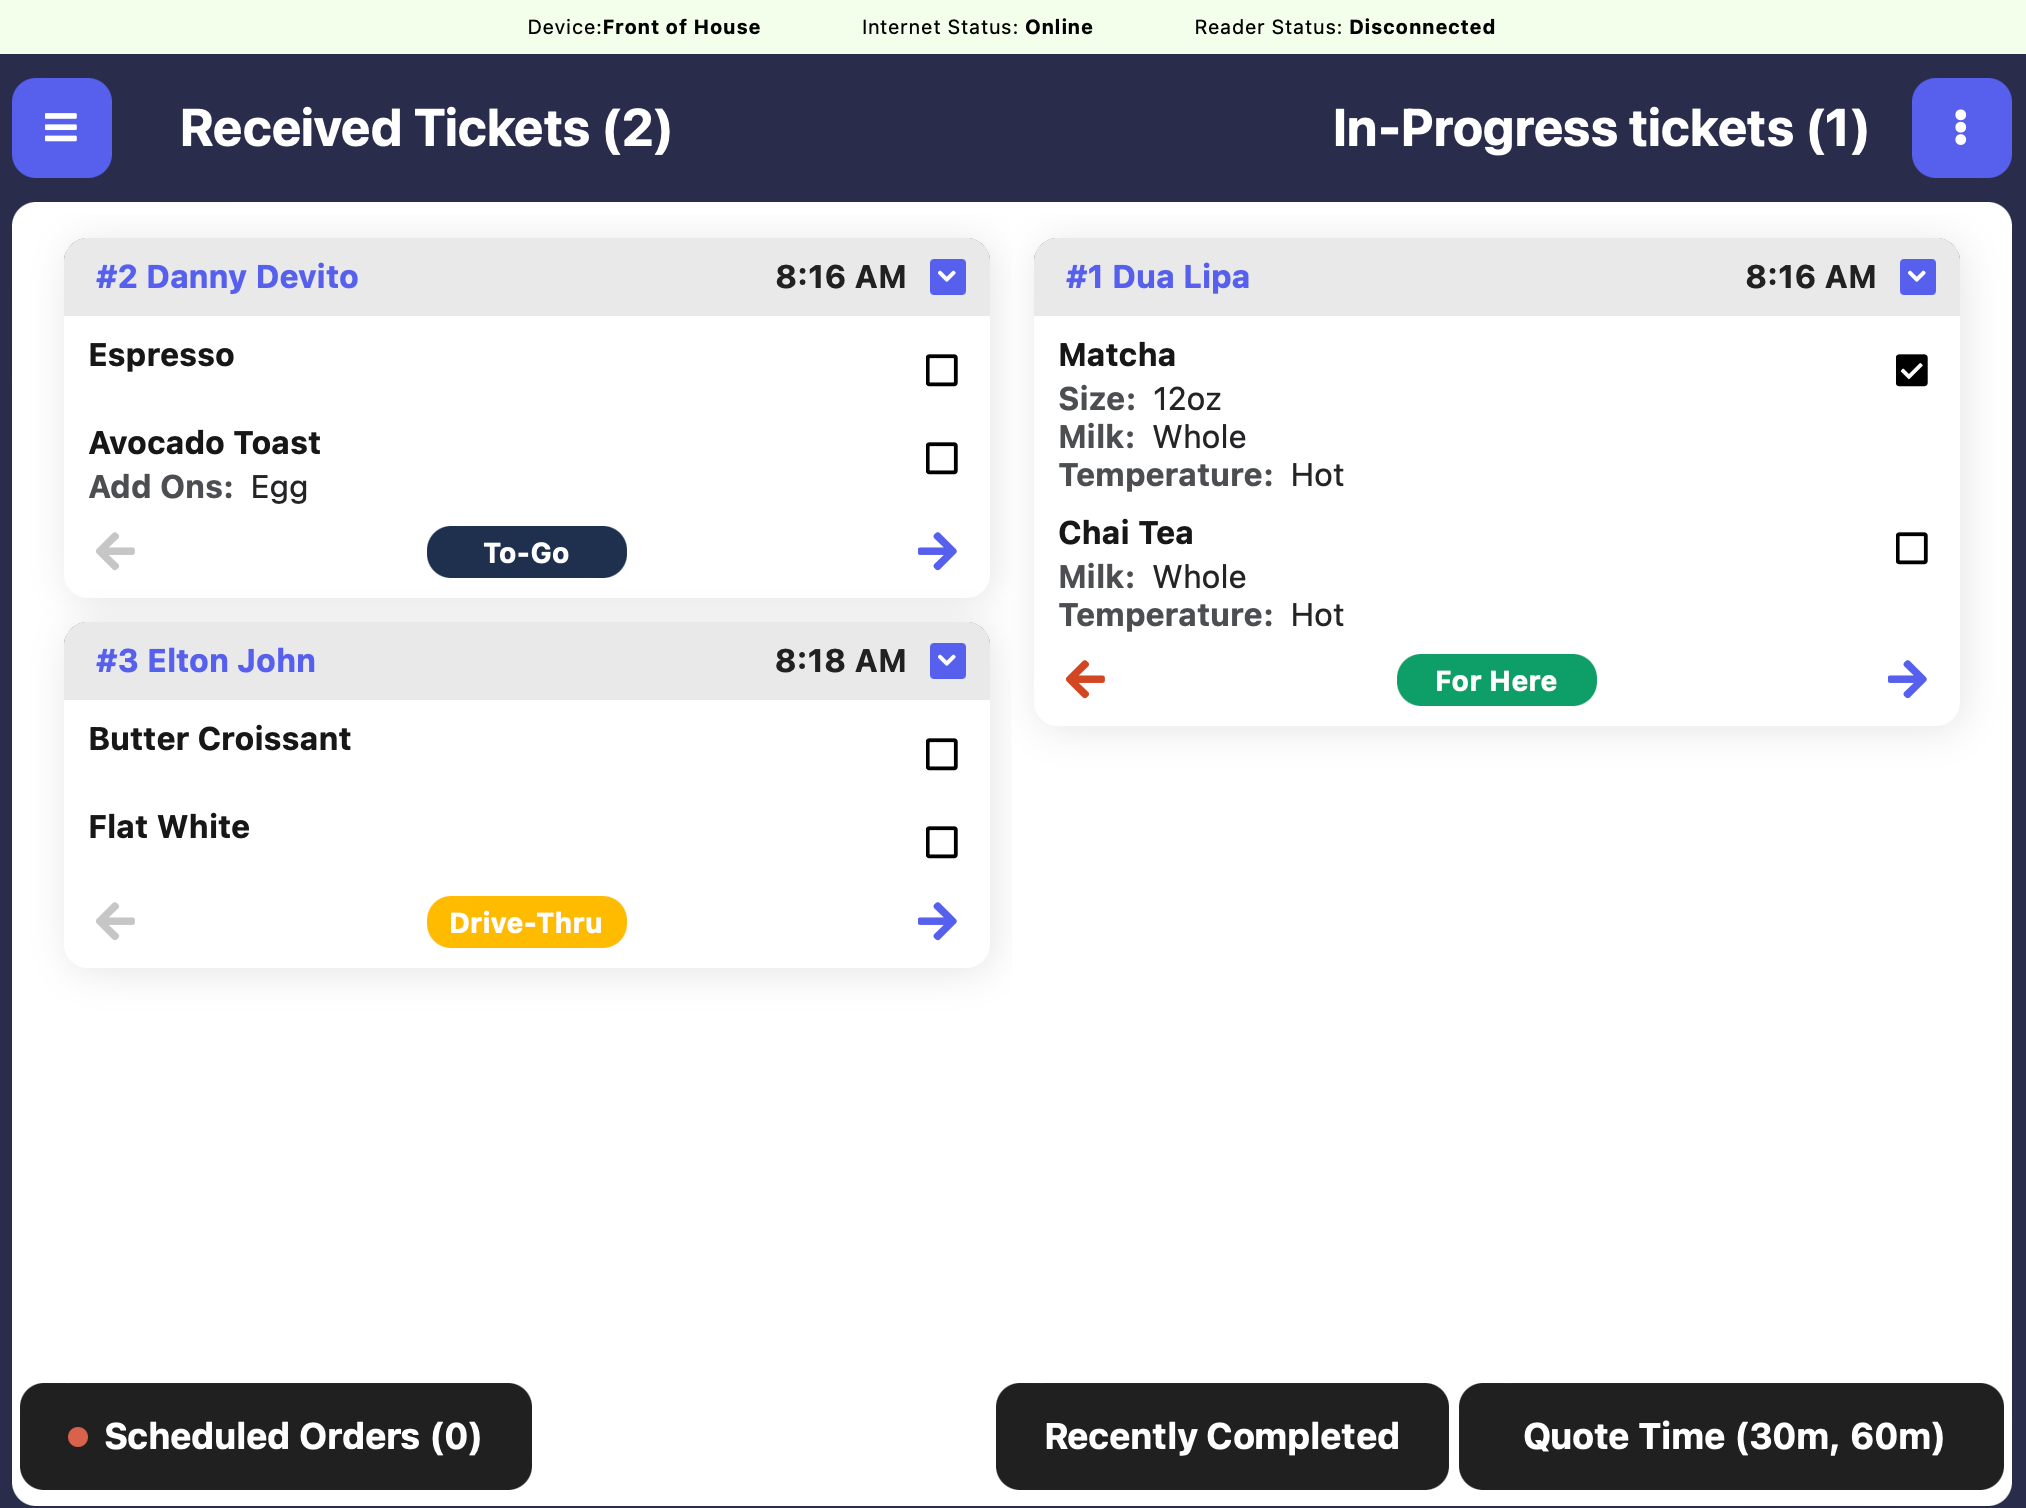
A KDS, or Kitchen Display System, is a digital screen used in cafes and restaurants to help the bar and kitchen stay organized.
Instead of printing paper tickets, orders from the register or online go straight to the screen in the bar/kitchen.
This helps the baristas and cooks see what to prep, in what order, and makes it easier to keep track of everything—especially during busy times.
It’s faster, reduces mistakes, and helps your orders come out just right and on time!
Simple Kitchen Display Screen
Quick Kitchen Display Screen
Navigate the KDS
When an order is created, a ticket is created.
Tickets can be managed and edited as they progress through the ticket screen
Understanding a Ticket
Tickets give a snapshot of an order so a team can communicate and deliver orders quickly and with ease.
Order Number & Name
Order Number & Name
Order Menu Products
Payment Status (only appears for unpaid tickets)
Ticket Type: For Here, To-go, Mobile
Progression Arrow: click to move ticket to the next stage in order process (In-Progress, Completed)
Regression Arrow: move ticket back to the previous stage (Not Started, In-Progress)
Checkboxes: mark each product as completed
Ticket Toggle: collapse a ticket i.e minimize the order items and checkboxes to fit more tickets on the screen
Time Created: appears for orders that are to be made ASAP
Time Scheduled: appears for Scheduled orders
Understanding the Ticket Screen
Learn how tickets appear on the ticket screen and how to complete a ticket
Tickets: patron orders awaiting completion
Scheduled Orders: pull up this tab to see the shop’s scheduled orders
Recently Completed: pull up this tab to access tickets marked completed
Quote Time: edit the quote time for your online and delivery orders to be ready
Received Tickets: tickets will appear here first when created.
In-Progress Tickets: tickets will move here from Received Tickets using the progression arrows or checkboxes
Complete All Button: mark all tickets complete by hitting the complete all button
Tickets have 3 stages:
Received
In-Progress
Completed
There are 3 ways to progress a ticket toward completion:
Checkbox
Each item on a ticket has a checkbox
Mark a checkbox to move to In Progress
Mark all checkboxes to complete ticket
Arrows
Progress the ticket to the next stage with the blue arrow
Regress the arrow to the previous stage with the red arrow
Transaction Status
Status can be progressed from the order’s Transaction page
View Recently Completed Orders and send them back to the ticket screen if necessary.
Scheduled Orders will automatically appear on the Ticket screen at just the right time.
They appear based on when the order is set to be picked up minus how long it takes to prepare. That way, the staff knows exactly when to start prepping the order so it is always fresh and right on time!
Scheduled orders will display their pickup/delivery time beside the ticket Name
A Scheduled Order can also manually be sent to the Ticket screen at any time:
Edit quote times provided to customers for pickup and delivery orders.
Example: If the pickup estimate time is 15 minutes, if a customer places a mobile order at 3:45PM for ASAP pickup, the soonest their order will be ready is 4:00PM.
To clear the ticket screen at once, mark all tickets on the screen as complete.
Customization
Streamline orders, reduce wait times, and keep your team in sync—so you can serve up great food and drinks, faster.
Global Ticket Settings
Navigate to Global Ticket settings on any Point of Sale > press the tribar (≡) at the top left of the screen > settings icon (⚙️) below > Global Ticket Options
When enabled, an entire order placed on a specific platform will be marked as complete upon payment and never appear on the Ticket Screen.
When enabled, a custom product added to an order will be marked as complete upon payment and never appear on the Ticket Screen.
When enabled, this screen will no longer appear when completing an order. The order will simply be marked as complete when all products are marked complete.
Highlight a mobile ordering ticket until it’s been marked as in-progress.
If enabled, clicking + Patron or Name during checkout defaults to Name screen.
If enabled, the Ticket screen will switch to the Quick KDS format (left), instead of the default KDS format (right).
Orders are automatically marked as Received when they hit the ticket screen.
Orders are marked In-Progress by clicking a product’s checkbox.
Orders are marked as Completed by checking all product checkboxes.
Quick Kitchen Display Screen
Default Kitchen Display Screen
If enabled, voiding or refunding tickets will require an employee PIN from someone with the necessary permission.
Learn more about Role-Based permissions here.
If enabled, saved tickets will be broken down into tabs of ASAP, Scheduled, and Past.
If enabled, discounts can be applied to the sale of a gift card. Learn more here.
Choose a daily time to automatically mark all unfulfilled orders as complete to clean up your Ticket screen.
This will not effect any scheduled orders for future dates.
Device Ticket Settings
Navigate to Device Ticket settings on any Point of Sale > press the tribar (≡) at the top left of the screen > settings icon (⚙️) below > Device Ticket Options
Want to keep things simple?
Customize each station to see only what they need— like showing just food items in the kitchen and only espresso drinks at the barista station. No extra clutter, just what matters most!
Use Display Tickets Filtering to customize which categories, products, ticket types, and device orders appear on each Ticket screen.
By Categories: Only products from the selected categories will show on the Ticket screen— everything else will be hidden.
By Products: Only these selected producted will show on the Ticket screen- everything else will be hidden.
By Device: Only orders placed on these devices will show on the Ticket screen- everything else will be hidden.
If the Ticket screen is filtered By Device, mobile orders will never appear on the Ticket screen.
By Type: Only orders of the selected Ticket Types will show on the Ticket screen- everything else will be hidden.
Select a default ticket type to automatically apply to an order upon checkout if Show Order Type Screen is disabled
Determine when a ticket should be sent to the Ticket screen during the checkout process
Fire tickets when checkout is complete (default): Tickets appear on the Ticket screen as soon as the order is paid for.
Fire tickets when items are added to cart: When a product is added to the cart, it will instantly appear on the Ticket screen—if it matches the selected filters.
Fire tickets when named: Once an order is given a name—either through a Patron profile or a quick name entry—it will automatically appear on the Ticket screen.
Fire tickets when payment method is selected: As soon as a payment method is chosen (cash, card, etc.), the ticket will appear on the Ticket screen, even before payment is collected.
If enabled, when a saved ticket is created the employee will be prompted to decide if this patron should be saved for future visits.
If enabled, when you click “New Order” after checkout, you’ll be taken directly to the saved ticket screen instead of the register screen.
If enabled, all tickets on the ticket screen will be collapsed default
If enabled, the checkboxes from Ticket screen tickets will be removed
This feature lets you swipe tickets to easily move them between “In Progress” and “Completed” statuses.
Display Ticket Number
Hide Ticket Number
When enabled, a custom product added to an order will never appear on the Ticket Screen.
If a enabled, when a patron is added during checkout, their name will replace the current ticket name.
If enabled, this device will be used as the Expo Screen.
An Expo Screen adds one more additional check before an order can be marked as complete.
Example workflow: The kitchen marks an order as complete from the Ticket screen. This order then is sent to the Expo screen at the front counter. The front counter employee then marks the order as comple from the Expo screen when it’s ready to hand to the customer
Complete the following steps on all ticket types that will require Expo completion:
View Ticket Type
On the Web Dashboard, navigate to Sales > Checkout Flow > Ticket Type > View Ticket Type
Edit Information
Click Edit Information > Require Expo Completion = Yes > Save
When creating a new ticket using the plus (+) button at the top of the register, any existing product in cart will be removed
As soon as you start a new Saved Ticket, you can begin typing right away into the field— no need to click into the field!
Close the Saved Tickets modal automatically when a saved ticket is selected
Select the number of minutes before pickup when scheduled orders should automatically change to ‘Received’ status, thus appearing on the Ticket Screen.
Defaults to the pickup order estimate time determined on the Ticket screen
If enabled a ticket timer will count up from the time the ticket was created.
The time will turn red after X amount of seconds inputted for Ticket Timer Warning
Enable sounds to play from your device when an order is created.
To play a sound whenever a new order comes through, simply turn on the Sound on New Ticket toggle
To play a sound only when mobile orders come through, turn on both the Sound on New Ticket and Only sound when ticket is mobile or web toggles
Sound Looping: Select how many times the sound should ring
Test your new ticket sound to make sure your staff can hear it!