On the Dashboard click Menu > Categories > Create Category
2
Complete the following fields and click Save
Enable on Point of Sale: If yes, the category will be displayed on the POS.Enable on Mobile: If yes, the category will be available for order on the Order App and Order Website .Enable on Kiosk: If yes, the category will be available for order when the POS is in kiosk mode.Enable on Third Party: If yes, the category will be available for order on third party order websites, such as DoorDash.Auto Complete Products: If set to yes, products in the category will automatically be marked as complete and will not appear on the ticket screen.
Add and remove products, tax rates, and discounts from a category. Additionally, add a schedule to a category.
Manage Category Products
On the Web Dashboard click Menu > Categories > View category
To add an existing product to a category, click Add Product > select an existing product from the dropdown > Add
To add a new product to a category, click Create Product. Learn more about how to create a product here.
To add a global modifier to products in a category, click the checkbox next to the left of the product(s) > Add Global Modifier. Learn more about how to create modifiers here.
To delete a product from a category, click the checkbox next to the left of the product(s) > Delete Product(s)
Reorder Category Products
Reorder the list of products within a category on all ordering platforms from the Point of Sale using Edit Mode. Learn how to use Edit Modehere.
Add and Remove Category Tax Rates
Adding a tax rate to a category will automatically apply the tax rate to all products in the category.Learn how to add and remove tax rates from a category here
Create Category Schedule
Determine when a category is available for ordering on all enabled ordering platforms.If no schedule is set, the category will always be available during store hours.If a schedule is set, the category will only appear on enabled platforms during its scheduled time frames.
1
View Category
On the Web Dashboard click Menu > Categories > View category
2
Add Schedule
Scroll down to the bottom of the category’s page > Add Schedule.
3
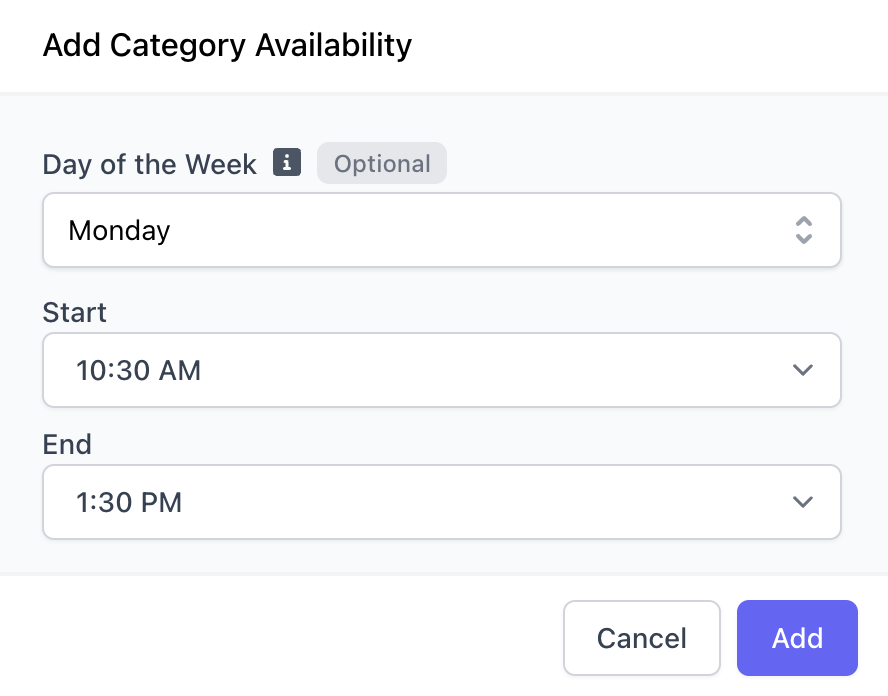
Add Daily Schedule
Create a new schedule for each day of the week as necessary.
Available Monday from 10:30AM - 1:30PM
Delete a Category
On the Web Dashboard click Menu > Categories > View categoryClick Actions > Archive Items